


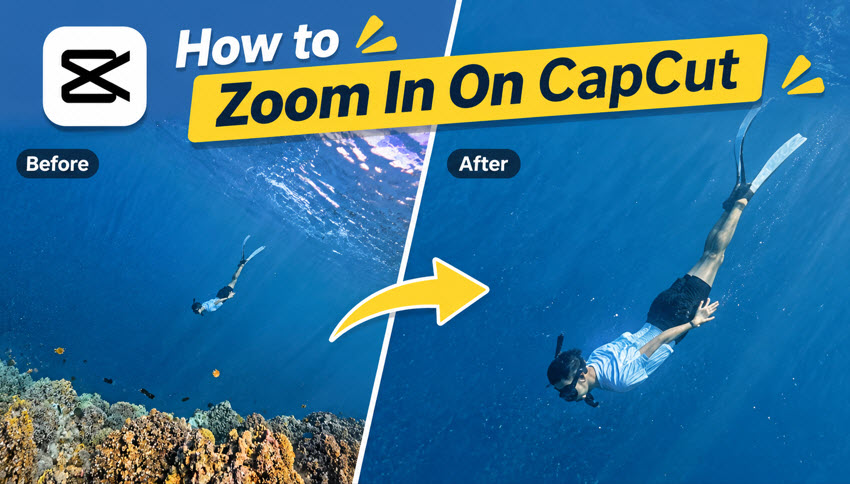
Zooming in on a video in CapCut is a common editing task when you want to draw attention to a specific subject, highlight small details, or make a static shot feel more dynamic. Whether you're editing a tutorial, a product video, a vlog, or a social media clip, CapCut offers several ways to create this effect.
You can zoom in manually, animate the movement with keyframes, apply a built-in effect, or create a zoom transition between clips. This guide explains how to zoom in on CapCut using each method, and shows you how to fix blurry or pixelated footage after zooming in.
How to Zoom In on CapCut on Desktop and Mobile
There are different ways to zoom in on a video in CapCut: manually adjusting the video size, animating the zoom with keyframes, or applying a built-in zoom effect. The best method depends on whether you want a fixed close-up, a gradual camera movement, or a ready-made effect.
Method 1. Manually Zoom In on a Video in CapCut
If you only need to enlarge a video and keep the frame at a fixed zoom level, manual scaling is the quickest option. It works well when you want to focus on a person, object, or particular area without creating an animated movement.
The process is slightly different on desktop and mobile.
On CapCut Desktop (Windows & Mac):
Step 1. Open CapCut Desktop, create a new project, and click Import to add your footage. Drag the video onto the timeline.
Step 2. Click the clip you want to enlarge. Its editing controls will appear in the right-hand panel.
Open the Video panel and locate the Scale control under the Basic or transform settings. Increase the value to enlarge the footage. For example, changing the scale from 100% to 150% creates a more noticeable close-up.
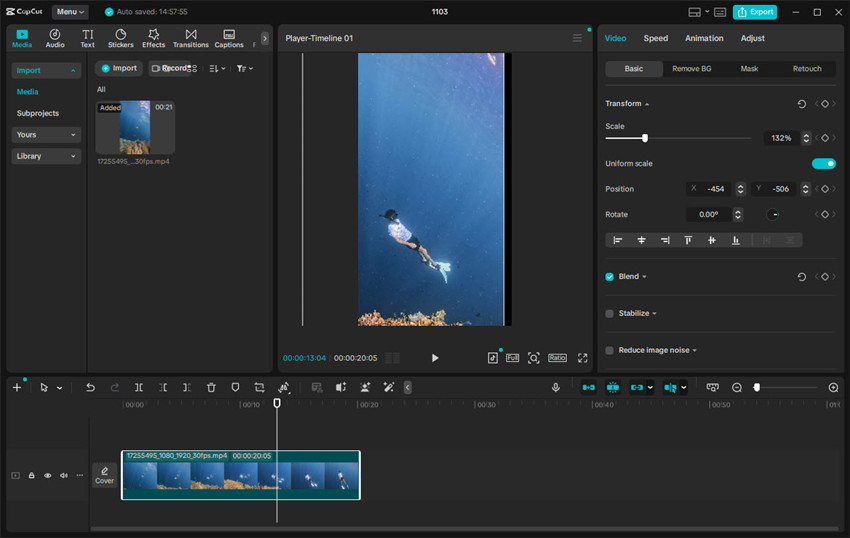
Step 3. After enlarging the clip, adjust its horizontal and vertical position to bring the subject into the frame. You can use the Position controls or drag the footage directly in the preview window.
Step 4. Play the video to check the framing. Adjust the scale and position if the subject is cut off or the composition feels unbalanced.
On CapCut Mobile (iPhone & Android):
- Tap New project to import your video and select the video clip in the timeline.
- Place two fingers on the video preview and spread them apart to enlarge the footage.
- Drag the enlarged image to reposition it and focus on the area you want to highlight.
- Play the video to check the result, then export when you're satisfied.
Manual zooming changes the video's size without animating it. If you want the video to gradually move from its original framing to a close-up, use keyframes instead.
Method 2. Create a Zoom-In Animation Using Keyframes
Keyframes let you control how a video changes over time. By setting one keyframe at the original size and another at a larger scale, you can create a gradual zoom-in effect. You can also adjust the video's position to make the camera movement appear to follow a particular subject. For example, you can start with a full shot of a person and gradually zoom in on their face. This is a popular way to create a dramatic close-up or emphasize an important moment.
Here's how to do the zoom-in effect on CapCut using keyframes.
On CapCut Desktop (Windows & Mac):
Step 1. Open your project, import the footage, and drag it onto the timeline. Select the clip you want to animate.
Step 2. Move the playhead to the point where you want the zoom to begin. In the right-hand editing panel, open Video > Basic and locate the Scale control. Click the diamond-shaped keyframe icon next to Scale to add your first keyframe. Keep the scale at 100% if you want the video to start at its original size.
Step 3. Move the playhead to the point where you want the zoom-in animation to finish. For example, for a two-second zoom, place it approximately two seconds after the starting keyframe. The distance between these two points determines the zoom speed: a longer interval creates a slower, more gradual zoom, while a shorter one produces a faster movement.
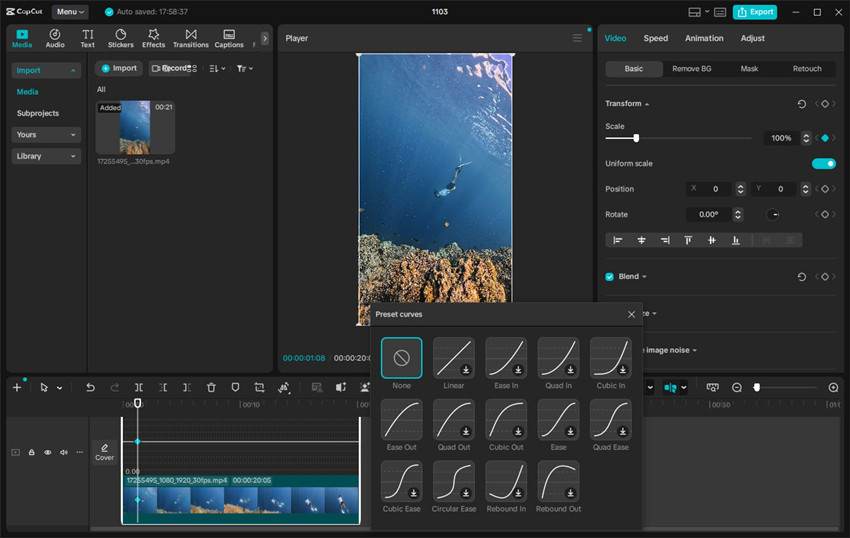
Step 4. Increase the Scale value to enlarge the footage. A moderate zoom, such as 120%–150%, is often enough to highlight a subject without making the footage look excessively enlarged. If you want to zoom in on an off-center object or person rather than the middle of the frame, adjust Position as well to keep the subject properly framed. CapCut automatically creates another keyframe when you change the property at the new playhead position.
Step 5. Move the playhead back to the starting point and press Play to preview the animation. Check that the subject stays within the frame and that the movement feels natural throughout the clip. If the zoom is too fast, move the ending keyframe farther away; if it feels too slow, move the keyframes closer together. If your CapCut version offers easing options, you can also use them to make the zoom start or stop more smoothly.
On CapCut Mobile (iPhone & Android):
- Open your project and select the video clip in the timeline.
- Move the playhead to the point where you want the zoom to start. Tap the diamond-shaped Keyframe icon to add the first keyframe.
- Move the playhead forward to the desired ending point.
- Spread two fingers on the preview screen to enlarge the video. Reposition it if you want to focus on a particular subject.
- CapCut creates another keyframe to record the new framing. Play the clip to preview the animated zoom.
Method 3. Apply a Built-In Zoom Effect in CapCut
If you don't want to adjust scale and keyframes manually, CapCut's built-in effects provide a faster way to add a stylized zoom. Depending on the version and platform, you may find effects with names such as Zoom In, Optical Zoom, or Zoom Lens. These presets can be useful for short-form videos, dramatic reveals, and edits that need a more noticeable camera movement.
On CapCut Desktop:
Step 1. Import your footage and place it on the timeline.
Step 2. Move the playhead to the section where you want the zoom effect to appear.
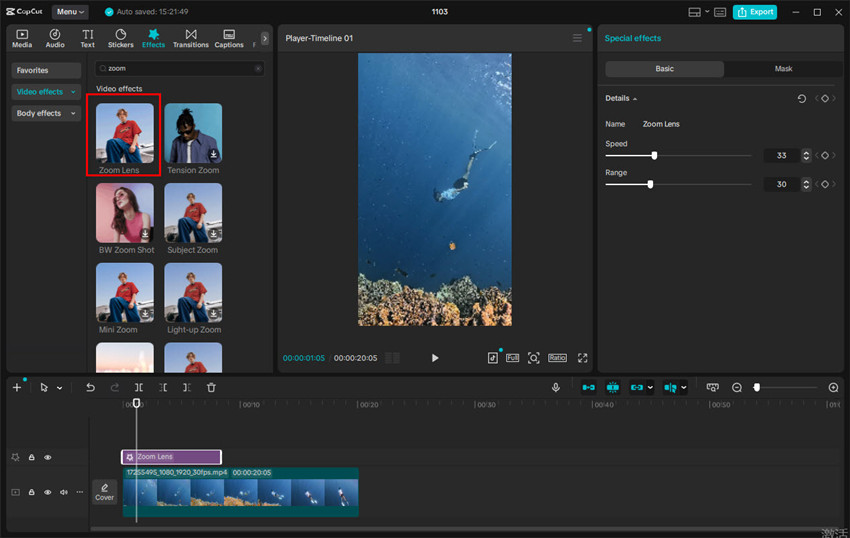
Step 3. Click Effects in the editing toolbar. Search for Zoom or browse the available video effects. Look for a suitable option, such as Optical Zoom or Zoom Lens, if available.
Step 4. Drag the selected effect onto the timeline and position it over your video clip. Then select the effect layer to adjust its duration and available intensity or speed settings. Preview the result and make further adjustments if needed.
On CapCut Mobile:
- Open your project and select the video you want to edit.
- Tap Effects in the editing toolbar.
- Browse the Video Effects library or use the search function to find zoom-related presets.
- Select a suitable effect and apply it to your video.
- Adjust its duration and available settings, then preview the result.
The exact effect names and available controls may vary between CapCut versions, devices, and regions. If you can't find a suitable preset, keyframes give you more direct control over the zoom direction, scale, and timing.
Note: CapCut's effect names, availability, and interface may vary by version, platform, and region.
Method 4. Create a Zoom Transition Between Clips
A zoom transition makes one scene appear to move closer before revealing the next scene. It can help connect two shots, emphasize a change in location, or create a more energetic editing rhythm.
There are two ways to create this effect in CapCut: use a transition preset or animate the clips with keyframes.
Option 1. Use a Built-In Transition
Add two video clips to the timeline and place them next to each other without a gap.
Step 1. Open the Transitions library and browse or search for a zoom-style transition.
Step 2. Apply the transition between the two clips or split your video into two clips in advance.
Step 3. Adjust its duration if the option is available and preview the result to check whether the movement connects the two scenes naturally.
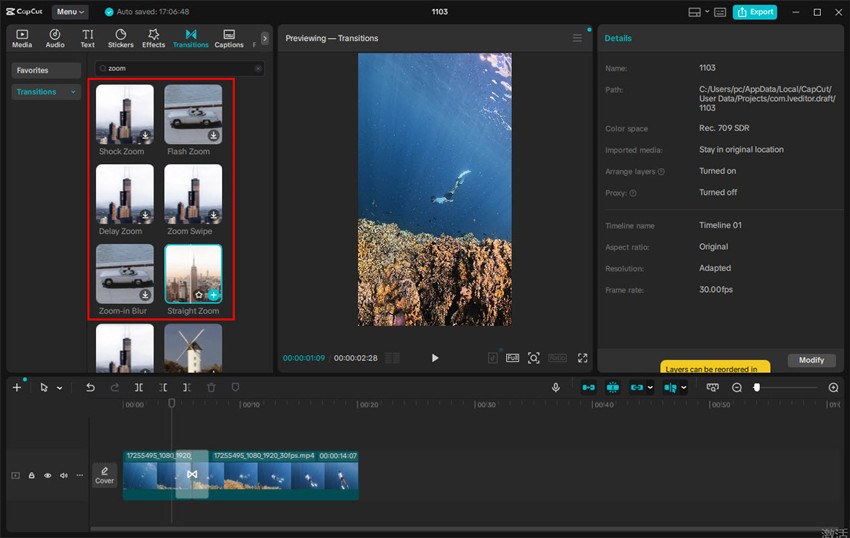
On mobile, tap the small transition icon between the two clips to open the transition library. On Desktop, open the Transitions tab and drag the selected transition between the clips.
Option 2. Create a Zoom Transition with Keyframes
For more control over the direction and speed of the movement, animate the two clips separately.
Step 1. Select the first clip and add a keyframe near its ending point.
Step 2. Move slightly forward and increase its scale, creating a zoom-in movement toward the end of the clip.
Step 3. Select the second clip and add a starting keyframe with a similar enlarged scale and position.
Step 4. Move forward on the second clip and add another keyframe that returns the video to its original size. Then preview the cut and adjust the scale, position, and keyframe timing until the two movements connect smoothly.
You can use the Scale and Position controls on Desktop or the keyframe and pinch gestures on Mobile. The key is to match the framing at the cut. If the second clip starts at a noticeably different zoom level or position, the transition may look like an abrupt jump rather than one continuous movement.
How to Fix Blurry Videos After Zooming In on CapCut
Zooming enlarges part of the original frame, but it doesn't automatically add new visual information. If your source footage is low-resolution, compressed, or already blurry, enlarging it can make pixelation, noise, and soft details more noticeable.
There are a few ways to improve the result, starting with CapCut's own editing and enhancement tools.
Improve zoomed-in video quality with CapCut built-in features:
1. Export at a suitable resolution
When exporting, choose a resolution that matches your intended playback quality, such as 1080p or 4K, if supported by your source and project. CapCut can also upscale your video to a higher resolution in CapCut using its available enhancement tools. However, exporting a video at a higher resolution doesn't necessarily restore the details lost when you zoom in. For example, exporting a heavily enlarged 720p clip in 4K won't automatically give the subject genuine 4K detail.
2. Adjust sharpness carefully
CapCut's adjustment tools may include sharpening controls that make edges and fine details appear more defined. A small adjustment can help slightly soft footage, but excessive sharpening may create halos, harsh edges, or emphasize noise.
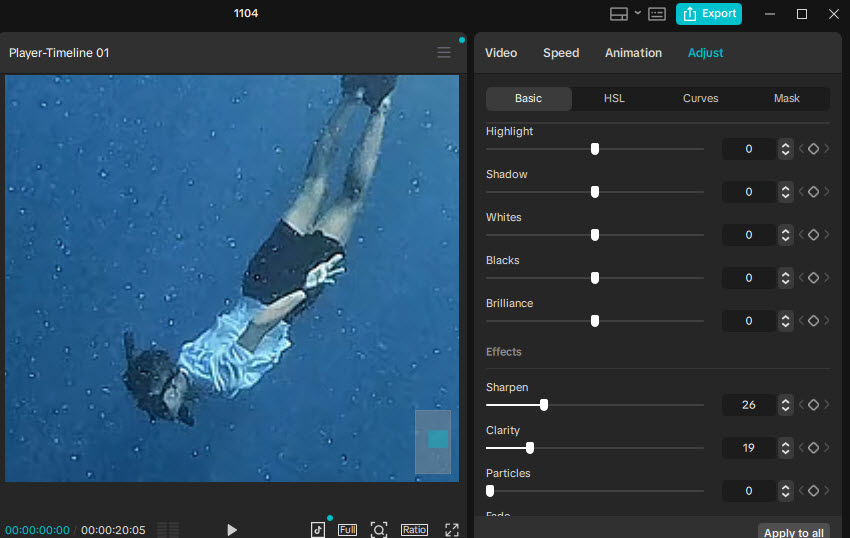
3. Try CapCut's Enhance Quality feature
CapCut Desktop also offers an AI-based video enhancement option. Just open Video > Basic > Enhance quality, and choose an available enhancement level such as HD, UHD, or 4K.
However, the results depend on the source zoom-in footage, and the feature's availability and options may vary by version, platform, region, or account. If the footage still looks soft after enhancement, or you need more focused control over detail recovery, denoising, and deblurring, a dedicated AI video enhancer may be worth trying.
Enhance Zoomed-In Footage with Aiarty Video Enhancer
CapCut's built-in tools can help sharpen zoomed-in videos or improve their output resolution, but they may not fully restore details lost during enlargement. If your footage still looks blurry, pixelated, or noisy after zooming in, you may need a dedicated AI video enhancer.
Aiarty Video Enhancer offers AI-powered upscaling, denoising, and deblurring to help improve the quality of zoomed-in footage from CapCut. Unlike basic sharpening in CapCut, its AI models are designed to refine visible details, reduce noise, and address blur and compression artifacts in different types of video. If a zoom effect in CapCut makes your subject look soft or pixelated, you can export the clip and use Aiarty to upscale by 2x, 4x, or a custom amount, with output up to 4K.
After exporting your zoomed-in clip from CapCut, open it in Aiarty Video Enhancer and select an AI model based on the footage. Adjust the upscaling settings as needed, then preview the result before exporting. You can choose 2x, 4x, or custom upscaling to improve the clip's resolution and clarity.
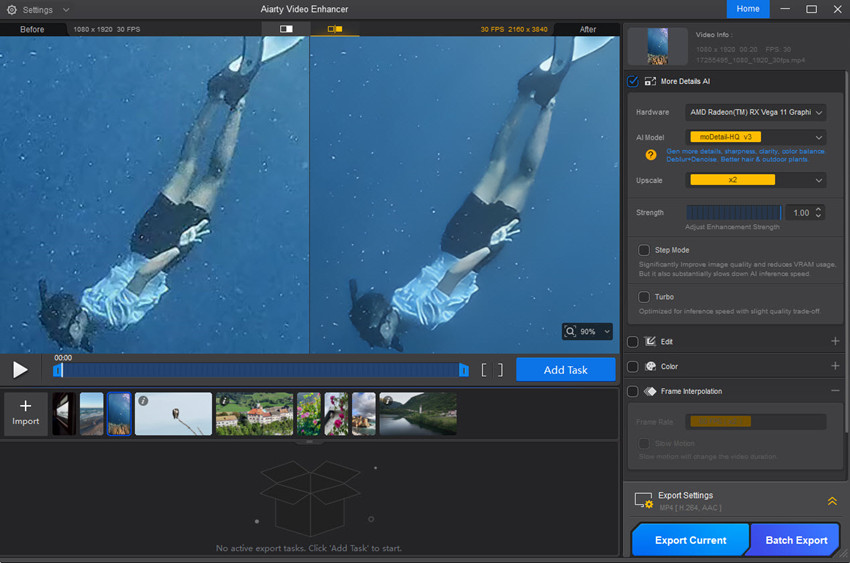
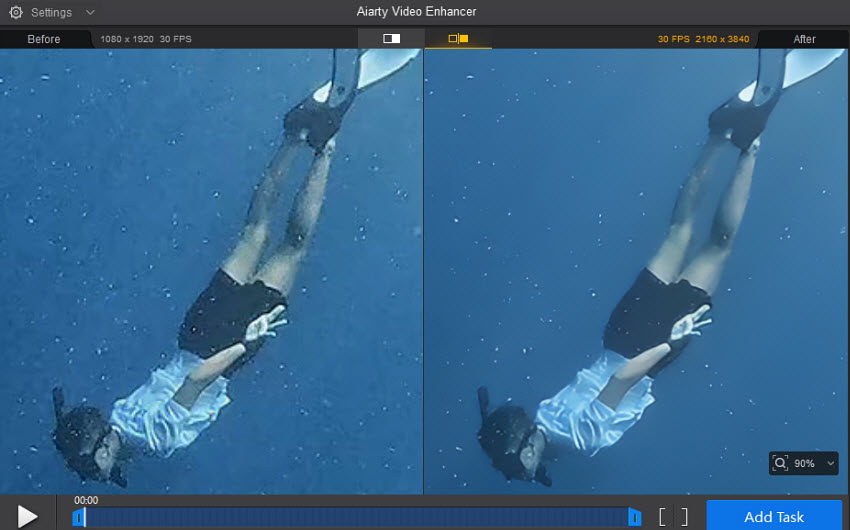
Compare the original zoomed-in footage with the enhanced result to see how Aiarty improves image clarity. Fine details can appear more defined, while noise, blur, and compression artifacts may be reduced, depending on the source footage. This can make a noticeable difference when your CapCut zoom effect leaves the subject looking soft or pixelated.
Conclusion
CapCut offers several ways to zoom in on a video, from simple manual scaling to keyframe animations, built-in effects, and zoom transitions. The best approach depends on the type of movement you want to create and how much control you need over the framing and timing.
As you experiment with different zoom effects, keep an eye on the footage quality, especially when enlarging a small area of the original frame. If the result looks blurry or pixelated, CapCut's built-in enhancement tools may help, while Aiarty Video Enhancer provides additional options for upscaling, reducing noise, and refining details. With the right combination of editing and enhancement, you can create zoomed-in videos that look clear and natural.
 FAQ
To create a slow zoom-in effect on CapCut PC, select your video clip and add a starting keyframe next to the Scale setting at the point where you want the zoom to begin. Move the playhead further along the timeline, add another keyframe, and gradually increase the scale (for example, from 100% to 120%). For a slower, smoother zoom, increase the distance between the two keyframes. Preview the clip and adjust the timing and scale until the movement looks natural.
First, enlarge the video using the Scale control or a pinch gesture. Then adjust its position so the area you want to highlight appears in the center of the frame. If you want the video to move toward that area during playback, use keyframes to animate both Scale and Position.
Create a new project and add your video. Select the clip, then place two fingers on the preview and spread them apart to zoom in. Drag the image to adjust its position. For an animated zoom, add a keyframe before changing the scale at a later point in the clip.
To zoom out manually, decrease the Scale value on Desktop or pinch inward on the Mobile preview. To create an animated zoom-out, set the first keyframe at a larger scale and a later keyframe at the original size. CapCut will gradually reduce the video size between the two points.
Start with the highest-quality source footage available and avoid excessive enlargement. Export at an appropriate resolution and bitrate, and try CapCut's Enhance Quality feature if it is available in your version. If the footage remains blurry or pixelated, an AI video enhancer such as Aiarty Video Enhancer can help upscale, denoise, and refine the source before you apply the zoom in CapCut.
You May Also Like


This post was written by Ashley Brown, a videographer turned AI explorer. As an associate writer at Digiarty Software, she dives into the latest AI-powered tools for video enhancement and content creation, offering practical insights and unbiased commentary. Accuracy confirmed by Abby Poole.
