You’ve got a few video clips for your project, but there’s a problem: one is 720p, another is 1080p, and the last one came straight from someone’s phone at some weird vertical resolution. Trying to throw them together in Premiere Pro without adjusting the sizes? It looks messy, stretched, or squashed. That’s when you need to figure out how to resize video in Premiere Pro so everything fits nicely in your timeline.
How to Resize Video in Premiere Pro?
Premiere Pro gives a few ways to resize videos. Here’s a breakdown of the main methods.
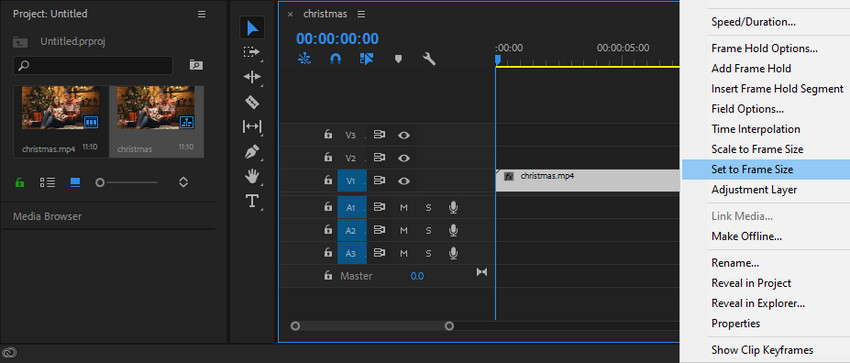
Method 1. Resizing a Video in Premiere by Using "Set to Frame Size"
If your clip is bigger than your sequence and you just want it to fit, Set to Frame Size does it without messing with the original resolution. The clip will shrink to match your sequence, but Premiere keeps it sharp. Compared to Scale to Frame Size, it doesn’t resample the video, so the quality stays higher—especially if you plan to move or zoom the clip later.
How to do it:
- Right-click the clip in your timeline.
- Select Set to Frame Size.
- Premiere adjusts the clip to fit the sequence. You don’t have to tweak numbers, and it keeps the clip looking sharp.
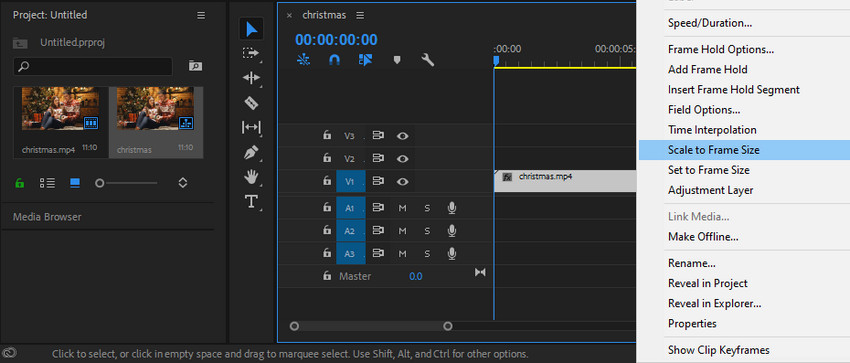
Method 2. Resizing a Video by Using "Scale to Frame Size"
This one actually resamples the clip to match the sequence. It’s handy if you need the clip to match resolution exactly or reduce file size, but smaller clips can get a little soft. Basically, Set to Frame Size keeps the original pixels, while Scale to Frame Size redraws them.
How to do it:
- Right-click the clip in your timeline.
- Choose Scale to Frame Size.
- Premiere resamples the video to the sequence resolution, making it fit precisely.
Method 3. Motion Effect for Crop and Resize
Sometimes you don’t just want to shrink or stretch a clip—you might want to crop and resize video in Premiere Pro to focus on a certain part, or adjust it without cutting anything off. Every clip comes with built-in effects, and in the Effect Controls panel, there’s a section called Motion that lets you do this easily.
- Scale: This controls the size of your clip. If you scale up past the original edges, you’re basically cropping out parts of the video. Scale down, and the whole frame stays visible—perfect if you want to resize without cropping.
- Position: Lets you move the video horizontally or vertically. Handy for re-centering after scaling or focusing on a specific area.
- Uniform Scale: By default, this is checked, so width and height scale together. Uncheck it, and you can adjust width and height separately, giving you full control over the crop or custom aspect ratio.
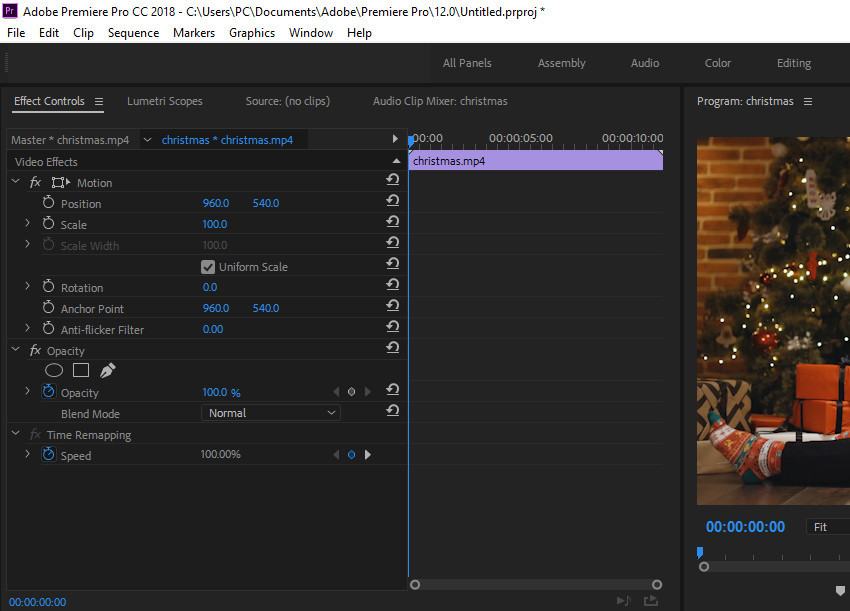
This method is flexible. You can crop, resize, or even just tweak clips so different resolutions fit together nicely on your timeline. It’s the go-to when you need precise control over both the size and composition of your footage.
Quick tip: If you want to crop precisely, you can combine Motion with the Crop effect. Adjust Left, Right, Top, Bottom in Effect Controls, then use Scale and Position to fill the frame or re-center the subject. This way, you can fine-tune the crop without losing the overall composition, and it works seamlessly with the other resize methods we’ve covered.
Hot search: ways to resize video without quality loss
Aspect Ratio Tips When Resizing Video in Premiere Pro
After resizing clips, the next thing to watch out for is aspect ratio—basically, the relationship between width and height. Mess it up, and your video can end up stretched, squashed, or with awkward black bars on the sides.
For example, say you have a horizontal 16:9 clip but want it to fit a vertical 9:16 sequence for Instagram Reels. Simply scaling it up will either crop out important parts or leave black bars. In Premiere Pro, you can fix this by using Motion controls to scale and reposition, or combine it with the Crop effect to focus on the key area.
Another common scenario is mixing clips of different resolutions. A 1080p clip and a 720p clip in the same 16:9 sequence might look inconsistent. Here, resizing carefully without changing the aspect ratio keeps everything looking balanced. This is where understanding how to change video size in Premiere Pro properly comes in handy—you can scale clips up or down while keeping their original proportions, or crop selectively when needed.
Quick tip: Always check the final sequence in full screen before exporting. A tiny mismatch in aspect ratio can be distracting, especially on big screens or social media feeds.
If your video appears sideways, you can rotate a video in Premiere in the Effect Controls panel.
How to Resize Video in Premiere Pro Without Cropping
Sometimes you just want to resize a video in Premiere Pro without losing any part of the frame. Maybe you have a clip that needs to match the sequence resolution, but you don’t want to crop out anything important.
The easiest way is to use the Motion Scale in the Effect Controls panel. Scale the clip down or up so it fits the sequence, and leave Position untouched if you want the full frame to stay visible. This is especially useful when you’re working with multiple clips of different resolutions and want them to look consistent without cutting off any content.
If you’re worried about empty space or black bars appearing, you can combine this with a background fill—either a blurred copy of the same clip or a solid color—so the resized clip looks natural on any platform.
Quick practical note: when resizing without cropping, don’t over-zoom smaller clips. They can get blurry fast, so sometimes it’s better to slightly adjust sequence size or use a subtle Scale increase rather than forcing it to fill completely.
Advanced Tips and Common Issues
When you’re juggling clips of different resolutions, some headaches are almost guaranteed. Here are a few tips to make life easier:
- Matching multiple resolutions: If your sequence has 1080p clips and 720p clips, scaling the smaller ones up too much can make them look soft. A practical workaround is to slightly reduce the larger clips or use subtle Scale adjustments so everything feels balanced.
- Avoiding stretched or squashed footage: Always check the aspect ratio after resizing. If something looks off, tweak Scale and Position instead of forcing the clip to fit, or use Uniform Scale carefully.
- Batch resizing clips: Got a bunch of clips with the same issue? Select them all in the timeline, right-click, and use Set to Frame Size or Scale to Frame Size. Saves tons of time.
- Maintaining quality: Scaling up small clips too much will reduce sharpness. If you notice this, consider minor adjustments rather than a full zoom, or use effects like Sharpen lightly. Some editors even use AI-powered tools to upscale without losing too much detail.
- Quick preview before export: Always play through the sequence full screen before exporting. Tiny misalignments or inconsistent scaling can stick out more than you think, especially on large monitors or social feeds.
A Little Extra Help for Tough Clips
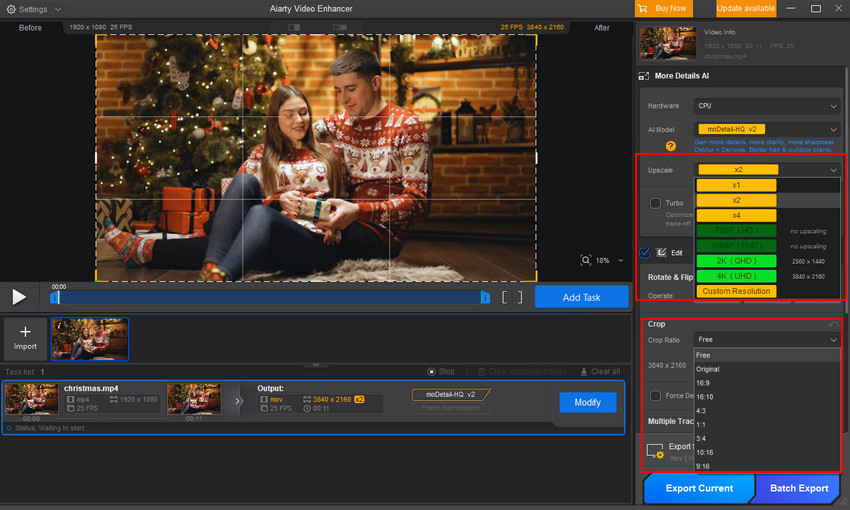
Even before jumping into Premiere Pro, some clips are just too low-res or noisy to work with. If you try to resize them directly in Premiere, they often look soft, blurry, or full of compression artifacts.
This is where Aiarty Video Enhancer can give you a head start. You can upscale your footage to higher resolutions, crop to the exact aspect ratio you need, reduce blur, and clean up noise—all before importing the clips into Premiere. That way, once you start editing, you’re working with footage that already looks sharp and consistent.
Think of it as prepping your clips: Aiarty handles the heavy lifting of enhancing and resizing, while Premiere takes care of the editing and creative side. For projects with mixed resolutions or older footage, this workflow saves time and keeps the final video looking polished on any screen.
Just hit the download button below to grab Aiarty Video Enhancer. Then you can upscale, crop, and sharpen your video before bringing it into Premiere Pro.
You May Also Like
This post was written by Ashley Brown, a videographer turned AI explorer. As an associate writer at Digiarty Software, she dives into the latest AI-powered tools for video enhancement and content creation, offering practical insights and unbiased commentary. Accuracy confirmed by Abby Poole.