Summary: This guide show you how to resize videos with FFmpeg, step by step. FFmpeg lets you quickly adjust file dimensions for easier sharing and compatibility. However, mastering command-line instructions can be challenging and sometimes leads to processing issues or quality loss. If so, Aiarty Video Enhancer offers a smarter alternative, providing an intuitive interface, AI-powered upscaling, and batch processing - making professional-quality resizing accessible to everyone, without complicated commands or risk of errors.
If you've ever wrestled with video files that are too big to share, too slow to stream, or oddly sized for your favorite social platform, you're not alone. FFmpeg, the powerhouse multimedia tool used by pros and hobbyists alike, can help. At its core, FFmpeg makes resizing videos straightforward - whether you want to trim down storage needs, boost performance, or ensure your clips play nicely everywhere.
In this post, I'll walk you through practical, step-by-step ways to use FFmpeg for resizing - covering all scenarios, from simple scale commands to advanced batch processing. You don't need to be a tech wizard - just a spark of curiosity and a video ready to resize!
Method 1: FFmpeg Resize Video with Fixed Dimensions
When you want to resize a video for a specific purpose - maybe to meet a standard like 720p or 1080p, or to ensure smooth uploads to a particular platform - fixed dimensions are your go-to. This approach is perfect when you know exactly what width and height you need.
With FFmpeg, resizing to fixed dimensions is remarkably straightforward. You simply pick your target resolution and plug it into a simple command. For example, to resize any video to the popular 1280x720 resolution (that's 720p!), you'd use:
ffmpeg -i input.mp4 -vf scale=1280:720 output.mp4 This command tells FFmpeg to load your input file, resize it to 1280 pixels wide and 720 pixels high, and save the result. It's as easy as ordering coffee - just with a bit more typing and far fewer calories.
Step-by-Step Tutorial: Resizing to 720p
Ready to jump in? Here's how to resize a video to 720p, even if you're totally new to FFmpeg:
Step 1. Install FFmpeg: Grab the latest version from the official FFmpeg site and install it on your system.
Step 2. Open Your Terminal or Command Prompt: No matter if you're on Mac, Windows, or Linux! Navigate to the folder where your video lives.
Step 3. Run the Resize Command: Use the following, replacing sample.mp4 with your file's name:
ffmpeg -i sample.mp4 -vf scale=1280:720 output_720p.mp4 Step 4. Check Your Output : Once finished, play the new video (output_720p.mp4) to ensure it's the right size and there's no distortion.
Pro Tips for Smooth Resizing
- Check Original Resolution: Before resizing, it's smart to see your video's original dimensions. Use:
- This helps you pick the best output size and avoid unintended stretching.
- Stick to Standard Resolutions: Standard sizes like 1920x1080, 1280x720, or 640x360 keep your videos compatible across devices and services.
- Aspect Ratio Alerts: If your input file's aspect ratio doesn't match your target resolution, the image might get stretched or squashed. If you want to keep things proportional, use -1 for height or width (e.g., scale=1280:-1), and FFmpeg will auto-calculate it for you.
ffprobe input.mp4 Check how to upscale videos TO HD/4K in FFmpeg
Method 2: FFmpeg Resize Video with Original Aspect Ratio
The aspect ratio is simply the proportional relationship between a video's width and height. If you resize a 16:9 (widescreen) video to a 1:1 (square) dimension without any adjustments, your visuals can look severely distorted. Preserving aspect ratio prevents fat faces, tall cats, and other digital calamities.
A well-maintained aspect ratio ensures that: your subjects look natural, there's no stretching or squashing, the video appears as the creator intended, no matter where you play it, etc.
Hot search: how to resize video without quality loss
Tutorial: FFmpeg Scaling with Aspect Ratio Preservation
FFmpeg makes it quite simple to resize while keeping proportions intact. Instead of hard-coding both width and height, you can use a special flag to let FFmpeg calculate one dimension automatically:
ffmpeg -i input.mp4 -vf scale=1280:-2 output.mp4 The -vf scale=1280:-2 command tells FFmpeg to make the width 1280 pixels, but automatically adjust the height to preserve the original aspect ratio (what -2 does).
Let's say you have a 1920x1080 video and want it at 1280 pixels wide, but you also want the height adjusted precisely:
ffmpeg -i input.mp4 -vf scale=1280:-2 output_1280.mp4 The height will be calculated automatically to maintain the 16:9 look, resulting in a proper 1280x720 output.
Method 3: FFmpeg Resize Video in Batch
If you're a content creator, video editor, or just someone with a mountain of media from your latest vacation, you know the pain of manually resizing each file one-by-one. Enter batch processing with FFmpeg - a true game-changer for busy folks who'd rather spend their time shooting or sharing, not clicking through endless menus.
Batch resizing isn't just convenient - it's transformative, especially when you're handling dozens or hundreds of video files at once. Imagine you're a web developer prepping 50+ videos for a slick new website, and you need every single file down to 640x360 for speedy loading. Running batch scripts with FFmpeg can save hours, if not days, of repetitive work. In fact, automating this process overnight could mean seeing an entire video library resized and ready by your morning coffee - improving storage efficiency and website performance all in one go.
Step-by-Step Tutorial: Resize a Folder of Videos
For Linux or macOS Users: Fire up your Terminal and navigate to the folder housing your videos. Try a simple one-liner script:
for i in *.mp4; do ffmpeg -i "$i" -vf scale=854:480 "resized_$i"; done This command loops through every .mp4 file and resizes it to 854x480 (standard SD), saving each with a new filename.
For Windows Users: No Mac? No problem. Open Command Prompt in your video folder and use:
for %f in (*.mp4) do ffmpeg -i "%f" -vf scale=854:480 "resized_%f" Almost identical! This line tells Windows to process each .mp4 file, resize, and output with a new name.
Also learn: how to resize MP4 videos
Batch Processing Best Practices
- Test Before You Leap: Run your command on a single video first to make sure everything looks right.
- Keep Tabs on Storage: Batch resizing can generate lots of new files quickly! Ensure you have enough disk space to fit all the outputs.
- Use Standard Resolutions: Choose popular sizes like 1280x720 or 640x360 for maximum compatibility and the best file size-to-quality ratio.
- Monitor for Errors: If you spot any strange outputs, double-check your command for typos or try smaller batches.
Method 4: FFmpeg Resize Video and Optimize Video Quality
Here's the golden rule: smaller files almost always mean some drop in quality, but you can get that sweet spot where your video both looks great and loads fast. FFmpeg's secret weapon for balancing quality versus file size is the -crf setting - short for Constant Rate Factor.
The CRF scale runs from 0 (lossless, massive files) to 51 (lowest quality, tiny files). In the real world, 23 is a solid default for H.264 encoding—a happy medium between clarity and compression.
| CRF Value | Quality Level | Typical Use Case |
|---|---|---|
| 18-21 | High | Archival, vlogs, HD content |
| 22-28 | Good/Standard | Social sharing, web streaming |
| 29-35 | Low (smaller files) | Previews, rough cuts, quick shares |
Pro Tip: Lower CRF values mean higher quality (and larger files); higher values shrink file size at the expense of detail. For most projects, a CRF of 18-23 works beautifully.
Here's how you might resize your video to 1280x720 and maintain strong quality:
ffmpeg -i input.mp4 -vf scale=1280:720 -crf 23 output.mp4 If you want to get really granular about quality, add a few more options:
ffmpeg -i input.mp4 -vf scale=1280:720 -c:v libx264 -crf 20 -preset fast output.mp4 -c:v libx264 uses the H.264 codec, which is widely supported and offers an excellent quality-to-size ratio. And -preset fast tells FFmpeg to use a fast encoding process - a practical balance between speed and quality. For higher quality (and slower encode times), try medium or even slow.
Common Pitfalls and How to Avoid Them
- Over-Compression: High CRF values (above 30) can make your video look mushy or blocky. If your output is showing artifacts or color banding, dial that number back down.
- Slow Processing: All those crisp frames? They take time. If you're in a hurry, start with -preset veryfast when testing, then switch to fast or medium for final exports.
- Codec Headaches: Stick with even dimensions (like 1280x720 or 640x360) and proven codecs like H.264 (libx264). This keeps playback smooth across all your devices and prevents annoying compatibility errors.
Troubleshooting Common FFmpeg Resizing Video Issues
Even the most seasoned video enthusiasts (yes, I've been there too!) can hit a snag when resizing videos with FFmpeg. Whether you're greeted by a bizarrely blurry export or a mysterious error message, don't worry - most issues have a quick fix. Let's walk through the most common resizing headaches so your workflow stays as smooth as a perfectly compressed MP4.
Issue 1. Output Video Is Blurry
After all your hard work, a fuzzy final result is enough to make anyone sigh. This typically happens if the bitrate is set too low or you've scaled your video too aggressively. For sharpness that matches your expectations:
- Solution 1: Increase the video bitrate with the -b:v flag, for example: -b:v 5M (for a 5 Mbps bitrate)
- Solution 2: Lower your CRF (Constant Rate Factor) value. If you used -crf 28, try -crf 20 for noticeably better quality.
These tweaks tell FFmpeg to preserve more data, giving you a crisper, cleaner video—just the way you want it.
Issue 2. Codec Compatibility Errors
Ran a resize job and got a codec not supported, Invalid dimensions, or Failed to encode error? This one's more common than you think. Many codecs (especially H.264, H.265, and VP9) require both video width and height to be even numbers. Try resizing a video to 1279x719, and you might run into trouble.
- Solution: Always use even dimensions in your scale commands, such as scale=1280:720 or scale=854:480. If you're letting FFmpeg calculate one side, use -2 instead of -1 (e.g., scale=1280:-2) - this ensures FFmpeg rounds to the nearest even number for compatibility.
Issue 3. Slow Processing
If your resizing seems to be taking forever (and you can almost hear your CPU groaning), you're not alone. This can happen with high-res footage, complex filters, or older hardware.
- Solution 1: Use a faster encoding preset, like -preset ultrafast or -preset veryfast. Your command might look like: ffmpeg -i input.mp4 -vf scale=1280:720 -preset ultrafast output.mp4
- Solution 2: If possible, reduce your input resolution before applying heavy filters or effects.
- Solution 3: Minimize simultaneous tasks - some computers don't multitask as well as we do!
Looking to Go Beyond Standard Video Resizing with FFmpeg?
If you're seeking not just to resize but to significantly enhance your video's visual quality, Aiarty Video Enhancer offers a compelling AI-powered alternative.
Unlike FFmpeg's traditional resizing that uses pixel interpolation for quick dimension changes, Aiarty Video Enhancer uses advanced deep learning algorithms to intelligently upscale your video quality and scale up to 4K, or customize to any resolution.
This AI-driven process restores fine details, reduces noise, sharpens edges, and improves motion clarity - transforming low-resolution or old footage into crisp, vibrant videos with natural textures. It features specialized AI models tailored for denoising, deblurring, and face refinement, all while preserving authentic colors and smooth motion.
Key advantages of Aiarty Video Enhancer over FFmpeg resizing include:
- Superior visual quality: AI super-resolution restores details standard resize filters cannot recover. By comparison, FFmpeg uses traditional filters like bicubic, lanczos, and some ML-based super-resolution filters (e.g., SRCNN, ESPCN).
- Simplified workflow: No complex command lines; just drag, drop, and select your upscale factor (1x, 2x, 4x...). By comparison, while FFmpeg provides incredible power and flexibility, mastering its commands can be daunting, especially for those new to video editing.
- Batch processing & turbo speed: Process multiple videos simultaneously with efficient GPU acceleration. No manual setup like FFmpeg requires.
- Wide format compatibility and professional codec support.
So why not free download it now and then follow the steps below to check how it helps for your video reiszing and upscaling?
Step 1. After installing Aiarty Video Enhancer on your Windows or Mac computer, run it.
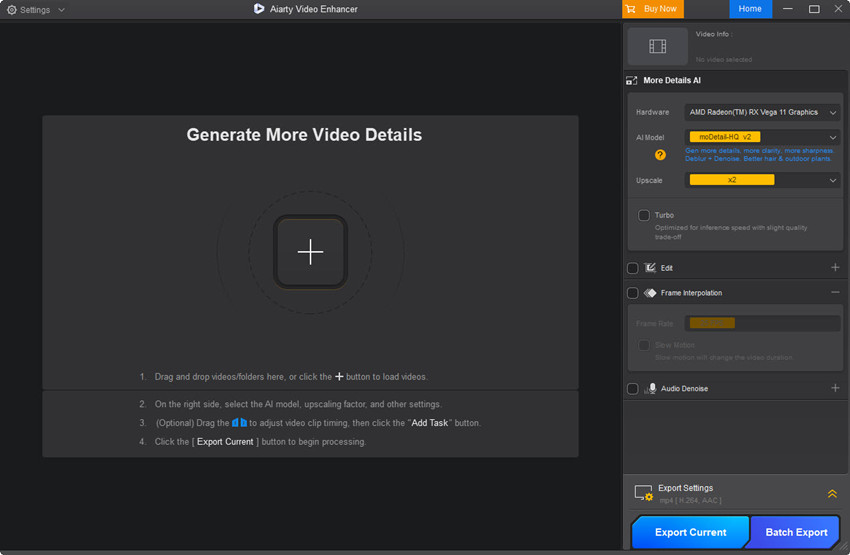
Step 2. Then drag and drop your video(s) into it.
After loading finishes, on the right panel, go to the Upscale drop-down menu to choose the resolution option that you want your video to be resized to. Do not foregt to try the Custom Resolution option for more possibilities and creativities.

Step 3. If you want to change the aspect ratio of the original video(s), go to check the Edit feature.
Enable it and then you will see the Crop feature. Then click the Crop Ratio drop-down menu, where you will get a bunch of options, such as free, Original, 16:9, 16:10, 4:3, 1:1, etc.
Select the one that you prefer. If none, you can simply drag the bounding box directly on your video preview to achieve the desired video size ratio.

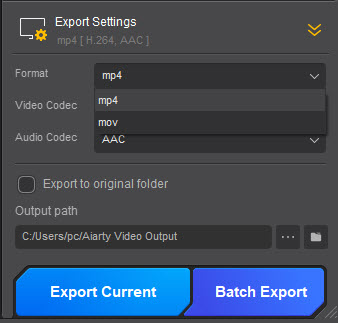
Step 4. After all are set right, hit Export Current (for one video) or Export Batch (for multiple files) to save the processed file(s).
Conclusion
FFmpeg gives you powerful tools for video resizing, from simple fixed dimensions to aspect ratio preservation, advanced filters, batch processing, and quality optimization. The flexibility of this free, open-source software makes it perfect for everything from personal projects to professional work.
Don't be intimidated by the command line - start with a sample video, experiment with different methods, and find what works best for your needs. With practice, you'll quickly master the art of perfectly sized videos. Remember, every video editor faces challenges, but the techniques in this guide will help you overcome them.
You May Also Like
This post was written by Ashley Brown, a videographer turned AI explorer. As an associate writer at Digiarty Software, she dives into the latest AI-powered tools for video enhancement and content creation, offering practical insights and unbiased commentary. Accuracy confirmed by Abby Poole.