DaVinci Resolve just released v21 beta with a new photo page and more AI features. The photographer communities are mostly excited about its dedicated photo panel, adding up to its ecosystem of photo culling, management, editing, enhancement, face retouch tools, and even RAW photo support for many camera devices.
Many Lightroom or Photoshop users are considering shifting some of their editing routine into DaVinci Resolve v21, from culling to editing, color grading, and quality enhancement.
Can you use DaVinci Resolve to remove noise in images?
Yes. From DaVinci Resolve v21 and onward, you can denoise images with dedicated photo editing features. To be more precisely, you can apply the Noise Reduction (Spatial NR) from Color page to assets in Photo page, just as how you apply video noise reduction in DaVinci Resolve previously.
Within the Spatial NR option, there are general noise reduction algorithms and AI UltraNR. For AI UltraNR, you need to update to DaVinci Resolve Studio version ($299 one-time purchase).
For the free DaVinci Resolve version, you can preview AI UltraNR effects, though with a large watermark on your photos.
How to Remove Image Noise with DaVinci Resolve v21
For experienced users already accustomed to how DaVinci Resolve works, here is a quick answer for you to denoise images in DaVinci Resolve.
- Create a new project, go to Photo page to import images.
- Go to Color page, create a new node, find Noise Reduction under effects.
- Under Spatial NR, choose a noise reduction option available in your version.
For beginners using DaVinci Resolve for the first time, or only handling with videos a few times before, here are detailed steps with screenshot, with explanations of the mechanism behind and shortcuts to enhance your workflow.
Step 1. Download the latest version of DaVinci Resolve.
Visit the official page here. As of April 2026, you need to use "DaVinci Resolve 21 Public Beta" which contains the new Color Page.
For AI-powered noise reduction and SuperScale, you need to update to the paid Studio version.
Step 2. Install and create a new project.
This may sounds weird for beginners only familiar with other photo editing apps.
Given that DaVinci Resolve was a dedicated video color grading and editing software, it's probably because their developer prefer to stick to this mechanism for some considerations, such as syncing changes across Cut, Photo, Color, Fusion and other panels (or Pages in DaVinci term).
Step 3. Import photos and optionally create albums.
Go to the Photo page, drag and drop photos into the top-right media panel, or use the menu to import photos or folders.
You can select multiple photos and right-click to create an album.
Step 4 (optional). Culling or apply photo editing before noise reduction.
For seamless workflow, you might prefer to rate, pick, or reject photos just as how you manage photos with Lightroom or other photo culling software.
For instance, I prefer to group all the wildlife photos into an album for noise reduction; and low-light portrait photos into another album for another round of image noise removal.
Inside the Photo page, you can crop photos before focusing your tasks on noise removal, face enhancement, and other fixes.
Step 5. Apply Noise Reduction from effects.
Click the panel label at the bottom to switch to the Color Page.
Now, instead of directly applying the NR effect on your photo, you can create a new node for the noise removal task.
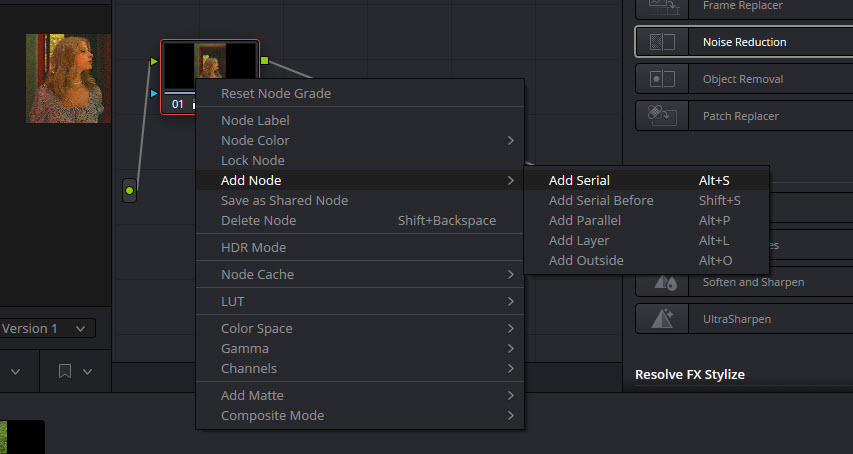
Right-click on the image > Add Note > Add Serial (Shortcut key: Alt/Option + S).
Step 6. Tweak noise reduction settings.
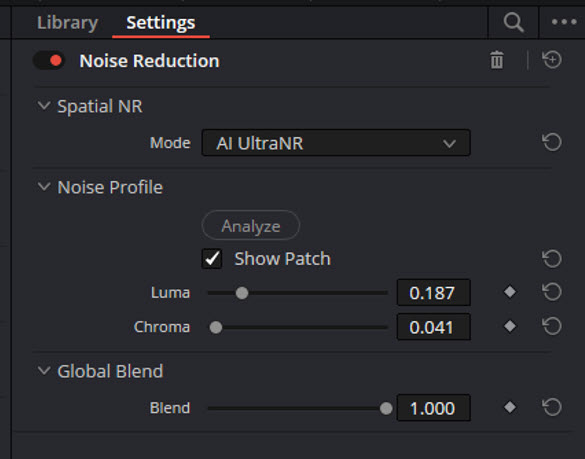
Drag and drop the Noise Reduction from effects onto the newly created nodes. Under Spatial NR, you can choose among Al UltraNR and other general NR (prioritizing speed or quality).
For AI UltraNR that's only available in Studio version, hit Analyze for AI to finish its job, and then manually adjust parameters under Noise Profile.
How to set Luma and Chroma values in noise reduction?
Luma targets those contrast and brightness noise, while Chroma handles color speckles. If you push the Luma slider too much, it can lead to a soft, over-smoothing look.
Can I adjust the noise reduction strength in DaVinci Resolve?
You can change the Global Blend value under Noise Reduction. For instance, as shown in the comparison below, a global blend of 0.75 still retains some grains of the original image, while 1.0 value smooth out the skin alongside noise removal.
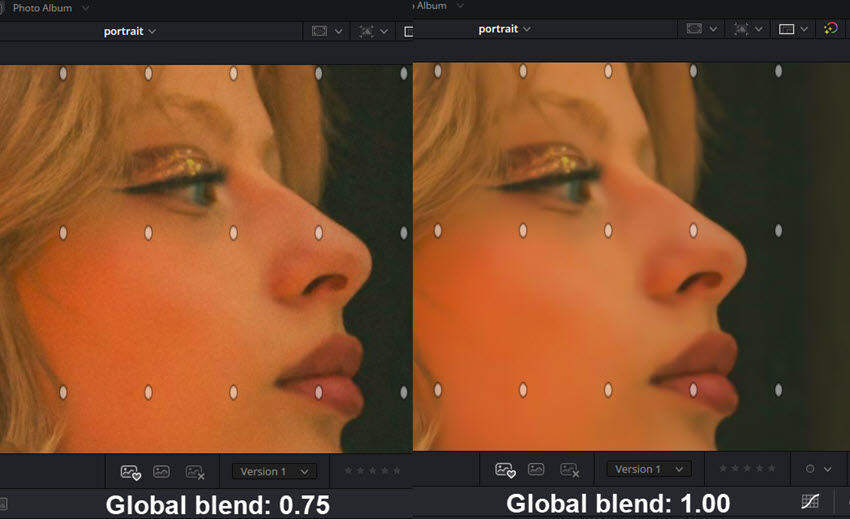
Shortcut: You can hold Ctrl/Cmd+D to compare noise reduction effect before and after for that serial node.
Step 7 (optional). Apply color editing.
Generally, it is recommend to apply image noise reduction before color grading. Noise removal provides a clean foundation so that further editing won't magnify artifacts or make the image look like a mess.
After step 6, you can go back to the Color page to adjust saturation, contrast, and more.
Side Note:
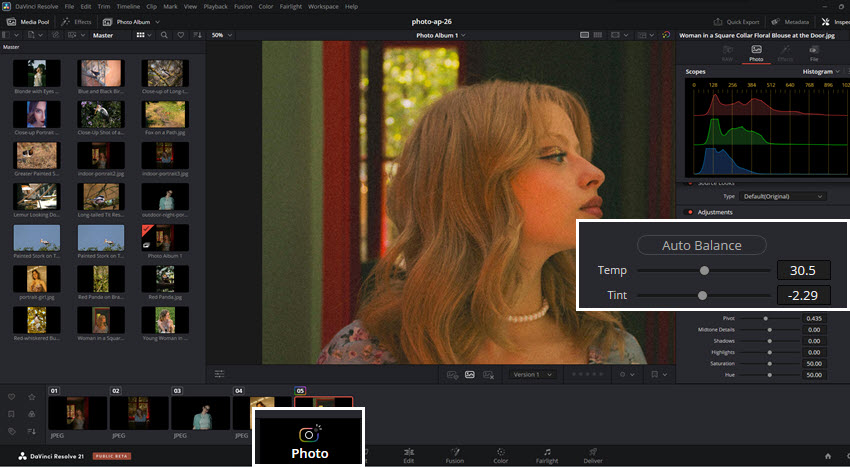
Though photo edits are non-destructive, the edits are linked to the whole projects inside DaVinci Resolve. For instance, the noise reduction node in Color page will be synced across the entire project. You shall see it taking effects in Photo page, fusion, and even video timeline.
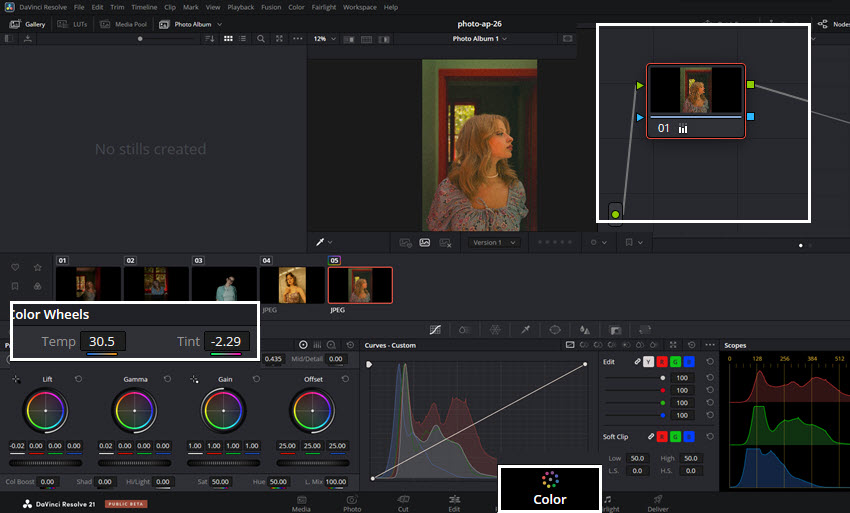
As you can see from the screenshots above, when you adjust parameters on Photo Page (Temp 30.5, Tint -2.29), it is synced in the Color Page (Under Color Wheels, Temp 30.5, Tint -2.29).
You can double-click on sliders to reset the value.
Tips to Enhance Noise Removal and Editing Efficiency in DaVinci Resolve
For beginners navigating inside DaVinci Resolve to reduce image noise, upscale photos, retouch portraits, or applying other photo edits, below are some handy tips to enhance your workflow.
Shortcuts to quickly cull photos before diving into editing
- Press S to select photos
- Press X to reject photos
- Right-click on the heart icon to filter: good take (selected), rejected, or untagged
- Arrow left and right: move between photos in the album
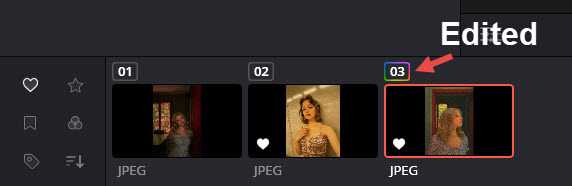
For images with color editing applied, you shall see a colorful ring around its number lable.
Shortcuts to better preview images in DaVinci Resolve
- Press Ctrl + mouse scroll: move images up and down.
- Press Ctrl + Shift+ mouse scroll: move images left and right.
- Press Space: toggle the last tab on and off.
For instance, it's handy to hide album panel for more previewing space during editing, and bring it up to move to the next photo.
How to Use AI-Powered Image Noise Reduction without Studio Version
AI UltraNR in DaVinci Resolve requires an upgrading to the $299 Studio Version, so does other AI features, such as SuperScale and Topaz Plugin for DaVinci Resolve.
How to use AI-powered noise reduction without DaVinci Resolve studio?
For the free DaVinci Resolve version, you can apply Spatial NR in non-AI mode, though it struggles to handle challenging scenes, such as dark indoor shots and grainy low-light portraits.
The general noise reduction in DaVinci Resolve can smooth out some details and make the image soft.
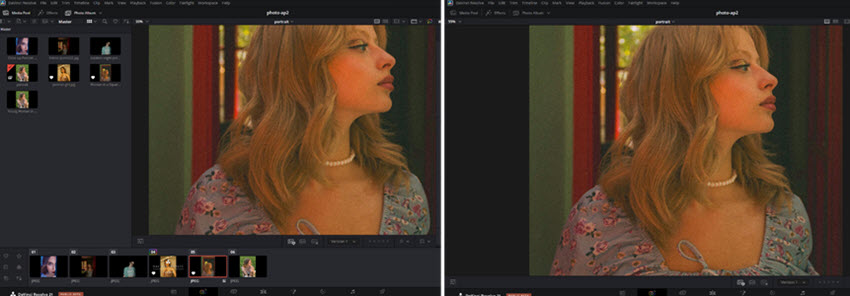
So my solution is to use a dedicated AI image enhancer to remove photo noise and restore details, before tapping into the great color grading features in DaVinci Resolve.
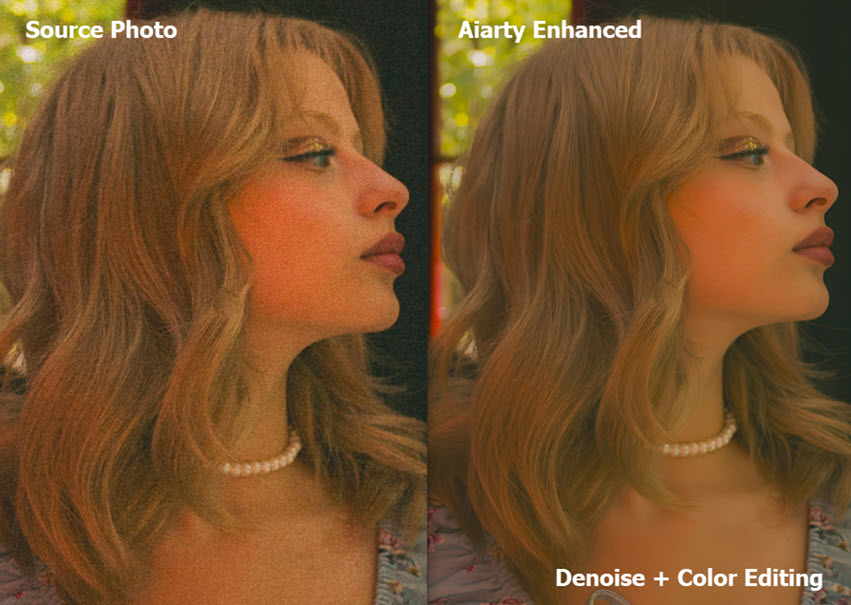
As shown in the testing above, this indoor portrait suffers from high ISO noise and color speckles. The tool I used is Aiarty Image Enhancer, it uses AI models to infer photo problems, reduce noise, and bring back details. It also includes AI-powered super resolution for detail-preserving upscaling.
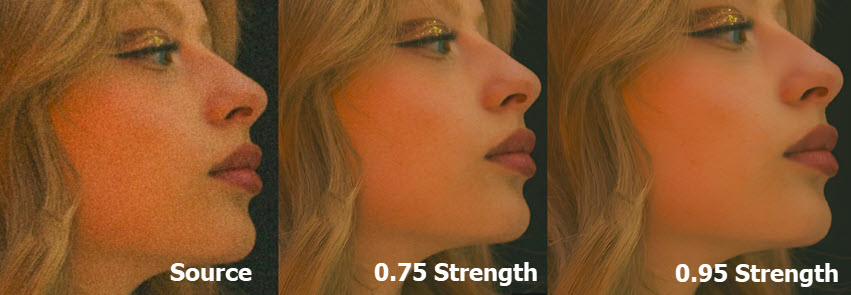
If you love the film grains for a certain feel, just as the Global blend in DaVinci Resolve, you can adjust a strength slider in Aiarty Image Enhancer during quality enhancement.
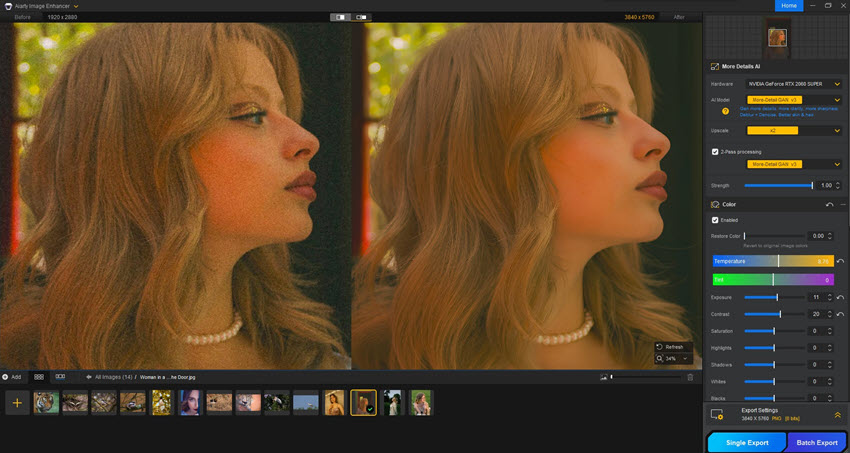
Here's the interface. It works as a desktop image enhancer and upscaler for Windows and Mac, and it's easy to navigate without any technical know-how.
You can use it for the entire workflow, or fit it before further processing in DaVinci Resolve, which turned out to be a nice combination of great value. You can enjoy AI-powered noise reduction, upscaling, detail restoration and face enhancement in Aiarty, while tapping into the node-based color grading in DaVinci Resolve.
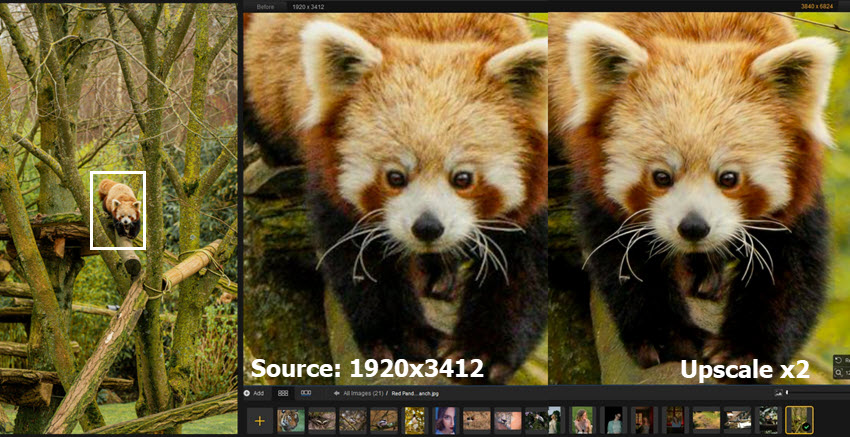
Here's another test using Aiarty to crop onto the subject, remove sensor noise, and restore compression artifacts of a wildlife photo. Now it's denoised and upscaled with details for fur.
You can hit the buttons below to free download Aiarty Image Enhancer, test out full features, and see how it fits into your photo editing workflow.
You May Also Like
This post was written by Brenda Peng who is a seasoned editor at Digiarty Software who loves turning ordinary photos into extraordinary works of art. With AI assistance for brainstorming and drafting, the post is reviewed for accuracy by our expert Abby Poole for her expertise in this field.