


Stretching an image is useful when you need to change its size, adjust the aspect ratio, or fit a photo into a new layout. You may want to stretch a picture for a website banner, social media post, wallpaper, presentation, or printing.
However, simply stretching an image can create unwanted results. When the width or height changes too much, objects may look unnatural, faces may become distorted, and details may appear blurry.
The key is choosing the right method:
- Use online tools for quick adjustments
- Use Photoshop for more precise control
- Use AI enhancement when stretching requires enlarging an image while maintaining quality
In this guide, we will show you how to stretch an image horizontally or vertically using different methods and how to preserve image quality after stretching.
Stretch vs Resize vs Crop vs AI Expand: What's the Difference?
Stretching an image means changing its width, height, or both by expanding the existing pixels. Unlike regular resizing, which usually keeps the original aspect ratio, stretching changes the image proportions and may cause distortion if applied too much.
Stretching, resizing, cropping, and AI expansion all help adjust images for different formats, but they work in different ways.
For example, horizontal stretching makes an image wider, while vertical stretching makes it taller. However, excessive stretching may distort objects and reduce quality. AI expansion is a better option when you need to extend the image area while keeping the result more natural.
Yes, but the result depends on the original image resolution and how much you stretch it.
For small adjustments, most image editors can handle stretching well. However, when you significantly enlarge an image, quality problems become more noticeable. Traditional stretching enlarges existing pixels, which can cause blur, soft edges, pixelation, and loss of sharpness. These problems are more noticeable in low-resolution, old, or compressed images.
For better results, adjust the image size or aspect ratio first, then stretch or resize the image and enhance the final quality with AI before exporting.
Aiarty Image Enhancer can help improve stretched images by upscaling resolution, enhancing details, and reducing noise after enlargement. It is especially useful when a photo needs to be enlarged beyond its original resolution while keeping important details sharper.
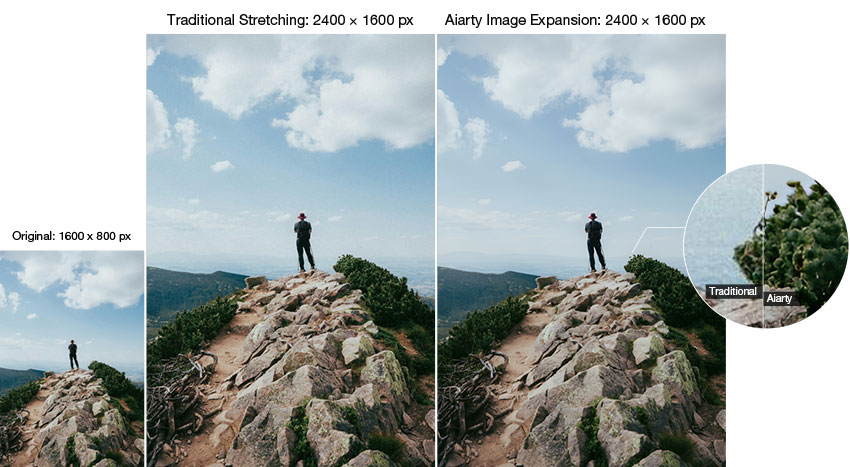
Stretch images without sacrificing quality. Enhance resolution and details with Aiarty Image Enhancer.
How to Stretch an Image Online (Desktop & Mobile)
Online image editors are the easiest way to stretch a photo without installing software. Many tools work both in a browser and on mobile devices, making them convenient for quick edits.
Method 1: Stretch an Image with Canva
Canva is a popular option for beginners who need to quickly stretch image dimensions for social media, marketing materials, and simple designs.
Steps to stretch an image in Canva:
- Upload your image to Canva and open it in the editor.
- Create a new design with your desired dimensions or aspect ratio.
- Adjust the canvas size or resize the image to fit the new layout.
- Drag the image edges to stretch it, then reposition it for the best composition.
- Preview the result and export the final image.
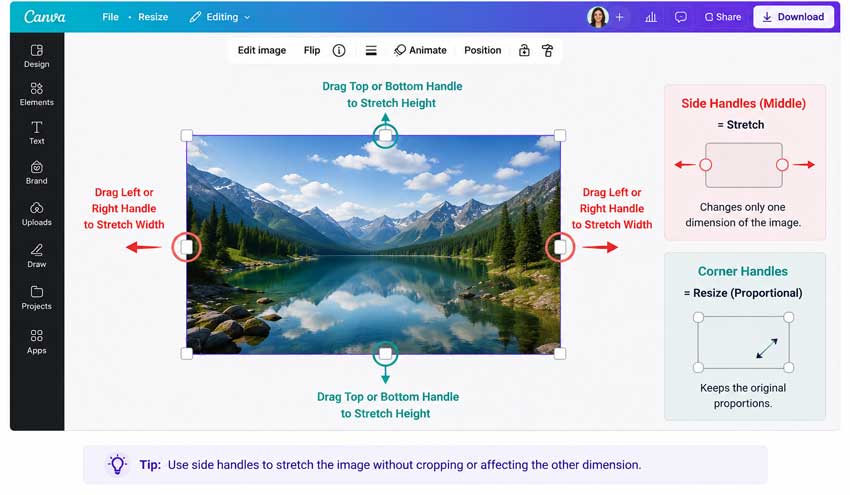
Canva is a convenient option for stretching images used in social media posts, posters, presentations, and marketing graphics. Besides directly stretching an image horizontally or vertically, you can also resize the design canvas, fill the entire page with an image, or use Magic Expand to extend the image background.
However, extreme stretching may still distort important details because it enlarges existing pixels rather than creating new image information. For example, stretching a portrait photo too much can make a person’s face appear wider or unnatural.
Method 2: Stretch an Image with CapCut
CapCut is another convenient option, especially for creators who work with social media content. Although CapCut is mainly known as a video editor, it also supports image editing and resizing.
Steps to stretch an image in CapCut:
- Import your image into CapCut and add it to the editing timeline or canvas.
- Select the canvas ratio based on your target platform, such as vertical, square, or widescreen formats.
- Resize, scale, and reposition the image to fit the new layout.
- Adjust the image placement and composition to avoid unwanted cropping or distortion.
- Preview the result and export the edited image.
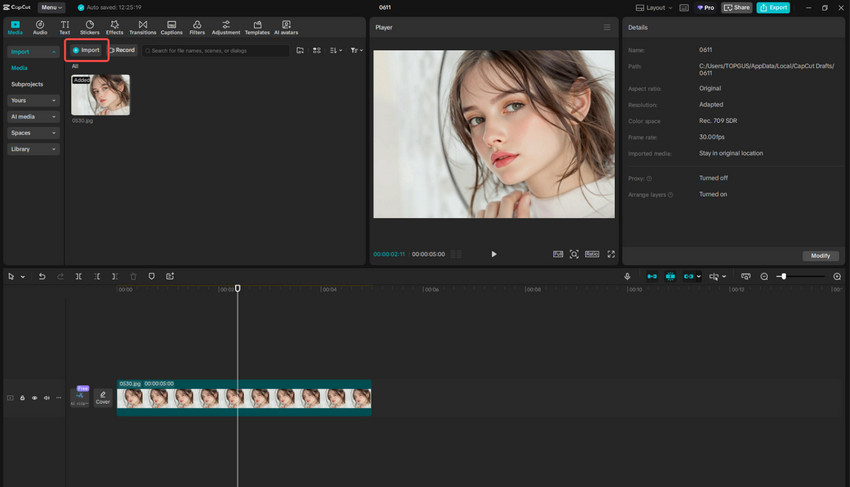
CapCut is especially useful for quickly adapting images for TikTok covers, video thumbnails, social media graphics, and other mobile content. With both desktop and mobile versions available, it makes it easy to resize images for different platforms. However, like traditional editing tools, excessive stretching may still affect image proportions because it does not create new image details.
Learn More: Why Is CapCut Not Working? Fix Crashes, Export, Login, and Network Errors
Other browser-based tools can also help you adjust image dimensions, including Adobe Express, Fotor, and Photopea. These tools are suitable for quick resizing and simple aspect ratio changes. However, like most traditional editors, they mainly modify existing pixels. If the stretched image becomes blurry, AI enhancement may be needed to improve the final quality.
How to Stretch an Image in Photoshop
Photoshop offers several ways to stretch an image, from basic resizing to more advanced content-aware tools. The right method depends on whether you only need to change dimensions or want to preserve image quality and composition.
Basic Image Stretching in Photoshop
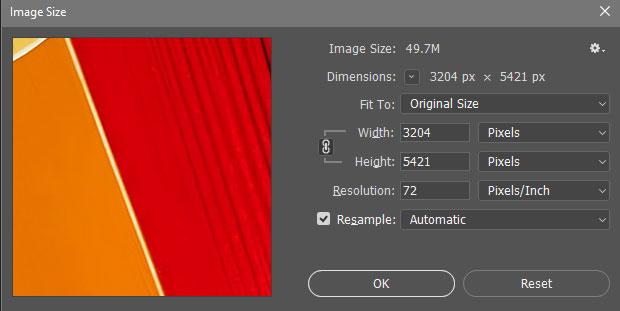
To stretch an image manually, open your image in Photoshop, go to Image > Image Size, unlock the aspect ratio option, and adjust the width or height value. This allows you to stretch the image horizontally or vertically instead of scaling it proportionally.
This method is useful for precise size adjustments and simple layout changes. However, because it enlarges existing pixels, extreme stretching may reduce sharpness and create distortion.
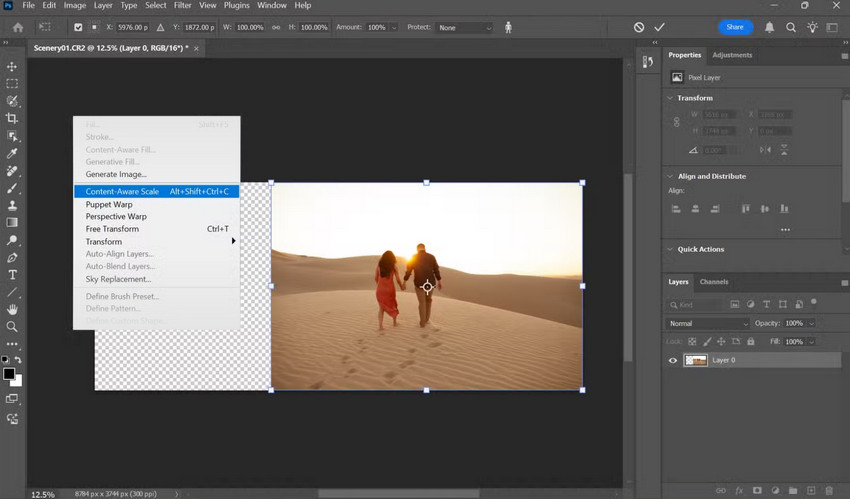
Use Content-Aware Scale for Smarter Resizing
Content-Aware Scale adjusts image dimensions while protecting important areas, such as people or main objects, from excessive distortion. It is useful when you need to change the image ratio while keeping the main subject more natural.
Use Generative Expand to Extend an Image
Generative Expand uses AI to add new content beyond the original image boundaries. Instead of stretching existing pixels, it creates additional background areas, making it useful for changing compositions, adding space for text, or adapting images to new aspect ratios.
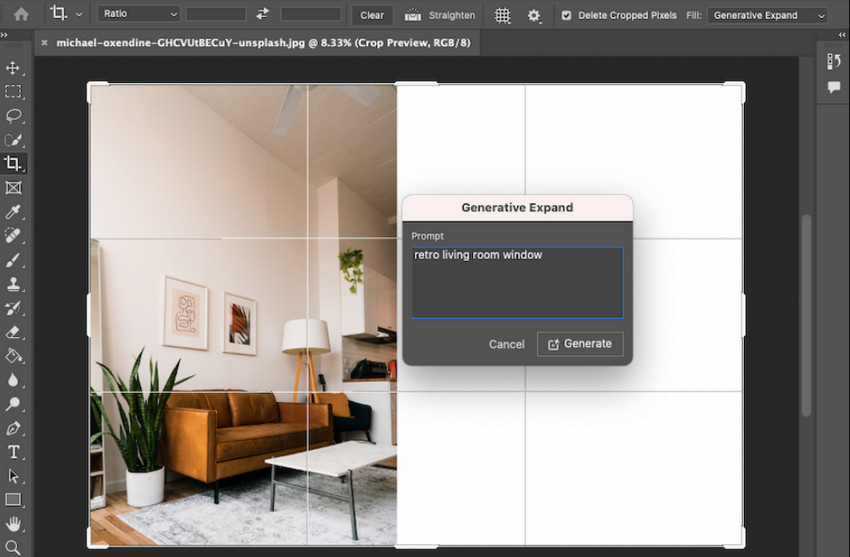
These tools are especially helpful when you need to adjust an image layout, but they are designed for different purposes: Content-Aware Scale preserves existing content, while Generative Expand creates new surrounding areas.
How to Stretch an Image Without Losing Quality
Stretching an image is not only about changing its dimensions. In many cases, the bigger challenge is keeping the image sharp after enlargement. A photo may look fine at its original size but become blurry when stretched for large prints, website banners, wallpapers, or high-resolution displays.
To maintain better quality, consider combining image stretching with AI enhancement.
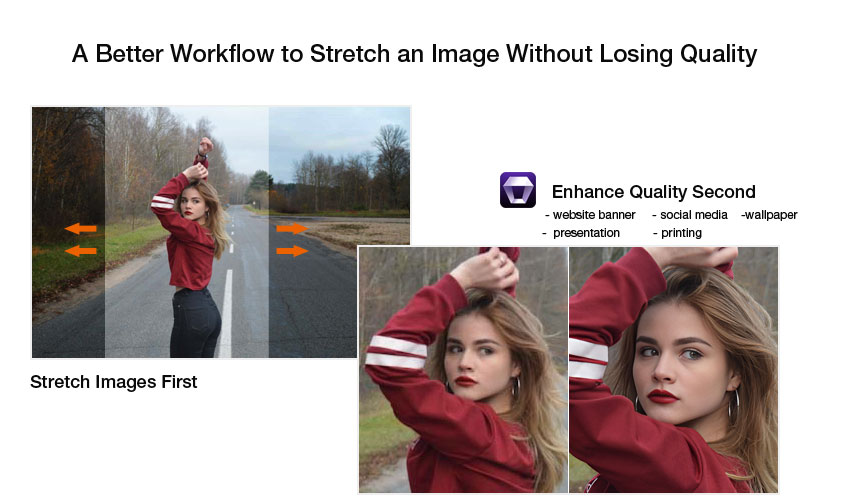
Better Workflow: Stretch First, Enhance Quality Second
A practical workflow is to adjust the image size first, then improve its quality with AI enhancement:
- Stretch or resize the image: Adjust the dimensions or aspect ratio to fit your target format.
- Enhance the image quality: Use AI enhancement to improve details, reduce noise, and make the enlarged image look sharper.
This workflow is especially useful for images that need to be printed, used as banners, uploaded to websites, or enlarged for professional projects.
Enhance Stretched Images with Aiarty Image Enhancer
Aiarty Image Enhancer is designed to improve image quality after resizing or enlarging. Instead of simply enlarging pixels, it uses AI models to analyze image details and improve the final output.
Aiarty Image Enhancer can help improve stretched images by:
- Upscaling Enlarged Images: Enhance resolution and preserve clearer details when a stretched image needs to be used for larger displays, posters, or high-quality prints.
- Improving Fine Details: Restore clearer textures, edges, hair details, and object clarity that may become softer after stretching.
- Reducing Noise and Artifacts: Clean up noise and compression artifacts that become more noticeable after enlarging low-resolution, compressed, or older photos.
- Cropping and Adjusting Composition: Crop images to remove unwanted areas or refine the composition before or after stretching, helping images better fit different layouts and aspect ratios.
- Preparing Images for Professional Use: Create sharper images for printing, presentations, websites, and marketing materials after resizing or stretching.
Note: Aiarty Image Enhancer supports image resizing and stretching workflows, but it is not a traditional image stretching tool. Instead, it focuses on improving image quality by enhancing details, reducing noise, and maintaining clarity after enlargement.
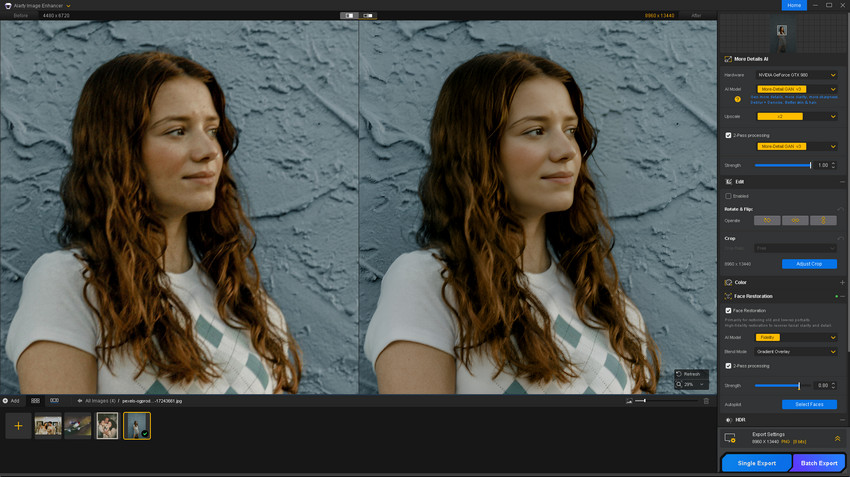
Easy Steps to Enhance Stretched Photos in Aiarty Image Enhancer
- Import your photos: Free download and launch Aiarty. Drag and drop to import the photo(s) you want to strect and enhance.
- Resize or crop the image (optional): Click Edit > Adjust Crop, choose a suitable crop ratio, and apply the changes to resize the photo for your intended use.
- Enhance the image quality: Choose a suitable AI model, adjust the Upscale level, and click Start to upscale the image, expanding its size while enhancing details, reducing blur, and preserving clarity.
- Export the improved image: Select the output format, quality, and other export settings, then click Single Export or Batch Export to save the enhanced photo.
Conclusion
Stretching an image is a simple way to adjust dimensions, but the wrong method can lead to distortion and quality loss. For quick edits, online tools like Canva and CapCut are convenient options. Photoshop provides more advanced control for professional workflows.
However, when stretching requires enlarging an image beyond its original resolution, maintaining image quality becomes the biggest challenge. Combining stretching with AI enhancement can help preserve details and create sharper results.
Aiarty Image Enhancer helps upscale and enhance images after resizing, making it easier to prepare photos for printing, websites, social media, and other high-quality uses.
 FAQs
FAQs
Yes, but the result depends on how much you stretch the image. Small adjustments usually work well, while excessive stretching may distort faces, objects, and details. For larger changes, AI enhancement can help maintain better image quality.
You can use online editors such as Canva or CapCut. Upload your image, adjust the canvas size or aspect ratio, change the image width, and export the result. If the image becomes blurry after resizing, use an AI enhancer to improve details.
To stretch a photo vertically, open it in an image editor, adjust the height while unlocking the aspect ratio, and export the image. This method is commonly used for wallpapers, portrait designs, and social media formats.
Yes. Stretching enlarges existing pixels but does not add new details. Large changes may make images look blurry or pixelated, especially when the original resolution is low.
To resize an image while maintaining quality, use a high-resolution source, avoid excessive stretching, and apply AI upscaling for significant enlargements. Tools like Aiarty Image Enhancer can help improve sharpness and restore details after resizing.
You May Also Like


This post was written by Brenda Peng who is a seasoned editor at Digiarty Software who loves turning ordinary photos into extraordinary works of art. With AI assistance for brainstorming and drafting, the post is reviewed for accuracy by our expert Abby Poole for her expertise in this field.
