Trying to stretch an image in Canva but ending up with a cropped photo, a locked aspect ratio, or a blurry result? You're not alone. Canva makes it easy to resize images, but stretching them is a little less obvious. Depending on what you're trying to achieve, there are actually several ways to make an image wider, taller, or fit a different canvas size without ruining the design.
In this guide, we'll walk through the easiest methods to stretch an image in Canva, explain when stretching is a bad idea, and show you how to avoid common quality issues.
How to Stretch an Image in Canva
If your goal is simply to make an image wider or taller, Canva lets you do that by dragging the side handles of the image.
- Select the image.
- Click and drag a side handle instead of a corner handle.
- Pull outward to increase width or height independently.
- Release when the image reaches the desired shape.
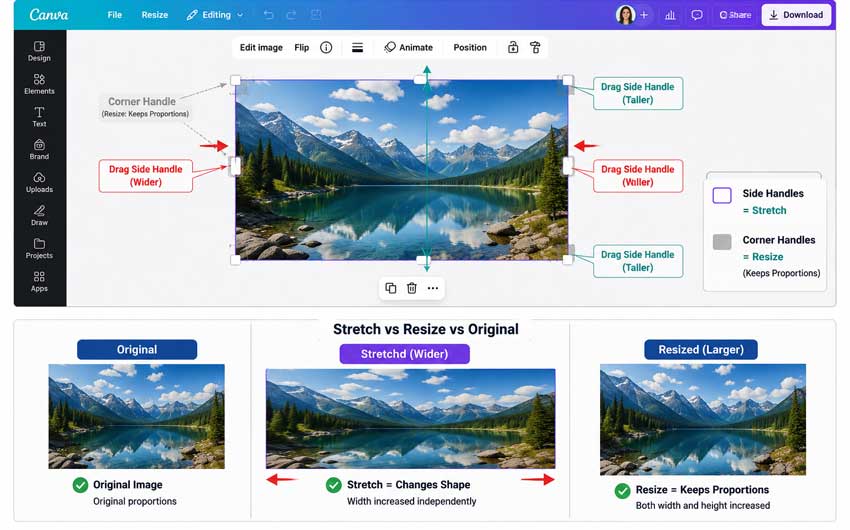
This changes the image dimensions without keeping the original proportions.
However, "stretching" isn't always what people actually need. Sometimes users want the image to fill the page, avoid cropping, or fit a different design size. That's why it's helpful to understand the different methods below and choose the one that matches your situation.
Method 1: Stretch Image in Canva Horizontally or Vertically
Use this method when you intentionally want the image itself to become wider or taller.
Step 1: Open Your Canva Project
Launch Canva and open an existing design or create a new one.
Step 2: Insert Your Image
Upload your own image or choose one from Canva's media library.
Step 3: Select the Image
Click the image once to display the resize handles around its edges.
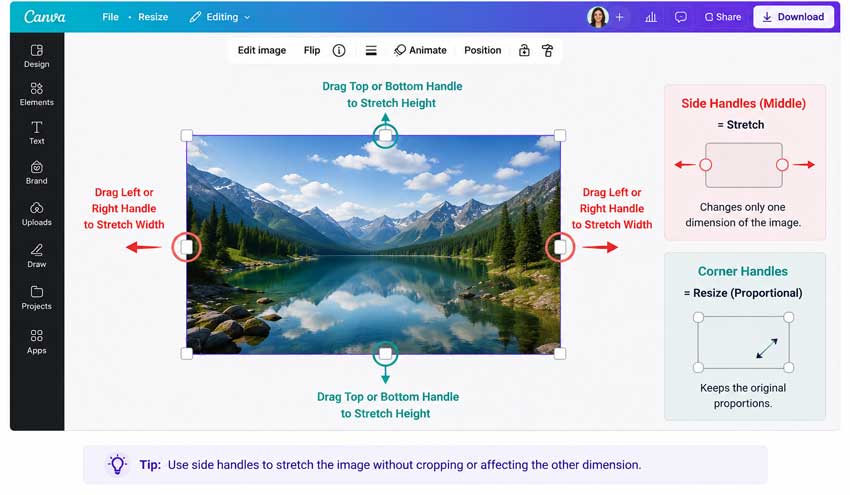
Step 4: Drag a Side Handle
Use one of the middle handles rather than the corner handles.
- Left or right handle = stretch width
- Top or bottom handle = stretch height
As you drag, Canva changes only one dimension of the image.
Step 5: Fine-Tune the Layout
Move the image if necessary and adjust surrounding elements to maintain balance within the design.
Method 2: Stretch Image in Canva to Fill the Entire Canva Page
Sometimes users search for "stretch image in Canva" when they don't actually want to distort the image. They just want it to cover the whole canvas.
This is common when creating designs such as:
- YouTube banners
- Presentation slides
- Website headers
- Social media covers
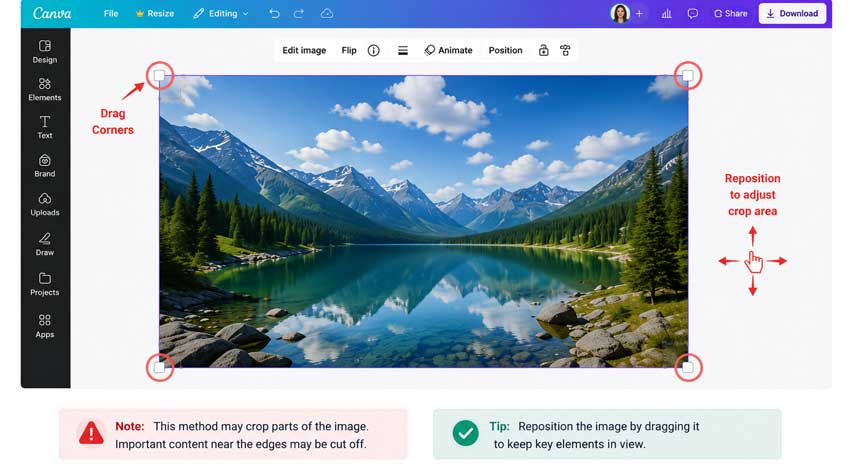
To do this, select the image and drag the corners until it covers the entire page. Then reposition the image to keep the most important content visible. Keep in mind that this method may crop parts of the image. If you need extra space without cropping, Magic Expand is usually a better choice.
Method 3: Use Magic Expand to Stretch Image in Canva
If stretching makes the image look distorted or filling the page causes unwanted cropping, try Magic Expand.
Unlike stretching, Magic Expand doesn't enlarge existing pixels. Instead, Canva generates new content around the edges of the image.
This often creates a more natural result because the original subject keeps its proportions.
Magic Expand is useful when a photo is too narrow for your design, you need extra background space, stretching makes people look distorted, or you want to preserve realistic proportions.
For landscapes, product photos, and travel images, Magic Expand usually looks much better than traditional stretching.

Method 4: Resize the Design Instead of the Image
There's one more scenario that's often confused with image stretching. Sometimes the problem isn't the image at all. The canvas size is wrong. For example, you may be turning a square design into a rectangle, converting a landscape image into a vertical format, or adapting content for different social platforms. In these cases, changing the design dimensions may solve the issue without stretching or expanding the image.
Simply click Resize, choose the new dimensions, and adjust image placement afterward. This approach often preserves image quality better than aggressive stretching.
How to Stretch an Image in Canva Without Losing Quality
One of the biggest concerns when stretching images is quality loss. The more you stretch an image, the more noticeable softness, blur, and distortion can become. To minimize quality issues, start with a high-resolution image. Images with more pixels can tolerate stretching better than low-resolution files.
It's also better to avoid extreme distortion. Small adjustments usually look acceptable, but large stretches can make people, products, or text look unnatural.
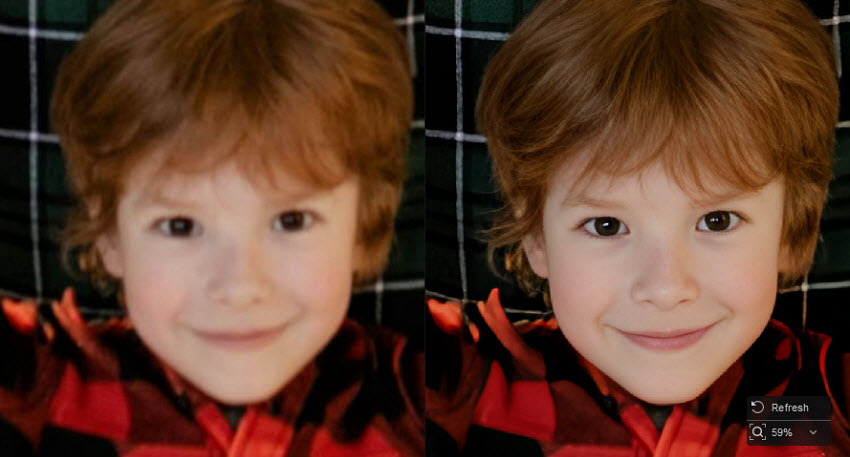
If stretching causes softness, blur, or visible pixelation, an AI image enhancer can help restore lost detail before export. Aiarty Image Enhancer is particularly useful for improving images that have been resized, stretched, or repurposed for different layouts in Canva.
Powered by advanced AI upscaling and enhancement models, Aiarty can recover fine textures, sharpen edges, reduce artifacts, and increase resolution without making images look overly processed. This helps stretched images appear cleaner and more professional, especially when used for website headers, YouTube banners, presentations, and social media graphics.
If you're preparing images for larger displays or high-resolution exports, enhancing them with Aiarty after stretching can often produce noticeably better results than exporting the stretched image alone.
When possible, consider expanding instead of stretching. Generating additional background content often produces cleaner results than stretching existing pixels. The best approach depends on the image itself. For a small shape adjustment, side-handle stretching is usually fine. For larger format changes, Magic Expand or design resizing often gives a cleaner result.
Final Thoughts
Stretching an image in Canva is easy once you know where to find the correct resize handles.
For minor adjustments, dragging the side handles is usually enough. For larger format changes, Canva's Magic Expand feature often delivers better-looking results because it adds new content instead of distorting the original image. If quality becomes an issue after stretching, start with a high-resolution image or use an AI image enhancement tool to recover lost detail. The best method ultimately depends on your goal: stretch when you need a quick shape adjustment, expand when you need more space, and resize the design when the canvas itself is the problem.
This post was written by Brenda Peng who is a seasoned editor at Digiarty Software who loves turning ordinary photos into extraordinary works of art. With AI assistance for brainstorming and drafting, the post is reviewed for accuracy by our expert Abby Poole for her expertise in this field.