

How to Edit Photos in ChatGPT: 40+ Copy-and-Paste Prompts



With the integration of image generation and editing features, ChatGPT has evolved from a text-only assistant to a creative visual tool. Whether you want to touch up a portrait, change a background, or reimagine a photo entirely, ChatGPT’s photo editing capabilities make it surprisingly easy — even if you don’t have Photoshop skills.
In this guide, we’ll show you how to edit photos in ChatGPT, from generating new images to modifying existing ones, along with some of the best prompt examples to inspire your creativity.
How to Edit Photos in ChatGPT
ChatGPT can now handle more than text. It can generate and edit images directly in the chat window. You can either work on pictures you create inside ChatGPT or upload your own photos for quick edits. Both ways are easy once you get the idea.
ChatGPT allows you to create an image with a text prompt an
Editing Images Made in ChatGPT
d edit it right away. It’s built into the same chat, so you don’t need to switch tools.
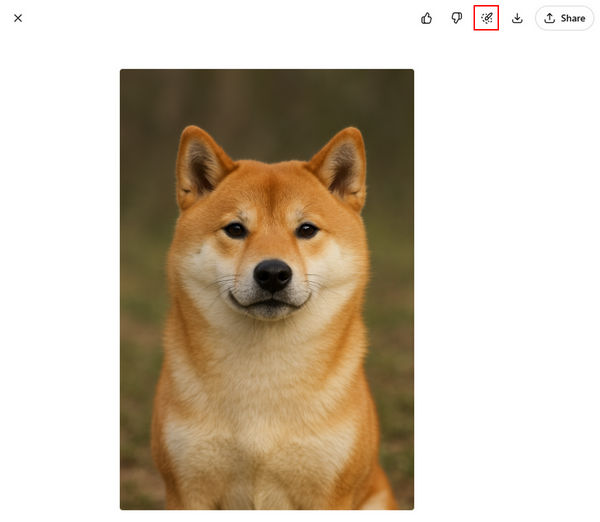
Start by opening a new chat and entering a short description of what you want. For example, type something like “create a photorealistic image of a Shiba Inu”.
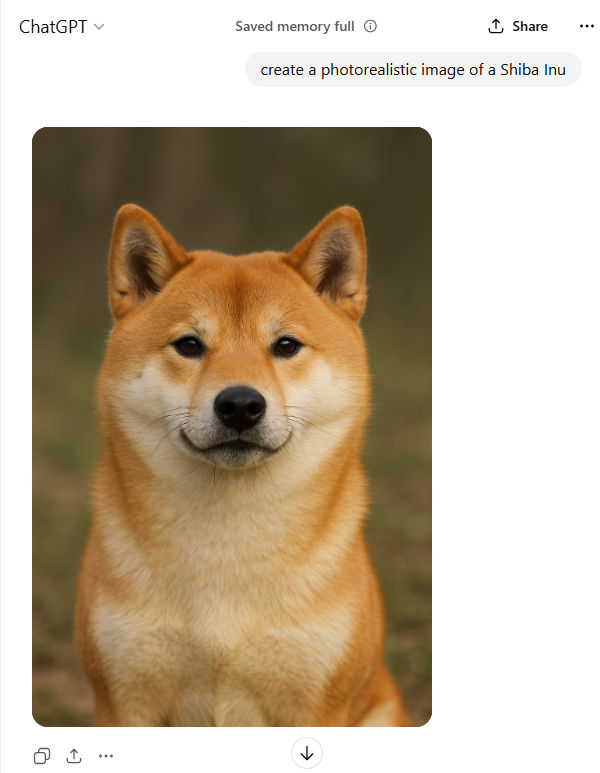
When the image appears, click on it to open the editor.
Inside the editor, you’ll see two ways to work.
You can use the selection tool to mark a part of the image you want to change.
Then, type what you’d like to adjust. Maybe you highlight the dog’s eyes and write “wearing round, black-rimmed glasses”.
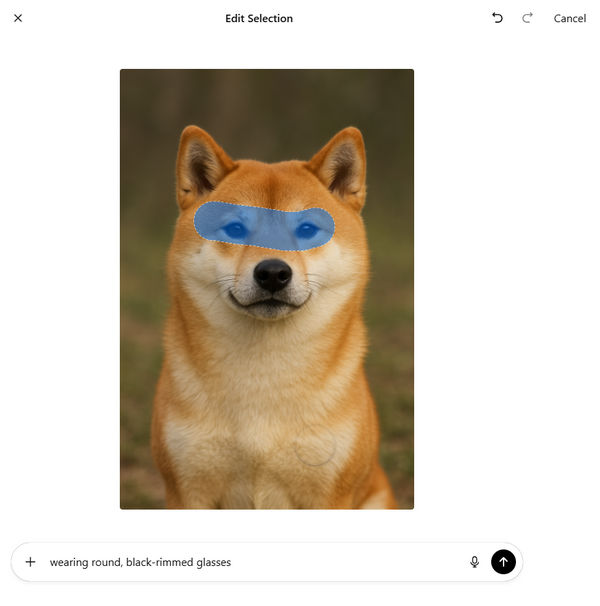
ChatGPT will edit only that area and keep the rest untouched. Edits usually take a few seconds to appear, depending on how complex the request is.
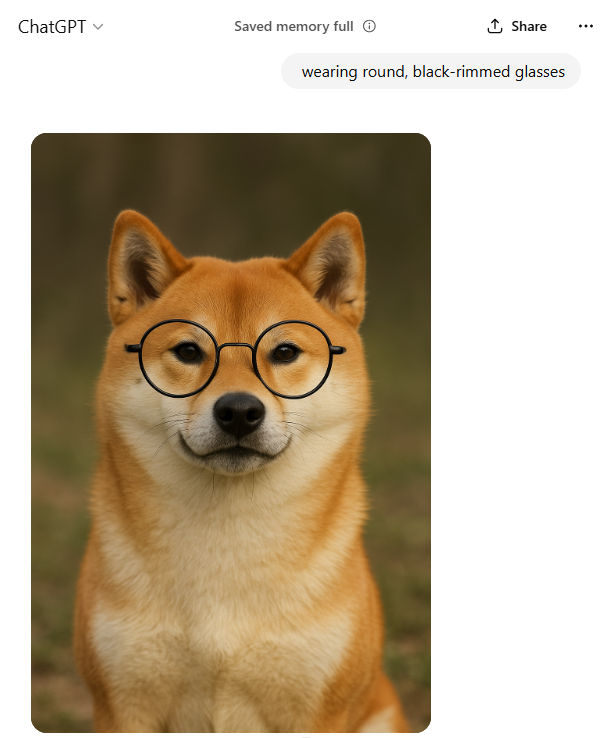
Or you can use prompt editing. Just type your change in the chat, such as “make the lighting softer” or “add a blue background”. ChatGPT updates the image based on your description.
This feature is useful for anyone creating concept art, social media images, or visual drafts.
Editing Your Existing Photos in ChatGPT
You’re not limited to AI-made images. You can also upload a photo you already have. It could be a selfie, a product shot, or something you downloaded online.
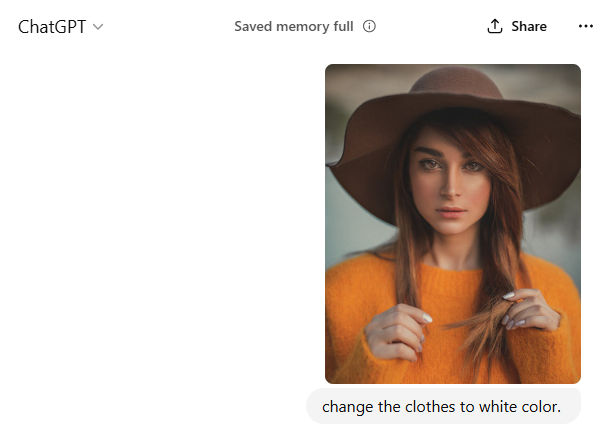
Open a new chat and upload the image. Then describe what you want to change. You might write “change the clothes to white” or “remove the background and add a plain blue wall.” ChatGPT reads the image, applies the edit, and shows the new version.
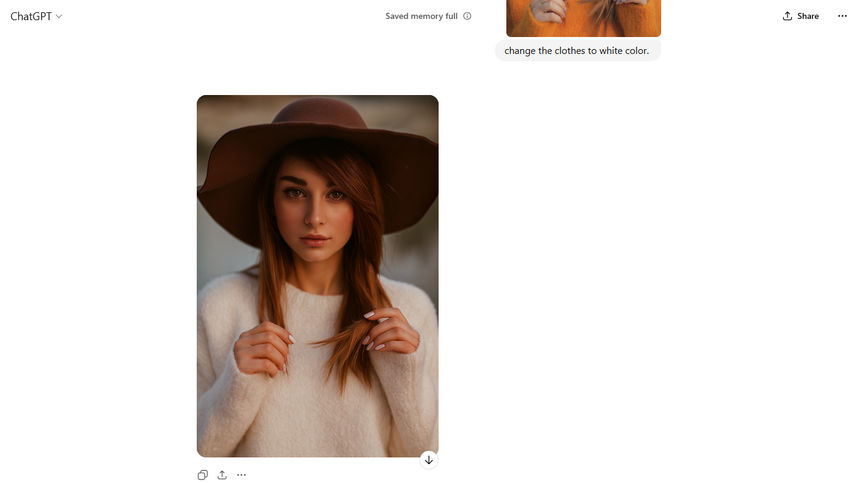
This works well for simple touch-ups, quick color changes, or testing creative ideas. The better the image quality, the better the result. Large, clear photos tend to produce more accurate edits.
If your original picture looks grainy or low-res, you can upscale and enhance it first with a tool like Aiarty Image Enhancer or any similar software you prefer.
ChatGPT Photo Editing Prompts: 40+ Copy-and-Paste Examples
ChatGPT can edit an existing photo based on a simple description of what you want to change. You can upload a photo and describe the edit directly, or use the Selection Tool to highlight a specific area before giving your instruction. For localized edits, mentioning the exact area in your prompt can help make your intent clearer.
The best ChatGPT photo editing prompts are not necessarily long or complicated. For most edits, focus on what to change, where to change it, and what should stay untouched.
A Simple Formula for ChatGPT Photo Editing Prompts
A useful formula is:
Action + Target + Desired Result + Preserve + Constraints
For example:
Remove the person in the background + reconstruct the missing area naturally + keep the main subject unchanged + match the original lighting and perspective.
You don't need to include every element every time. Use only the details that matter for the edit.
5 Core Principles for Better Photo Editing Prompts
1. Start with a clear action.
Use direct verbs such as remove, replace, brighten, restore, sharpen, recolor, resize, extend, blur, or change.
2. Identify exactly what should change.
Instead of saying "clean up this photo," say "remove the power lines crossing the sky."
3. Specify the area when necessary.
For localized edits, name the location or use ChatGPT's Selection Tool to highlight it. This is especially useful for removing objects, changing backgrounds, or editing clothing.
4. Say what should remain unchanged.
For example: "Keep the person's face, pose, clothing, and background unchanged." This helps distinguish an edit from a request to generate a completely new image.
5. Describe the desired result, not technical jargon.
You usually don't need a long list of terms such as "8K, HDR, ultra-detailed, masterpiece." Instead, describe the visual result you actually want: natural skin texture, realistic lighting, subtle grain, clean background, or preserved facial features.
40+ ChatGPT Photo Editing Prompts You Can Copy and Paste
The following prompts cover common photo editing tasks, from removing unwanted objects to restoring old photos and changing the overall look.
Remove Unwanted Objects
1. Remove a distracting object
Remove the [object] from the image. Reconstruct the area naturally using the surrounding background, lighting, texture, and perspective. Keep everything else unchanged.
2. Remove power lines
Remove the power lines crossing the sky. Reconstruct the sky naturally and preserve the buildings, trees, lighting, and overall composition.
3. Remove a sign
Remove the sign in the background and naturally reconstruct the wall behind it. Keep the rest of the image unchanged.
4. Remove multiple unwanted objects
Remove the [objects] from the image and fill the missing areas naturally. Preserve the main subject, composition, lighting, and surrounding details.
Remove People
5. Remove people from the background
Remove all people in the background while keeping the main subject unchanged. Reconstruct the missing areas naturally using the existing scenery, perspective, lighting, and depth of field.
6. Remove one specific person
Remove the person standing on the far left. Naturally reconstruct the background behind them while keeping all other people and objects unchanged.
7. Clean up a crowded scene
Remove the distracting people in the background and make the scene look naturally less crowded. Keep the main subject, architecture, and original perspective unchanged.
Change or Replace the Background
8. Replace a simple background
Replace the background with a clean, neutral studio backdrop. Keep the subject's face, hair, clothing, pose, body proportions, and lighting unchanged.
9. Change the background to a beach
Replace the background with a realistic tropical beach at sunset. Keep the person, facial features, pose, clothing, and overall lighting unchanged, and make the new background match the original perspective.
10. Blur the background
Create a natural shallow depth-of-field effect by softly blurring the background. Keep the main subject sharp and preserve their facial features, hair, clothing, and overall appearance.
11. Make the background cleaner
Simplify and clean up the background by removing distracting objects and clutter. Keep the main subject completely unchanged and preserve the original lighting and perspective.
Retouch Portraits Naturally
12. Remove minor blemishes
Retouch the portrait naturally by reducing minor blemishes and uneven skin tone. Preserve natural skin texture, facial structure, pores, and the person's identity. Avoid excessive smoothing.
13. Reduce under-eye shadows
Reduce the dark under-eye shadows subtly while preserving the person's natural facial features and skin texture. Keep the lighting and overall appearance realistic.
14. Natural portrait retouching
Give this portrait a subtle professional retouch. Even out minor skin imperfections and improve overall clarity while preserving natural skin texture, facial details, and the person's identity.
15. Improve facial lighting
Improve the lighting on the person's face so it looks more evenly illuminated and natural. Preserve facial features, skin texture, hairstyle, clothing, and background.
Change Hair, Clothing, or Appearance
16. Change hair color
Change the person's hair from [current color] to [new color]. Preserve the original hairstyle, facial features, skin tone, lighting, and background.
17. Change hairstyle
Change the person's hairstyle to [hairstyle]. Keep their facial features, identity, skin tone, pose, clothing, lighting, and background unchanged.
18. Change clothing
Change the person's clothing to a [description of clothing]. Preserve their face, hairstyle, body proportions, pose, hands, lighting, and background.
19. Change clothing color
Change the color of the person's [shirt/jacket/dress] to [color]. Keep the clothing style, person's appearance, pose, lighting, and background unchanged.
20. Create a professional headshot
Turn this casual portrait into a clean professional headshot. Keep the person's identity and facial features unchanged, use natural studio lighting, and replace the background with a simple professional backdrop.
Fix Lighting and Color
21. Brighten a dark photo
Brighten the overall photo and recover details in the shadows without washing out the highlights. Preserve the original colors, contrast, and natural appearance.
22. Fix an overexposed photo
Reduce the overexposure and recover as much highlight detail as possible. Keep the colors natural and preserve the original composition and subject.
23. Correct the white balance
Correct the white balance so the image looks naturally neutral. Remove the unwanted [warm/cool] color cast while preserving the original colors and lighting.
24. Improve dull colors
Improve the color and contrast of this photo so it looks more vibrant and lively, but keep the result natural. Avoid oversaturation and preserve realistic skin tones.
25. Create a warmer look
Give the photo a subtle warm color treatment with natural golden tones. Preserve skin tones, details, composition, and overall realism.
Change Weather, Time, or Atmosphere
26. Change the weather
Change the sunny weather to an overcast day. Keep the buildings, people, objects, composition, and perspective unchanged, and adjust the lighting naturally to match the new weather.
27. Create a sunset
Turn this daytime scene into a realistic sunset scene. Preserve the original composition, people, buildings, and perspective, and adjust the lighting and shadows consistently with the new time of day.
28. Add rain
Add realistic light rain to the scene. Keep the people, buildings, objects, and composition unchanged, and make the wet surfaces and lighting consistent with rainy weather.
29. Change the season
Change the scene from summer to autumn. Add realistic autumn foliage and seasonal colors while preserving the original buildings, people, composition, and perspective.
Restore and Improve Old Photos
30. Restore an old photo
Restore this old photo by removing scratches, dust, stains, and minor damage. Improve clarity and contrast while preserving the original facial features, composition, and vintage character.
31. Restore a damaged portrait
Repair the damaged areas of this portrait and reconstruct missing details naturally. Preserve the person's original facial features, expression, hairstyle, clothing, and overall appearance.
32. Colorize a black-and-white photo
Colorize this black-and-white photo with realistic skin tones, clothing colors, and environmental colors. Preserve the original details, facial features, composition, and historical character.
Improve Clarity and Reduce Blur
33. Improve a slightly blurry photo
Improve the clarity of this slightly blurry photo and recover visible details as naturally as possible. Preserve the original facial features, textures, colors, and composition, and avoid creating artificial-looking details.
34. Sharpen a soft photo
Sharpen the photo subtly to improve overall clarity and definition. Preserve natural textures and avoid excessive sharpening, halos, or artificial-looking edges.
35. Improve a low-quality portrait
Improve the overall clarity of this portrait while preserving the person's identity and natural facial features. Reduce visible noise and compression artifacts, and avoid excessive skin smoothing or invented details.
Change Photo Style
36. Add a subtle film look
Give this photo a subtle analog film look with slightly softer contrast, natural colors, and fine film grain. Keep the subject, composition, and facial features unchanged.
37. Create a black-and-white version
Convert this photo to a timeless black-and-white look with natural tonal range and good contrast. Preserve the original details, composition, and facial features.
38. Create a cinematic look
Give this photo a subtle cinematic color grade with balanced contrast and natural skin tones. Keep the composition, subject, facial features, and lighting direction unchanged.
Extend and Reframe the Image
39. Extend the image
Extend the image [left/right/top/bottom] to create more space around the subject. Continue the existing background naturally and keep the original subject, proportions, lighting, and perspective unchanged.
40. Change the aspect ratio
Reframe this image to a [16:9 / 4:5 / 1:1 / 9:16] aspect ratio. Extend the background naturally where necessary and keep the main subject unchanged.
Tips: ChatGPT also provides an aspect ratio control in its image editor, so you can use the tool itself when you need to change the image's proportions.
Make Selective Edits
41. Edit only the sky
Change only the sky to a dramatic sunset sky. Keep everything below the horizon, including the buildings, people, landscape, and foreground, unchanged.
42. Edit only the clothing
Change only the person's jacket to a dark brown leather jacket. Keep the person's face, hair, body proportions, pose, hands, background, and lighting unchanged.
43. Edit only one object
Change only the [object] to [desired change]. Do not alter any other objects, people, background elements, lighting, or composition.
When an edit needs to affect a specific part of an image, select that area first with the Selection Tool and then use a prompt like these. Keep in mind that selections are not always perfectly precise, so edits can sometimes extend beyond the highlighted area.
 FAQs about Photo Editing in ChatGPT
Yes. You can upload an existing photo to ChatGPT and describe the changes you want to make. You can ask ChatGPT to remove objects, change backgrounds, adjust colors and lighting, retouch portraits, restore old photos, or make other creative edits.
For the best results, be specific about what you want to change and what should remain unchanged. For example:
"Remove the person in the background while keeping the main subject, facial features, clothing, lighting, and composition unchanged."
Upload the photo to ChatGPT, then describe the edit you want in a clear, natural-language prompt. You can also use the image editor's Selection Tool to highlight a specific area before describing the change.
A simple workflow is:
- Upload your photo to ChatGPT.
- Describe what you want to change.
- Specify what should stay unchanged if preserving the original subject is important.
- Use the Selection Tool for more localized edits when needed.
- Review the result and refine your prompt if necessary.
For example, you can say: "Change only the sky to a warm sunset sky. Keep the buildings, people, foreground, and overall composition unchanged."
Yes. ChatGPT can remove unwanted people, objects, signs, power lines, and other distracting elements from an uploaded photo. For a more targeted edit, select the area you want to change before entering your prompt.
Try a prompt like:
"Remove the people in the background while keeping the main subject unchanged. Reconstruct the missing areas naturally using the surrounding scenery, perspective, lighting, and depth of field."
Keep in mind that removing large or complex objects can be more difficult when they cover important background details. You may need to refine the instruction or make the edit in smaller areas.
Yes. You can ask ChatGPT to replace a photo's background with a different scene, color, or setting while keeping the main subject.
For example:
"Replace the background with a clean studio backdrop. Keep the person's face, hair, clothing, pose, body proportions, and lighting unchanged."
If you want to change only the background, explicitly say so. Phrases such as "change only the background" and "keep the subject unchanged" help make the editing intent clear.
ChatGPT can often preserve the appearance of a person during an edit, but generative image editing is not guaranteed to keep every facial detail identical. This is especially important when making substantial changes to the pose, clothing, hairstyle, or surrounding scene.
To reduce unwanted changes, clearly state what must be preserved. For example:
"Change the background only. Preserve the person's identity, facial features, hairstyle, skin tone, pose, clothing, and body proportions."
For a localized edit, using the Selection Tool to identify the area you want to change can also help keep the scope of the edit focused.
Yes. ChatGPT can make common portrait edits such as reducing minor blemishes, improving lighting, evening out skin tone, and making subtle cosmetic adjustments.
For natural-looking results, avoid asking for overly smooth or artificial skin. Instead, specify that you want to preserve natural texture and facial features.
For example:
"Retouch the portrait naturally by reducing minor blemishes and uneven skin tone. Preserve natural skin texture, facial structure, pores, and the person's identity. Avoid excessive smoothing."
ChatGPT can improve the perceived clarity of some blurry or low-quality images, but the result depends heavily on the original photo. Mild softness, compression artifacts, and some visible noise may be improved, while severe motion blur or heavily missing detail can be difficult to recover accurately.
For a mildly blurry image, you can try:
"Improve the clarity of this slightly blurry photo and recover visible details as naturally as possible. Preserve the original facial features, textures, colors, and composition, and avoid creating artificial-looking details."
If your main goal is dedicated upscaling, sharpening, noise reduction, or detail recovery, a specialized AI photo enhancer may provide more control and be better suited to the task.
ChatGPT can edit and regenerate images based on your instructions, but it is not primarily designed as a dedicated high-resolution photo upscaler. If you simply need a larger image with enhanced fine details, a specialized AI upscaling tool may be a better choice.
For example, a dedicated image enhancer can be more appropriate when you need to enlarge low-resolution photos while focusing on detail recovery, noise reduction, sharpening, and high-resolution output.
For creative edits or general image improvements, however, ChatGPT can be a convenient option because you can describe the desired result in natural language.
Yes. ChatGPT can make creative restoration edits to old photos, such as removing visible scratches, dust, stains, and minor damage, improving contrast, and colorizing black-and-white images.
For example:
"Restore this old photo by removing scratches, dust, stains, and minor damage. Improve clarity and contrast while preserving the original facial features, composition, and vintage character."
For severely damaged photographs or restoration work where preserving fine original details is critical, results may vary. Always compare the edited image with the original to make sure important details have not been unintentionally changed.
Yes. ChatGPT's image editor includes a Selection Tool that lets you identify an area for a more targeted edit. You can then describe what you want to change in that selected region.
For example, select the sky and ask:
"Change only the selected sky to a dramatic sunset sky. Keep everything below the horizon unchanged."
Selection-based editing is useful for tasks such as removing an object, changing clothing, editing the sky, or modifying a specific part of the background. However, the edited area may not always follow the selection boundary perfectly.
Keep your prompt clear and specific rather than filling it with unnecessary technical terms. A useful structure is:
Action + Target + Desired Result + What to Preserve + Constraints
For example:
"Remove the trash can on the right side of the image and reconstruct the pavement naturally. Keep the person, buildings, lighting, perspective, and overall composition unchanged."
The most important rule is to explain both what you want to change and what you want to preserve. This is particularly useful when editing people, faces, backgrounds, or other important parts of a photo.
Generative image editing can sometimes modify surrounding areas even when your instruction targets only one part of the image. This can happen when the requested change affects nearby details, lighting, perspective, or other visual elements.
To reduce unwanted changes, make the edit more specific and state what must remain unchanged. You can also use the Selection Tool for localized edits.
For example:
"Change only the color of the jacket. Do not alter the person's face, hair, hands, body proportions, background, lighting, or composition."
ChatGPT is useful for many creative and generative photo edits, including object removal, background replacement, localized changes, portrait retouching, and style adjustments. However, it is not a replacement for every specialized photo enhancement workflow.
If your priority is high-quality upscaling, noise reduction, fine-detail recovery, face restoration, or enhancing large numbers of photos, a dedicated AI photo enhancer may be more suitable. ChatGPT is generally more useful when you want to describe a creative or targeted edit conversationally.
ChatGPT's image editing workflow is primarily designed around supported image uploads rather than acting as a full RAW photo development application. If you need precise control over RAW exposure, white balance, color profiles, lens corrections, or other RAW-specific adjustments, dedicated photo software is a better choice.
For general edits, it is usually more practical to work with a standard image format such as JPEG or PNG.
ChatGPT can work with uploaded images, but it is not primarily designed as a dedicated batch photo-processing application. If you need to apply the same enhancement workflow consistently across a large collection of photos, specialized photo editing or AI enhancement software can be more efficient.
For a small number of images or one-off creative edits, ChatGPT can be convenient because you can describe the desired changes in natural language.
You May Also Like
- How to Enhance Images in ChatGPT with Prompts for the Best Results

- How to Use ChatGPT to Create Fujifilm Recipes (AI Film Simulation Guide)
- Nano Banana Upscaler Review: Is Nano Banana Pro a True AI Image Upscaler?
- How to Edit Bird Photos: A Complete Workflow for Sharper, Cleaner Bird Photography Results

This post was written by Brenda Peng who is a seasoned editor at Digiarty Software who loves turning ordinary photos into extraordinary works of art. With AI assistance for brainstorming and drafting, the post is reviewed for accuracy by our expert Abby Poole for her expertise in this field.
