How to Use Sora and Get Sora 2 Invite Code
Update: Previously, Sora made it incredibly easy to generate videos and images from simple prompts. However, OpenAI has announced that the Sora app and website will be shut down on April 26, 2026, with API access ending later on September 24, 2026.
If you're still looking to create AI-generated videos, there are now several alternative tools that offer similar capabilities. And if you want to enhance the quality of AI-generated content, whether from other platforms or existing footage, tools like Aiarty Video Enhancer and Aiarty Image Enhancer can help upscale and refine results for more professional output.
It starts with a sentence. Maybe just a fleeting idea: "A fox riding a bicycle through a neon-lit Tokyo alley." You type it in, hit generate—and then watch as it becomes a fully animated video, frame by frame. No cameras. No actors. No editing timeline headaches.
That’s Sora.
OpenAI’s latest generative tool doesn’t just imagine—it directs. With just words, it builds worlds, scenes, even emotions. In this guide, I’ll walk you through how to get Sora 2 invite code and how to actually use Sora—especially for video generation, which is where the magic really happens. We’ll also touch on what kind of resolution you can expect (yes, it can do 1080p), and how to get the best results whether you’re creating for fun, storytelling, or content work.
Oh, and if you're curious about Sora’s image generation too—don’t worry, we’ll get to that as well.
How to Get Sora 2 Invite Code
Getting a Sora 2 invite code can be tricky, as OpenAI is still rolling out access in limited batches. However, there are several proven ways to increase your chances — from joining active Reddit communities to trying in-app sign-ups.
1. Start with the Official App
To get on the waitlist directly from OpenAI:
- Download the Sora app from the Apple App Store (look for the navy and white cloud icon).
- Log in using your ChatGPT account, or tap Use different account if needed.
- Tap "Notify me when access opens".
- When prompted, allow push notifications — this ensures you’ll be notified the moment you’re eligible for access.
2. Try Direct Access with ChatGPT Pro
Some users report getting immediate access simply by logging in with their ChatGPT Pro account. In several cases, users mentioned that after signing in, they were automatically given access and even a few invite codes to share.
"I signed in with chat gpt a few days ago but I do not pay for chat gpt at all. I went to the app again today and it asked me to chose a username and now I have access and 4 invites." - by Confused_Rat600
3. Join Reddit and Forum Communities
Active subreddits such as r/OpenAI, r/SORA, and r/Natively regularly host megathreads and giveaways for Sora 2 invite codes. Posts like "New Sora 2 Invite Code Megathread" are excellent starting points.
Many Redditors also run community giveaways — for instance:
"I have 4 invite codes, took me about 400 tries to eventually get in so I know the struggle, if this comment gets 200 likes I’ll give 4 out to 4 random number generated people." - by Bigjoosh
4. Check Discord Channels
Some Discord servers (often shared in the megathreads) feature invite code bots that distribute codes automatically. Look for channels named #sora-invite-codes and follow their rules to participate.
Tips for Success
- Stay active: Comment, upvote, and engage with others. Users who contribute to discussions are more likely to receive codes.
- Use a VPN if needed: Access may vary by region. Some users outside the U.S. gained entry by switching their App Store region to the United States and using a U.S. VPN.
- Avoid scams: Never pay for a Sora 2 invite code. Many reports indicate that sellers are fraudulent — stick to official channels and trusted community threads only.
How to Use OpenAI’s Sora AI Video Generator
At its core, Sora is OpenAI’s newest tool that turns text into video—think of it as DALL·E meets a movie director. You give it a Sora 2 prompt, and it generates moving images that look like they came straight from a high-end film studio. No need to animate or edit—Sora handles it all behind the scenes.
So how do you actually use it?
Here’s a step-by-step walkthrough, from prompt to playback:
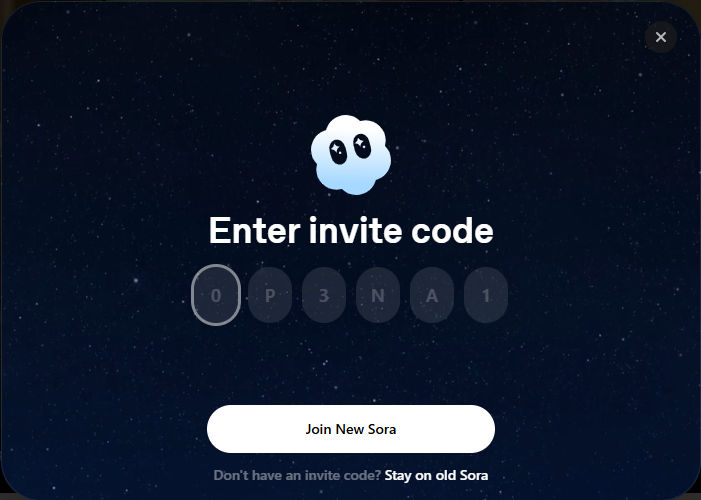
Step 1: Visit Sora and Sign In with Your OpenAI Account
First things first — head over to Sora’s website. Once there, just sign in using your OpenAI account. If you already have a ChatGPT Plus, Team, or Pro subscription, you’re good to go. No extra sign-up needed.
If you don’t have an OpenAI account yet, now’s the time to create one—it’s the key that unlocks all of Sora’s AI magic.
Step 2: Write Your Prompt
To start creating, click on the “Videos” tab or “My media” on the left sidebar. At the bottom of the page, you’ll see a prompt bar that says something like “Describe your video...”—this is where the magic begins.
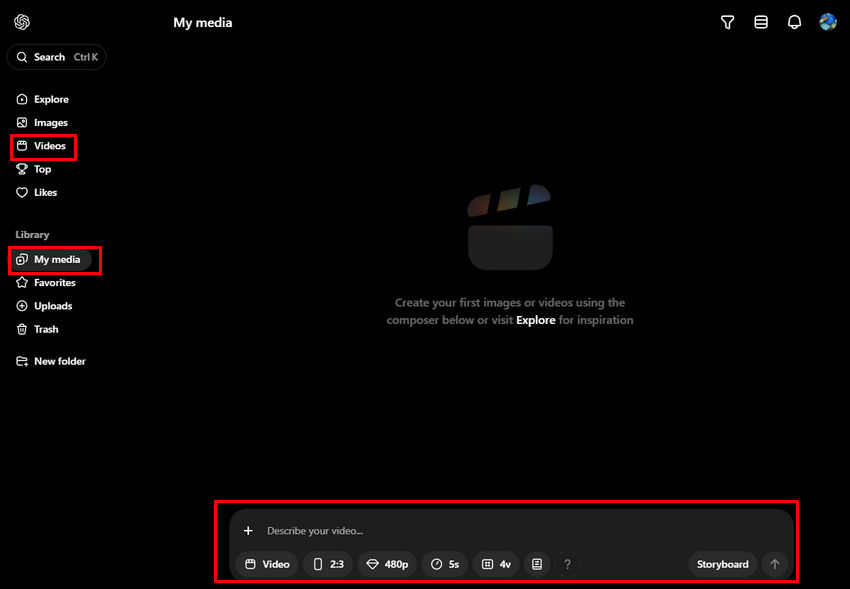
Tell Sora what kind of video you want by typing a short or detailed description. It could be something simple like:
“a misty mountain at sunrise”
Or something fun and specific like:
“a robot dog skateboarding through Times Square in the rain”
Don’t worry about getting it perfect on the first try—Sora is surprisingly good at interpreting creativity.
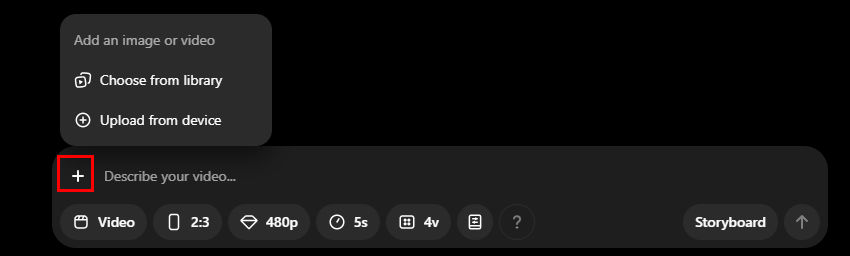
Step 3: Upload an Image or Video (Optional)
If you want to guide Sora with a visual reference, you can upload an image or short video clip alongside your text prompt. This helps the AI better understand your vision and generate something more aligned with your idea.
This step is completely optional, but especially useful if you're going for a consistent visual theme, want to match a specific style, or want to base your video on a real-world photo or motion.
Step 4: Customize Your Video Settings
After entering your prompt, you’ll see a variety of settings to shape how your video looks and feels. Here's what you can adjust:
Aspect Ratio: Choose from 16:9 (standard), 1:1 (square), 9:16 (vertical), 3:2, or 2:3—depending on where you plan to share the video.
Resolution:
- 480p – Fastest render time
- 720p – Around 4× slower
- 1080p – Up to 8× slower, available to ChatGPT Pro users only
Duration: Select from 5, 10, 15, or 20 seconds. The higher your plan, the longer your video can be. For example:
- Plus & Team users: up to 10 seconds at 720p
- Pro users: up to 20 seconds at 1080p
Number of Variants: Generate 1, 2, or 4 versions at once so you can pick the best one.
Style Presets: Choose from a variety of artistic styles to create unique visual effects for your video. Each preset offers a distinct look, ranging from classic to experimental, for different creative needs:
- Film Noir v0: This preset mimics the iconic film noir style, known for its high contrast, deep shadows, and moody atmosphere. It is perfect for creating suspenseful or mysterious visuals, often used in crime or thriller genres.
- Cardboard & Papercraft v0: This style gives your video a handmade, crafty feel, resembling paper cutouts and cardboard textures. It’s ideal for projects that aim to evoke a playful, artistic vibe, such as children’s animations or DIY-style creations.
- Cartoonify by Sora v0: This preset transforms your video into a cartoon-like visual style, with bold outlines and bright, saturated colors. It is best for humorous, lighthearted content or any project that requires a fun, animated aesthetic.
- Pixel Art by Sora v0: This style gives your video a retro, pixelated look, reminiscent of classic video games. It’s a great choice for nostalgic, gaming-themed, or vintage projects that want to capture the essence of pixel art.
Additionally, there are more experimental styles to explore:
- Balloon World: A whimsical and imaginative style, this preset creates a world made of floating balloons, giving your video a dreamlike, surreal quality. It’s suitable for abstract, fantastical, or highly creative projects.
- Archival v0: This style emulates the look of old archival footage or documentaries, with a grainy texture and slight color shifts. It’s perfect for historical or retro-themed projects that want to evoke a sense of time or nostalgia.
These style presets offer a wide range of possibilities, allowing you to select the perfect visual treatment for your video, depending on your project’s tone and theme.
What’s “Storyboard”?
You might notice an option called Storyboard. This lets you create a multi-shot video with several scenes that transition over time. Think of it as piecing together a short narrative or montage. For now, it's still early-stage, but worth exploring if you're aiming to tell a small story in one go.
If you’re just starting out or want quick results, you can skip it for now and focus on single-scene videos.
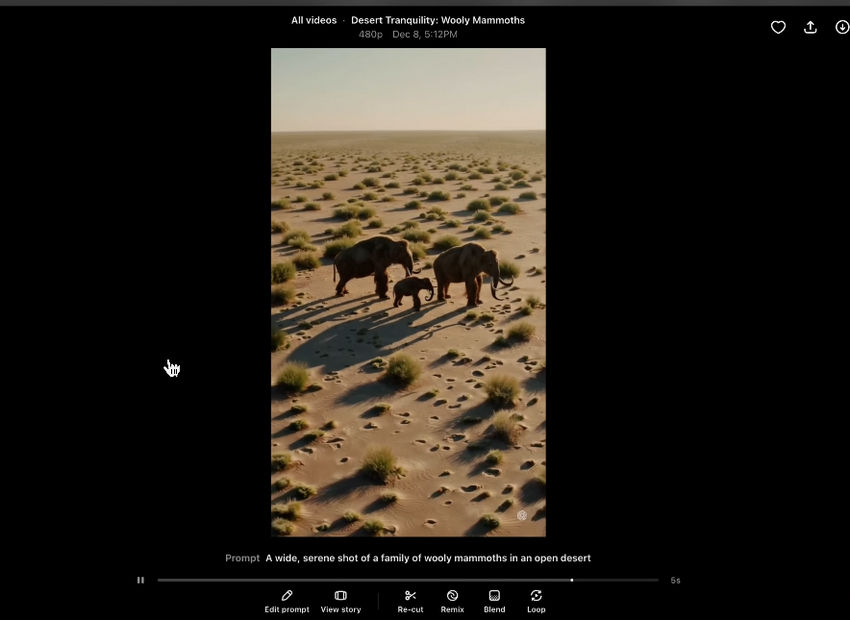
Step 5: Generate and Review Your Video
Once everything’s set, click the generate button (a small upward arrow icon) and let Sora do its thing. The render time depends on your settings—higher resolution and longer videos take more time.
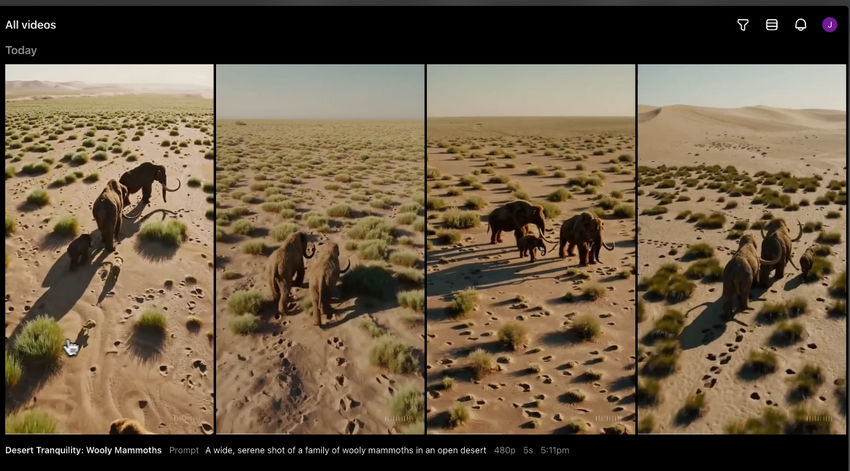
You’ll get multiple versions (if you chose more than one variant), and they’ll show up in your media panel. You can:
- Click each version to preview
- Compare how different settings affect the outcome
- Select and favorite the best one
Didn’t nail it the first time? Just tweak your prompt, adjust the settings, or try a different preset and generate again. There’s no limit to how many times you can experiment—especially helpful for Plus, Team, and Pro users, who get unlimited generations.
Pro Tip: ChatGPT Pro users also get up to 5 concurrent generations, meaning you can generate multiple videos at the same time—great for speeding up creative workflows.
Step 6: Download Your Video
Happy with the result? You can download it directly from your media panel. Here’s what to expect depending on your plan:
- ChatGPT Plus & Team: Download videos up to 720p. These downloads include a small watermark.
- ChatGPT Pro: Enjoy downloads up to 1080p, without a watermark, and faster generation times overall.
Once downloaded, your AI-generated video is ready to be shared, edited, or archived—whatever you need it for.
Step 7: Upscale or Enhance Your Sora Video (Optional)
While Sora allows you to export up to 1080p resolution (for Pro users), you might want to upscale your video to 2K or 4K, or enhance it with more details—especially if you plan to use it in a professional project or upload it to a platform that favors higher resolution.
That’s where Aiarty Video Enhancer comes in.
With its AI-powered video enhancer, you can:
- Upscale 720p or 1080p footage to 4K without quality loss.
- Clean up blur, noise, or pixelation from lower-quality generations.
- Recover lost details and sharpen key visuals like faces, textures, or landscapes.
All you need to do is load your Sora video into Aiarty Video Enhancer, choose an AI model and a target resolution (like 4K), and let the AI do the rest.

How to Use Sora to Generate Images
Sora isn’t just about video—it also lets you create still images with the same powerful AI, using simple prompts or reference photos. Here's how to do it:
Step 1: Switch to the Image Generator
Click on the Images tab in the left menu. Alternatively, go to My Media and switch the content type from “Video” to “Image” in the input box at the bottom.
This changes the interface slightly, but the basic workflow is the same.

Step 2: Enter Your Prompt
Just like with video generation, start by typing what you want to see. Your prompt can be anything from “a cyberpunk city at night” to “a watercolor-style painting of a fox in a snowy forest.”
The clearer or more creative your input, the better the results.
Step 3: (Optional) Upload an Image
You can also guide the style or structure by uploading a photo. This is especially helpful if you want Sora to transform or reference a specific subject or composition.
Step 4: Adjust Your Settings
Before generating your image, tweak a few options to suit your needs:
- Aspect Ratio: Choose from 2:3, 3:2, 1:1
- Number of Variants: Generate 1, 2, or 4 versions at once
- Presets: Add stylistic flair with options like Film Noir, Cartoonify, Pixel Art, or Balloon World
When you're ready, hit the Create Image button (look for the upward arrow).
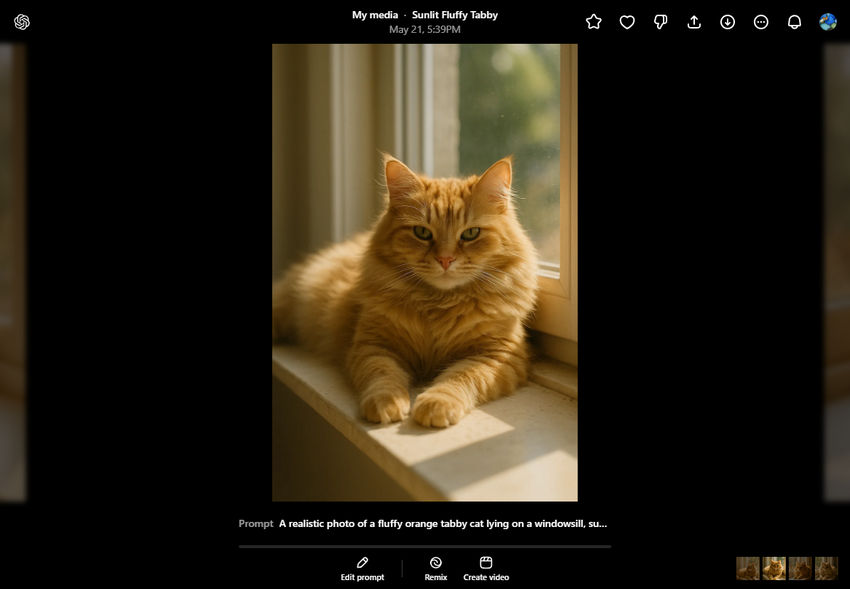
Step 5: Review and Remix
Once your image is generated (this may take up to 2 minutes depending on prompt complexity), you can click to view it in full.
If it’s not quite what you imagined—or if you want to explore a variation—select Remix or press R on your keyboard to describe changes. Sora will generate a new image based on the original.
Step 6: Download Your Image
Click the download icon to save your favorite result to your device.
Step 7: Upscale or Enhance Your Image (Optional)
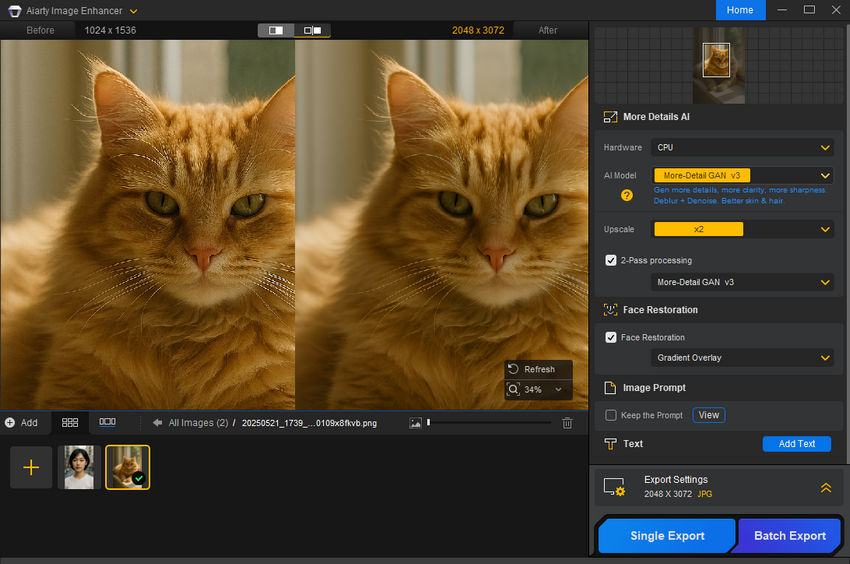
If you want to polish the final image—for example, for printing, commercial design, or high-res display—you might want to take it a step further. In this case, you can try Aiarty Image Enhancer.
With Aiarty, you can upscale low-res AI art to 4K/8K and even 32K, remove unwanted blur or jagged edges, refine textures, sharpen faces, and restore clarity.
Just upload your Sora-generated image into Aiarty, pick the AI model that best fits your image type, and let the AI handle the details.
How to Download Sora Videos (Own & Others)
Once you have generated a masterpiece or found an inspiring clip on the Explore feed, the next step is saving it. Whether you are looking for a Sora video downloader to save others' creations or just want to export your own project, here is a complete guide on how to get the MP4 file safely.
Method 1: Download Sora Videos Using the Official Built-in Option (Recommended)
For most users, the easiest way to download Sora video files is directly through the official dashboard. This ensures you get the original file without needing third-party tools.
- Log in to your workspace on sora.com.
- Navigate to the "Project" or "Media" page to find your video.
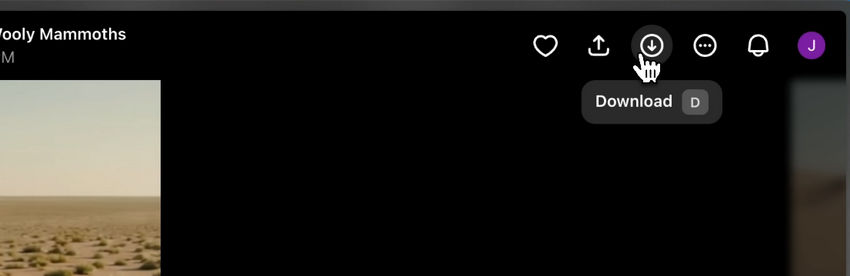
- Click the three-dot menu (⋯) located in the top-right corner of the video player.
- Select "Download" from the dropdown menu. The video will be saved as an MP4 file to your device.
Note:
- Official downloads typically include a visible watermark and invisible C2PA provenance metadata to indicate the content is AI-generated.
- This method works for most standard Sora videos created by yourself.
- Downloads may be disabled for videos containing restricted Cameos or protected likenesses.
Method 2: Download Public Sora Videos from the Explore Feed
Can you download videos created by other users? Yes, provided the creator has published them to the public Explore feed and allowed downloads.
- From the Feed: Look for the same three-dot menu (...) on any public video. If the creator has enabled permissions, you will see a "Download" button.
- Remix & Blend: Even if a direct download isn't available, you can often "Remix" the video in your own workspace and then download the result.
Things to keep in mind:
- Not all public videos allow downloads.
- Always check the creator’s permissions.
- For commercial use, it’s best to request explicit permission from the original creator.
Method 3: Download Sora Videos Using Browser Developer Tools
Sometimes, the download button might be missing (e.g., due to a "Cameo" restriction or a glitch), but you still want to save your work. You can use your browser’s built-in tools to find the source file.
- Open the video in your browser (Chrome/Edge).
- Right-click anywhere on the page and select "Inspect" (or press F12).
- Go to the "Network" tab and refresh the page (F5).
- In the filter box, type "mp4".
- Find the first file that appears, right-click it, and select "Open in new tab". The video will play in a new window where you can right-click and "Save video as...".
Method 4: Using a Third-Party Sora Video Downloader
Some users rely on third-party tools to simplify the download process.
Common options include:
- Browser extensions (e.g., Sora video downloader extensions for Chrome)
- Bulk download tools shared in developer or Reddit communities
- Mobile apps with built-in video detection browsers
Here are some Sora video downloader tools available:
- GrabIt (Chrome Extension): The best one-click solution for desktop users. It adds a "Save" button directly under every video on the sora.com feed.
- SoraVideoDownloader.org: A reliable web-based tool. Just paste the shareable link, and it handles the rest.
- SVDL (Mobile App): Perfect for downloading and sharing AI videos on the go.
Third-party tools and browser extensions for downloading Sora videos can be convenient, but they come with notable drawbacks. Because Sora is frequently updated, these tools may stop working without notice or fail to detect videos correctly. Some of them may also violate Sora or OpenAI’s terms of service, which could put your account at risk.
In addition, third-party downloaders are not always secure. Installing unknown extensions or software can expose you to privacy issues, data tracking, or even malware. For these reasons, this approach is not recommended for professional or commercial workflows. If you choose to use third-party tools, proceed with caution and only install extensions from sources you trust.
Method 5: Screen Recording (Last-Resort Option)
If all download options are blocked, screen recording can be used as a fallback.
Pros:
- Works on any device
- No technical setup required
Cons:
- Lower video quality
- Watermark will be visible
- May capture UI elements or audio artifacts
For best results, use a high-resolution screen recorder and play the video in full-screen mode.
Tips: Enhancing Your Downloaded Video
Most Sora downloads are limited to 720p or 1080p. If you plan to use these clips for professional editing, YouTube, or marketing, the raw quality is often not enough. In this case, you can use AI video upscaler such as Aiarty Video Enhancer to upscale your Sora clips to crystal-clear 4K.
 FAQs About Using Sora AI
Yes, Sora is free to access for ChatGPT users with an OpenAI account. However, free-tier users have limited image generations per day and cannot generate videos. To unlock full access to both image and video generation, you'll need to subscribe to ChatGPT Plus, Team, or Pro.
Yes. Sora is available in the ChatGPT mobile app (iOS and Android). Just open the app, go to the “Images” or “Videos” tab, and start creating.
Yes. Sora offers basic editing options once your video is generated. You can click on a video to enter a larger view where you can:
- Re-cut – Trim or extend the video in a new storyboard
- Remix – Describe changes and generate a new version
- Blend – Merge elements from this video and another
- Loop – Seamlessly loop part of the video
For advanced editing—like color correction, speed adjustment, upscaling to 4K, or noise reduction—you can use external tools to refine your video further.
Videos are exported in .mp4 format, while images are exported in .png format.
The maximum video resolution currently supported by Sora is 1080p, available only to ChatGPT Pro users. Plus and Team users are limited to 720p.
4K export is not supported yet, but you can upscale videos to 2K/4K using tools like Aiarty Video Enhancer.
Sora generates images at up to 2048 × 2048 resolution. This should be sufficient for most creative and online use cases, though the actual resolution may vary depending on your settings and aspect ratio.
No, you can only download the media you’ve created in your own account.
OpenAI supports access in most major regions, including: United States, Canada, United Kingdom, Australia, Japan, Germany, France, South Korea, India, Brazil, and many others.
However, Sora is not accessible in countries where OpenAI services are restricted—this includes places like China, Russia, Iran, North Korea, and a few others.
If you're unsure, you can always check the full list of supported countries here: OpenAI Supported Countries
Note: If you're trying to access Sora (or any OpenAI services) from an unsupported country, your account could be suspended or blocked.
Yes, Sora AI includes specialized output classifiers to detect and prevent harmful content, including NSFW material. These classifiers also target minors, violence, and the misuse of likenesses. If such content is detected, Sora may block videos before they are shared with the user, ensuring a safer experience for all.
No, Sora AI does not directly upscale its generated images. If you need to enhance the resolution of Sora-generated images, you’ll need to use third-party tools such as Aiarty Image Enhancer.
Yes, you can upload an image to Sora to guide video generation. To do this, simply click the plus icon (+) in the input field and select your image from your computer. After uploading, you can add a text prompt to describe the changes you want to see, allowing Sora to generate a video based on your provided image and instructions.
This is a known technical bug, not a normal user limitation. While Plus members are typically allowed to run multiple generations at once, the system can sometimes get stuck on a canceled or failed task, preventing you from starting new ones.
How to fix it:
- Delete failed or canceled tasks: Many users have found that deleting failed or canceled tasks in their image/video library immediately solves the problem.
- Contact OpenAI support: If that doesn't work, you can reach out to OpenAI's support team. They have the ability to clear your "in-progress" task status on their end, restoring your generation privileges. When you submit your request, be sure to mention you're a Plus member and believe your concurrent generation status is stuck.
- Wait it out: This issue sometimes resolves itself within a few hours. If your project isn't urgent, waiting might be a good option.
You May Also Like
This post was written by Brenda Peng who is a seasoned editor at Digiarty Software who loves turning ordinary photos into extraordinary works of art. With AI assistance for brainstorming and drafting, the post is reviewed for accuracy by our expert Abby Poole for her expertise in this field.