


How to Unblur a Video: 6 Ways to Fix Blurry Footage



A blurry video is not always a lost cause. Mild focus issues, compression artifacts, noise, low resolution, and some types of motion blur can often be reduced after recording. However, the right solution depends on what caused the blur.
Traditional sharpening may be enough for slightly soft footage. A low-resolution, noisy, or heavily compressed clip usually needs a combination of denoising, deblurring, detail reconstruction, and upscaling. Severely out-of-focus footage can only be partially improved because the camera never captured enough reliable detail.
This guide explains how to unblur a video on Windows, Mac, iPhone, Android, and online. It also shows you how to identify the type of blur, choose appropriate enhancement settings, and avoid halos, flickering details, or an unnatural oversharpened look.
Quick answer: Use light sharpening for mild softness, AI enhancement for low-resolution or noisy footage, artifact removal for compressed video, and realistic expectations for strong motion blur or severe focus failure. Always inspect moving frames at 100% scale before exporting.
Quick Answer: Best Fix for Each Type of Video Blur
Part 1. Identify Why Your Video Is Blurry
Before applying a sharpening filter or AI model, pause on several representative frames and identify the main problem. Different types of blur require different treatment, and using the wrong method can make the footage look harsher without restoring meaningful detail.
Focus Blur
Focus blur occurs when the camera focuses in front of or behind the subject. Slightly missed focus may respond well to detail enhancement. Severe defocus is harder to repair because the original edges and textures were not recorded clearly.
Motion Blur
Motion blur appears when the subject or camera moves during the exposure. It often produces directional trails, doubled edges, or smeared limbs. Mild motion blur may be reduced, but long motion trails cannot always be reconstructed accurately.
Compression Blur
Messaging apps, social platforms, repeated exports, and low-bitrate encoding can remove fine texture. Compression damage often appears as blocks, mosquito noise around text, smeared backgrounds, or unstable details between frames.
Low-Light Blur and Noise
In dim environments, cameras may raise ISO, reduce shutter speed, or apply aggressive internal noise reduction. This creates a mixture of grain, color noise, motion softness, and waxy texture. Denoising should usually come before strong sharpening.
Low Resolution
A 360p, 480p, or 720p video may look acceptable on a phone but blurry on a larger display. In this case, AI upscaling can improve edge definition and perceived texture while increasing the output resolution.
Tip: Check whether the video is genuinely blurry or only displayed at a reduced preview quality. Editing software may use half- or quarter-resolution playback for smoother performance.
Part 2. How to Unblur a Video on Windows or Mac with AI
For footage affected by more than mild softness, Aiarty Video Enhancer provides a local AI workflow for video deblurring, denoising, detail recovery, and upscaling. It is suitable for old recordings, low-light clips, compressed social videos, blurry portraits, AI-generated footage, and low-resolution sources.
Unlike a basic sharpen filter, the software can process several quality problems together. Its x1 option improves clarity without changing the output size, while x2 and x4 combine enhancement with resolution enlargement. Strength Control helps balance stronger reconstruction against a more conservative, natural result.
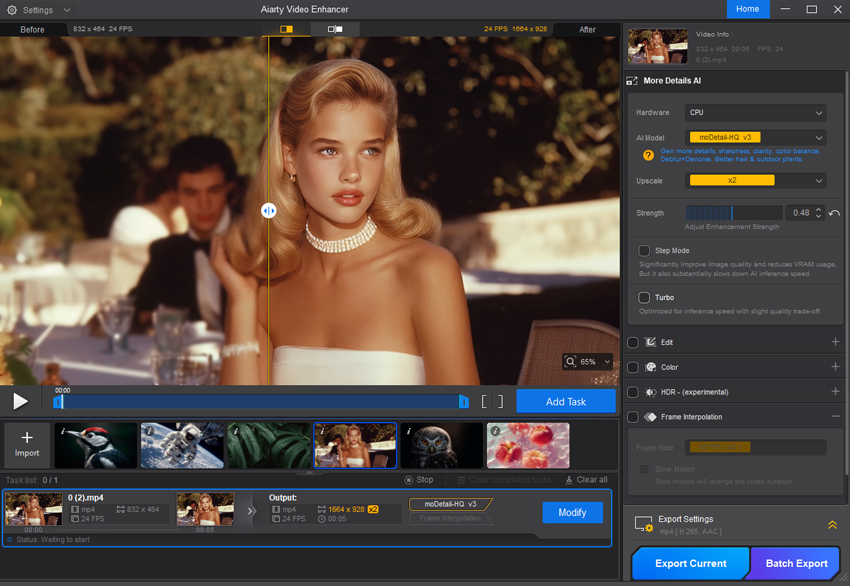
Step 1. Choose the Right AI Model for the Blur
Select a model according to the source rather than automatically choosing the strongest option. Start with the model that best matches the dominant problem, then preview a short section containing motion, faces, shadows, and fine texture.
Step 2. Import the Blurry Video
Drag and drop one video, multiple files, or an entire folder into the main interface. Once imported, check the source resolution, frame rate, codec, and duration before changing the enhancement settings.
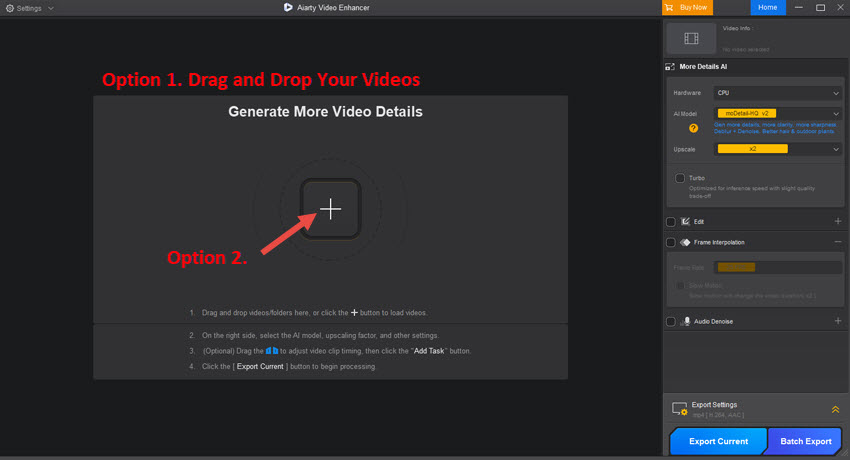
If the footage only looks blurry in the preview window, switch the preview to full resolution or inspect an exported frame first. This prevents unnecessary enhancement of a source that is already sharp.
Step 3. Select x1, x2, or x4
Choose x1 when the source resolution is already sufficient and your main goal is to remove softness, noise, or compression artifacts. Use x2 when the source is low resolution or will be displayed on a larger screen. Use x4 more carefully for very small sources, as a larger output does not automatically mean more authentic detail.

Start with the default Strength value. Reduce it if you see bright halos, rough skin, artificial wall texture, unstable hair, or flickering details. Increase it gradually only when the result remains too soft and the source contains enough recognizable structure.
Step 4. Preview Motion and Export
Preview a five- to ten-second section instead of judging the result from one paused frame. Check eyes, teeth, hair, text, high-contrast edges, moving hands, foliage, and dark backgrounds at 100% scale.
When the result looks clear and temporally stable, select the output resolution, codec, frame rate, bitrate, and destination folder. Keep the original frame rate unless you intentionally need frame interpolation, and avoid an unnecessarily low bitrate that could reintroduce compression blur.
Best practice: The goal is not maximum sharpness. A successful restoration should improve clarity while preserving natural faces, believable texture, clean motion, and stable details from frame to frame.
Part 3. How to Unblur a Video Online
An online video clearer is useful when you have a short clip, a stable internet connection, and only need a quick adjustment. Browser-based editors commonly provide sharpening, contrast, brightness, saturation, and noise-reduction controls.
For example, Kapwing's video clearer lets users upload footage and adjust visual properties in a browser. This type of workflow works best for mild softness rather than severe focus blur or strong motion trails.
How to Make a Blurry Video Clear Online
- Open an online video enhancement or editing tool.
- Upload the clearest available copy of the video.
- Find the Enhance, Adjust, Sharpen, or Clarity controls.
- Increase sharpness gradually instead of applying the maximum value.
- Reduce noise first if the footage is grainy or compressed.
- Preview moving scenes and inspect high-contrast edges.
- Export at a suitable resolution and bitrate.
- Short social media clips with mild softness.
- Screen recordings with weak text edges.
- Quick brightness, contrast, and clarity adjustments.
- Users who do not want to install desktop software.
- The file is large, long, private, or high resolution.
- The video contains strong noise, compression, or missing texture.
- You need batch processing or detailed model control.
- You want to avoid uploading footage to a third-party server.
Free-plan limits for upload size, watermarking, export resolution, and processing time may change, so check the current conditions before uploading an important project.
Part 4. How to Unblur a Video on iPhone or Android
A mobile AI enhancement app is convenient for short portrait clips, casual recordings, and social media footage. Remini, for example, provides a video enhancement workflow that automatically improves perceived detail and clarity.

Steps to Unblur a Video on a Phone
Step 1. Install and open the app.
Download a reputable video enhancement app from the App Store or Google Play, then sign in if required.
Step 2. Open the Video Enhance feature.
The exact label may vary by app version, but it is usually called Video Enhance, AI Enhance, Improve Quality, or a similar name.
Step 3. Import the clearest available video.
Select the original clip from your gallery whenever possible. A video that has already been compressed by a messaging app gives the enhancement model less reliable detail to work with.
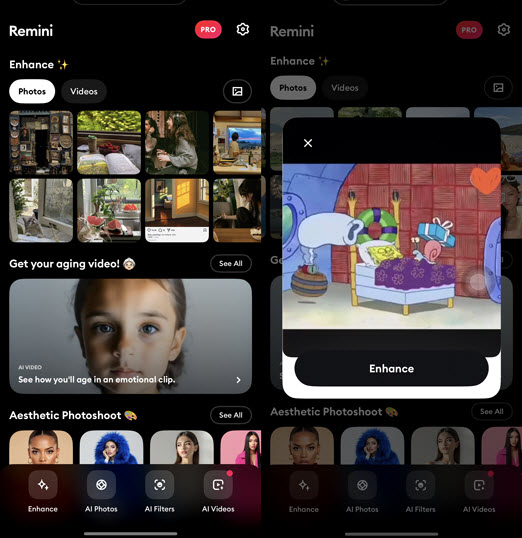
Step 4. Start the enhancement.
Allow the app to analyze the clip and apply its sharpening, denoising, and detail-recovery process.
Step 5. Preview and save the result.
Compare the original and enhanced versions, paying attention to faces, hair, text, and moving edges. Save the result at the highest appropriate quality.
Mobile enhancement is best for quick fixes. Long videos, batch jobs, high-resolution masters, or footage that requires model and Strength control are easier to manage on a desktop.
Part 5. How to Fix a Blurry Video Someone Sent You
A video may look sharp on the sender's phone but blurry after being shared. The most common causes are resolution reduction, low-bitrate transcoding, repeated compression, or a low-quality streaming preview.
Try These Fixes Before Enhancing the Video
- Request the original file: Ask the sender to share it as a document, cloud-storage link, AirDrop transfer, or full-quality download.
- Download instead of previewing: Some services initially show a lower-quality streaming copy.
- Check playback resolution: Video platforms may automatically select a low quality on a slow connection.
- Avoid screen recording: Recording an already compressed video introduces another generation of quality loss.
- Enhance the best available copy: Remove artifacts and noise before applying strong sharpening.
Important: Compression blur often looks like blockiness, smeared texture, ringing around text, or unstable detail. Increasing sharpness alone can emphasize these defects, so artifact cleanup and denoising should come first.
Part 6. How to Make an Old or Low-Resolution Video Clearer
Old recordings often combine several problems at once, including low native resolution, analog noise, interlacing, faded color, compression artifacts, camera shake, and soft focus. A restoration workflow is therefore more effective than applying one sharpen filter.
Recommended Restoration Order
- Use the best available source or re-digitize the original tape.
- Deinterlace the footage when necessary.
- Remove excessive noise and compression artifacts.
- Reduce blur and restore edge definition.
- Upscale the video to the required output resolution.
- Correct exposure, white balance, and color.
- Apply frame interpolation only when the motion genuinely benefits from it.
- Export a high-quality master before creating smaller delivery copies.
Processing order matters. Strong sharpening before denoising can make grain, ringing, and block artifacts more visible and harder to remove.
What Types of Video Blur Cannot Be Fully Fixed?
Video enhancement can improve perceived quality, but it cannot perfectly recover information that was never captured. The following situations require realistic expectations.
Severe Out-of-Focus Blur
When a subject becomes a large, featureless blur, the original facial features or texture are not present in the file. AI may generate plausible detail, but it should not be treated as an exact reconstruction.
Strong Motion Smear
If a fast-moving object stretches across many pixels in each frame, there may be no clean edge for the software to recover.
Extreme Compression
Repeated downloads, uploads, exports, and screen recordings can remove too much stable information for natural restoration.
Tiny or Obscured Subjects
A face occupying only a few pixels cannot be restored with the same reliability as a clear close-up. Enhancement should be used especially carefully for legal, forensic, scientific, or identification purposes.
Why Is My Video Blurry? Common Causes and Prevention Tips
1. The Camera Missed Focus
Autofocus may lock onto the background instead of the subject, particularly in low light or scenes with several possible focus points.
How to prevent it:
- Tap or manually set focus on the main subject before recording.
- Use continuous autofocus for moving subjects when appropriate.
- Review critical footage at full size before leaving the location.
2. The Shutter Speed Was Too Slow
A slow shutter speed records more movement inside each frame, creating trails and soft edges.
How to prevent it:
- Use a faster shutter speed for sports, animals, vehicles, or handheld movement.
- Add more light instead of relying only on a slower exposure.
- Use a tripod or gimbal to reduce camera movement.
3. The Scene Was Too Dark
In low light, the camera may increase ISO, lower shutter speed, or apply aggressive internal noise reduction. This can make the video both grainy and soft.
How to prevent it:
- Add natural or artificial light when possible.
- Avoid unnecessarily high ISO values.
- Use a lens with a wider aperture for dim environments.
4. The Resolution or Bitrate Was Too Low
Low-resolution capture and low-bitrate encoding remove fine detail before editing even begins.
How to prevent it:
- Record at 1080p or 4K when storage and workflow allow.
- Use an appropriate recording and export bitrate.
- Keep the original master instead of relying on a social-media download.
5. The Video Was Compressed During Sharing
Messaging and social apps may resize and transcode a video automatically.
How to prevent it:
- Share the original file through a cloud link or file-transfer service.
- Avoid repeated downloads and reuploads.
- Follow the platform's recommended resolution, frame rate, and aspect ratio.
6. The Preview or Export Settings Were Incorrect
A low-quality preview can make sharp footage look blurry, while a low-bitrate export can permanently reduce detail.
How to prevent it:
- Check the editor's preview resolution before judging the source.
- Match the export resolution to the project timeline.
- Use a suitable codec and enough bitrate for the amount of motion and detail.
 FAQs
FAQs
A blurry video can often be made clearer when the problem is mild softness, low resolution, noise, or compression. Severe focus blur and strong motion smear are harder to repair because much of the original detail was never captured.
AI can improve edges, texture, and perceived clarity in slightly out-of-focus footage. It cannot guarantee an exact recovery of details that are completely absent from the source.
Sharpening increases contrast around existing edges. Deblurring attempts to reduce the visual effect of focus problems, motion, or camera shake. AI enhancement may also reconstruct plausible textures instead of only increasing edge contrast.
Traditional resizing only increases the number of pixels and does not remove blur. AI upscaling can combine enlargement with denoising, edge restoration, and detail reconstruction, which may produce a clearer result.
Open a video enhancement app, import the original clip, apply its video enhancement feature, preview the moving footage, and save the result at the highest suitable quality. Start with the original file rather than a compressed copy from a messaging app.
Use an Android video enhancement app, select the blurry clip, run the AI enhancement, compare the result with the original, and export it at an appropriate resolution and bitrate.
Some browser-based editors offer free sharpening or enhancement features. Limits related to file size, resolution, watermarking, processing time, or exports may apply and can change over time.
Mild motion blur may be reduced with AI deblurring or camera-shake reduction. Strong motion trails are more difficult because the moving object may not contain a clearly recorded edge in any individual frame.
The platform may resize or recompress the video. Upload the highest-quality original, follow the recommended resolution and aspect ratio, avoid repeated exports, and allow the platform time to finish processing the high-resolution version.
Increase enhancement gradually and inspect moving footage at 100% scale. Reduce the Strength when you see halos, rough facial texture, amplified noise, unstable hair, or flickering edges.
Final Thoughts
The best way to unblur a video depends on why it looks blurry. Use light sharpening for footage that is only slightly soft. Use AI enhancement when the source also suffers from low resolution, noise, compression, or missing texture. For a video received through a messaging app, try to recover the original file before enhancing the compressed copy.
Most importantly, judge the result across moving frames instead of relying only on a single before-and-after screenshot. A good restoration should improve clarity while preserving natural faces, stable texture, realistic edges, and consistent motion.
You May Also Like


This post was written by Brenda Peng, a seasoned editor at Digiarty Software who specializes in practical image and video enhancement workflows. With AI assistance for brainstorming and drafting, the article is reviewed for accuracy by Abby Poole.
