


How to Improve YouTube Video Quality Before and After Upload



A video can look sharp on your computer and still look noticeably worse on YouTube. Sometimes the problem starts with the original footage: low resolution, poor lighting, noise, or a soft image. In other cases, quality drops during editing and export, or the higher-resolution version simply hasn't finished processing after upload.
The good news is that you have several ways to improve YouTube video quality, depending on where the problem comes from. You can start with better recording settings, use the right export settings, enhance low-quality footage with AI, and check YouTube's processing and playback settings after uploading.
In this guide, we'll walk through practical ways to make your YouTube videos clearer and better-looking, from recording and editing to AI enhancement, export, and upload. We'll also cover what you can do when an existing YouTube video looks blurry or fails to play at the quality you expected.

Quick Answer: How to Improve YouTube Video Quality
To improve YouTube video quality, focus on the stage where quality is being lost:
- Start with better footage. Record at 1080p or 4K, use enough lighting, and avoid excessive digital zoom or camera shake.
- Enhance low-quality footage. If your original video is blurry, noisy, low-resolution, or lacking detail, use video enhancement tools to denoise, sharpen, or upscale it before uploading.
- Export with the right settings. Use a suitable resolution, bitrate, frame rate, and format for YouTube. Avoid repeatedly re-encoding the same video.
- Give YouTube time to process your upload. A newly uploaded video may initially be available only in lower quality while HD or 4K versions are still processing.
- Check playback quality. If the video looks blurry only when you watch it on YouTube, manually check the quality setting and make sure your connection and device can handle the selected resolution.
- For existing videos, identify the problem first. YouTube's playback settings can be adjusted, but if the uploaded source itself is low quality, you'll generally need to enhance the original file and upload a better version.
In short, the best results come from improving the source video before uploading, exporting it properly, and checking YouTube's processing and playback settings afterward.
How to Improve YouTube Video Quality Before Uploading
The quality of your YouTube video is largely determined before you ever click the Upload button. A high-resolution source, good lighting, stable footage, and a clean export give YouTube more detail to work with and leave less room for quality loss during compression.
Here are the most important things to check before uploading.
1. Record at a Higher Resolution
Whenever possible, record your video at 1080p or 4K rather than starting with a low-resolution source. More pixels give you more detail to work with when editing, cropping, or exporting the final video.
If your footage was recorded in 4K, keeping a 4K workflow can also be useful when you want to crop the frame or create a sharper-looking final video. However, recording in 4K alone won't fix poor focus, heavy noise, or motion blur.
2. Get Enough Light
Good lighting can make a bigger difference than simply increasing the resolution. Insufficient light often introduces visible noise and makes fine details harder to preserve, especially in darker areas of the frame.
Use natural light or additional lighting where appropriate, and avoid severely underexposing your footage. Cleaner footage gives you a better starting point for editing and video enhancement.
3. Keep Your Footage Steady
Camera shake can make an otherwise high-resolution video look soft and distracting. Use a tripod, gimbal, or other stabilization method when the shot calls for it.
For handheld footage, try to keep movements controlled and avoid excessive digital stabilization in post-production, which can crop the frame and sometimes introduce unwanted artifacts.
4. Avoid Excessive Digital Zoom
Digital zoom enlarges part of the image without adding new detail. If you zoom in too far while recording, the resulting footage can look pixelated or soft.
When possible, move closer to your subject or use optical zoom instead. If you already have low-resolution footage that needs to be enlarged, AI video upscaling can be a better option than simply stretching the image during editing.
5. Match Your Frame Rate to the Content
Choose a frame rate that fits the type of video you're recording. Common options include 24, 30, and 60 fps.
For example, 24 or 30 fps works well for most talking-head and general-purpose videos, while 60 fps can be useful for sports, gameplay, and other fast-moving content. When editing, it's generally best to keep the timeline and final export consistent with the original footage unless you have a specific reason to change the frame rate.
6. Start With the Best Source File You Have
Avoid repeatedly exporting and re-compressing the same footage. Each lossy encoding step can discard additional image information and introduce artifacts such as blockiness, banding, or loss of fine detail.
Keep the original camera footage whenever possible, make your edits from that source, and export the final version once using settings appropriate for YouTube.
How to Improve YouTube Video Quality in Post-Production
Not every video comes out of the camera looking ready for YouTube. You may have footage that is technically usable but looks soft, noisy, pixelated, or less detailed than you'd like. This is where post-production can make a noticeable difference.
The right approach depends on what's wrong with the footage. A low-resolution clip may benefit from upscaling, while noisy footage needs denoising. Soft details may need sharpening or AI enhancement, and heavily compressed footage may require artifact reduction. Trying to fix everything with a single filter can easily make the video look unnatural.
Upscale Low-Resolution Footage
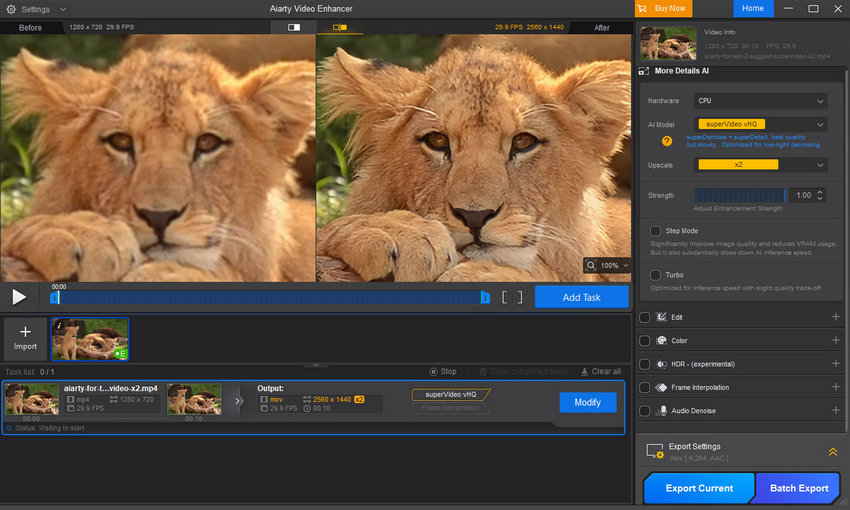
If your source video was recorded at 480p, 720p, or another low resolution, simply increasing the output resolution in an editor won't add meaningful detail. It only makes the existing pixels larger.
AI video upscaling takes a different approach. It analyzes the footage and reconstructs details while increasing the resolution, which can produce a cleaner-looking result when preparing older or low-resolution footage for YouTube.
For example, you can upscale:
- 720p footage to 1080p
- 1080p footage to 2K or 4K
- Older or heavily cropped footage to a higher-resolution format
The higher-resolution output won't contain the exact detail that a camera would have captured natively at that resolution, but a good upscaler can make the footage look sharper and more suitable for modern displays.
Reduce Noise and Compression Artifacts
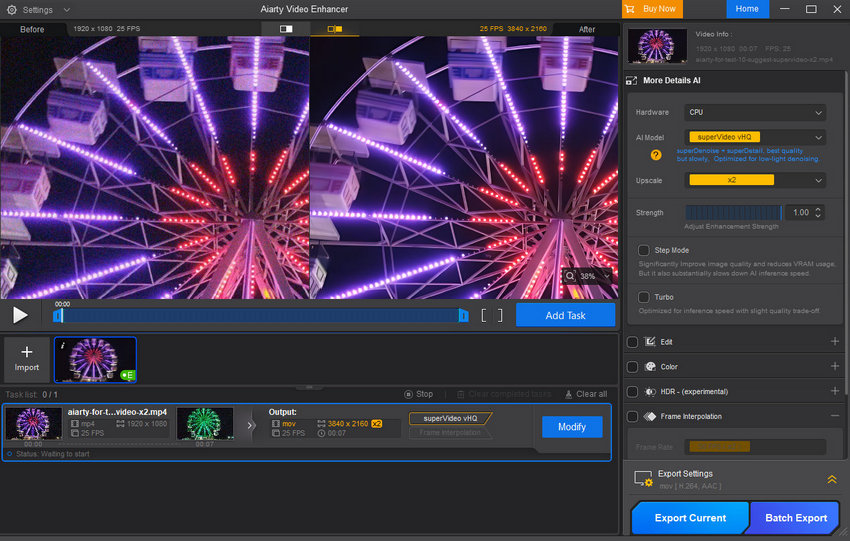
Noise is especially common in low-light footage. When combined with YouTube's own compression, it can make dark areas look messy and obscure fine details.
Video denoising can clean up this unwanted noise before the video is uploaded. It can also help reduce some of the visual damage caused by heavily compressed source files. The goal is not to remove every bit of texture, but to produce a cleaner image while keeping natural detail intact.
Sharpen Soft Footage
Slightly soft footage can sometimes be improved with sharpening. However, aggressive sharpening often creates halos around edges, exaggerated textures, and other artifacts.
AI-based enhancement can be useful when the footage needs more than a simple sharpening filter. Instead of applying the same effect uniformly, AI models can analyze different areas of a frame and attempt to reconstruct missing or weak details.
Improve Faces and Fine Details
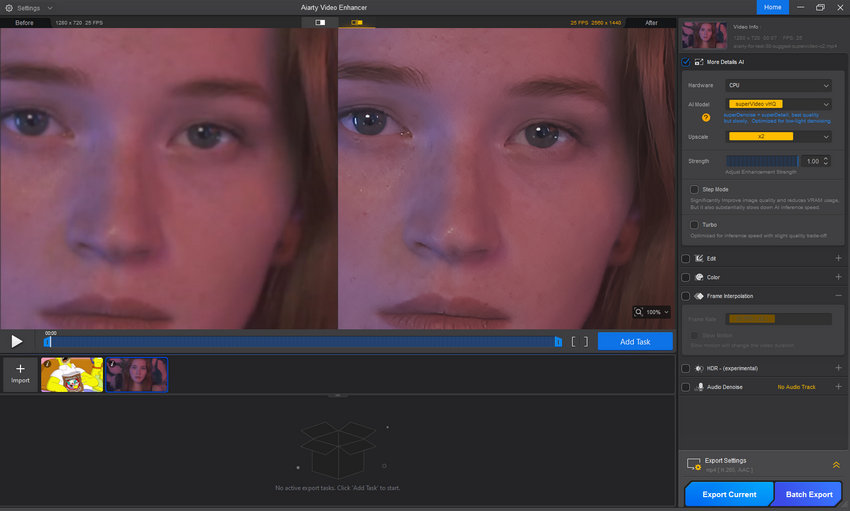
Faces, hair, text, and other fine details can lose clarity when the original video is low-resolution or compressed. If these elements are important to the video, general sharpening may not be enough.
Some AI video enhancers include specialized processing for faces and fine details, making them useful for interviews, vlogs, tutorials, and older footage where facial features have become difficult to distinguish.
Use an AI Video Enhancer for Multiple Problems
If a video suffers from several problems at once, using separate tools for upscaling, denoising, and sharpening can make the workflow more complicated and may introduce additional quality loss through repeated processing.
An AI video enhancer such as Aiarty Video Enhancer can handle several of these tasks in one workflow. It can upscale footage to higher resolutions while also improving detail and reducing noise, making it a practical option when the original video needs more substantial restoration before being uploaded to YouTube.
For example, if you have an old 720p recording that looks noisy and soft, you can process the original footage first, preview the result, and then export a higher-resolution version for YouTube. This gives you control over the footage before YouTube applies its own compression.
Just keep expectations realistic: AI enhancement can improve the appearance of imperfect footage, but it cannot recover every detail lost through severe blur, extreme compression, or poor focus.
How to Upload Videos to YouTube Without Losing Quality
YouTube re-encodes uploaded videos for playback, so you cannot completely prevent quality loss after uploading. However, you can minimize unnecessary degradation by starting with a high-quality source, exporting with appropriate settings, and giving YouTube enough time to finish processing the higher-resolution versions.
Upload the Highest-Quality Source Available
Whenever possible, upload the highest-quality version of your finished video rather than a smaller compressed copy.
For example, if you edited a video in 4K, avoid exporting it to 1080p just to make the file smaller and then uploading that version. Similarly, don't download your own video from a social platform or messaging app and use that copy as the YouTube source, as it may already have been compressed.
If your original footage is low-resolution, consider enhancing or upscaling it before the final export rather than relying on YouTube to improve the source.
Use YouTube-Friendly Export Settings
Your export settings have a direct impact on the quality of the file you upload. YouTube recommends MP4 with H.264 video encoding and progressive scanning, while keeping the exported frame rate the same as the original recording.
For SDR video, YouTube's recommended bitrate varies by resolution and frame rate:
| Resolution | Recommended Bitrate |
| 1080p, 24/25/30 fps | 8 Mbps |
| 1080p, 48/50/60 fps | 12 Mbps |
| 1440p, 24/25/30 fps | 16 Mbps |
| 1440p, 48/50/60 fps | 24 Mbps |
| 4K, 24/25/30 fps | 35–45 Mbps |
| 4K, 48/50/60 fps | 53–68 Mbps |
These settings give YouTube a sufficiently detailed source to work with. Using an unnecessarily low bitrate can introduce compression artifacts before YouTube even processes the video.
Don't Re-Encode the Video Unnecessarily
Every time you export a video using a lossy codec, some image information may be discarded. Repeatedly converting and compressing the same file can make fine details softer and introduce artifacts.
A better workflow is to keep the original footage or a high-quality intermediate file, complete your editing, enhancement, and color adjustments, and then create one final upload file for YouTube.
Upload in 4K When It Makes Sense
If your video is genuinely available in 4K, uploading the 4K version gives YouTube more image information than uploading a 1080p copy.
This is particularly useful for videos with fine textures, landscapes, gameplay, wildlife, and other content where small details matter. YouTube may also take longer to process higher-resolution uploads, so don't assume something went wrong if 4K is not immediately available after uploading.
Avoid Black Bars and Unnecessary Cropping
Prepare the video in the aspect ratio you actually want to publish. For standard YouTube videos, 16:9 is the most common aspect ratio.
Avoid adding black bars directly into the video unless they are part of the creative design. Unnecessary padding reduces the area available for the actual image and can make the video look smaller on some screens.
Give YouTube Time to Process HD and 4K
A newly uploaded video may initially appear at a lower quality while YouTube processes the higher-resolution versions. This can make a video look blurry immediately after upload even when the source file is perfectly fine.
Check the video's quality options after processing is complete. If 1080p or 4K is still unavailable, wait for processing to finish before judging the final quality.
Check the Quality Setting When Watching Your Video
Sometimes the upload itself is not the problem. YouTube can automatically adjust playback quality based on factors such as your internet connection, device, screen size, and the original video quality.
If your video looks blurry during playback, open the quality settings and manually select a higher available resolution. If the higher-resolution option is not available yet, the video may still be processing.
How to Watch YouTube Videos in Higher Quality
Even when a YouTube video has been uploaded in 1080p, 1440p, or 4K, you may not always be watching it at the highest available quality. YouTube can automatically adjust playback quality based on your internet connection, device, screen size, and the quality of the original upload.
If a video looks blurry or less detailed than expected, check the playback quality settings first. The exact steps vary slightly depending on whether you're watching on a computer, phone, tablet, or TV.
On a Computer
When watching YouTube in a web browser, you can manually select the playback resolution:
- Open the YouTube video.
- Click the Settings icon (gear) in the video player.
- Select Quality.
- Choose the highest available resolution, such as 1080p, 1440p, or 2160p (4K).
If 4K or another high-resolution option does not appear, the problem may not be your browser settings. The uploaded video may not have been processed at that resolution yet, or the original video may not have been uploaded in a higher resolution.
For the best playback experience, use a modern browser and a stable, sufficiently fast internet connection. A video may also look softer when the browser automatically lowers quality to prevent buffering.
On iPhone, iPad, or Android Phones and Tablets
The YouTube app can automatically adjust video quality based on your connection and viewing conditions. To manually choose a higher quality:
- Open the video in the YouTube app.
- Tap the Settings icon.
- Tap Quality.
- Choose Advanced if available.
- Select the highest resolution supported by the video and your device.
You can also adjust YouTube's default video quality preferences in the app's settings. Choosing a higher quality for Wi-Fi playback can help prevent YouTube from automatically selecting a lower resolution, although higher quality uses more data.
Keep in mind that a phone's display resolution also affects how much difference you can actually see between 1080p, 1440p, and 4K.
If YouTube Keeps Playing at a Lower Quality
If YouTube repeatedly switches to 360p, 480p, or 720p even though the video is available in higher resolutions, check these factors:
- Internet connection: A slow or unstable connection can cause YouTube to reduce playback quality.
- Quality settings: YouTube may be set to automatically choose a quality level based on your connection and device.
- Video processing: Newly uploaded videos may not have finished processing at 1080p, 1440p, or 4K.
- Device limitations: Older phones, TVs, or streaming devices may not support every available resolution or codec.
- Browser or app: An outdated browser or YouTube app can sometimes cause playback problems.
- The original upload: You cannot select a resolution that the creator did not upload or that YouTube has not generated for playback.
 Frequently Asked Questions
There is no fixed processing time for every 4K upload. YouTube says processing time depends on factors including video format, length, frame rate, resolution, and current traffic. Higher-resolution and higher-frame-rate videos generally take longer to process.
For example, YouTube notes that a 4K video at 30 fps and 60 minutes long can take up to about four hours to finish high-resolution processing, while 4K at 60 fps can take longer.
No. There is no indication in YouTube's official documentation that new creators are automatically given lower video quality.
YouTube does not necessarily deliver exactly the same playback conditions on every device. The available quality can depend on the device, browser or app, screen size, internet connection, and supported video formats.
A 4K video may also look noticeably sharper on a large 4K TV than on a small phone screen, even when both devices are playing the same source video.
If a high-resolution option is missing on one device but available on another, check whether that device or browser supports the required video format.
Yes. YouTube processes uploaded videos into versions suitable for streaming on different devices and connection speeds. This means the file you upload is not simply delivered to every viewer exactly as it was exported.
YouTube does not provide a way to replace the actual video file of an existing upload while keeping that video's URL, views, comments, and other engagement data attached to a new video file.
If the original upload has a significant quality problem, you generally need to upload an improved version as a new video.
For an important video that has already accumulated views, consider whether the quality problem is significant enough to justify a new upload before replacing the existing version.
You May Also Like


This post was written by Brenda Peng who is a seasoned editor at Digiarty Software who loves turning ordinary photos into extraordinary works of art. With AI assistance for brainstorming and drafting, the post is reviewed for accuracy by our expert Abby Poole for her expertise in this field.
