You’ve finally found the perfect image for your project, only to realize it’s far too small to use. We’ve all been there - trying to stretch a tiny file until it inevitably turns into a blurry, pixelated mess.
In this guide, we’ll show you exactly how to upscale an image in GIMP, the web's favorite free and powerful image editor. We will walk through the best settings to preserve quality using traditional methods, and then we’ll introduce a smarter, AI-powered alternative if you’re looking for noticeably sharper, professional-grade results.
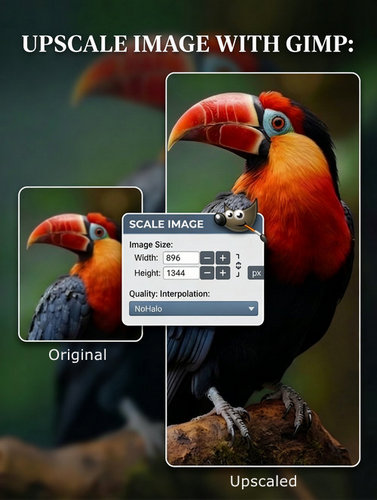
How to Upscale an Image in GIMP
Step 1: Open Your Image
Launch GIMP and go to File > Open… to import the image you want to upscale.
Step 2: Open the Scale Image Dialog
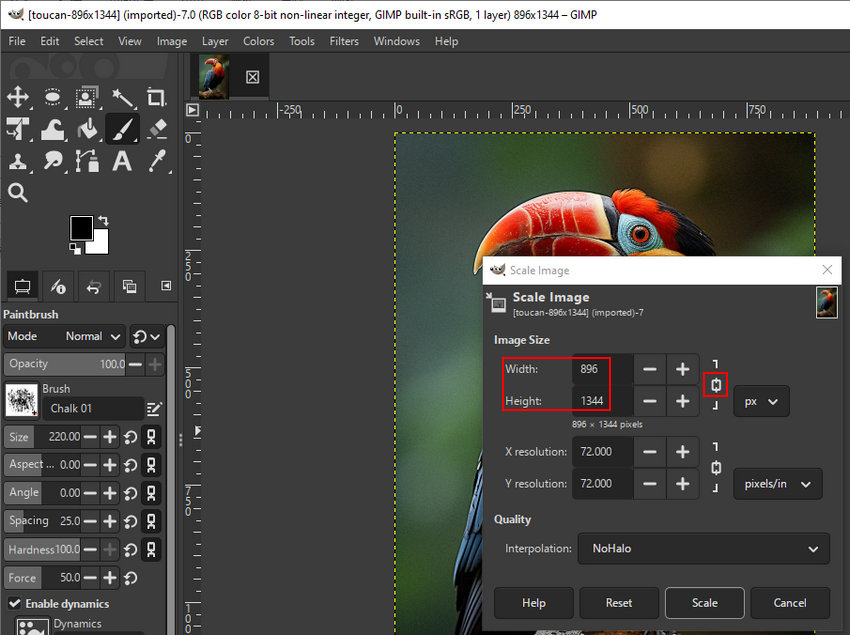
Once your image is loaded in GIMP, go to the top menu and select Image > Scale Image.... This will open a dialog box where the "magic" (or at least the math) happens.
Step 3: Set Your New Dimensions
In the Image Size section, enter your desired width or height.
Make sure the chain link icon is closed. This ensures your aspect ratio stays locked so you don’t accidentally turn your landscape photo into a tall, skinny mess.
If you are preparing a file for print, you might also want to increase the X and Y resolution to 300 pixels/in (PPI).
Step 4: Choose the Right Interpolation (The Critical Part)
This is where GIMP decides how to create the new pixels. Under the Quality section, you’ll see a dropdown for Interpolation.
For the best results, ignore the "None" and "Linear" options. You want to focus on:
- Cubic: The old reliable. It’s smooth and works for most general purposes.
- NoHalo: Recommended. Generally the best choice for large upscaling. It prevents the "halo" effect (weird glowing edges) around sharp lines.
- LoHalo: Best if you aren't enlarging the image by a huge amount, as it preserves more of the original color integrity.

Step 5: Click "Scale" and Review
Hit the Scale button. GIMP will process the request, and you’ll see your enlarged image.
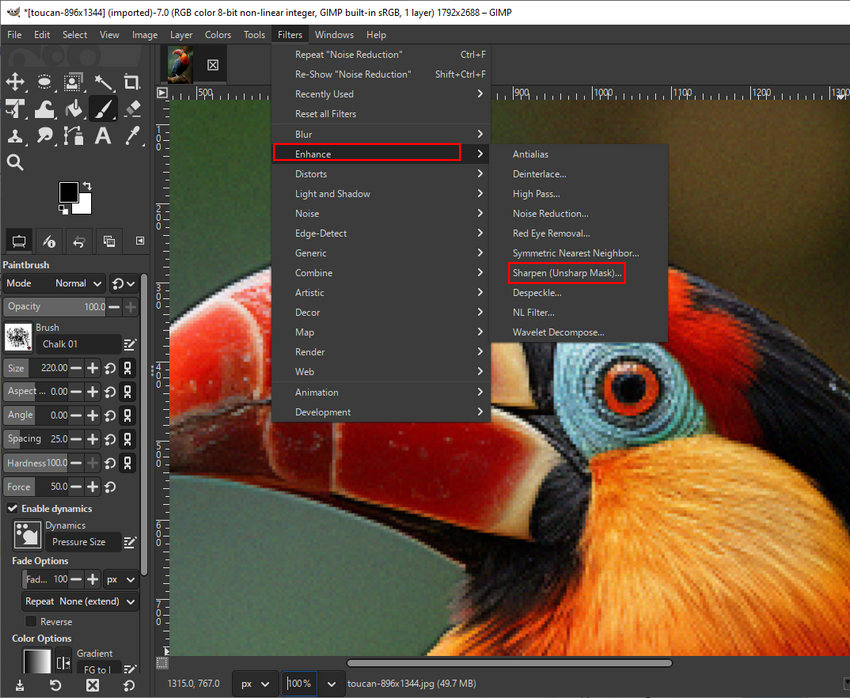
Step 6: Enhance the Upscaled Image
After clicking Scale, your image will be larger, but it likely won't look "sharp." To fix this, you can use GIMP’s built-in enhancement filters:
- Navigate to Filters > Enhance > Sharpen (Unsharp Mask)...
- Adjust the Radius: This controls how many pixels on either side of an edge are affected. Keep this low for a more natural look.
- Adjust the Amount: This increases the contrast of the edges. Slide it up until the details pop, but stop before you start seeing "grain" or "noise."
- Threshold: If your image starts looking too grainy, increase the threshold to tell GIMP to only sharpen the most distinct edges.

In addition to sharpening, here are other useful tools to use.
- Noise Reduction: When you upscale an image, any existing digital noise or grain becomes much more visible. Before sharpening, run Noise Reduction to smooth out these artifacts without losing the core structure of the image.
- High Pass: If the standard "Unsharp Mask" feels too aggressive, try High Pass. It’s a favorite among pro editors for isolating and enhancing fine textures, like the feathers on a bird or the fabric of a shirt, without creating ugly "halos" around high-contrast edges.
- Antialias: If you scaled an image with sharp geometric lines (like a logo) and they look slightly "jagged" (aliased), this filter helps smooth those stair-step edges for a cleaner look.
The Technical "Ceiling" of Traditional Image Editors
While GIMP is incredibly powerful, you will eventually hit a technical wall when trying to significantly enlarge an image. This comes down to two main limitations:
The Limits of Interpolation
To be clear, GIMP does not just blindly "stretch" pixels (which would result in blocky, pixelated squares). Instead, it uses sophisticated interpolation algorithms (like NoHalo and LoHalo) to calculate and fill in new pixel colors based on the surrounding data.
However, mathematical calculation has a ceiling. Interpolation is fantastic at reducing distortion, but it cannot add original details that weren't there in the first place. If you try to upscale a photo by 200%, 400%, or more, the software can only create a soft, smooth transition between pixels. The result? The image loses its crispness and takes on a blurry, "painterly," or out-of-focus look.
The Time and Skill Barrier
For beginners or professionals dealing with large volumes of images, GIMP's workflow becomes a massive bottleneck. Achieving a passable upscale requires a tedious, multi-step process for every single image: selecting the right interpolation method, running Noise Reduction, carefully dialing in the Radius and Amount for the Unsharp Mask, and checking for artifacts. If you have a folder of 50 images to process, this manual trial-and-error approach is incredibly time-consuming.
The Best AI Alternative for Lossless Image Upscaling
If you need to upscale images quickly without losing quality, Aiarty Image Enhancer is the perfect upgrade from GIMP.
Powered by advanced deep learning, Aiarty leaves traditional interpolation behind. Instead of just sharpening, it analyzes the image content, predicts and reconstructs missing details, and restores textures in a more natural way.
Here is why it stands out as the ultimate upscaling solution:
- Generative Detail Restoration: Aiarty reconstructs missing elements. Hair becomes individual strands, blurred text becomes legible, and soft edges become razor-sharp.
- Specialized AI Models: It offers different AI models trained for specific image types. Whether you are upscaling 2D anime graphics, photorealistic portraits, or 3D renders, Aiarty applies the exact right algorithm for the job.
- Flawless 4K/8K Upscaling: While GIMP struggles past a 1.5x to 2x enlargement, Aiarty can confidently upscale images by 400% or even 800% (up to 32K resolution) while keeping the final result crystal clear.
- 1-Click Batch Processing: This completely eliminates the GIMP learning curve. No more manually adjusting radius sliders or testing filters. You can drag and drop hundreds of photos, select your target resolution, and let the software automatically process the entire batch in minutes.
How to Upscale Images with Aiarty Image Enhancer
While GIMP requires multiple manual steps and filter adjustments, Aiarty uses an automated, intelligent workflow to achieve superior results in seconds. Here is how simple it is.
Step 1: Install and Import Your Images
After installing Aiarty Image Enhancer, launch the program and simply drag-and-drop your low-res files into the workspace. You can import a single photo or an entire folder for efficient batch processing.

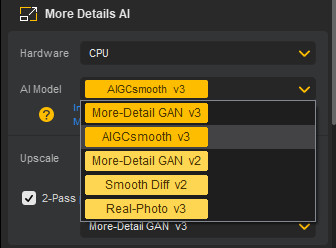
Step 2: Choose the AI Model
On the right-hand panel, select the AI model that best fits your image type. Aiarty features specialized models (such as More-Detail, Smooth-Diff, or Real-Photo) trained to recognize and reconstruct different textures, from skin and hair to 2D anime lines.
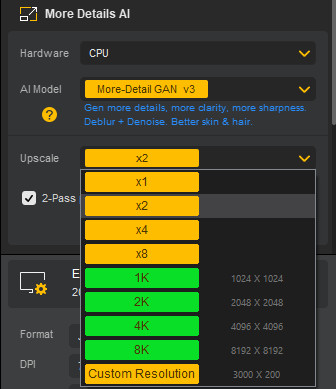
Step 3: Select Your Target Resolution
Choose your desired enlargement scale. You can select presets like x2, x4, x8, or specific resolutions like 2K, 4K, or 8K. You can also enter a custom resolution. Unlike GIMP, Aiarty maintains razor-sharp edges and realistic textures even at these extreme scales.
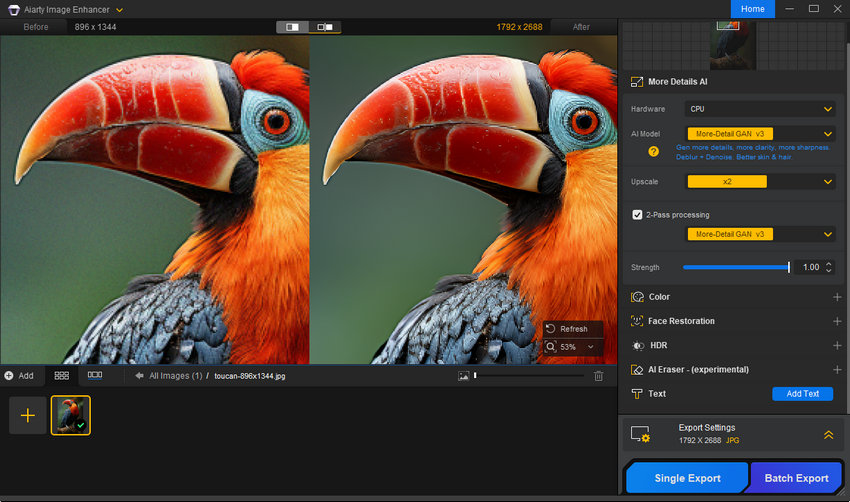
Step 4: Preview and Fine-Tune
Wait a few moments for the AI model to perform its inference. Once done, you can preview the result side-by-side with the original.
If you aren't perfectly satisfied, you can easily switch models or tweak the settings. Use the Strength Slider to control the intensity of the enhancement, or adjust the Color settings to ensure the output perfectly matches your vision.
Step 5: Export the Enhanced Image
Once you are happy with the preview, choose your output format (JPG, PNG), set your desired DPI, and select the Quality level. Click Single Export or Batch Export, and Aiarty’s GPU acceleration will process the image instantly, delivering a high-resolution masterpiece that looks as if it were shot with a high-end professional camera.
GIMP vs. Aiarty Image Enhancer: Which Should You Use?
To help you decide the best workflow for your needs, here is a quick comparison:
Conclusion
Knowing how to upscale an image in GIMP is a fantastic skill to have in your digital toolkit. For minor dimension adjustments and basic print preparations, GIMP’s NoHalo tool paired with some gentle sharpening will absolutely get the job done.
However, if you are working with extremely low-quality source files, dealing with large batches of images, or needing to enlarge an image massively for high-end printing, traditional interpolation simply won't cut it. For true, lossless upscaling that saves you hours of manual editing and actually breathes life back into blurry files, we highly recommend downloading the free trial of Aiarty Image Enhancer. It eliminates the guesswork and delivers professional, high-resolution results instantly.
 FAQs about GIMP Upscale Image
Currently, GIMP does not have native, generative AI image upscaling features built into its core installation. It relies on traditional mathematical interpolation algorithms like NoHalo and LoHalo. While these are excellent for basic scaling, they cannot "create" new pixels or restore lost details the way modern AI models do.
Best GIMP AI Tools and Plugins for Image Enhancement, Generation, and Editing >>
Yes, there are third-party plugins like GIMP-ML (which integrates machine learning models) or Resynthesizer. However, these can be quite technical to install, often requiring Python environments and specific dependencies that may be prone to errors.
To resize an image in GIMP with minimal quality loss, follow these three rules:
• Scale Down, Don't Scale Up: Shrinking an image is usually lossless, but enlarging it always requires the software to "guess" new pixels.
• Use NoHalo Interpolation: This is GIMP's most advanced method for preserving edge sharpness.
• Post-Process: Always apply a subtle Sharpen (Unsharp Mask) or High Pass filter after scaling to counteract the natural "softness" that occurs during the process.
• Note: If you need to enlarge an image by more than 200%, you will inevitably see some quality degradation unless you use an AI-based reconstructive tool.
You May Also Like
This post was written by Brenda Peng who is a seasoned editor at Digiarty Software who loves turning ordinary photos into extraordinary works of art. With AI assistance for brainstorming and drafting, the post is reviewed for accuracy by our expert Abby Poole for her expertise in this field.