


Video haze is not always caused by actual fog or atmospheric conditions. In many cases, the low-contrast look comes from the way light interacts with the camera. Shooting toward a bright sky, filming under tree canopies, using diffusion filters, or recording with a camera profile that preserves a wider range of tones can all create footage that looks soft and slightly washed out.
Dehazing is useful when the image feels flat, the blacks look lifted, and the subject does not separate well from the background. It can help restore contrast and depth, but it is not a tool for every situation. Some footage naturally has a softer look, and pushing dehaze too far can make skin tones harsh, shadows unnatural, and fine details look processed.
For this test, I worked with a standard Rec.709 file rather than Log footage. The footage was already processed in-camera and did not require a Log conversion. Its technical specifications were:
Testing Footage:
- 709 8-bit H.264/AVC file:
- Color depth: 8-bit, chroma: 4:2:0
- Bitrate: ~5.8 Mbps
- Resolution: 1920×1080
- Frame rate: 50 fps
For this type of footage, I would approach dehazing as part of a broader correction process. The goal is not only to remove haze, but also to restore contrast, balance skin tones, and improve separation between the subjects and the background.
Method 1. Dehaze Video with the Lumetri Panel
Premiere Pro does not include a dedicated dehaze slider like Lightroom, but the same visual effect can often be achieved by combining contrast adjustments, curves, and careful color balancing.
For this specific footage, alongside slight dehazing, I would grade it with contrast restoration, warmer skin tones, a face mask exposure lift, and a small vignette. These adjustments keep the natural documentary and folk feeling of the scene instead of turning it into a heavily stylized cinematic grade.
Step 1. Create a Premiere Project and import the footage.
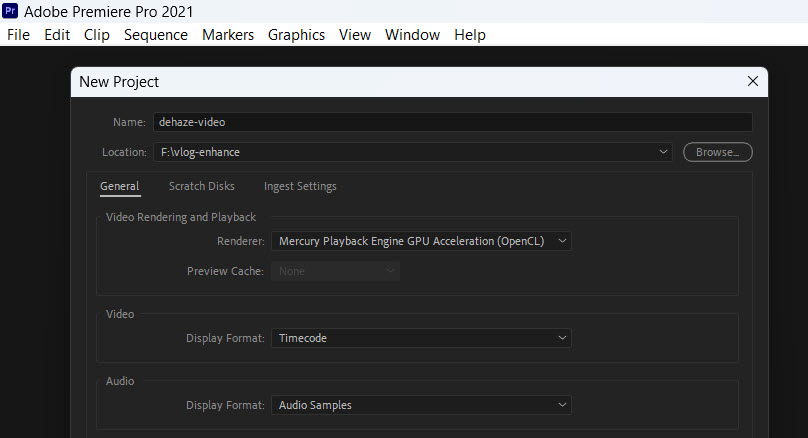
Open Premiere Pro and create a new project. Import the video file into the Project panel.
Before making adjustments, check the footage settings. Since this is already Rec.709 footage, there is no need to apply a Log conversion LUT.
Step 2. Add the footage to the timeline.
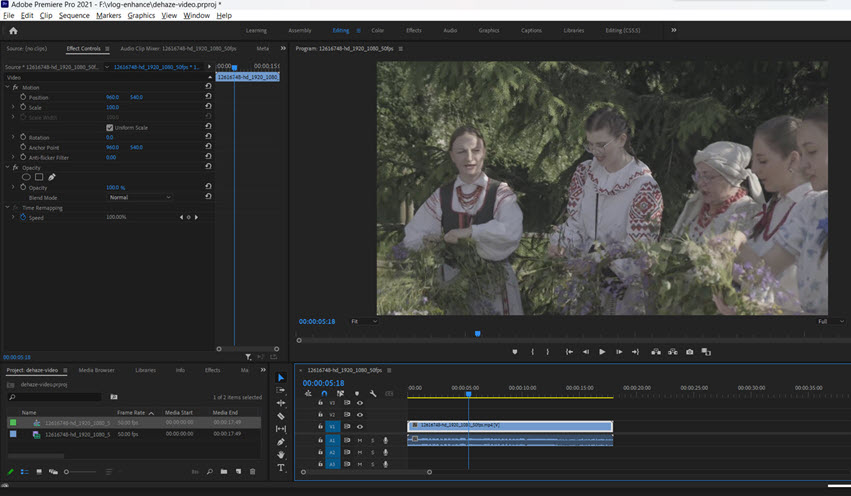
Drag the clip onto the timeline. Open the Color workspace and select the Lumetri Color panel.
It is helpful to enable the Lumetri Scopes, especially the Waveform Monitor, to judge exposure more accurately. A Rec.709 image should generally keep important highlights below clipping and preserve enough shadow detail.
Step 3. Fix exposure and contrast first with the Lumetri Panel.
Start with Basic Correction. These settings are only a starting point and should be adjusted depending on the camera and lighting conditions.
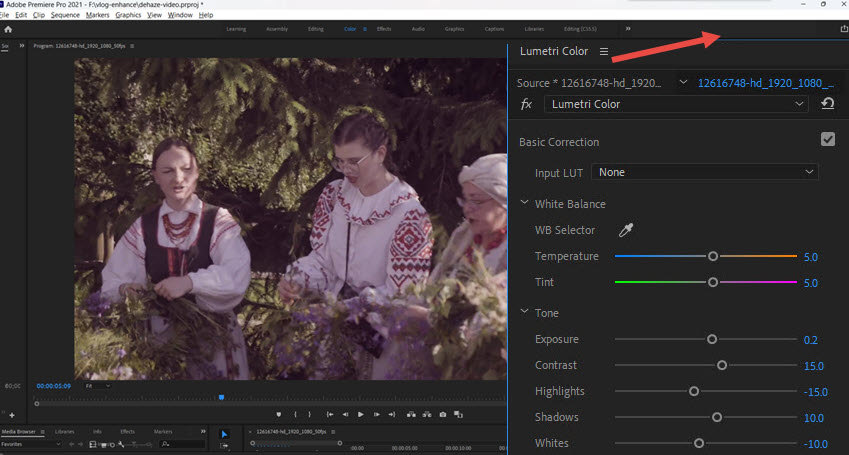
For this footage, I tested these parameters as the starting point, and nudge the slider with real-time preview.
- Exposure: +0.2
- Contrast: +15
- Highlights: -15
- Shadows: +10
- Whites: -10
- Blacks: -15
- Temperature: +5
- Tint: +5
The slight exposure increase helps bring back detail in faces, while lowering highlights protects the bright clothing and sunlight areas. Reducing blacks restores depth and removes the washed-out appearance.
The temperature and tint adjustments are subtle. Outdoor footage under trees often picks up a green cast, so adding a small amount of warmth and magenta can help keep skin tones more natural.
Step 4. Add subtle Dehaze with creative color grading.
After balancing exposure, use the Creative section in Lumetri Color to increase clarity and separation. Premiere does not have the exact Lightroom "Dehaze" slider, but you can simulate it with these parameters:
- Faded Film: 0
- Sharpen: 10
- Vibrance: +10
- Saturation: 105
The purpose here is not to make the image look heavily processed. A small increase in vibrance can bring back color that was lost in the low-contrast image, while a small sharpening adjustment can help compensate for the softness caused by compression.
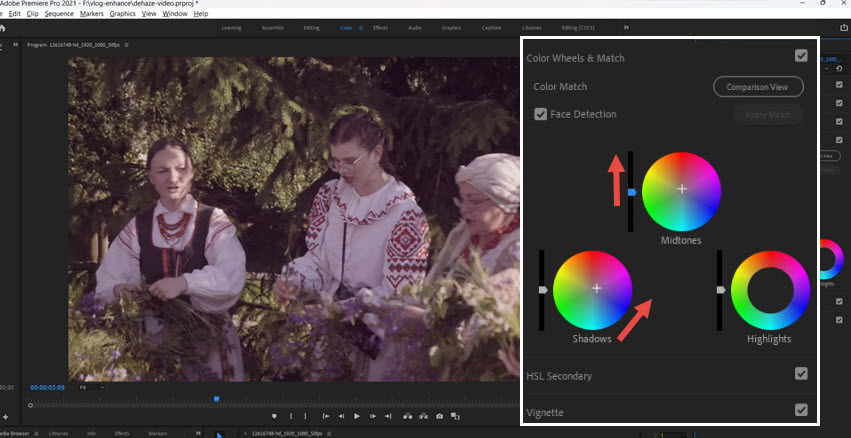
Optionally, we can use Lumetri curves:
Go to the RGB curves, pull shadows slightly down, and lift midtones slightly. This gives the "dehaze" contrast effect.
I would not push a strong cinematic teal and orange grade because the scene already has a natural documentary and folk feeling.
Method 2. Dehaze Video Using the Unsharp Mask
Sometimes a hazy appearance is partly caused by softness rather than only low contrast. This is common with compressed footage, especially when fine textures such as hair, leaves, embroidery, and fabric lose definition.
The Unsharp Mask effect can improve perceived clarity by increasing edge contrast. It does not restore missing detail, but it can make the image feel more defined.
Step 1. Apply Unsharp Mask.
Open the Effects panel and search for Unsharp Mask. Drag the effect onto the video clip.
Step 2. Adjust the settings carefully.
A reasonable starting point:
- Amount: 50-80
- Radius: 0.8-1.5 pixels
- Threshold: 2-5
Step 3. Preview the result before exporting.
Method 3. Use Premiere Pro Plug-ins
For footage with stronger haze or low-contrast issues, third-party plugins can provide more specialized controls.
For instance, Boris FX Continuum includes tools designed for image enhancement and dehazing. These plugins can offer more targeted adjustments compared with basic color correction.
A good starting point for this footage would be: keep the dehaze amount around 10–20% maximum.
Other options include Red Giant Magic Bullet Looks and FilmConvert Nitrate, which provide different approaches to contrast, film texture, and color finishing. These tools are useful when you want more control over the final look, but they should support the footage rather than replace good exposure and color correction.
Before Final Delivery: Enhance Video Quality
The file is 5.8 Mbps at 1080p 50fps, that is quite compressed as a decent quality of 1080p is usually 10-20 Mbps. This can cause soft foliage, mushy details, less texture in fabric and clothing, and blocky shadows.
Since Premiere is not dedicated for detail restoration and AI-drive video quality enhancement, you can resort to Aiarty Video Enhancer either before or after the Premiere workflow.
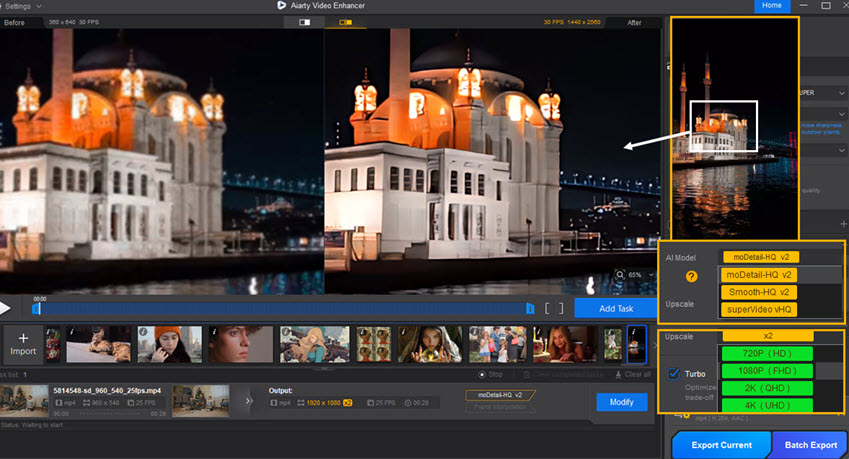
Step 1. Download and install Aiarty Video Enhancer.
Launch this video enhancer and import the footage to dehaze.
Step 2. Choose an AI enhancement model and adjust settings
Select an enhancement model based on the condition of your footage. Avoid pushing enhancement levels too high. Excessive processing can create unnatural textures, especially on faces, hair, and foliage.
Step 3. Adjust colors and enhancement strength.
Reduce the enhancement strength and preview again. A moderate improvement usually produces a more natural result.
Step 4. Preview the result and refine the enhancement.
Use the preview function to compare the original footage with the enhanced version.
You can then bring the processed file back into Premiere Pro for final color adjustments, audio editing, and delivery export.
Wrap Up
Dehazing video in Premiere Pro is not about removing all softness or atmosphere. Small adjustments to contrast, exposure, and color can often restore depth while keeping the original mood of the footage.
For compressed footage, color correction and sharpening have limits. When more detail recovery is needed, additional enhancement tools can help, but the goal should remain a natural-looking result that preserves the character of the original video.
You May Also Like


This post was written by Ashley Brown, a videographer turned AI explorer. As an associate writer at Digiarty Software, she dives into the latest AI-powered tools for video enhancement and content creation, offering practical insights and unbiased commentary. Accuracy confirmed by Abby Poole.
