


Blurring a face in a still image is easy. Doing it in video is where things get more complicated. A blur can look perfectly placed on the first frame, then drift away as soon as the person turns their head, walks across the shot, or disappears behind another subject.
The basic idea is simple: place a blur, mosaic, or pixelated mask over the face, then make that mask follow the person throughout the clip. For a stationary subject, manual positioning may be enough. For a moving face, motion tracking or automatic face detection saves a lot of work.
After working through the common options, I found that the best method really depends on the footage. Automatic face detection is the fastest for straightforward clips, Premiere gives you much better control when tracking gets difficult, CapCut is convenient for quick edits, and YouTube Studio is surprisingly useful if the video has already been uploaded.
Below, I'll go through six practical ways to blur faces in a video, including moving faces, multiple people, online video, iPhone, Android, CapCut, Premiere Pro, and YouTube.
How to Blur Faces in a Video: Quick Answer
If you only need the short answer, the easiest way to blur a face is to place a blur or mosaic mask over it and use motion tracking to keep the mask attached as the person moves.
For simple clips, an automatic face-blur tool is usually the quickest option. For footage where the face moves quickly, turns sideways, becomes obstructed, or crosses other people, a full video editor such as Adobe Premiere gives you more control over the tracking.
Method 1. How to Blur a Moving Face in Adobe Premiere
Adobe Premiere is the method I would choose when the blur needs to stay accurate for more than a few seconds or when the subject moves unpredictably.
Premiere's masking workflow has changed significantly in recent versions, so older tutorials may not match the current interface exactly. Current versions provide redesigned mask tools and mask tracking controls, while newer Object Mask workflows can also help identify and track people or objects before applying selective effects.
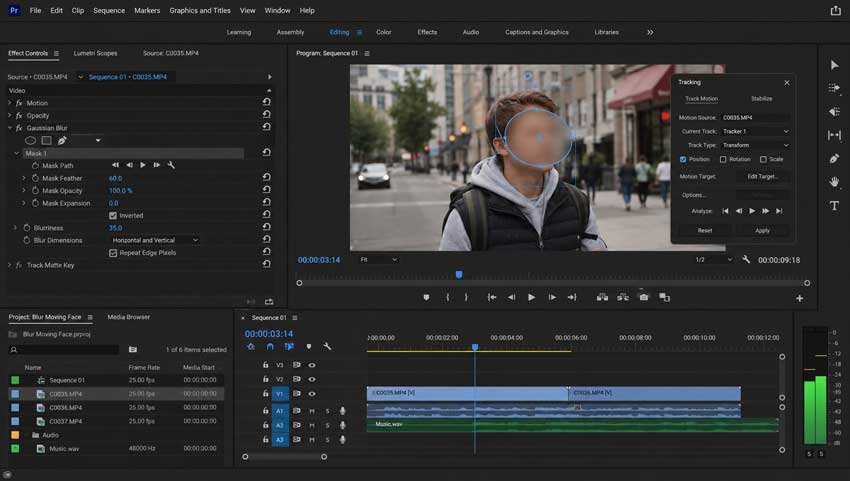
Step 1. Add the Video to the Timeline
Create a sequence and place your video clip on the timeline.
Before creating the mask, scrub through the footage and find a frame where the face is clearly visible. Starting on a clean frontal or three-quarter view generally gives the tracker a better reference than beginning when the face is blurred, partly hidden, or turned completely sideways.
Step 2. Create a Mask Around the Face
Select the clip and create an ellipse mask around the face. For most people, an ellipse is faster than drawing a custom shape manually.
One thing I would avoid is making the mask fit the face too tightly. Leave a little room around the forehead, chin, cheeks, and sides of the head. If the person suddenly turns, an extremely tight mask can reveal part of the face before the tracker catches up.
Adding some feathering also helps the blurred area blend more naturally into the surrounding footage instead of looking like a hard circle pasted over the person's head.
Step 3. Track the Moving Face
Open the mask controls in Premiere and use the tracking buttons to analyze the movement of the face through the shot.
If you are working with the complete shot, tracking forward and backward from a clear starting frame is usually the fastest way to begin.
Once Premiere finishes analyzing the clip, scrub slowly through the result rather than assuming that a completed tracking pass means the mask is correct.
Step 4. Apply the Blur
Apply a blur effect such as Gaussian Blur to the masked area, then increase the strength until identifying facial details are no longer readable.
If you prefer a more obvious censorship effect, Mosaic is another useful option.
Step 5. Fix Tracking Errors
This is the part that usually makes the biggest difference.
Move carefully through any section where:
- The person rotates their head.
- The face becomes partly covered.
- The camera shakes or changes direction.
- The subject suddenly changes speed.
- Another person passes in front.
If the mask slips away from the face, correct its position or shape and continue tracking from that point. For a difficult few frames, manual corrections are often faster than repeatedly restarting the automatic tracking process.
Tip: When privacy matters, I would rather make the mask slightly larger than necessary. A perfectly fitted mask may look cleaner, but a slightly oversized one is less likely to expose an eye, jawline, or other recognizable feature when the subject turns.
You can find Adobe's current masking and tracking documentation on the official Premiere Pro help page.
Method 2. How to Blur Faces in CapCut
CapCut is a much faster option when you do not need the level of control available in Premiere. Current versions of CapCut offer several ways to hide a face, including Blur, Mosaic-style effects, masks, keyframes, and mask tracking. For short social videos, the workflow is usually quicker to set up than a full professional editing project.
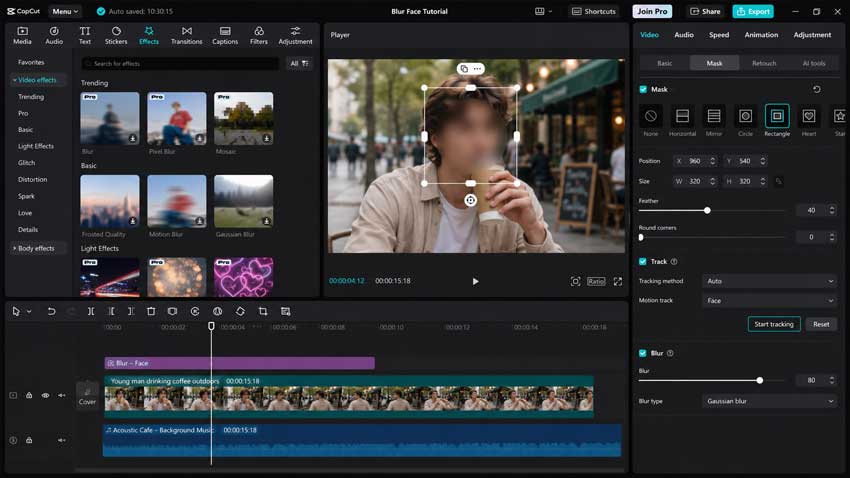
How to Blur a Face in CapCut Desktop
- Import your video and drag it onto the timeline.
- Open the Effects panel and apply a Blur effect.
- Use a mask to limit the blur to the face.
- Resize and position the mask.
- Use mask tracking to follow the moving face.
- Play through the entire shot and fix any tracking errors.
- Export the finished video.
CapCut also includes face-oriented effects that can be useful for casual edits, but when privacy is the main goal, I prefer a regular blur or mosaic mask because it is much easier to see exactly what is being hidden.
When CapCut Works Best
CapCut makes the most sense for:
- TikTok videos and Instagram Reels.
- Short interviews.
- Vlogs.
- Street footage.
- Videos with one or two people.
- Quick edits where opening a larger Premiere project would be unnecessary.
For a mostly stationary person, the process is straightforward. For movement, use tracking rather than trying to manually reposition the blur throughout the whole clip.
When Premiere Is the Better Choice
The difference becomes more obvious when the footage gets difficult. If someone keeps turning, moves behind another subject, disappears from the frame, or crosses several other faces, you may spend more time correcting the blur than expected. In those cases, Premiere's more detailed mask controls make the additional setup worthwhile. CapCut also maintains an updated face blurring guide covering its current desktop and mobile workflows.
Method 3. How to Blur Faces in a YouTube Video After Uploading
This is one of the easiest options to overlook. If your video is already uploaded to YouTube, you may not need to download it, reopen the original project, render another file, and upload everything again. YouTube Studio includes its own built-in Face blur tool.
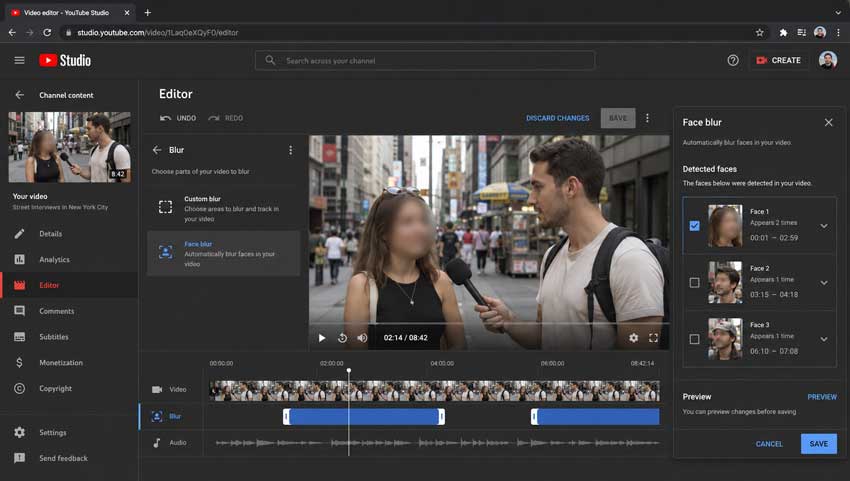
How to Use YouTube Studio Face Blur
- Open YouTube Studio.
- Go to Content.
- Select the video you want to edit.
- Open Editor.
- Select Blur.
- Choose Face blur.
- Wait while YouTube analyzes the video.
- Select the detected faces you want to blur.
- Review the blurred region and timing.
- Save the changes.
This is particularly useful when a person contacts you after a video has already gone live and asks to have their face hidden.
Preview Before You Save
One detail is worth knowing before using YouTube's editor. Since June 2025, saved YouTube Studio Editor changes cannot simply be reverted through the older "Revert to original" workflow. That makes the preview stage much more important. Check which faces were selected and watch the edited section carefully before saving the change. If you still have the original source file or project, keep it as your master copy.
For the latest steps, refer to Google's official YouTube blur documentation.
Method 4. How to Blur a Face in a Video Online
For a short clip, a browser-based editor can be perfectly adequate.< Online video editors such as VEED and similar browser tools provide blur or pixelation effects without requiring a full desktop installation.
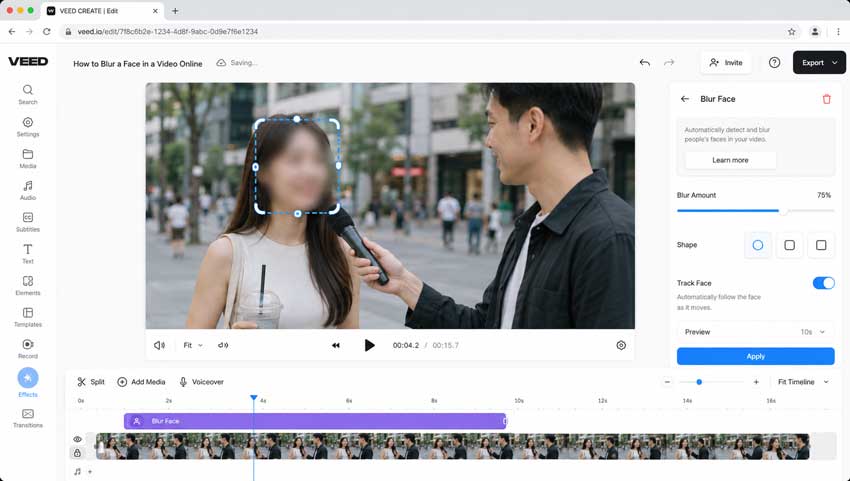
The general workflow is:
- Upload the video.
- Add it to the timeline.
- Create a blur or pixelated area.
- Position the effect over the face.
- Adjust the size and blur strength.
- Track or reposition it as the person moves.
- Preview the clip.
- Export the result.
For someone who stays mostly still, this can be the quickest solution. Once the subject starts moving heavily, however, proper tracking becomes much more important.
Limitations of Online Face-Blurring Tools
Before uploading a large project, I would check:
- Maximum file size.
- Maximum video length.
- Watermark restrictions.
- Export resolution.
- Whether automatic tracking is included.
- How uploaded videos are stored and processed.
That last point matters more for face blurring than for many other editing tasks. There is something slightly contradictory about uploading privacy-sensitive footage to a third-party server in order to make it more private. For ordinary social clips this may not be a major concern, but if the video contains children, internal company footage, confidential interviews, medical information, or other sensitive content, I would check the service's privacy policy before uploading it. For sensitive footage, a local desktop workflow is generally easier to control.
Method 5. How to Blur Faces on iPhone and Android
You do not need a desktop computer for every face-blurring job. Mobile editors can handle straightforward clips directly on an iPhone or Android phone.
CapCut is one of the more practical options because its mobile workflow supports blur effects, masks, overlays, keyframes, and tracking-related tools.
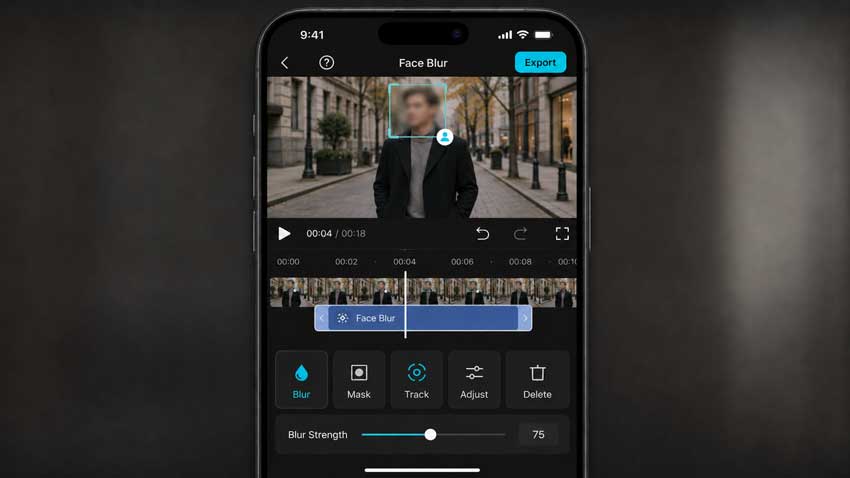
How to Blur a Face in CapCut Mobile
- Create a new project and add the video.
- Add or duplicate the clip as an overlay if required by your workflow.
- Apply a Blur effect to the layer used for the face.
- Add a circular or suitable mask.
- Resize the mask and place it over the face.
- Use tracking where available, or add keyframes as the face moves.
- Preview the full sequence.
- Export the video.
For a stationary person, this is straightforward. For somebody walking across the frame, manual keyframes become much more noticeable. If you have to use keyframes, add a new one whenever the direction or speed of the face changes rather than relying on two keyframes placed far apart.
Zoom In Before You Export
One mobile editing habit that helps is zooming into the preview while positioning the face mask. On a phone screen, a mask may appear to cover the entire face even though part of an eye, forehead, or jaw is still visible around the edge. After positioning it, play the clip once at normal speed and then scrub through the difficult frames manually. The two checks tend to reveal different problems.
How to Blur Multiple Faces in a Video
Blurring several people changes the workflow more than you might expect. If five people appear in one shot, placing one large blur over the whole group is quick, but it can hide a large part of the video. A cleaner method is to create a separate tracked mask for each person.
The usual process is:
- Create a mask around the first face.
- Track that face through the shot.
- Review and correct the tracking.
- Create another mask for the next face.
- Repeat the process for every person you need to hide.
- Check carefully when two or more faces overlap.
The difficult part is not creating the masks. It is what happens when those masks cross each other. Imagine two people walking past one another. For a few frames, one face may completely cover the other. When they separate, the tracking mask can occasionally attach itself to the wrong subject. Whenever people overlap, I would inspect that section manually. For a large crowd or a long piece of street footage, automatic multi-face detection can save a significant amount of time compared with building individual masks from scratch.
Low-Quality Footage? Enhance the Video Before You Blur the Face
There is one workflow issue worth thinking about if the original footage is noisy, blurry, compressed, or low-resolution:
Do your video restoration first and blur the faces afterward.
For example, imagine you have an old 720p recording with heavy noise and compression. If you blur the faces first and then run the censored video through sharpening, denoising, restoration, or upscaling, you are processing the privacy mask along with the rest of the frame. That makes the final anonymization stage harder to judge.
The workflow I prefer is: Original Footage → Denoise/Deblur/Upscale → Color Correction → Face Blur & Tracking → Final Export
This is where Aiarty Video Enhancer fits naturally into the process. Instead of using it after the privacy edit, you can clean up and restore the source footage first, then create the face blur on the final-quality version.
How to Enhance Low-Quality Footage Before Face Blurring
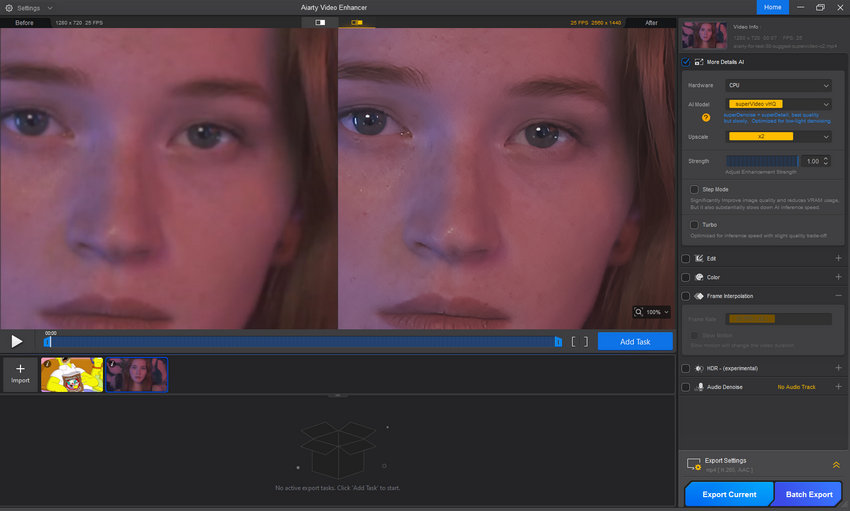
- Import the original video into Aiarty Video Enhancer.
Use the cleanest source file you have. If possible, avoid starting with a copy that has already been downloaded and recompressed by a social media platform.
- Choose an enhancement model based on the actual problem.
If the footage is mainly noisy, prioritize noise cleanup. If it is soft, blurry, or low-resolution, test detail restoration and upscaling.
Aiarty Video Enhancer supports video denoising, deblurring, detail restoration, and AI upscaling, and current versions also provide controls that let you adjust how strongly the enhancement is applied. I would avoid automatically choosing the strongest setting. With real camera footage, a restrained enhancement generally looks more believable than pushing every edge and texture as far as possible.
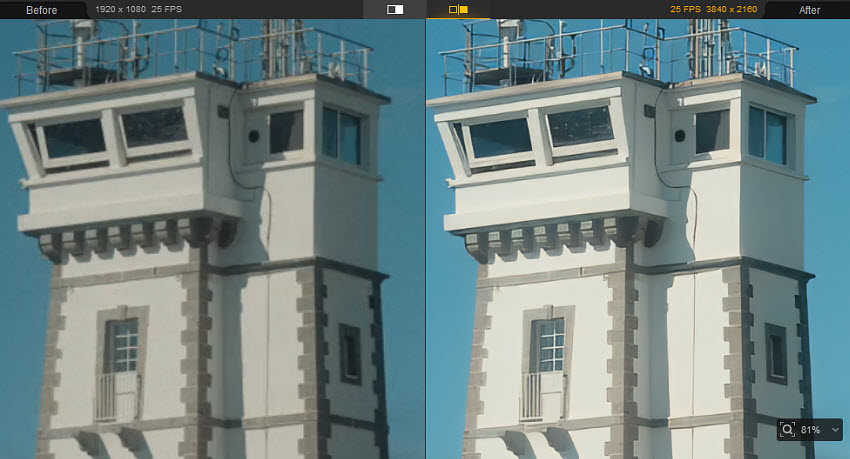
- Preview difficult areas before processing the full video.
Check areas such as:
- Hair.
- Facial edges.
- Clothing texture.
- Text and signs.
- Foliage.
- Fine moving objects.
These areas usually reveal excessive denoising or sharpening faster than flat parts of the frame.
- Export the enhanced master.
If the source needs a higher-resolution deliverable, you can upscale the footage before moving on to the privacy edit.
- Open the enhanced video in Premiere, CapCut, or your preferred editor and blur the faces.
At this point, the blur and tracking are being created on the actual resolution and visual quality you intend to publish.
That makes the final privacy check much easier.
For privacy-sensitive footage, another useful point is that Aiarty processes video locally on Windows or Mac, so the enhancement stage does not require uploading the original source footage to an online video editor.
Important: Video enhancement should be used to improve your own source footage before anonymization. It should not be used to try to reverse or defeat intentional face blurring applied to someone else's video.
 FAQs
FAQs
Yes. Automatic face-blurring tools use face detection and tracking to identify faces in the video and keep a blur, pixelation, or mosaic effect attached as the person moves.
Automatic tracking still needs to be reviewed when people overlap, disappear from the shot, turn sharply, or move quickly.
Use a mask with motion tracking. In Premiere, create a mask over the face and track it through the clip. In CapCut, use a mask and the available tracking tools to keep the blurred region attached to the face.
If automatic tracking loses the subject, correct the mask manually using keyframes or frame-by-frame adjustments.
Create and track a separate mask for each person, or use a face-detection tool that can automatically detect multiple people.
Pay special attention when faces overlap because a tracker can occasionally switch from one person to another.
Yes. Free and freemium video editors provide blur, mosaic, mask, and face-tracking options. CapCut includes face-blurring workflows, while YouTube Studio provides a built-in Face blur tool for videos already uploaded to YouTube.
Free-plan limitations, watermarks, export resolution, and feature availability can change, so check the current plan before starting a large project.
You can use a mobile video editor such as CapCut. Apply a blur to the relevant layer, limit it to the face with a mask, and use tracking or keyframes to follow the person's movement.
For a short clip with limited movement, manual keyframes may be enough.
Yes. Open the video in YouTube Studio and go to Editor > Blur > Face blur. YouTube will analyze the video and allow you to select the detected faces you want to hide.
Preview the result carefully before saving your changes.
Before.
If the original footage needs denoising, deblurring, restoration, color correction, or upscaling, complete those steps first. Then add the face blur to the final-quality version. For low-quality footage, Aiarty Video Enhancer can handle the restoration stage before you move the video into Premiere, CapCut, or another editor for face tracking.
Conclusion
The easiest way to blur faces in a video depends less on the blur effect itself and more on how much the person moves.
For a stationary face, almost any editor with a blur and mask will work. For a moving face, use tracking. For several moving people, automatic face detection can save a lot of time.
Premiere gives you the most control when tracking becomes difficult. CapCut is faster for everyday and social editing, while YouTube Studio is a convenient option when the video is already online.
If the original footage is noisy, blurry, compressed, or low-resolution, finish the quality restoration first. Tools such as Aiarty Video Enhancer can clean up and enhance the source locally before you create the final face masks.
Whatever method you choose, watch the finished video from beginning to end before publishing it.
A face only needs to slip outside the mask for a few frames for the blur to stop doing its job.
You May Also Like


This post was written by Ashley Brown, a videographer turned AI explorer. As an associate writer at Digiarty Software, she dives into the latest AI-powered tools for video enhancement and content creation, offering practical insights and unbiased commentary. Accuracy confirmed by Abby Poole.
