Summary: This guide explains how to color grade video footage in Adobe Premiere Pro using Lumetri Color tools for professional results. It emphasizes preparing clips beforehand with Aiarty Video Enhancer for AI-powered upscaling, noise reduction, and detail recovery, which ensures a cleaner and more accurate color grading process.
Color grading is a crucial step in the video editing process that can dramatically enhance the look and feel of your footage. Whether you're aiming for a cinematic style, a vibrant pop of color, or a subtle mood shift, mastering color grading can elevate your videos to a professional level.
In this guide, you'll learn how to effectively use Adobe Premiere Pro's powerful Lumetri Color tools to achieve stunning results. We'll also explore why it's beneficial to prepare your footage with AI-powered upscaling and noise reduction before grading, and share tips to avoid common beginners' mistakes.
Let's dive in and unlock the full potential of your video projects!
Step 0. Enhance Your Video Before Color Grading in Premiere Pro
First of all, this is an optional step. Then why we need to do it?
Enhancing video quality first before color grading empowers you to work with a visually optimized foundation, potentially saving time and effort in Premiere Pro and ultimately leading to a more refined and visually striking end product. Here are more details:
1. Clean Footage for a Precise Grade
- Improved Accuracy: Enhancing resolution, removing noise and deblurring the footage beforehand provides a cleaner, higher-quality canvas for color grading. This allows you to make more precise and effective color adjustments without those adjustments being influenced by pre-existing imperfections.
- Targeted Corrections: You can address issues like noise, blur, and artifacts first, and then focus specifically on the creative color adjustments in Premiere Pro's Lumetri Color panel.
2. Optimized Workflow for Color Grading
- Consistent Timeline Resolution: Enhancing the footage to a higher resolution (e.g., 4K) before grading ensures that you are working on a conformed timeline, which can be particularly beneficial for editing and visualizing the final output.
- Reduced Color Shift Concerns: Performing the enhancement first can help mitigate potential color shifts or artifacts that might be introduced by the AI enhancement process. This means you can focus on color grading without constantly battling unexpected color changes from the enhancement.
- Consistency in Grain (if applicable): If you plan to add film grain or other textures during color grading, applying it after enhancement can lead to a more natural and consistent look, as the grain won't be altered by the AI processing.
3. Enhanced Detail for Better Results
- Revealing Hidden Detail: Upscaling and sharpening features in tools like Aiarty can bring out details that might have been less apparent in the original, lower-resolution footage. This enhanced detail can lead to a more accurate and visually appealing color grade.
- Better Color Accuracy: With a cleaner and more detailed image, color adjustments in Premiere Pro are likely to be more precise, resulting in a more polished and professional final look.
If you feel interedted into this step, and think it necessary, we highly reommend Aiarty Video Enhancer as the best helper to do the job.
Aiarty Video Enhancer is an AI-powered desktop application that is specifically designed to improve video quality. It leverages advanced AI models to upscale, denoise, deblur, and restore details in videos, particularly those with low resolution, noise, or blur.
Here's why it's a good choice for upscaling video quality before color grading in Premiere Pro:
1. Focused on Enhancement, not Editing
- Dedicated Tools: Aiarty is purpose-built for video enhancement. It focuses on tackling issues like low resolution, noise, and blur, which are common challenges when working with older footage or content shot under less-than-ideal conditions.
- Complements NLEs: Rather than replacing your Non-Linear Editor (NLE) like Premiere Pro, Aiarty complements it by handling the enhancement tasks that would otherwise require additional plugins or complex manual adjustments.
2. Advanced AI Capabilities
- Upscaling with Detail: Aiarty goes beyond simple pixel stretching, using AI models to intelligently reconstruct missing details and textures, resulting in sharper and more natural-looking upscaled videos.
- Effective Denoising: It uses specialized AI models to eliminate various types of noise, including high ISO noise, low-light noise, and compression artifacts, without sacrificing detail or clarity.
- Targeted Deblurring: Aiarty's models can effectively restore edge definition and sharpness by removing motion blur and focus imperfections.
3. Workflow Efficiency
- Faster Processing: Aiarty leverages GPU acceleration and optimized AI models for significantly faster processing speeds compared to traditional methods and some other AI upscalers.
- Offline Processing: The software runs entirely offline, eliminating the need for cloud uploads and ensuring privacy and security, which is particularly useful for client-sensitive work or those with unreliable internet access.
- User-Friendly Interface: Aiarty offers a streamlined, one-click workflow that is easy to use for both beginners and professionals.
4. Addressing Specific Challenges
- Restoring Old Footage: Aiarty is particularly well-suited for enhancing and restoring older footage (e.g., from VHS tapes or low-resolution cameras) by removing noise, deblurring, and upscaling to higher resolutions.
- Tackling Low-Light and Grainy Footage: Its specialized models, like superVideo, excel at cleaning up noisy and grainy footage shot in low-light conditions, turning underexposed clips into clearer, more cinematic images.
- Recovering Texture and Depth: Aiarty can help restore natural textures and depth to footage that might appear overly smooth or flat due to compression or AI generation.
So why not give it trial now and help your video achive a much better color-grading result in Premiere Pro?
Step 1. Setting up Your Workspace
Open the Color workspace: Navigate to Window > Workspaces > Color or choose "Color" from the workspace switcher. This opens the Lumetri Color and Lumetri Scopes panels (Section A: Lumetri Scopes panel. Section B: Lumetri Color panel with curves, color wheels, and slider adjustments).
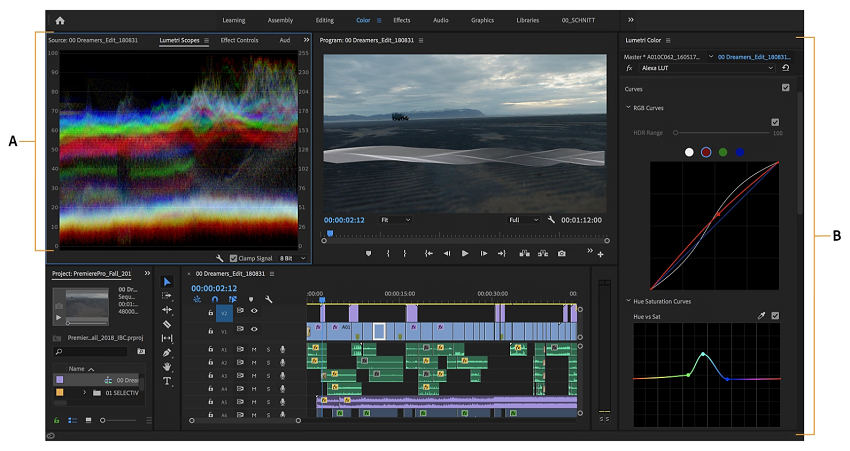
Note:The Lumetri Scopes (Vectorscope, Histogram, Parade, and Waveform) provide real-time visual feedback on the color and brightness of your video, which is crucial for making accurate and consistent adjustments. These scopes are valuable for assessing footage and ensuring accuracy during the coloring process.
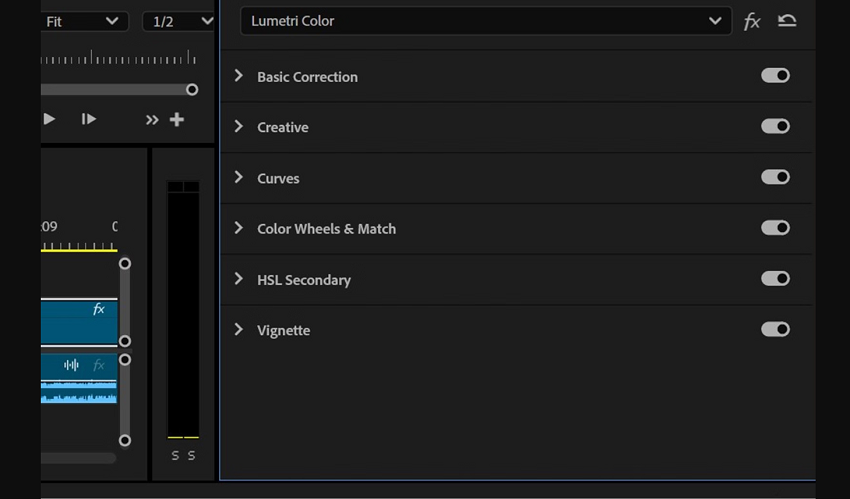
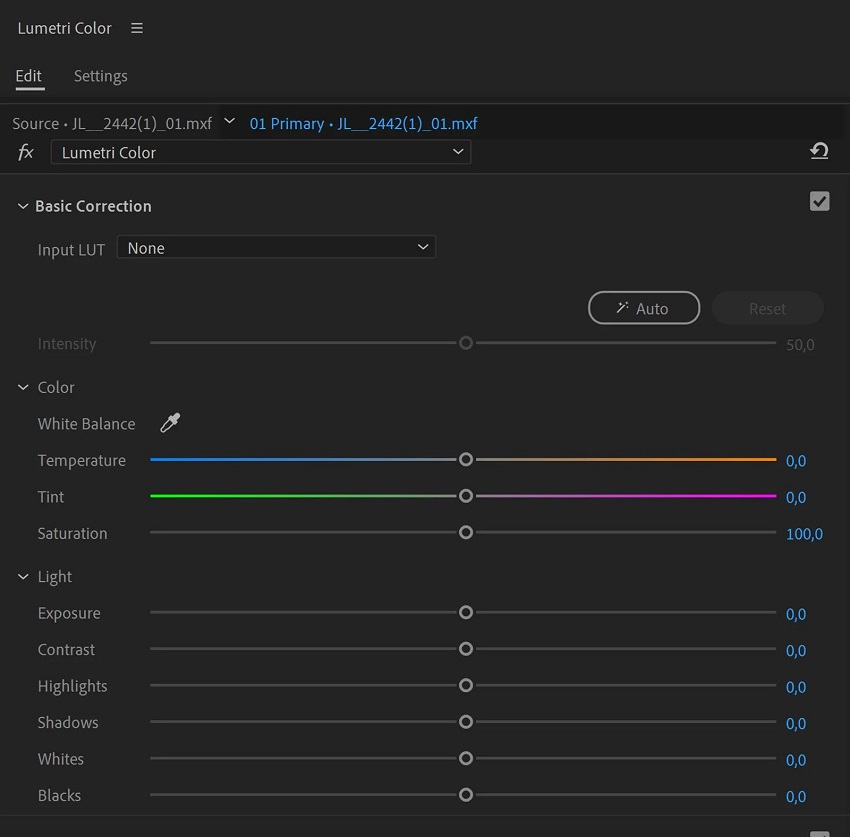
Step 2. Basic Correction (Technical Adjustments)
Select the desired clip or clips in your timeline. Then locate the Basic Correction tab within the Lumetri Color panel.
- Adjust Exposure and White Balance:
- Exposure: Adjust the brightness of the overall image.
- White Balance: Use the eyedropper tool to select a neutral white or gray in your footage to correct color casts, ensuring whites appear white and skin tones are accurate.
- Tone Sliders: Refine the tonal range with Exposure, Contrast, Highlights, Shadows, Whites, and Blacks sliders.
- Saturation: Adjust the intensity of colors in your footage.
Also learn: Best Ways to Fix Overexposed Video in Premiere Pro (Step-by-Step Guide)
Step 3. Creative Adjustments (Stylistic Choices)
Explore the options under the Creative tab in the Lumetri Color panel.
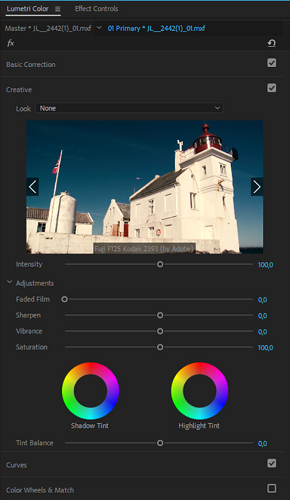
Apply a preset Look or a custom LUT (Look-Up Table) to quickly establish a specific aesthetic or film style. Remember that while creative LUTs can be helpful, overuse or improper application can lead to unnatural results.
Adjust sliders like Intensity, Faded Film, Sharpen, Vibrance, and Saturation to fine-tune the look. Also experiment with the tint wheels for shadows and highlights to add color casts to specific tonal ranges.
Step 4. Fine-tuning With Curves and Color Wheels
Curves (RGB and Hue Saturation):
- RGB Curves: Adjust the luminance and tonal ranges of your footage. Create an "S" curve to increase contrast or use it for precise white balance adjustments.
- Hue Saturation Curves: Target specific colors for adjustments:
- Hue vs. Saturation: Adjust the saturation of specific hues.
- Hue vs. Hue: Change the color of specific elements within your footage.
- Hue vs. Luma: Adjust the brightness of specific colors.
- Luma vs. Sat: Adjust saturation based on an area's luminance.
- Sat vs. Sat: Selectively alter the saturation of an image without affecting similar colors.
Color Wheels: Use the separate color wheels for shadows, midtones, and highlights to adjust the color balance in those specific areas.
Color Match: Use the Color Match feature to automatically match the color and lighting between different clips in your sequence. Select a reference frame and a target clip, then click "Apply Match".
Step 5. Targeted Adjustments (HSL Secondary)
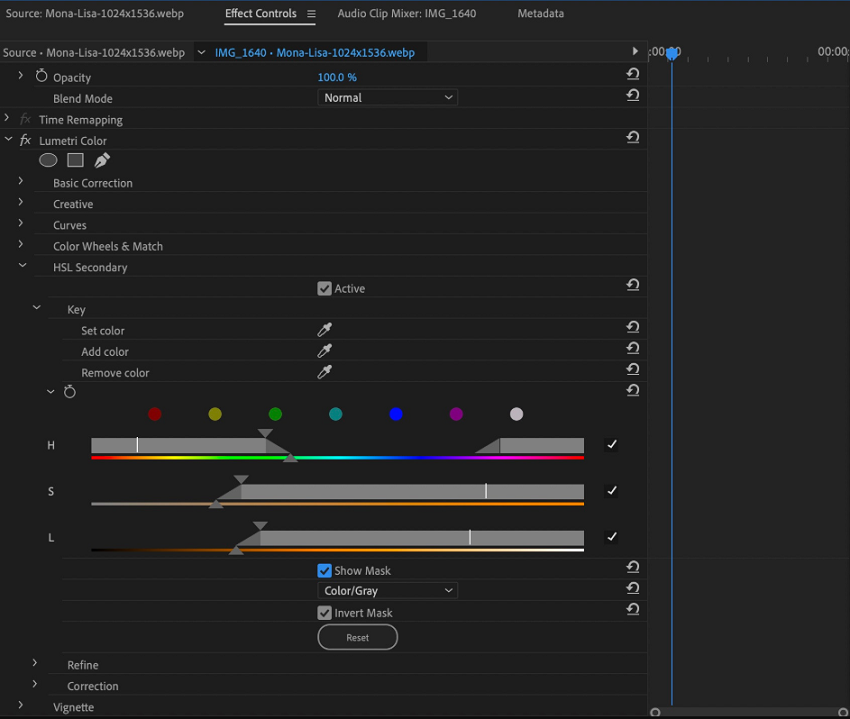
Use the HSL Secondary tab to isolate specific colors within your footage and make targeted adjustments to their hue, saturation, and luminance. This is particularly useful for fine-tuning elements like skin tones or the color of a specific object. Also use the Denoise and Blur sliders in the Refine tab to smooth out color transitions and create seamless blends.
Step 6. Finishing Touches
Add a vignette to draw attention to the center of the frame or create a specific mood. Adjust the Amount, Midpoint, Roundness, and Feather for the desired effect.
Step 7. Exporting Your Video
Once you're satisfied with your color grade, export your video by going to File > Export > Media.
Common Color Grading Mistakes Beginners May Make in Premiere Pro
Beginners in color grading often fall into certain traps that can lead to an unnatural or inconsistent look. Here are some common mistakes to be aware of.
Mistake 1. Overdoing It
- Over-saturation: Pushing the Saturation slider too far can result in artificial-looking colors and make skin tones appear unnatural.
- Excessive contrast: Crushing blacks or blowing out highlights can lead to a loss of detail in your footage.
- Applying heavy-handed looks: While creative LUTs can be helpful, over-reliance or improper application can lead to a generic or undesirable look that doesn't fit the mood of the film.
Mistake 2. Neglecting the Fundamentals
- Not balancing shots first: Failing to address issues like white balance and exposure before applying a creative grade can complicate the process and lead to inconsistent results across different clips. You should rectify basic errors like over-exposure or under-exposure and color casts before moving on to the creative grade.
- Ignoring the scopes: Trusting your eyes alone is unreliable, as your eyes can adjust to color casts, making it difficult to accurately judge color balance. Use Lumetri Scopes like the Vectorscope and Waveform to objectively assess and correct color and brightness levels.
Mistake 3. Inconsistency
- Different grades for different scenes: Applying different color treatments to various scenes within the same project can create a jarring and disjointed viewing experience.
- Not using adjustment layers: Directly grading clips can make it difficult to maintain consistency, especially across multiple clips or when making changes later in the process. Using adjustment layers allows for a non-destructive and consistent approach to grading.
- Ignoring skin tones: Skin tones are crucial for natural-looking video. Over-saturating or incorrectly balancing colors can lead to unnatural skin tones. The Vectorscope YUV can help you keep skin tones within the appropriate range.
Mistake 4. Other Mistakes
- Not working in a calibrated environment: Grading with an uncalibrated monitor can lead to inaccurate color judgments that won't translate well to other screens.
- Working without breaks: Fatigue can cause your eyes to become accustomed to the colors on your monitor, leading to over-adjustments. Taking regular breaks helps you maintain a fresh perspective.
- Not considering the client's vision: Failing to understand the desired mood or look for a project can result in a grade that doesn't match the director's intentions.
- Poor keying and tracking: When using masks or effects, bad keys or tracking can be obvious and distracting.
By being aware of these common pitfalls, beginners can avoid them and develop a more effective and professional color grading workflow in Premiere Pro.
Conclusion
Color grading is an essential skill that can transform your video projects from ordinary to extraordinary. Utilizing Adobe Premiere Pro's Lumetri Color tools like curves, color wheels, and sliders enables you to craft the exact mood and style you envision. And avoiding common beginner mistakes will help maintain a natural and consistent look throughout your video.
With practice and the right workflow, including smart enhancements and professional color correction, you can achieve polished and visually compelling results that captivate your audience every time.
You May Also Like
This post was written by Ashley Brown, a videographer turned AI explorer. As an associate writer at Digiarty Software, she dives into the latest AI-powered tools for video enhancement and content creation, offering practical insights and unbiased commentary. Accuracy confirmed by Abby Poole.