


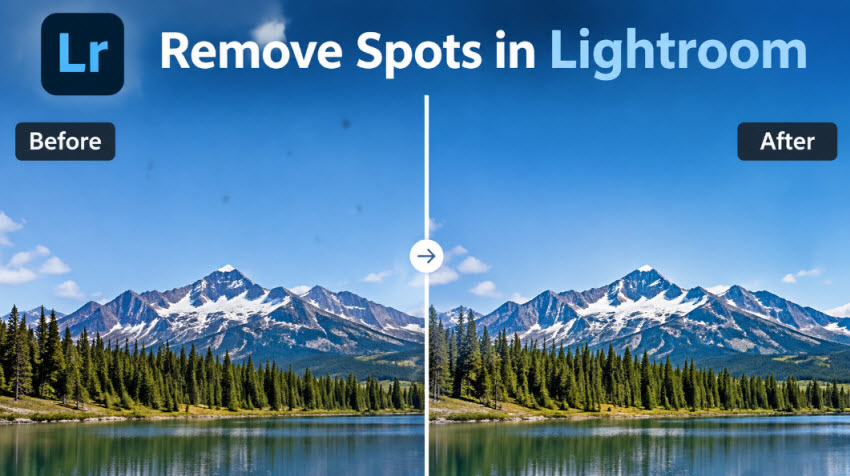
Unwanted spots can easily distract from an otherwise great photo. They may come from dust on your camera sensor, skin blemishes, small objects in the background, or other imperfections. Fortunately, Lightroom offers built-in retouching tools that let you remove these distractions without opening Photoshop.
In this guide, you'll learn how to use spot removal in Lightroom, find the Healing Brush, choose between Heal and Clone modes, and use Visualize Spots to detect tiny imperfections. We'll also cover common Spot Removal problems and introduce an alternative for removing more complex blemishes and improving overall image quality.
How to Use Spot Removal in Lightroom
Lightroom's spot removal feature allows you to remove unwanted marks by replacing the selected area with pixels sampled from another part of the same photo. It works well for sensor dust, small skin blemishes, and minor distractions. Here's how to remove spots in Lightroom step by step.
Step 1. Open the Remove Tool
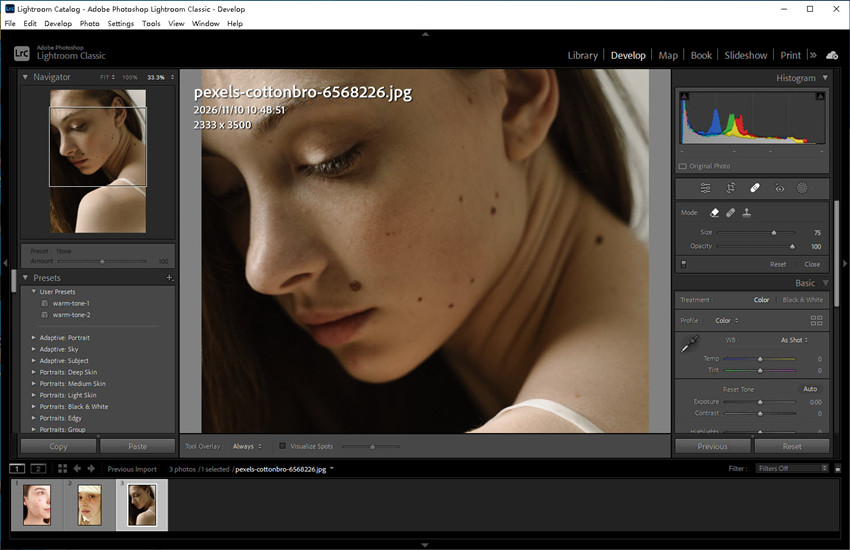
Open your image in Lightroom Classic and go to the Develop module. Click the Remove tool or press Q to activate it. In the tool panel, you'll find different removal modes, including Heal and Clone. Choose the one that best matches the area you're correcting.
Step 2. Choose Heal or Clone Mode
Before editing, decide how Lightroom should replace the unwanted area.
- Heal: Uses texture from a sampled area while blending its color, lighting, and shading with the surrounding pixels. This is generally a good starting point for removing dust spots, blemishes, and small distractions.
- Clone: Copies pixels directly from the sampled area into the selected region. It is useful when you need to preserve a particular texture or pattern without blending it into the original area.
For most small imperfections, start with Heal. If the result looks too soft or the texture doesn't match, switch to Clone and compare the results.
Step 3. Adjust the Brush Settings
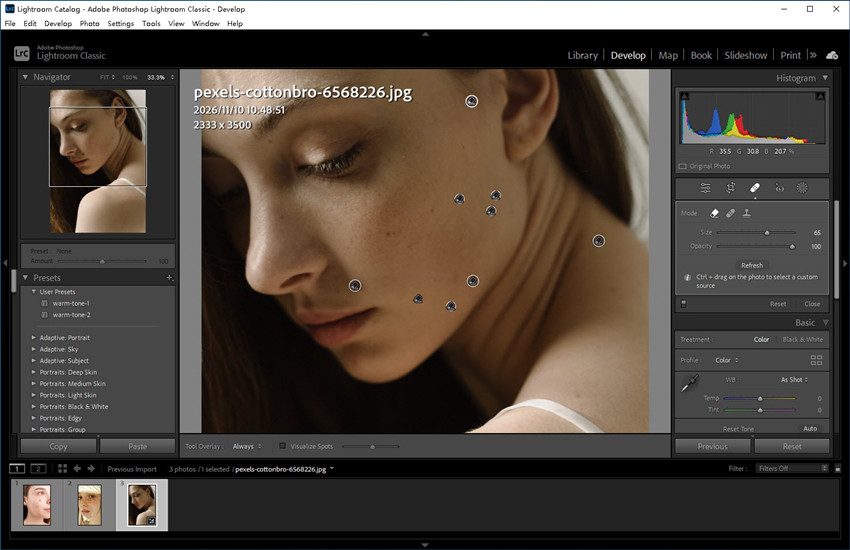
Before painting over an imperfection, adjust the brush settings to match its size and surrounding area.
Lightroom provides several controls:
- Size: Determines the diameter of the brush. Make it slightly larger than the spot you're removing so the entire imperfection is covered.
- Feather: Controls how softly the edited area blends into its surroundings. A higher value creates a softer transition, while a lower value produces a harder edge.
- Opacity: Determines how strongly the correction is applied. Use 100% for complete removal, or reduce it when you want to retain some of the original texture.
You can also use the left and right bracket keys ([ and ]) to decrease or increase the brush size without moving your cursor to the slider.
Step 4. Click or Paint Over the Spots
For small, round imperfections such as sensor dust, simply click on the spot. Lightroom will automatically select a nearby source area to replace it. For longer marks, scratches, or irregular blemishes, click and drag the brush over the entire affected area.
After applying the correction, Lightroom displays the selected region and its sampled source area. You can drag the source pin to another location if the automatically selected area doesn't match.
Step 5. Refine the Sample Area
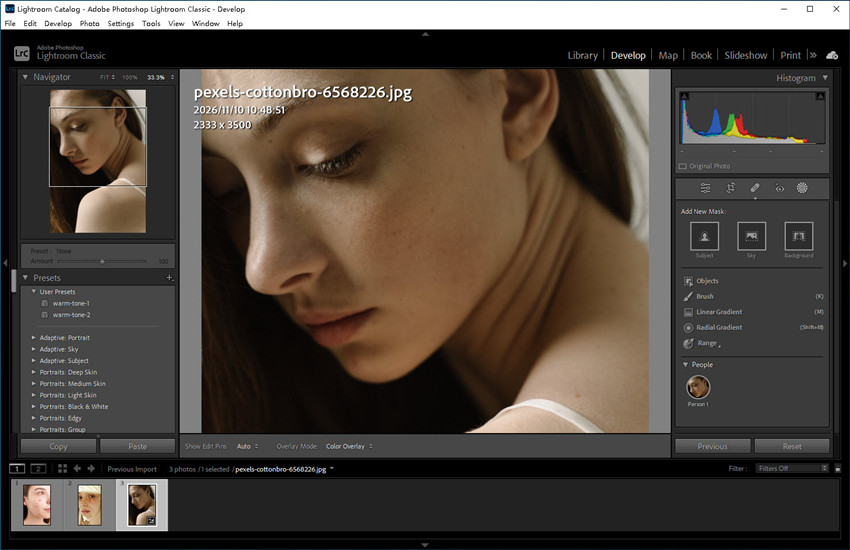
Automatic sampling doesn't always produce the best result, particularly when the surrounding image contains different textures or lighting.
To improve the correction, just select the adjustment pin associated with the edited spot. You can check the sampled source area and drag the source pin to a cleaner area with similar texture and lighting.
Repeat with another source area if necessary. If you're removing several imperfections, inspect each correction individually. A spot may disappear at normal viewing size but leave a visible patch when you zoom in.
How to Use Visualize Spots in Lightroom
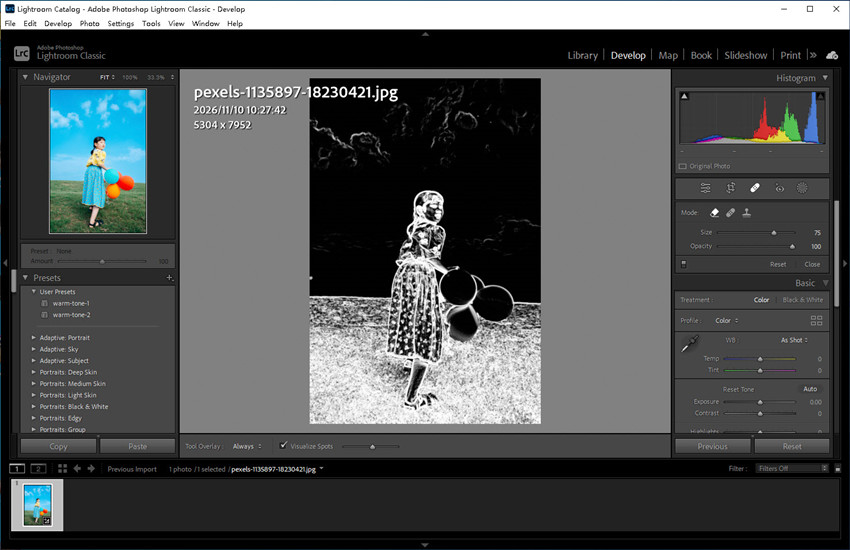
Some imperfections are difficult to notice in a normal photo, especially tiny sensor dust spots against a bright sky or a smooth background. Lightroom Classic's Visualize Spots feature helps reveal these hidden marks through an inverted, high-contrast view, making them easier to locate.
To visualize Spots in Lightroom, open your photo in the Develop module and select the Remove tool. Then find and enable the Visualize Spots checkbox in the toolbar below the image. Lightroom will display an inverted view of your photo, making small dust particles and other surface imperfections more visible.
You can adjust the Threshold slider to control how much detail is highlighted. Increase or decrease it until subtle dust spots become easier to identify without highlighting too much natural texture. Look for isolated dots, dark marks, or irregular patterns that don't belong in the image.
Once you've identified the spots, turn off Visualize Spots or keep the detection view active while using the Remove tool with Heal mode to correct them. You can then return to the normal image view and check whether the corrections look natural.
Remove Spots and Enhance Photo Quality with Ligthroom Plugin
Lightroom provides useful tools for correcting spots and blemishes during photo editing. If you also need to remove unwanted elements, reduce noise, recover fine details, or upscale an image, you can extend your workflow with Aiarty Image Enhancer.
Aiarty works alongside Lightroom Classic so you can send a photo from Lightroom to Aiarty for additional AI-powered retouching and enhancement, then bring the processed image back into Lightroom for further adjustments. Aiarty Image Enhancer includes an AI Eraser that lets you brush over unwanted elements and imperfections instead of manually selecting a clone or healing source.
It can also improve overall image quality. Its AI models support noise reduction, detail refinement, facial detail restoration, and 2x, 4x, or 8x upscaling. This is useful when a photo needs more than spot correction, such as recovering detail in a noisy or low-resolution image.
How to Combine Lightroom and Aiarty in Your Photo Editing Workflow
You don't have to choose between Lightroom and Aiarty. Each can handle a different part of the editing process.
Start with basic edits in Lightroom. Adjust exposure, white balance, contrast, and color as needed. You can also use Lightroom's Remove tool for individual spots and blemishes.
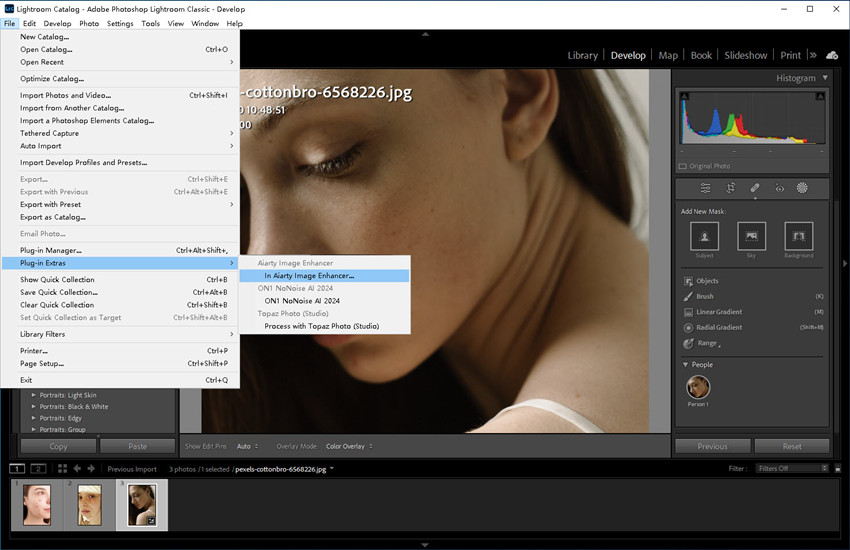
Send the photo to Aiarty Image Enhancer. In Lightroom Classic, select the edited photo and use the Edit In option or File to open it in Aiarty as an external editor.
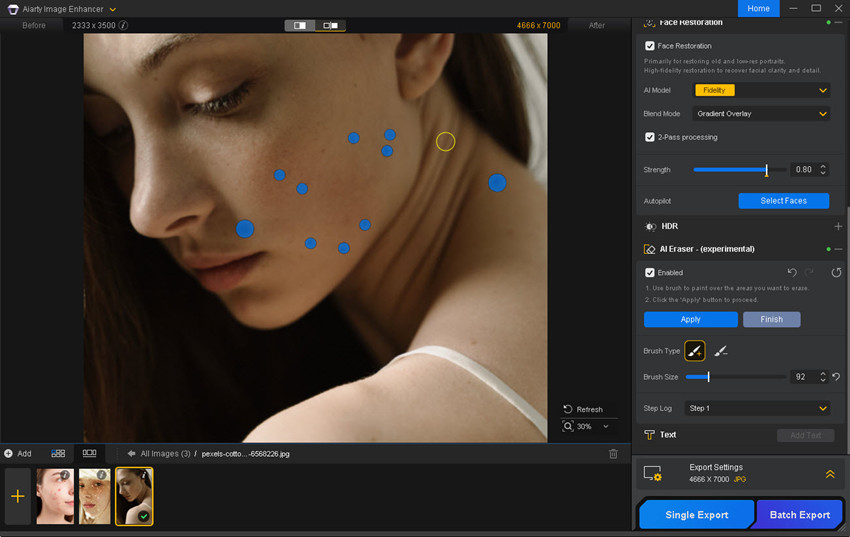
Enable AI Eraser option and adjust the brush size. Then brush over the spots, blemishes, or background distractions you want to remove. After all the spots are selected, click Apply and review the result, refining the selection if necessary.
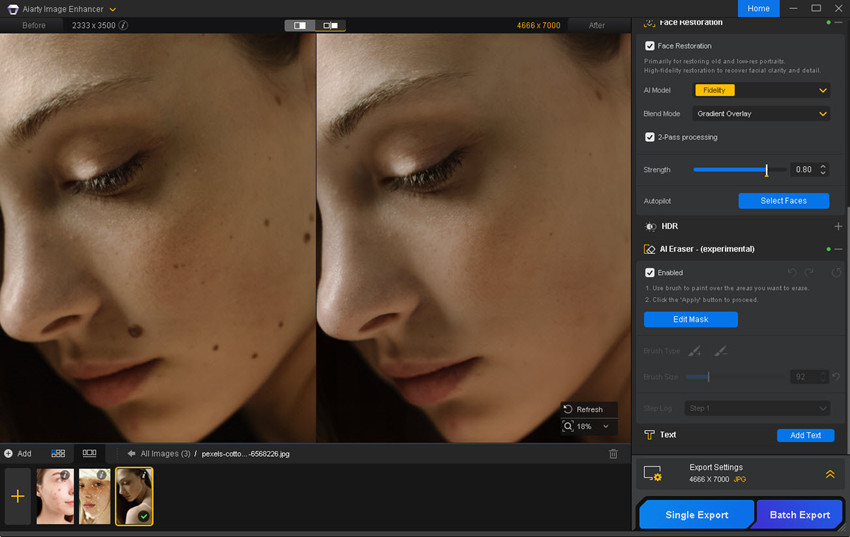
Enhance overall image quality. If the photo needs further improvement, choose an appropriate AI model to reduce noise, refine details, restore facial details, or upscale the image.
Save and return to Lightroom. Export or save the processed image from Aiarty. The resulting file can be brought back into your Lightroom Classic catalog for additional color adjustments, cropping, or final organization.
Final Thoughts
Lightroom makes it easy to remove spots and small imperfections from photos using its Remove tool, with Heal and Clone options for different correction needs. Features like Visualize Spots can also help you find sensor dust that might otherwise go unnoticed. For most everyday retouching tasks, the Lightroom spot removal tool provides a convenient way to clean up your images.
If you want to go beyond spot correction, you can combine Lightroom with Aiarty Image Enhancer. Its AI Eraser helps remove unwanted objects and blemishes, while its enhancement models can reduce noise, refine details, restore facial details, and upscale images. By using both tools in your editing workflow, you can handle local retouching and broader image-quality improvements without giving up your existing Lightroom workflow.
 FAQs
In Lightroom Classic, open a photo in the Develop module and select the Remove tool from the toolstrip below the Histogram panel. You can also press Q to activate it. In newer versions, the former Spot Removal or Healing tool is labeled Remove, with Heal and Clone available as correction modes.
The Heal tool blends the sampled texture, lighting, and shading with the selected area, making it useful for removing sensor dust, pimples, and small blemishes. Clone copies pixels directly from the sampled area, which is helpful when you need to preserve a specific texture or pattern. For most small spots and skin imperfections, start with Heal and switch to Clone if the result looks too soft or inconsistent.
You can remove sensor dust manually with the Remove tool using Heal mode. Zoom in on the image, click each visible dust spot, and adjust the sampled area if necessary. Visualize Spots can help reveal dust particles against bright skies or smooth backgrounds. In supported newer versions of Lightroom and Lightroom Classic, you can also use the AI-powered Dust Removal feature to detect and remove sensor dust automatically.
If spot removal does not seem to work, check the brush settings first. An opacity value that is too low may leave the original mark partially visible. Make sure your brush covers the entire imperfection, and check whether Lightroom has selected an unsuitable sample area. For Heal and Clone, try moving the sample source to an area with similar texture, color, and lighting. Also make sure Visualize Spots is turned off if you want to inspect the normal photo.
Yes. Lightroom's Heal and Clone tools are designed to correct selected areas while preserving the surrounding image. For natural-looking results, use a brush that closely matches the size of the imperfection, choose a suitable sample area, and avoid covering unnecessary details. Zoom in to inspect the correction, then compare it with the original image to check for visible edges, blur, or repeated textures.
You May Also Like


This post was written by Brenda Peng who is a seasoned editor at Digiarty Software who loves turning ordinary photos into extraordinary works of art. With AI assistance for brainstorming and drafting, the post is reviewed for accuracy by our expert Abby Poole for her expertise in this field.
