


There are several ways to transfer photos between Photoshop and Lightroom, depending on where the image starts and which version of Lightroom you're using.
If your photo originally comes from Lightroom, you can send it to Photoshop and have the edited version automatically return to your Lightroom library. But if you create an image directly in Photoshop, you'll need to save and import it separately. There are also ways to automate the import process or transfer files without manually browsing for them.
Below, we'll cover the different methods for Lightroom Classic and cloud-based Lightroom, along with a few tips for keeping your original RAW files and Photoshop edits together.
Part 1. Photoshop to Lightroom Classic
When the Photo Starts in Lightroom and Is Edited in Photoshop
If your photo is already in Lightroom Classic and you want to edit it further in Photoshop, you don't need to save and import the edited file manually. Lightroom Classic has a built-in Edit in Photoshop command that handles the round-trip process.
Step 1. Open the Photo in Photoshop from Lightroom Classic
In Lightroom Classic, select the photo you want to edit, then go to Photo > Edit In > Adobe Photoshop. You can also right-click the photo and choose the same option.
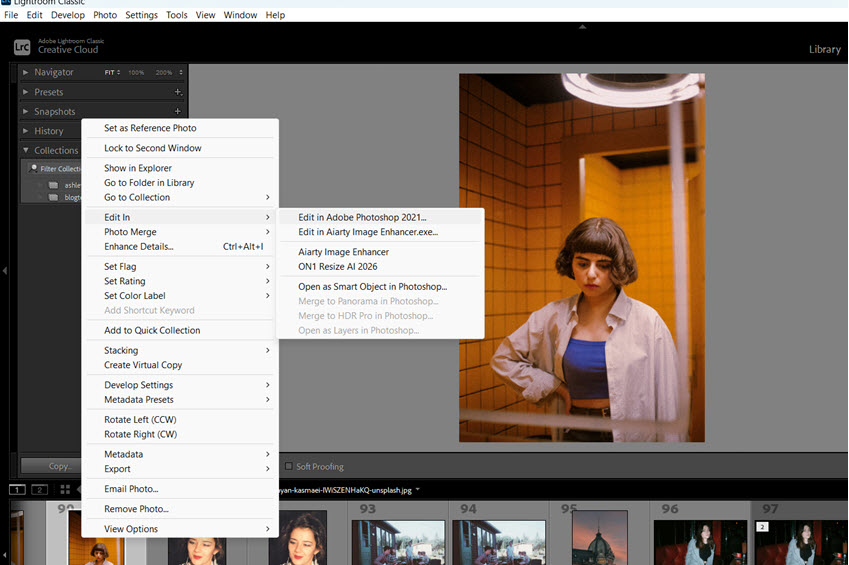
Step 2. Choose How to Edit the Photo
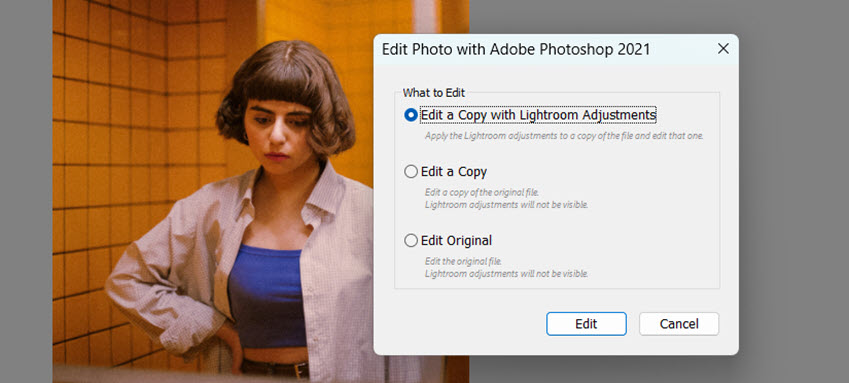
For RAW files, you'll generally see three options:
- Edit a Copy with Lightroom Classic Adjustments: Creates a copy with your existing Lightroom adjustments applied.
- Edit a Copy: Creates a copy without applying your Lightroom adjustments.
- Edit Original: Opens the original file for editing. This option isn't available for RAW files.
For most other formats, such as JPEG, TIFF, and PSD, the available choices are slightly different.
Step 3. Edit and Save the Photo in Photoshop
Make your edits in Photoshop as usual. When finished, go to File > Save and close the document.
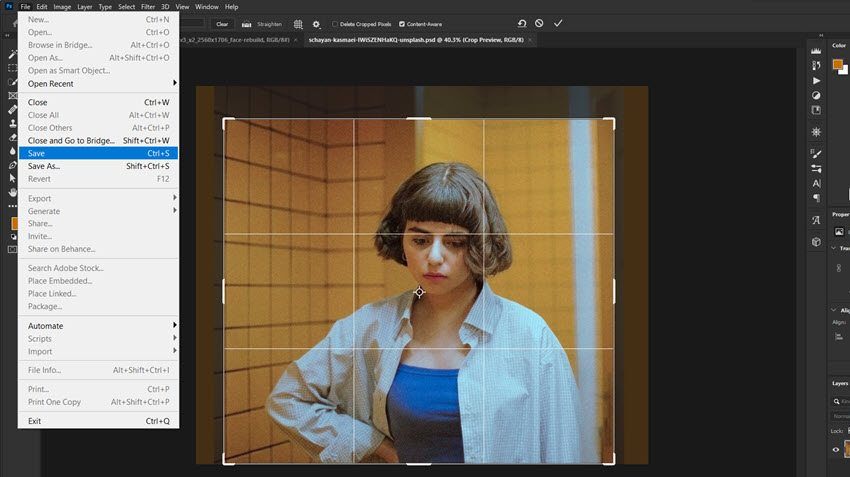
Step 4. Find the Edited Photo in Lightroom Classic
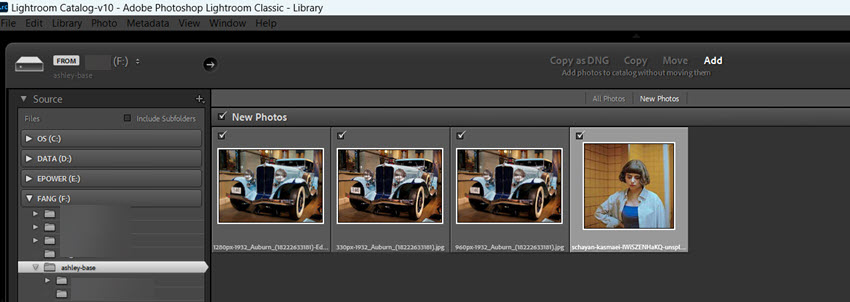
Return to Lightroom Classic. The Photoshop-edited version will automatically appear in your catalog, usually alongside the original photo.
By default, Lightroom Classic saves the edited version in the same folder as the original, using the file format specified in External Editing preferences, typically PSD or TIFF.
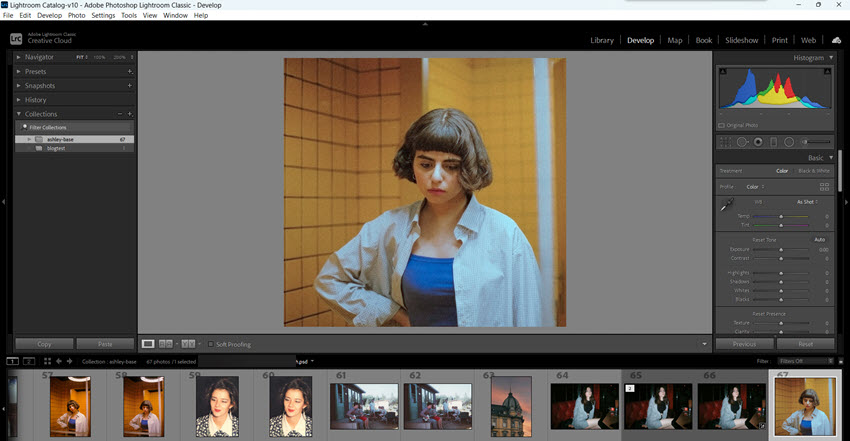
Note: This automatic return works when you send the photo to Photoshop through Lightroom Classic's Edit in Photoshop command. Simply opening a photo directly in Photoshop won't establish the same round-trip workflow.
When the Photo Starts in Photoshop
If you create an image directly in Photoshop, such as a graphic design, composite, or retouched photo, you can add it to Lightroom Classic by saving and importing it manually.
Step 1. Save the Photoshop File
In Photoshop, go to File > Save As or File > Save a Copy, depending on your version. Choose a suitable format, such as PSD or TIFF, and save the file to a folder on your computer.
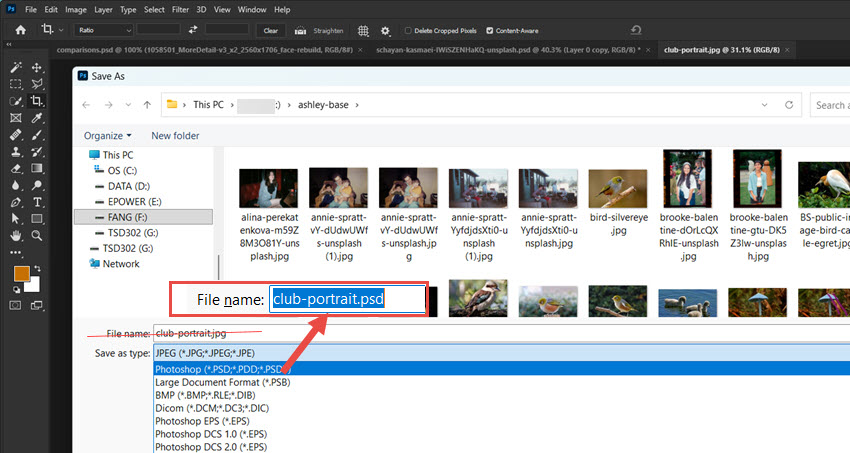
Step 2. Import the File into Lightroom Classic
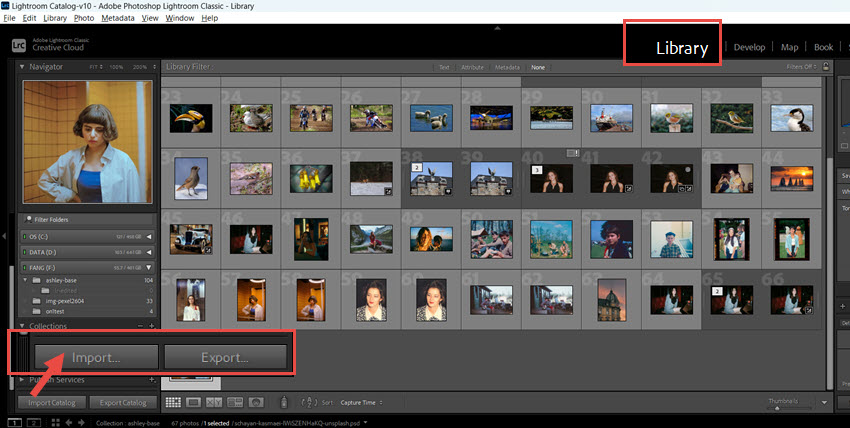
Open Lightroom Classic and click Import. Browse to the folder where you saved the Photoshop file, select it, and click Import.
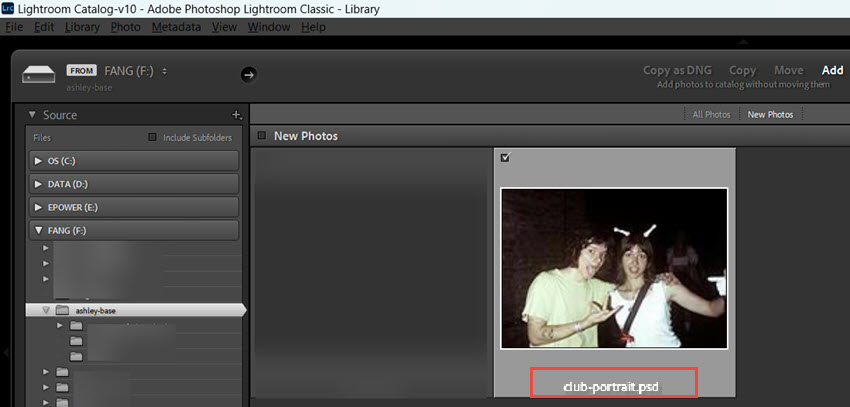
Your Photoshop image will now appear in the Lightroom catalog, ready for further editing and organization.
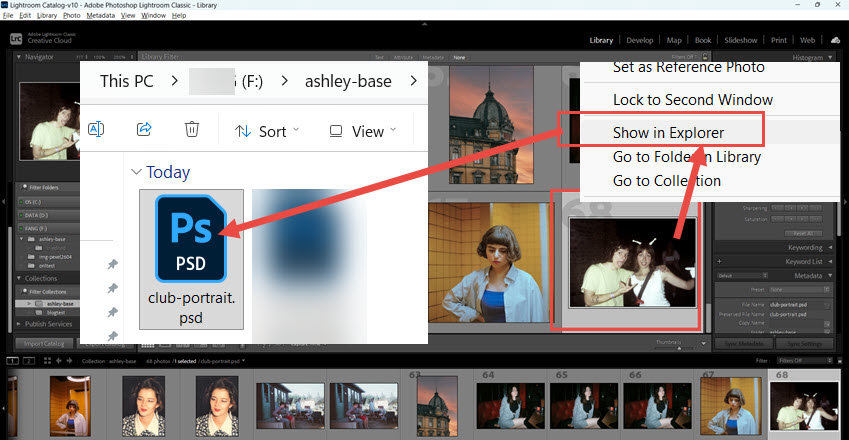
Which file format should you use?
- PSD: A good choice if you want to preserve Photoshop layers for future editing.
- TIFF: Another good option for maintaining image quality and compatibility with other editing applications. It can also retain layers when saved with the appropriate settings.
- JPEG: Suitable for finished images when you don't need to retain layers.
Unlike the previous workflow, this method requires a separate import because the image did not originate in Lightroom Classic.
Automatically Import Photoshop Files into Lightroom Classic
If you frequently save finished images from Photoshop and import them into Lightroom Classic, you can use its Auto Import feature to avoid repeating the manual import process.
Auto Import monitors a designated folder on your computer. Whenever a new supported image file appears in that folder, Lightroom Classic automatically imports it into your catalog.
Step 1. Set Up a Watched Folder
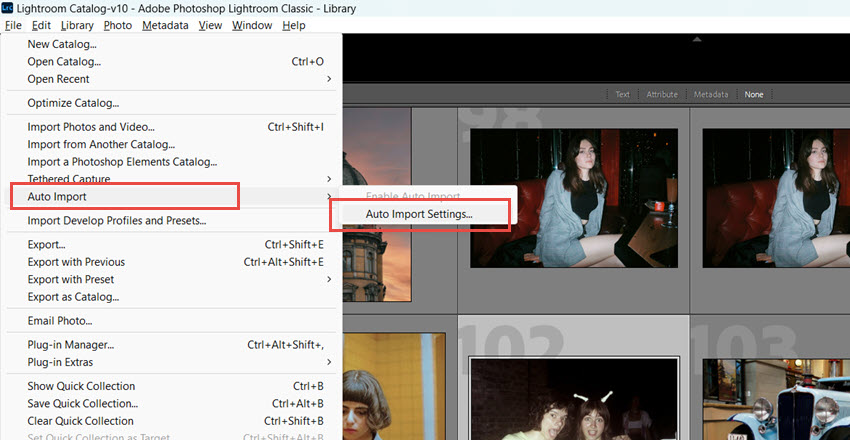
In Lightroom Classic, go to File > Auto Import > Auto Import Settings.
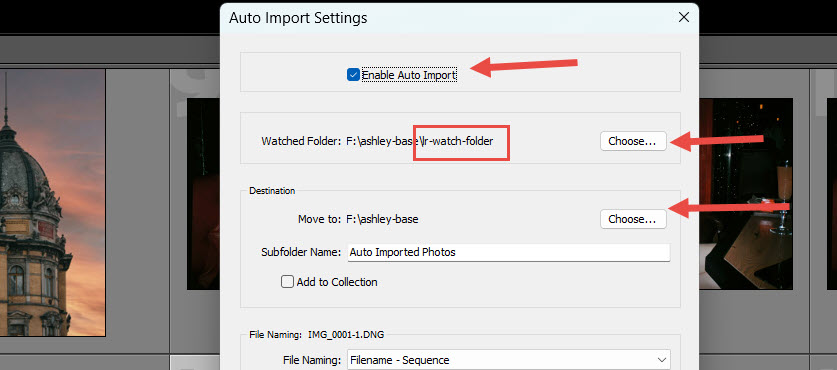
Choose an empty folder as your Watched Folder. This is where you'll save your Photoshop files.
Step 2. Choose a Destination Folder
Specify a separate Destination folder where Lightroom Classic will move the files after importing them.
Step 3. Enable Auto Import
Enable Auto Import and confirm your settings.
Step 4. Save Photoshop Files to the Watched Folder
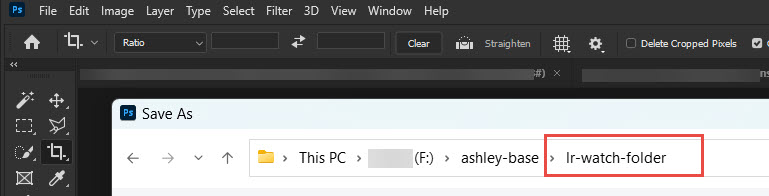
In Photoshop, save your finished PSD, TIFF, or other supported image file into the Watched Folder.
Lightroom Classic will detect the new file, move it to the Destination folder, and add it to your catalog automatically.
Note: The Watched Folder must be empty when you designate it, and Lightroom Classic only monitors the folder itself, not its subfolders. Also, Auto Import is different from the Edit in Photoshop workflow. It automatically imports new files but doesn't link them to an existing original photo.
Part 2. Photoshop to Lightroom CC
Unlike Lightroom Classic, cloud-based Lightroom stores imported photos in your Lightroom cloud library, making them available across your connected devices. If your image starts in Photoshop, you'll need to add it to Lightroom before you can manage and edit it there.
When the Image Starts in Photoshop
If you've created a graphic design, composite, or finished photo in Photoshop and want to add it to Lightroom, you can save the file and import it using the Add Photos feature.
This is also useful if you create graphics, illustrations, or other Photoshop documents that you want to organize alongside your photographs in Lightroom.
Step 1. Save the Photoshop File
In Photoshop, go to File > Save As or File > Save a Copy, depending on your version. Choose a format such as PSD, TIFF, or JPEG, then save the file to your computer.
Step 2. Open Lightroom and Add the Photo
Launch Lightroom and click Add Photos. Browse to the folder where you saved your Photoshop file, select the image, and confirm the import.
Step 3. Wait for the File to Sync
Once added, the image will appear in your Lightroom library. Lightroom will also queue it for upload to the cloud, allowing you to access it from other devices once syncing is complete.
Note: This workflow creates a separate Lightroom library entry for your Photoshop file. It doesn't automatically connect the image to another photo or its original RAW file.
Transfer a Photoshop File to Lightroom on Mac
If you're using a Mac, there's another way to add a Photoshop document to Lightroom without manually locating it through the Add Photos window. You can use macOS's built-in drag-and-drop functionality to transfer the file directly between the two applications.
Step 1. Arrange Both Application Windows
Open Photoshop and Lightroom, then position their windows so you can see both applications on your screen.
Step 2. Undock the Photoshop Document
In Photoshop, drag the document tab away from the application frame to turn it into a floating window. This reveals the standard macOS file icon in the document's title bar.
Step 3. Drag the File into Lightroom
Click and drag the file icon from the Photoshop document's title bar, then drop it into the Lightroom window.
Step 4. Confirm the Import
Lightroom will open its Import window in response to the file drop. Confirm the import, and your Photoshop document will be added to your Lightroom library.
Once imported, Lightroom will queue the file for upload to the cloud, just as it does with other imported files.
Note: This workaround relies on macOS drag-and-drop functionality and may not work on Windows.
Part 3. Keep the Original RAW File and Photoshop Edits in Lightroom
Sometimes, you may want to edit a RAW photo in Photoshop but still retain the original RAW file for future adjustments. For example, you might use Photoshop to remove unwanted objects, repair image details, or perform more advanced retouching, then continue adjusting exposure and colors in Lightroom.
The easiest way to handle this is to keep the original RAW file and save the Photoshop-edited result as a separate PSD or TIFF.
How to Keep Both RAW and Photoshop-Edited Versions in Lightroom
Step 1. Open the RAW File in Photoshop
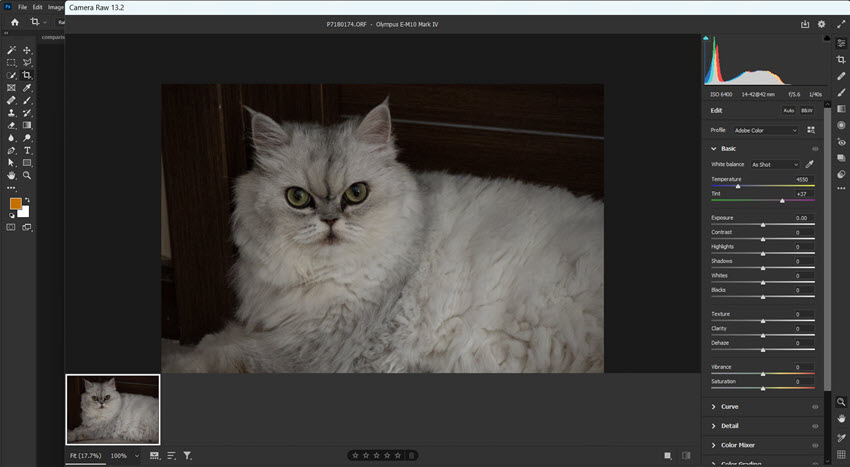
Open your original RAW photo in Photoshop. It will typically pass through Adobe Camera Raw before opening in the Photoshop workspace.
Step 2. Make Your Photoshop Edits
Perform the edits you need, such as object removal, Content-Aware Fill, or other retouching work.
Step 3. Save the Edited Image as PSD or TIFF
Go to File > Save As or File > Save a Copy, depending on your Photoshop version. Choose PSD or TIFF and save the edited image in the same folder as the original RAW file.
Step 4. Import the Edited Version into Lightroom
Open Lightroom and use Add Photos or Import, depending on your Lightroom version. Select the newly saved PSD or TIFF.
Both the original RAW photo and the Photoshop-edited version will now be available in your Lightroom library.
Note: The PSD or TIFF is a rendered image, not a RAW file. You can still adjust exposure, color, white balance, and other Lightroom settings, but you won't have the same RAW processing flexibility as with the original camera file.
FAQs
Can I Transfer Multiple Photoshop Files to Lightroom at Once?
Yes. You don't need to import Photoshop files individually. In Lightroom Classic, you can select multiple PSD, TIFF, or JPEG files in the Import window and add them to your catalog together.
In cloud-based Lightroom, use Add Photos to select multiple files from your computer before confirming the import.
Should I Save Photoshop Files as PSD or TIFF for Lightroom?
Both formats are suitable for transferring Photoshop images to Lightroom.
PSD is a convenient choice if you plan to continue editing the file in Photoshop and want to retain its layers. TIFF is another good option, particularly if you need compatibility with other image-editing applications.
JPEG is more suitable for finished images when you don't need to preserve layers. It generally produces smaller files, but uses lossy compression.
Can I Save Photoshop Edits as DNG?
Not in the same way you save a Photoshop document as PSD or TIFF.
DNG is primarily a RAW image format. Photoshop edits such as object removal, Content-Aware Fill, and pixel-level retouching cannot simply be written back into the original camera RAW data while preserving it as an untouched RAW file.
If you want to retain these edits, save the result as PSD or TIFF and keep the original RAW file separately.
Why Doesn't My Photoshop File Automatically Appear in Lightroom?
It depends on how you opened the image.
If you sent a photo from Lightroom Classic using Edit in Photoshop, the saved result should automatically return to the catalog.
However, if you opened a file directly in Photoshop, Lightroom has no existing round-trip connection to recognize it. You'll need to import it manually or use Lightroom Classic's Auto Import feature.
Can I Add Photoshop Files to Lightroom Without Uploading Them to the Cloud?
If you're using cloud-based Lightroom, you can browse and edit locally stored photos through its Local tab without immediately adding them to your cloud library.
However, if you want the Photoshop file to become part of your cloud-synced Lightroom library and appear across your connected devices, you'll need to add it to the cloud library and allow it to sync.
You May Also Like


This post was written by Brenda Peng who is a seasoned editor at Digiarty Software who loves turning ordinary photos into extraordinary works of art. With AI assistance for brainstorming and drafting, the post is reviewed for accuracy by our expert Abby Poole for her expertise in this field.
