How to Unblur a Video on CapCut [2026 Guide]
Blurry videos are a common frustration, whether you're editing vacation footage, social content, or low-quality clips. CapCut, a popular mobile video editor, provides tools to sharpen and enhance clarity. This guide shows you how to unblur a video in CapCut, and for those times when you need true detail recovery on a desktop, when to consider upgrading to a more powerful AI video enhancer like Aiarty Video Enhancer.
What If CapCut Falls Short? Try Aiarty Video Enhancer for True Video Unblurring
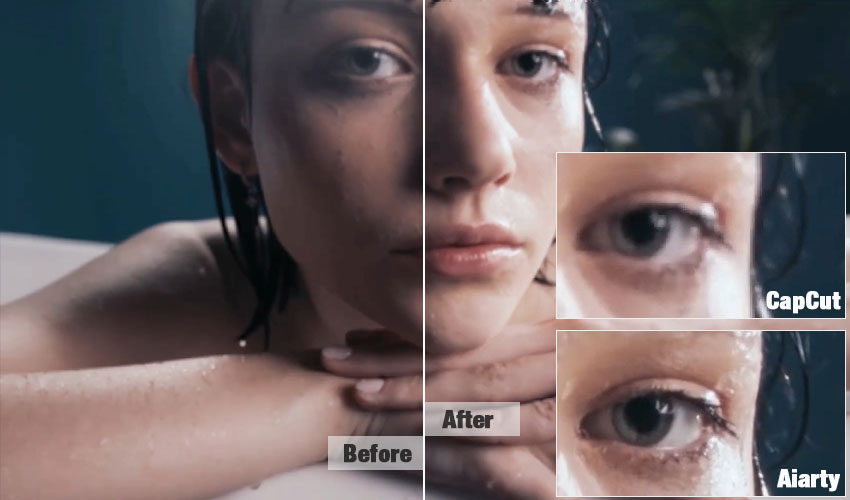
While CapCut offers great sharpening tools to improve clarity, it falls short for genuinely unblurring severely degraded or low-resolution video, with many users on Reddit reporting recurring quality loss issues during import, cropping, and export, frequently leading to noticeable pixelation and a lack of true detail recovery.
For more challenging cases, a dedicated AI video enhancer like Aiarty Video Enhancer can be a powerful alternative, using advanced diffusion and GAN AI technology to reconstruct details, remove blur and noise, and upscale resolution beyond what standard editors can achieve.
Why Your Videos Get Blurry?
Before we dive into sharpening your footage in CapCut, it's helpful to understand why videos get blurry in the first place. Knowing the cause can help you decide if CapCut's unblur video tools can effectively fix the issue, or if a more specialized AI video unblurring tool might be a better fit.
Here are the most common culprits behind blurry video:
- Motion blur: This often happens due to shaky hands during recording or fast movement within the frame.
- Low resolution or digital zooming: Recording at a low resolution or using excessive digital zooming can significantly degrade video quality.
- Out-of-focus recording: If your camera wasn't properly focused on your subject, the entire video or parts of it will appear out of focus.
- Compression artifacts: Uploading and downloading videos, especially across different platforms, can introduce compression artifacts that make your footage look pixelated or blurry.
How to Unblur A Video in CapCut: Step-by-Step Tutorial
CapCut stands out as a versatile and popular video editing app, widely praised for its user-friendliness that appeals to both beginners and professionals. Beyond its general editing capabilities, CapCut offers effective tools to get good video quality, including excellent video stabilization for shaky footage, precise controls for brightness and contrast to optimize lighting, and the ability to increase video resolution for upscaling lower-quality clips.
CapCut offers several built-in features that can help reduce blur and improve clarity, making it a popular choice for quick edits. Here’s how to attempt to unblur your video within CapCut:
At the very beginning, navigate to Capcut official site to download the desktop app or enter the online version to get started. Take online version as an example, drag and drop or click Upload to import your blurry video.
1. Utilize Sharpness & Adjust Filters for Clarity.
Click on the Basic option at the right sidebar, scroll down to find Effects. Then adjust the intensity slider for the Sharpness effect. Start with subtle adjustments and gradually increase it until edges appear crisper and definition improves without making the video look overly artificial or "crunchy."
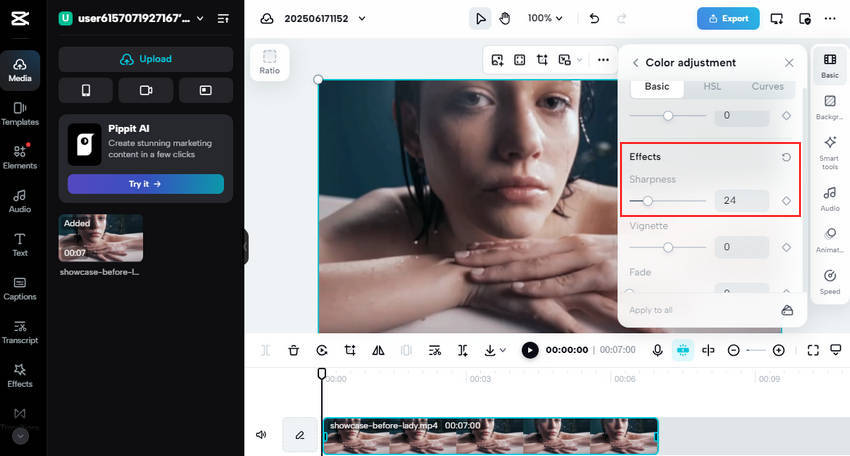
For a more polished look, pair Sharpen with Adjust tools: boost Contrast to make details pop, subtly decrease Brightness if overexposed, and enhance dulled colors with a slight Saturation increase.
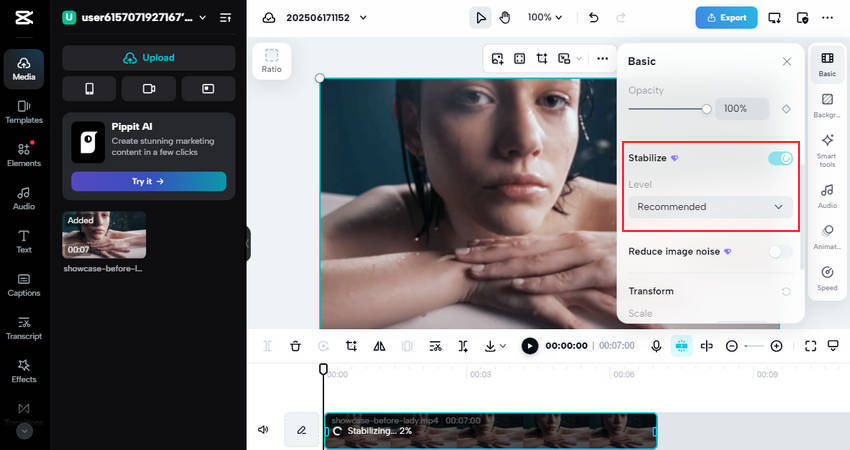
2. Apply Stabilization for Motion Blur
If the blur in your video is primarily due to camera shake or unsteady recording, enable the Stabilize option. CapCut will analyze your footage and attempt to smooth out unwanted motion, which can significantly reduce motion blur and jitter, making the video much more watchable. It's worthy noting that this feature is exclusively available to Pro users.
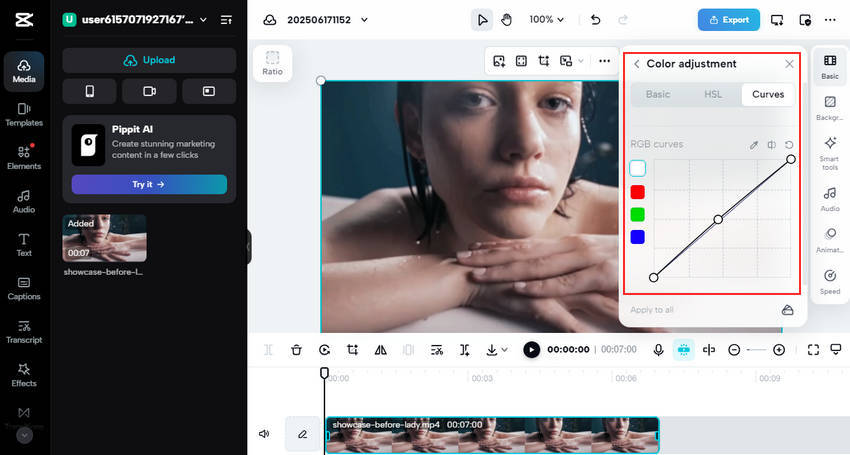
3. Use Curves or Sketch Filters for Detail Enhancement.
The Curves tool, under Color adjustment, lets advanced users fine-tune tonal range to balance light and subtly sharpen details. Alternatively, some apply Sketch or Outline filters from Effects to exaggerate edges for a perceived sharpness, though this often creates a stylized, rather than natural, look.
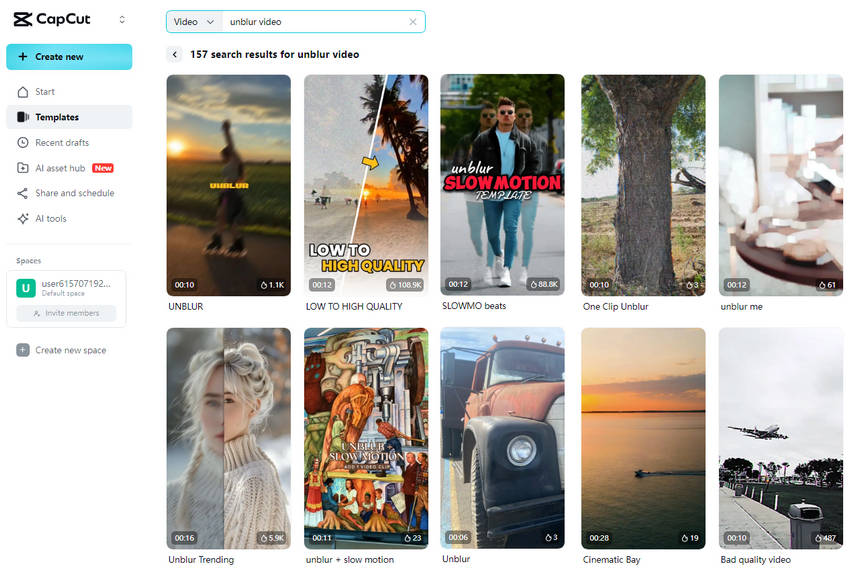
4. Explore CapCut Templates for Quick Video Unblurring.
CapCut's vast library of templates can be a time-saver. Search for "Unblur video" or "Sharpen video" for one-tap enhancements. Always preview results, as templates don't suit every video.
Once you're happy with your video, just click Export. You can then choose your preferred settings and download your sharpened creation.
Aiarty Video Enhancer: The AI Alternative for Real Video Unblurring
While CapCut is great for light edits, real users find its sharpening often creates artificial sharpness, amplifying noise or halos without restoring true lost detail or textures. Due to performance limitations on mobile devices, seriously blurry, compressed, or low-light footage usually demands a more powerful desktop tool for satisfactory results.
For those challenging cases, Aiarty Video Enhancer offers a next-generation AI solution for both Mac and Windows. It moves beyond CapCut’s basic filter-based sharpening, applying advanced AI models to truly deblur, denoise, enhance details, and upscale blurry videos up to 4K, delivering significantly better and more natural-looking results.
Here's how Aiarty can tackle your video blur and more:
- Deblurring & Denoising: Aiarty recovers true textures and eliminates video grain using advanced diffusion + GAN models. This is perfect for fixing blurry social clips and content, restoring old home videos that have lost their clarity, and enhancing footage that suffers from both blur and noise.
- Upscaling up to 4K: It intelligently upscales footage from 480p to stunning 4K, making it ideal for enhancing low-resolution YouTube footage or creating high-resolution exports from low-res sources.
- Flexible Turbo & Step Modes: Step Mode enhances quality with low VRAM usage, while Turbo Mode accelerates real-time bulk processing.
- Advanced Color & HDR Controls: Fine-tune temperature, tint, exposure, contrast, saturation, and more, with SDR-to-HDR conversion for vibrant, professional-quality results.
- Offline & Private Processing: It runs entirely on your desktop, meaning no data upload is required, guaranteeing privacy for all your video projects.
How to Unblur a Video with Aiarty Video Enhancer
Step 1. Download Aiarty Video Enhancer and Import Blurry Videos.
First, download and install Aiarty Video Enhancer for your Mac or Windows system from the official website. Once installed, launch the application and easily import your blurry video by either dragging and dropping it into the interface or using the dedicated import tool.
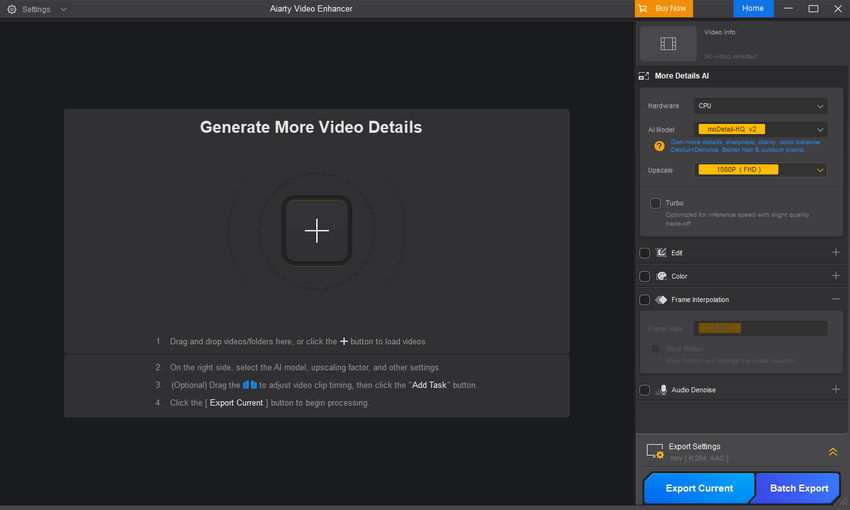
Step 2. Choose an AI Model
Click the AI Model dropdown to select the one that best suits your footage. There are three models available, each designed for different video types. For heavily blurred footage, consider selecting the moDetail-HQ model to prioritize detail recovery. If your footage needs smoother enhancement with less emphasis on sharp edges, the Smooth-HQ model might be more suitable. superVideo HQ is designed for low-light footages denoising and enhancement.
You can also experiment with different AI models and optionally adjust color settings to achieve the best possible results for your footage.
Step 3. Adjust Upscale Settings
Click the Upscale dropdown to choose your desired upscaling factor, such as 2×, 4× or directly to 1080p, 2K, 4K, depending on your target output resolution. If your computer has a compatible GPU, you can turn on Turbo Mode for significantly faster processing times.
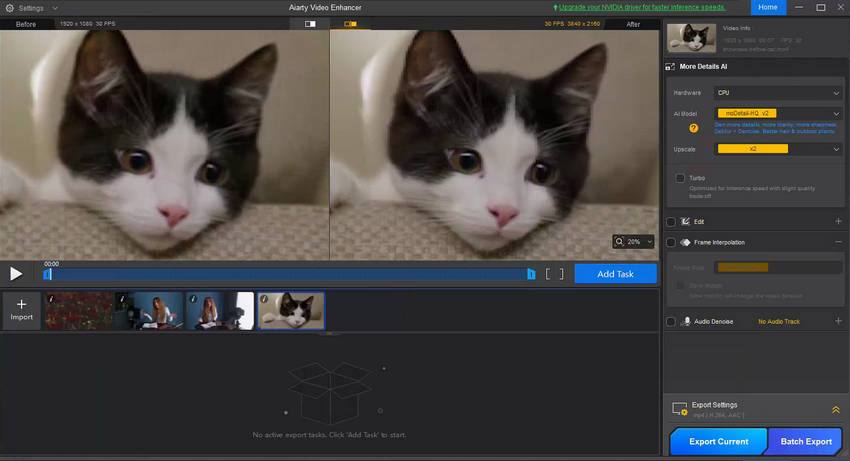
Step 4: Preview and Export
Before committing to the full export, Aiarty provides a convenient side-by-side comparison preview. This allows you to see the improvements in real-time and fine-tune settings if needed. Once satisfied, choose your preferred output format, and click the Export current or Batch Export button to export the unblurred video.
Final Thoughts
If you’re trying to unblur a video on CapCut, there are solid tools available—but don’t expect miracles. For more advanced restoration, especially on Mac or PC, Aiarty Video Enhancer offers one-click AI enhancement that can truly fix blurry video and improve video quality beyond what filters can do. With features like real-time GPU processing, true upscaling, and powerful AI models, Aiarty is the best AI video enhancer for Mac and PC when clarity matters most.
 FAQs
FAQs
CapCut can reduce mild blur using sharpening and contrast tools, but it can’t restore lost details or resolution.
- Sharpen Effect: Go to "Effects" > "Basic" > "Sharpen" and adjust the intensity. Don't overdo it to avoid an artificial look.
- Adjustments: Use "Adjust" to tweak "Contrast" (to make details pop), "Brightness" (if the video is overexposed), and "Saturation" (to enhance dulled colors).
- Stabilize: If the blur is from camera shake, use the "Stabilize" tool to smooth out motion.
Not always. While sharpening can enhance edges and make details appear crisper, over-sharpening can lead to a "crunchy" or "noisy" appearance, especially in areas with little original detail. It's a balance – subtle application is key.
You May Also Like
This post was written by Brenda Peng who is a seasoned editor at Digiarty Software who loves turning ordinary photos into extraordinary works of art. With AI assistance for brainstorming and drafting, the post is reviewed for accuracy by our expert Abby Poole for her expertise in this field.