Why Is My Camtasia Video Blurry? 8 Fixes for Recording, Preview & Export (2026)
Quick Answer: If your Camtasia video looks blurry, the most common causes are mismatched resolution, low frame rates, preview quality settings, scaling, or export compression. In most cases, adjusting Camtasia settings can improve clarity. For footage that remains blurry after export, an AI video enhancer can further restore details and improve quality. >> Enhance Camtasia videos after export
Camtasia is widely used for screen recording, tutorials, and online courses. However, many users notice that their Camtasia videos look blurry, pixelated, or low quality, especially after exporting.
If you’ve searched for things like “Camtasia video quality poor”, “Camtasia blurry recording”, or “Camtasia export looks bad”, you’re not alone. These issues usually come from a mix of recording settings, canvas scaling, compression, and Camtasia’s own technical limitations.
This guide covers:
- Why your Camtasia video looks blurry, pixelated, or low quality
- How to fix blurry recordings, preview quality issues, and export settings
- The best Camtasia settings for sharp 1080p and 4K videos
- How to enhance exported Camtasia videos when settings alone aren't enough
Why Is My Camtasia Video Blurry?
Many users searching for why is my Camtasia video blurry, Camtasia screen recording blurry, or Camtasia recording blurry run into the same issue: the final video loses sharpness due to mismatched settings across recording, editing, and export. Below are the most common causes.
- Resolution Mismatch (Most Common Issue): If your screen is recorded at one resolution (for example 1920×1080) but the project canvas or export settings use a different size, Camtasia will automatically rescale the footage. This mismatch is the leading reason for blurry or softened visuals in screen recordings.
- Recording at the Wrong Frame Rate (FPS Issues): Low or inconsistent frame rates can cause motion blur, especially during fast cursor movements or scrolling. Users often notice this when expecting Camtasia 60fps output but recording at a lower FPS, resulting in uneven playback and visible motion blur.
- Preview Quality Is Set Too Low: If the preview resolution is reduced during editing, the video may appear blurry inside the editor even if the final export is sharp. Many users confuse this with actual quality loss, often searching for Camtasia preview quality issues.
- Canvas Scaling Above 100% Causes Softness: Zooming in or scaling media beyond 100% stretches pixels, which leads to visible softness and reduced clarity. This is a frequent cause of zoomed-in recordings losing sharp detail.
- Export Settings Compress the Original Quality: If you notice a Camtasia blurry video after export, the cause is often heavy compression from default MP4 export presets. Bitrate reduction and web-optimized settings can significantly reduce fine detail and sharpness.
Related Search: Why Is My Video Quality So Bad & Fix It from Recording to Post
8 Ways to Fix Camtasia Video Blurry Issuse
Blurry videos in Camtasia can come from different stages of the workflow, including recording, previewing, editing, and exporting. The following fixes cover each stage to help you identify and eliminate the exact cause of quality loss.
Fix 1: Match Recording Resolution with Display (No Stretching)
To avoid Camtasia video blurry, always match your recording resolution with your intended final output, such as 1080p or 4K. Recording at a lower resolution and scaling up during editing often leads to blurry or pixelated results.
For example, if your final export is 1080p, record your screen at 1920×1080 instead of relying on Camtasia to upscale the footage later. This helps preserve sharp text, UI elements, and fine details in screen recordings.

Fix 2: Record at 60fps for Smooth Motion
Using a higher frame rate is another effective way to improve video clarity in Camtasia, especially for tutorials with cursor movement, scrolling, animations, or fast interactions.
Should You Record in 60fps in Camtasia?
Frame rate directly affects how smooth motion appears in your recording. In most cases, 30fps is enough, but 60fps becomes important when your content involves fast or continuous movement.
- 30fps is enough when: you are recording static tutorials, slides, presentations, or slow step-by-step software demos
- 60fps is recommended when: you need smoother motion for fast cursor movement, scrolling, or UI animations
This is why many users searching for Camtasia 60fps, camtasia record at 60fps, or camtasia fps settings notice differences in clarity depending on their project type.
- Record at 60fps whenever possible for motion-heavy content
- Higher frame rates reduce motion blur and make interactions look smoother
- For software tutorials, match FPS to the speed of on-screen actions
This is particularly important if you’ve noticed that your Camtasia screen recordings look choppy or blurry during fast movements such as scrolling, dragging windows, or demonstrating software workflows.
Fix 3: Increase Preview Quality Before Editing
When working in Camtasia, many users assume their video has become blurry during editing, but in reality the issue often comes from low preview settings rather than the actual footage.
If the preview quality is set too low, the video inside the editor may look soft, pixelated, or unclear—even though the original recording and final export remain unaffected. This is one of the most common reasons people search for Camtasia preview quality issues.
- Check preview settings and switch to a higher playback resolution when possible
- Avoid judging video clarity based only on low-quality preview playback
- Use full-resolution preview when fine-tuning text, UI elements, or small details
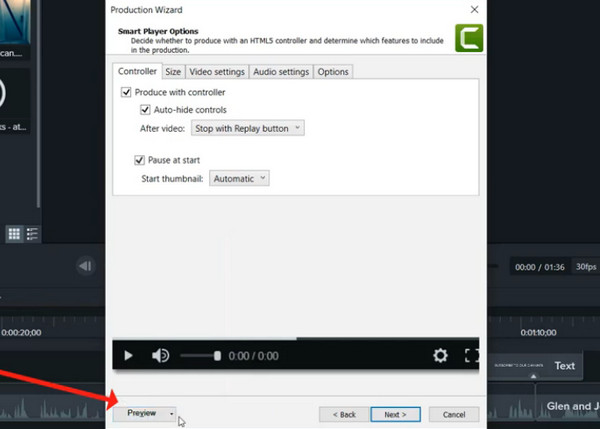
This step does not directly improve export quality, but it helps you accurately evaluate sharpness during editing and avoid unnecessary adjustments caused by misleading preview blur.
Fix 4: Avoid Scaling Media Above 100% in Timeline
Zooming in while recording may seem convenient, but it permanently stretches pixels and reduces image quality. This is a common reason why users later complain that Camtasia videos look pixelated.
If zooming is necessary, it’s better to record at full resolution and apply zoom effects carefully during editing instead of capture. This approach helps maintain cleaner visuals throughout the project.
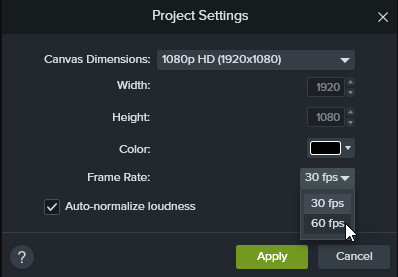
Fix 5: Keep Canvas Size Consistent Across Project Settings
In Camtasia, inconsistent canvas size is a common cause of blurry or soft-looking videos. When your recording resolution, canvas size, and export settings don’t match, the software has to rescale the footage, which can reduce sharpness.
- Match canvas size to your original recording resolution (e.g., 1920×1080)
- Avoid switching between different project dimensions during editing
- Keep export resolution consistent with both canvas and source footage
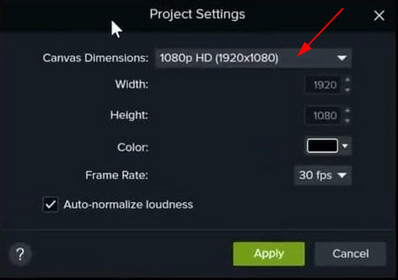
Maintaining consistency across project settings helps preserve original detail and prevents unnecessary scaling that leads to loss of clarity.
Fix 6: Use Higher Bitrate for Sharper Export
Bitrate plays a major role in how sharp your final video looks in Camtasia. A low bitrate can cause compression artifacts, soft text, and loss of fine UI details—especially in screen recordings with small fonts or fast movement.
If your Camtasia video looks blurry after export, increasing the bitrate is one of the most effective fixes. A higher bitrate preserves more visual information, reduces compression, and helps maintain crisp edges in text, icons, and interface elements.
For best results, avoid relying on default export presets and manually raise the bitrate when exporting MP4 files, especially for tutorials or high-detail screen recordings.
Fix 7: Avoid Default Export Presets (They Are Often Compressed)
Default export presets in Camtasia are designed for convenience and smaller file sizes, not maximum visual quality. As a result, they often apply stronger compression, lower bitrate, and reduced detail, which can make screen recordings look softer than expected.
If your Camtasia video looks blurry after export, switching away from presets like “Web” or “YouTube” and manually adjusting resolution, bitrate, and frame rate can significantly improve clarity. Custom export settings give you full control over how much detail is preserved in the final video.
Fix 8: Do Not Upscale Inside Camtasia to 4K Without Source Quality
In Camtasia, upscaling a video to 4K does not actually add new detail—it only stretches the existing pixels. If your original recording is 1080p or lower, exporting it as 4K will often make the image look softer or more blurred instead of sharper.
This is a common reason users notice a Camtasia blurry video after export even when all settings seem correct. Upscaling only works well when the source footage already has high detail and resolution. Otherwise, it can exaggerate compression and reduce clarity.
Best Export Settings to Avoid Quality Loss
Once your editing is complete, export settings become the final and often most critical step in preserving Camtasia video quality. If you’re searching for “Camtasia export high quality” or “Camtasia highest quality export”, the following settings have the greatest impact on how sharp and clear your final video looks.
Recommended Camtasia Export Settings (MP4)
For most use cases, MP4 with H.264 offers the best balance between quality and compatibility:
- Format: MP4 (H.264)
- Resolution: Match the canvas size, such as 1920×1080 or 3840×2160
- Frame Rate: 60fps for smoother motion and cleaner playback
- Bitrate: Use a custom bitrate set higher than Camtasia’s default
- Compression: Disable unnecessary compression options whenever possible
These settings help reduce visible artifacts and maintain clarity, especially for screen recordings and tutorials.

Even with optimized export settings, some videos may still look soft due to compression or original recording limitations. In these cases, an AI-based enhancement tool can help restore missing detail and improve perceived sharpness.
Aiarty Video Enhancer can upscale and enhance exported footage by reducing blur, recovering detail, and improving overall clarity—especially for screen recordings and tutorial videos.
Why Your Camtasia Videos Still Look Blurry Even After Fixing Settings
After optimizing recording, editing, and export settings, many users still find their Camtasia videos blurry or soft—and this is where frustration often sets in. You might have recorded at 1080p or higher, edited with consistent canvas settings and minimal scaling, and exported at a high bitrate with careful compression control.
Yet, even with these best practices, Camtasia has inherent limitations. It cannot:
- Restore fine details that were never captured.
- Remove compression artifacts introduced during export.
- Upscale footage while maintaining true clarity.
- Correct low-light noise, motion blur, or slight capture imperfections
These limitations explain why Reddit threads like “Camtasia makes my videos pixelated and blurry” continue to appear year after year. Camtasia is a powerful tool for editing and annotating screen recordings, but it is not designed as a video enhancement solution.
Final Solution: Enhance Blurry Videos with AI Upscaling
If your Camtasia video still looks blurry or pixelated after export, you’re not doing anything wrong. Camtasia simply isn’t built to enhance or recover visual details. Instead of tweaking export settings over and over, many creators choose to fix Camtasia videos after export.
Aiarty Video Enhancer is designed for exactly this situation. It uses AI to:
- Recover clarity from soft or blurry screen recordings.
- Upscale Camtasia videos to 4K without stretching pixels.
- Clean up compression artifacts from MP4 files.
- Reduce noise and improve overall sharpness naturally.
- Remove background audio noise like wind, hum, traffic, hiss and so on.
By using Aiarty Video Enhancer, the result is a visibly clearer video without re-recording, re-editing, or changing how you use Camtasia. If you want your Camtasia videos to look professional on YouTube, online courses, or client presentations, enhancing the final export with AI is often the fastest and most effective solution.
Try Aiarty Video Enhancer today to enhance your Camtasia exports into crisp, high-quality videos within clicks.
Conclusion
Many Camtasia users face similar frustrations: recordings often look clear in preview but appear blurry after export, high-quality settings sometimes still produce pixelation, and built-in sharpening effects cannot fully fix soft or blurry footage. These experiences highlight a key point—Camtasia isn’t broken; it simply isn’t designed for video enhancement.
For professional-looking results, whether for YouTube tutorials, online courses, or client presentations, relying solely on Camtasia’s settings is often not enough. The fastest and most effective solution is to enhance your exported videos with a dedicated AI video enhancer.
 FAQs
FAQs
Blurry Camtasia recordings are usually caused by recording at the wrong resolution, using a low frame rate, or scaling footage during editing. To maintain sharpness, record at your monitor's native resolution, use 60fps for motion-heavy content, and avoid enlarging footage beyond 100%.
If your video looks blurry after export, the most common causes are low bitrate, aggressive compression, or exporting at a different resolution than your original recording. Using custom export settings instead of the default presets can help preserve more detail.
For the best quality, export as MP4 (H.264), match the export resolution to your project canvas (such as 1920×1080 or 3840×2160), use 60fps when appropriate, and set a higher custom bitrate to minimize compression artifacts.
Yes. Camtasia can record and export in 4K if your display and recording settings support it. However, exporting a 1080p recording as 4K will not improve quality because Camtasia cannot reconstruct details that were not captured in the original footage.
For presentations, slides, and basic software demonstrations, 30fps is usually sufficient. If your recording includes fast cursor movements, scrolling, animations, or gameplay, 60fps produces smoother motion and reduces visible motion blur.
A blurry preview doesn't always mean your final video is low quality. Camtasia may lower preview resolution during editing to improve playback performance. Increase the preview quality to better evaluate your footage before exporting.
Camtasia can improve the appearance of a video through editing and proper export settings, but it cannot restore lost detail or perform true AI upscaling. If your footage is already blurry or low resolution, a dedicated AI video enhancer can produce better restoration results.
You May Also Like
This post was written by Brenda Peng who is a seasoned editor at Digiarty Software who loves turning ordinary photos into extraordinary works of art. With AI assistance for brainstorming and drafting, the post is reviewed for accuracy by our expert Abby Poole for her expertise in this field.