


Choosing between Luminar Neo and Topaz Photo AI is arguably the biggest dilemma facing photographers, designers, and AI artists looking to upgrade their post-processing toolkit today. Both claim to leverage powerful artificial intelligence, yet they serve fundamentally different masters.
On one side, you have Luminar Neo: a formidable, all-in-one Creative Editor. It is built for comprehensive image transformation, offering a user-friendly platform for artistic endeavors like sky replacement, creative relighting, and robust color grading—a true alternative to complex suites like Adobe Photoshop and Lightroom.
On the other stands Topaz Photo AI: the dedicated Restoration Utility. Its singular purpose is to fix technical flaws, consolidating Topaz’s renowned tools (Denoise, Sharpen, Gigapixel) into an automated solution for rescuing noisy, blurry, or low-resolution images.
The confusion arises when the goal is singular: Which one is truly better for pure image quality enhancement? When you need to upsize a low-res portrait or eliminate noise without sacrificing fine detail, should you choose the generalist editor or the specialist fixer?
In this in-depth review, we cut through the marketing jargon to compare Luminar Neo and Topaz Photo AI specifically on their image enhancement capabilities, from denoising efficiency to the critical issue of natural detail recovery.
Latest update: Skylum has recently announced a major rebranding: they are officially dropping the "Neo" suffix from their flagship product, simplifying "Luminar Neo" to just "Luminar". This means the "Luminar" currently on the market is the latest evolution of the software we are all familiar with. To align with common search habits and maintain consistency in our context, we will continue to use the familiar name "Luminar Neo" throughout the in-depth comparison below.
Luminar Neo vs Topaz Photo AI: Upscaling (Image Enlargement)
Luminar Neo: Fixed Multipliers, Solid Output
Luminar Neo offers three fixed upscaling factors—2x, 4x, and 6x—making it straightforward for users who simply want a quick enlargement without technical tweaking. The tool accepts images as small as 257×257 px, and outputs up to 32,000 px on the longest side, which is more than enough for large prints or detailed crops.
However, the fixed-multiplier design means users cannot define precise target resolutions (e.g., "make this 1080p → 4K"), which can be limiting for production workflows. Neo also does not provide granular controls over noise reduction, sharpening intensity, or artifact cleanup during the upscaling process. The enhancement is essentially "baked in".
Best for: users who want simple, no-adjustment enlargement with consistent quality.
Limitation: less flexibility, no tuning for different image types.

Topaz Photo AI: Flexible, More Technical, More Controllable
Topaz Photo AI also supports scaling up to 6×, but unlike Luminar Neo, it allows custom scaling values and custom output dimensions. If a user wants a specific target like 4096×4096, 8K, or a social-media-optimized 4:5 ratio, Topaz handles it precisely.
More importantly, Topaz integrates three enhancement sliders that directly affect the upscaling process:
- Remove Noise
- Sharpen / Deblur
- Fix Compression
These can be tuned individually per image, which is crucial when dealing with different degradation types—e.g., noisy phone photos, soft lenses, or highly compressed JPEGs. Like Neo, Topaz also supports 32,000 px on the longest side, allowing upscales up to 1 gigapixel.
Best for: users upscaling low-res, noisy, or blurry images who want full control.
Limitation: more sliders to manage; results vary depending on tuning.
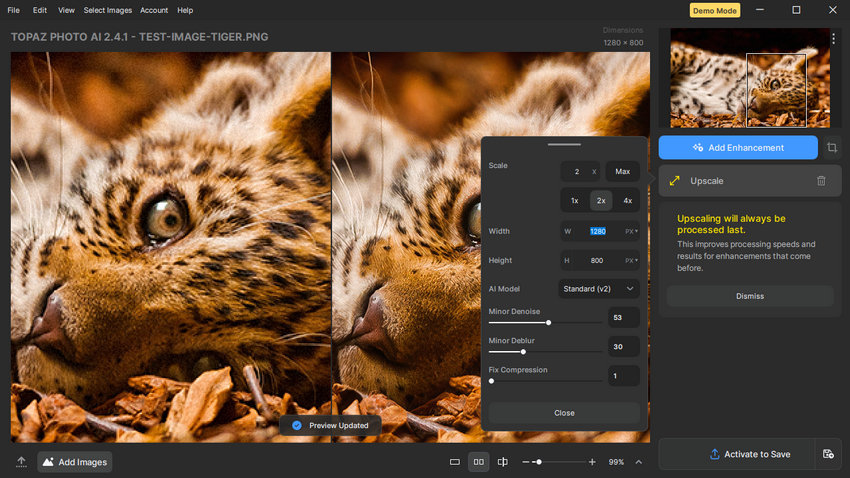
Image Quality Comparison (2× Upscale Test)
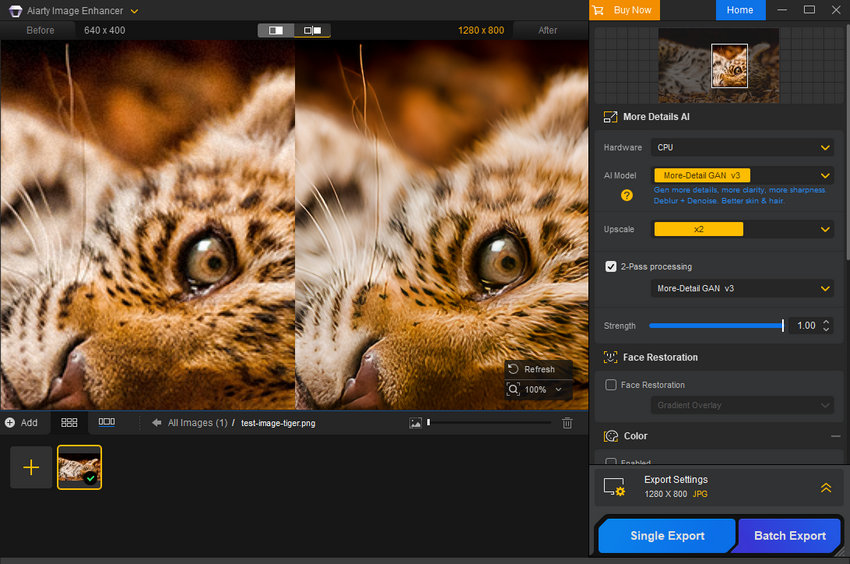
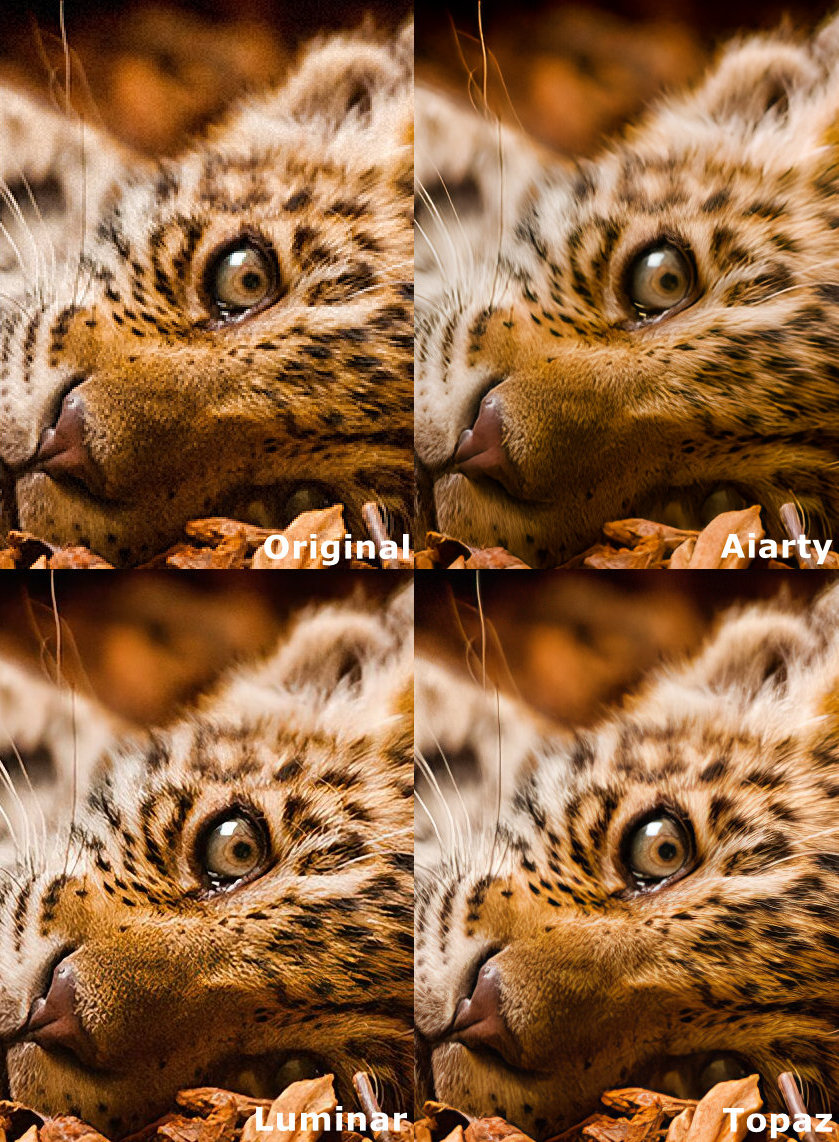
To put both tools to the test, I used a 640×400 low-resolution sample image, applied a 2× upscale, and kept all other settings at default to ensure a fair, out-of-the-box comparison.
Looking at the 100% crop in the image below, the differences in how each AI engine interprets missing pixels and handles noise become immediately apparent.
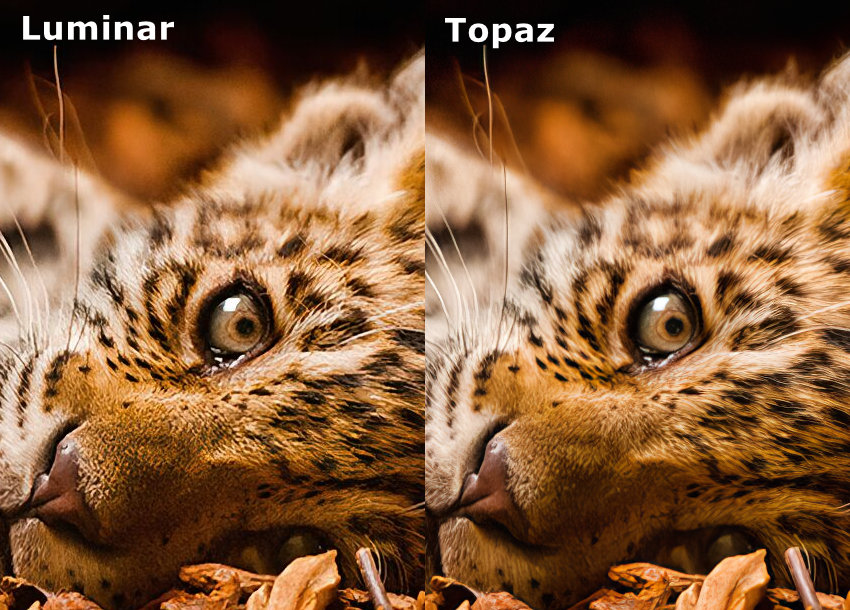
Luminar Neo: While Luminar successfully increases the resolution, its default upscaling approach seems to struggle with noise management. In the tiger's fur and the out-of-focus areas around the nose, the texture appears somewhat "crunchy" and over-sharpened. Although it brings out the details, it simultaneously amplifies the underlying digital noise. You can also notice some jagged, pixelated artifacts along the fine strands of the whiskers and the edges of the eye. It feels more like a traditional resize with a heavy sharpening filter applied.
Topaz Photo AI: On the right, Topaz Photo AI delivers a noticeably cleaner and more organic result. Topaz's AI models excel at simultaneously upscaling and denoising, and it shows here. The tiger's fur looks naturally soft without the harsh digital artifacts present in the Luminar version. The reflection in the eye is much sharper and better defined, and the whiskers are rendered as smooth, continuous lines. Furthermore, Topaz completely cleaned up the color noise in the blurry background and the bridge of the nose, resulting in a highly polished image.
The Verdict for Upscaling: For pure out-of-the-box upscaling quality, Topaz Photo AI is the clear winner in this test. It intelligently reconstructs realistic, natural-looking details while aggressively cleaning up the image, whereas Luminar leaves behind too much noise and digital artifacting.
Luminar Neo vs Topaz Photo AI: Denoising
Both applications are highly effective at noise removal, particularly when compared to traditional tools. The key difference lies not just in the power of the AI, but in how much control they grant the user over selective application and the final blending of the denoised result.
Luminar Neo’s Approach: Fine-Tuning and Masking
Luminar Neo’s approach to noise is deeply integrated into its editing environment, granting users exceptional control over where and how the noise reduction is applied.
The main Adjustments panel guides the user with initial Advice sliders (Low, Middle, or High) for a quick starting point. For advanced control, Neo allows users to manage Luminosity Denoise, Details, and Sharpness.
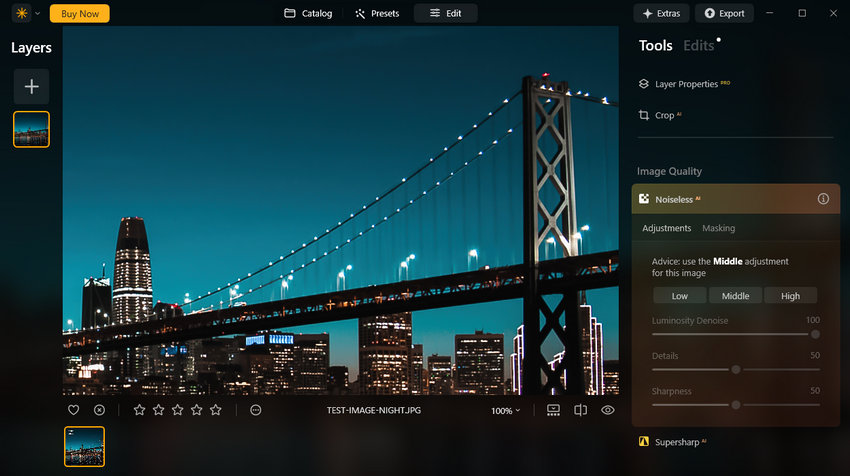
Crucially, Luminar Neo excels in selective application. Utilizing its comprehensive suite of masking tools—including Brush, Linear Gradient, Radial Gradient, Color Mask, Luminosity Mask, and the highly useful Mask AI (to automatically select objects)—users can apply heavy denoising only to areas like the sky or shadow regions while meticulously preserving the fine texture in the subject’s skin or clothing.
Topaz Photo AI’s Approach: Model Selection and Strength
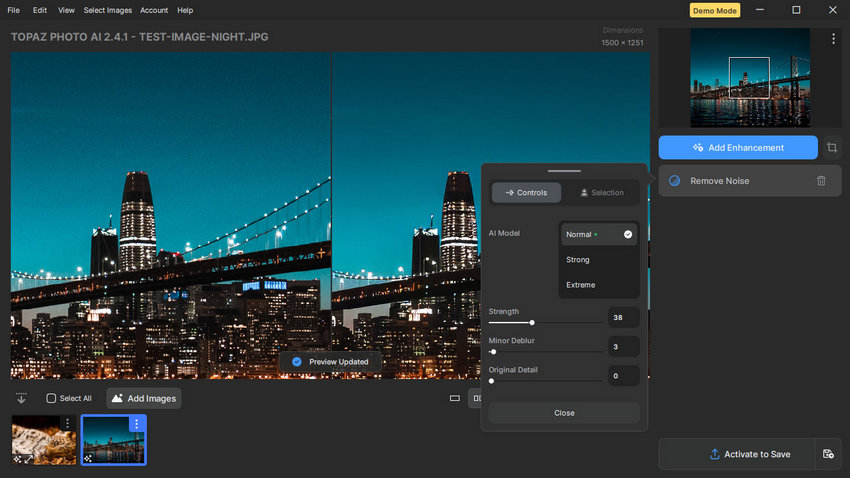
Topaz adopts a streamlined, model-driven approach, prioritizing the power of its AI engine. The core decision rests on selecting the right AI Model to match the severity of the noise (Normal, Strong, Extreme).
The output is then fine-tuned using:
- Strength (Overall power of the selected model)
- Minor Deblur (Integrated sharpening to counteract softness)
- Original Detail Slider (To re-introduce some texture lost during aggressive processing)
Topaz also supports selection methods, allowing users to define areas for processing.
Denoising Test Results
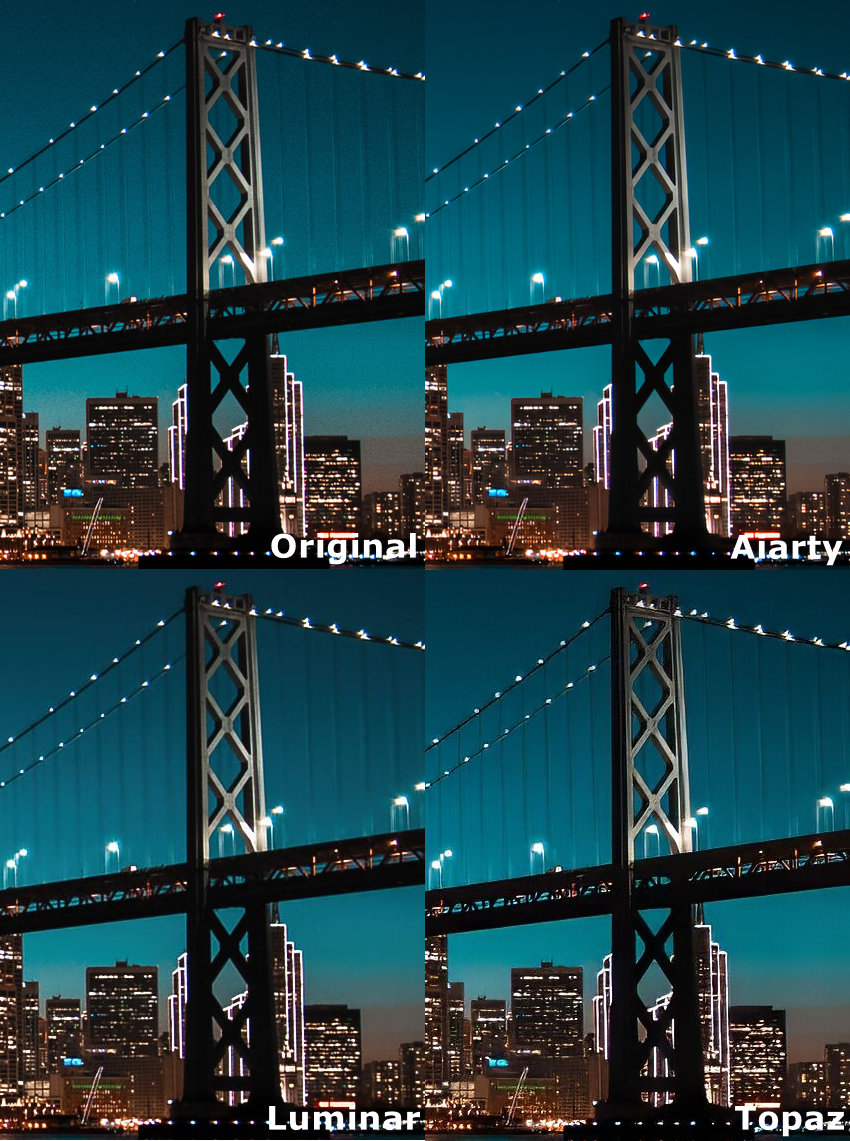
To evaluate noise reduction, I used a high-ISO night shot featuring a dark sky, complex bridge geometry, and detailed cityscape lights—a tough scenario for handling grain without destroying detail.
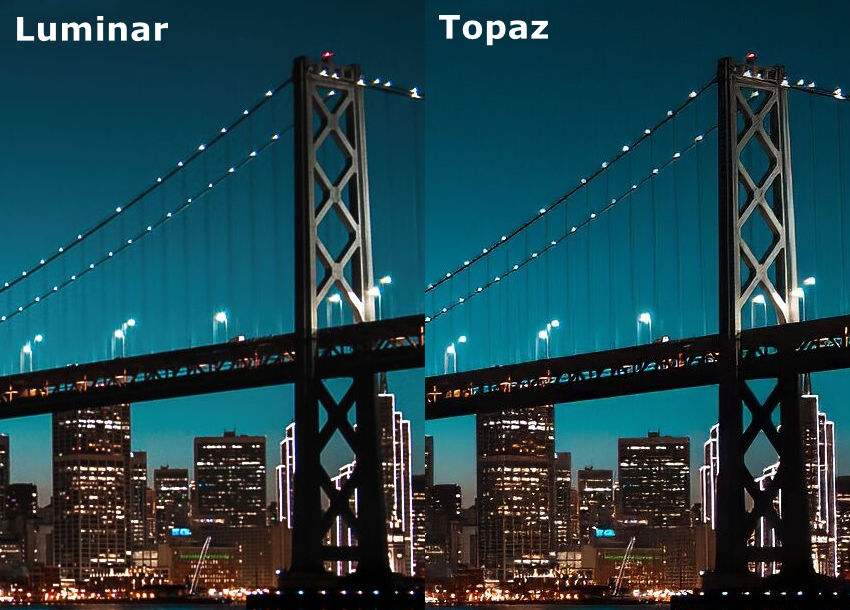
Luminar Neo: Effectively smooths out the heavy luminance noise across the dark night sky. However, this global smoothing approach impacts fine details. As shown in the crop, the delicate vertical suspension cables and the bridge's structural lattice appear softened and slightly blended into the background.
Topaz Photo AI: Takes a different approach, prioritizing edge retention alongside noise reduction. It removes the sky grain while maintaining high contrast on the geometric structures. The thin bridge cables remain distinct, and the structural edges stay well-defined.
Luminar Neo vs Topaz Photo AI: Sharpening & Detail Recovery
Sharpening is often where AI enhancement tools show their real character. While both Luminar Neo and Topaz Photo AI include AI-powered sharpening engines, their approaches — and the resulting image quality — differ much more noticeably here than in upscaling or denoising.
Luminar Neo: Supersharp — Flexible, but Not Always Natural
Luminar Neo’s sharpening toolset is centered on Supersharp AI, located under the Adjustments panel. Users can choose between two modes:
- Universal (general-purpose sharpening)
- Motion Blur (for mild motion softness)
Each mode offers Low, Middle, and High intensity presets, along with optional Face Enhancer settings for portraits. As with other Luminar modules, the full suite of Masking tools—Brush, Gradients, Color Mask, Luminosity Mask, and Mask AI—remains available, allowing selective sharpening where needed.
Best for: users who need quick, localized sharpening within a broader creative workflow.
Limitation: sharpness can look over-processed; not ideal for natural detail recovery.

Topaz Photo AI: More Specialized, More Natural Output
Topaz Photo AI continues its restoration-focused philosophy here, offering four AI sharpening models:
- Standard
- Strong
- Lens Blur
- Motion Blur
These models are optimized for different types of softness — from slightly soft focus to moderate subject movement. The Strength slider provides granular control, and Topaz also supports area selection, letting users sharpen only the subject while keeping the background smooth.
Best for: users who want photographic realism rather than visible “AI sharpening.”
Limitation: results depend on model selection; slightly more learning curve.
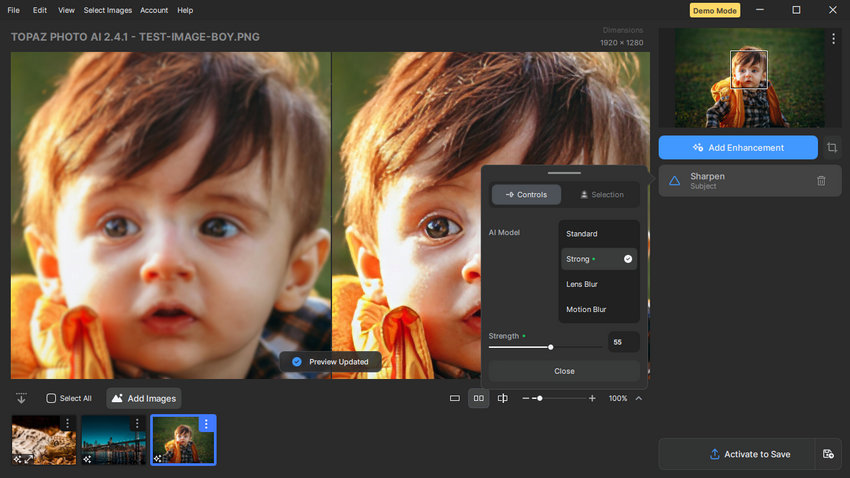
Sharpening Test Results
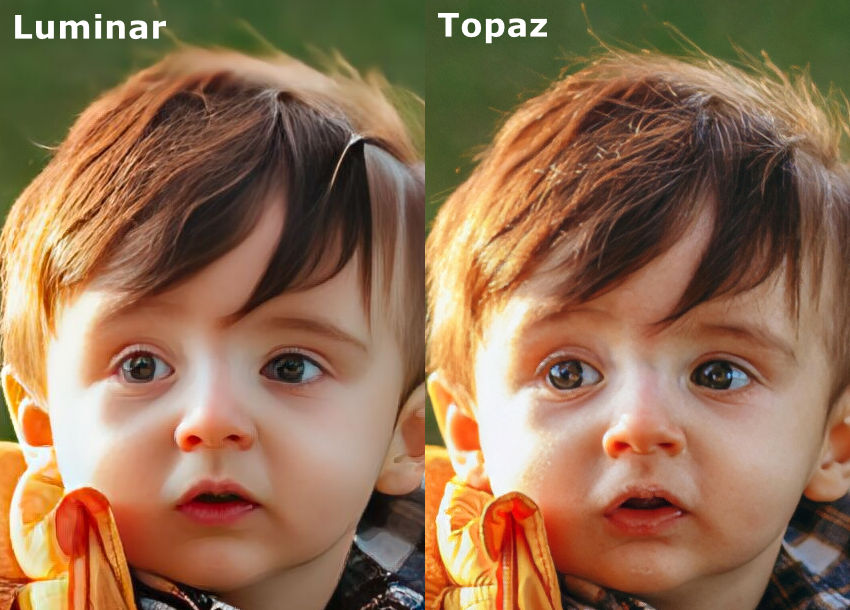
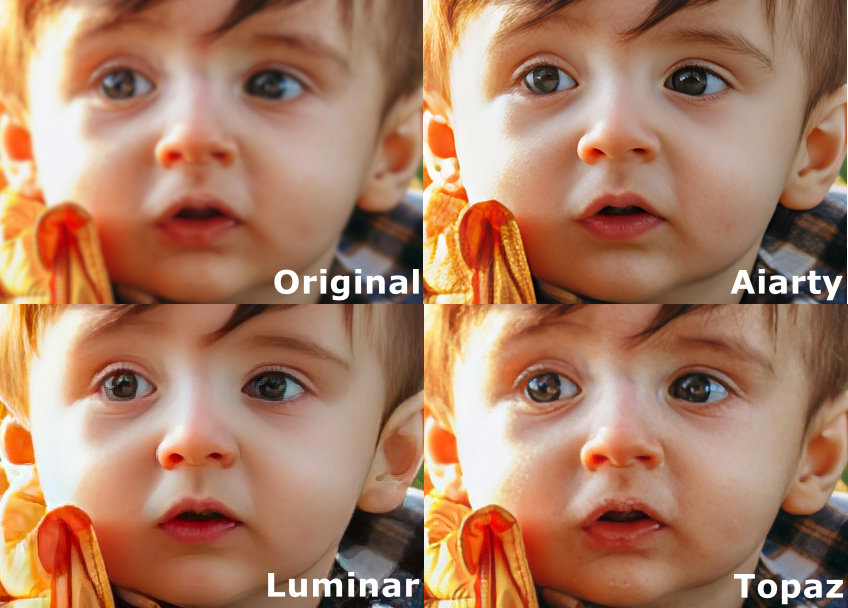
During testing, I evaluated both Universal and Motion Blur modes across all intensity levels. Although they did increase overall crispness, the effect often leaned toward over-sharpened or slightly artificial, especially in fine textures such as hair, fabric, or distant foliage. At higher intensities, halos and unnatural micro-contrast became more noticeable.
Topaz delivered consistently more natural and realistic sharpening. Edges became clearer without producing halos, textures regained detail without plasticity, and the restored clarity felt closer to what a high-quality lens would capture. Even at stronger settings, the results remained stable and convincing.
Luminar Neo vs Topaz Photo AI: Pricing & Long-Term Value
When evaluating enhancement tools, pricing isn’t just about the upfront cost. It’s about how much long-term value each option offers based on your workflow, update needs, and frequency of use. Luminar Neo and Topaz Photo AI follow two fundamentally different pricing models: subscription vs. perpetual licensing.
Topaz Photo AI: Subscription-Based, Higher Long-Term Cost
Topaz Photo AI now operates primarily under a subscription model, divided into two tiers:
- Personal Plan: $21/month or $199/year
- Pro Plan: $58/month or $599/year
The subscription includes continuous updates, new AI models, and access to premium features as they roll out. However, the cumulative cost adds up quickly, especially for photographers who keep the software for several years. Heavy users who rely on Topaz’s restoration accuracy may find the ongoing investment worthwhile, but casual users may consider it expensive compared to one-time-purchase alternatives.
Luminar Neo: One-Time Purchase, More Affordable
Luminar Neo uses a more traditional perpetual licensing model, offering three one-time purchase tiers:
- Perpetual Desktop License: $99
- Cross-Device Perpetual License: $139
- Perpetual Max License: $159
Even the highest-tier license remains far below Topaz’s yearly subscription cost. Neo’s model appeals to users who prefer predictable, fixed costs and don’t need frequent AI model updates. Although major upgrades sometimes require add-on purchases, the overall investment is still dramatically lower than maintaining an annual Topaz subscription.
Which Offers Better Value?
For users who prioritize cutting-edge restoration models and don’t mind a recurring subscription, Topaz Photo AI delivers strong value. For users who want solid AI enhancement without the ongoing cost, Luminar Neo is far more cost-effective.
Best Alternative to Luminar Neo and Topaz Photo
For users who want enhance images without committing to a heavy subscription or navigating complex creative interfaces, Aiarty Image Enhancer fills an important gap. It focuses purely on AI-powered image enhancement, offering:
- AI upscaling: adjustable 2× / 4× / 8× and custom resolution up to 32K
- AI denoise, deblur, sharpen, detail recovery, face enhancement
- Minimal sliders, with Strength control to balance detail and cleanliness
- Built-in color adjustment tools for quick tonal fixes
- Batch processing support
- Lower hardware requirements compared to heavier editors
- More affordable pricing with lifetime license for 3 devices - $119
In other words, Aiarty combines the clarity-first philosophy of Topaz with the simplicity and affordability of Luminar Neo, making it a strong choice for anyone whose primary goal is restoring or enhancing image quality.
How Does Aiarty Compare in Real-World Tests?
To see how Aiarty Image Enhancer compares with Luminar and Topaz in practice, I ran the same three test images through all three tools using comparable enhancement goals. The test covers three common image-enhancement scenarios: noise reduction, upscaling and detail recovery, and sharpening.
The side-by-side results below make the differences easier to see than feature lists alone. Overall, Aiarty produces a noticeable improvement in clarity while keeping textures and edges relatively natural. Compared with Luminar, its results tend to look more detailed and refined in restoration-focused tasks. Compared with Topaz, Aiarty delivers a similarly strong level of detail while appearing slightly more restrained in some areas, avoiding an overly sharpened or processed look.
Test 1: 2X upscale
Luminar vs Topaz vs Aiarty
In the wildlife example, Aiarty brings out more visible texture in the leopard's fur, especially around the eye, forehead, and muzzle. The eye also appears clearer and more defined.
Test 2: denoise

Luminar vs Topaz vs Aiarty
In the night bridge photo, Aiarty noticeably cleans up the fine grain and color noise in the dark sky while preserving the bridge cables, tower structure, and city lights. Luminar and Topaz also improve the image, but more residual noise is visible.
Test 3: sharpen
Luminar vs Topaz vs Aiarty
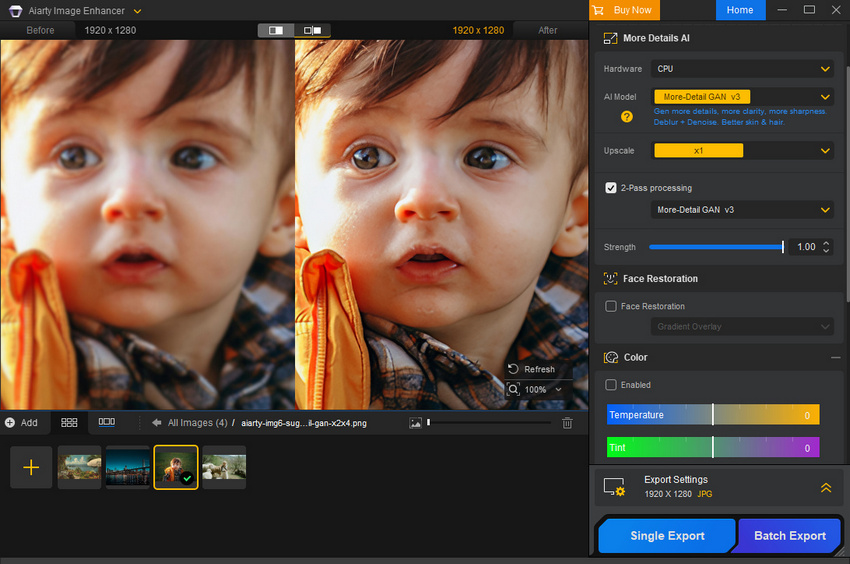
In the portrait example, Aiarty improves the definition of the eyes, hair, and facial contours while keeping the skin relatively smooth.
These results suggest that Aiarty is particularly competitive when the goal is straightforward image restoration rather than creative photo editing. It does not try to replace Luminar's broader creative toolkit or Topaz's extensive restoration controls. Instead, it focuses on making blurry, noisy, low-resolution, or otherwise degraded images cleaner, sharper, and more detailed with a relatively simple workflow.
Want to Test Aiarty With Your Own Photos?
The results above show how Aiarty performs on the same types of images used in our Luminar and Topaz comparisons, but every photo is different. A setting that works well for a noisy night scene may not be ideal for a soft portrait or a low-resolution wildlife crop.
The best way to judge whether Aiarty fits your workflow is to try it with your own photos. Download Aiarty Image Enhancer for free and check if it can handle your photos.
Final Verdict: Which One Is Better for Image Enhancement?
There is no single winner for every photographer. The better choice depends on what you expect from an AI photo enhancer.
| Feature / Criteria | Luminar Neo | Topaz Photo | Aiarty Image Enhancer |
|---|---|---|---|
| AI Upscaling | ✓ Up to 6× | ✓ Up to 6× | ✓ Up to 8× / Custom |
| Denoise | ✓ | ✓ | ✓ |
| Deblur / Sharpen | ✓ | ✓ | ✓ |
| Face Enhancement | ✓ Face Enhancer | ✓ Recover Faces | ✓ Face Restoration |
| Batch Processing | ✓ | ✓ | ✓ |
| Creative Editing | Extensive | Limited | Basic |
| Fine-Tuning & Local Adjustments | Extensive masking tools | Advanced controls & selections | Simplified controls |
| Image Quality | ★★★★☆ | ★★★★★ | ★★★★★ |
| Detail Recovery | ★★★★☆ | ★★★★★ | ★★★★★ |
| Natural-Looking Results | ★★★★☆ | ★★★★★ | ★★★★★ |
| Ease of Use | ★★★★★ | ★★★★☆ | ★★★★★ |
| Best For | Creative editing + enhancement | Professional image restoration | Focused AI image enhancement |
| Price | $99-$159 | Personal Plan: $21/month or $199/year Pro Plan: $58/month or $599/year |
1-Year: $59 Lifetime license : $109 |
| Overall Strength | Creative flexibility | Restoration power & control | Quality + simplicity + value |
Choose Luminar if you want an all-in-one creative photo editor. Its strength lies in combining AI enhancement with extensive creative tools, masking, color adjustments, lighting effects, and other ways to transform the overall look of a photo.
Choose Topaz if image restoration is your priority and you want extensive control over denoising, sharpening, face recovery, and upscaling. Its restoration-focused workflow is particularly suitable for photographers who are willing to fine-tune settings to get the best possible result.
Choose Aiarty if you want a more focused AI image enhancer for upscaling, denoising, deblurring, sharpening, and detail recovery. The tests above show that it can deliver highly competitive results while keeping the workflow straightforward, making it a practical option for users who don't need a full creative editing suite.
Ultimately, no software can consistently produce the best result for every image. Depending on the photo, you may need to compare different tools and decide which one handles the specific problem in front of you most effectively.
That's why the best choice isn't necessarily the tool with the most features or the highest overall rating. It's the tool that produces the result you prefer for the image you're actually trying to fix.
You May Also Like


This post was written by Brenda Peng who is a seasoned editor at Digiarty Software who loves turning ordinary photos into extraordinary works of art. With AI assistance for brainstorming and drafting, the post is reviewed for accuracy by our expert Abby Poole for her expertise in this field.
