MiniDV tapes hold a lot of memories. Birthdays, school plays, road trips, and early film projects all got recorded on these little cassettes. The problem is, most modern computers no longer have the ports or software needed to pull that footage off.
This guide covers everything to convert MiniDV to digital, from connecting your old camcorder to your computer, to fixing common problems, and enhancing your footage to higher resolutions. If you also have VHS cassettes, follow this guide to restore VHS videos.
What Is MiniDV?
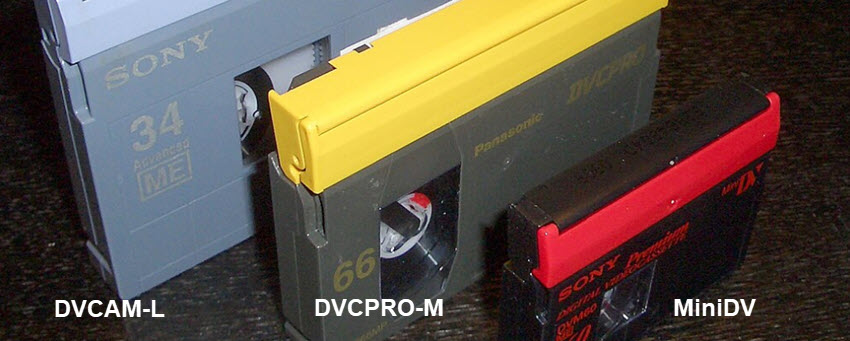
MiniDV was a popular cassette format from the late 90s to early 2000s. It stores digital video on magnetic tape. A standard MiniDV tape records in the DV format. Some higher-end cameras used variations like DVCAM or HDV, but the basic idea is the same. The tape stores 480i or 576i video, depending on whether it's NTSC or PAL.
When you transfer the video from a MiniDV tape to a computer, the digital data is wrapped inside a digital container file, such as AVI, QuickTime (QT) and MXF.
💡 What's the most practical choice to convert MiniDV tapes to digital?
Depending on whether you want to save time and effort by outsourcing, or enjoy the DIY at home workflow, here are some options.
1. I am willing to digitizing MiniDV at home.
Since the capturing workflow hasn't changed for decades, you need to buy old devices with firewire port, cables, install required utilities. I will guide you through steps and gadgets checklist in part 1 below.
Time: 4h purchasing hardware, 3h setup
Costs:
- Used MiniDV camcorder/deck: $50-$200
- FireWire card/cable if needed: $20-$50
- Software: Free (WinDV, iMovie), then upscale quality with best video upscaling tools for better clarity.
2. I prefer a paid service, handling digitizing to professional studios.
You can search for "MiniDV digitizing service near me" on Google, read store reviews from Google Maps to find a local store. Or you can resort to video digitizing companies, such as legacy box, iMemories.
Time: 2h choosing services, 2h packing and sending, 2-6 weeks processing and return
Costs:
- Per tape: typically $25-$30
- Bulk kits: $70-$1K depending on quantity
3. After digitizing MiniDV, I also need a quality upscaling for better clarity.
Digitizing services typically transfer your MiniDV at native resolution (480p DV, 1080p HDV), or offer an enhanced version. Some services may charge an extra fee per tape for AI enhancement.
Alternatively, you can use dedicated tools like Aiarty Video Enhancer to upscale old footage, reduce noise, and restore frame clarity while keeping the natural look.

 Aiarty Enhanced

 Aiarty Enhanced
Download Aiarty Video Enhancer to restore old videos:
1. How to Convert MiniDV to Digital
You'll need three main things: the camera or deck that can play your MiniDV tapes, a way to connect it to your computer, and software that can record the video stream.
Hardware checklist:
-A working MiniDV camcorder or playback deck
-A FireWire (IEEE 1394 or i.LINK) cable
-A computer with a FireWire port or a compatible adapter
-Power supply or battery for your camera
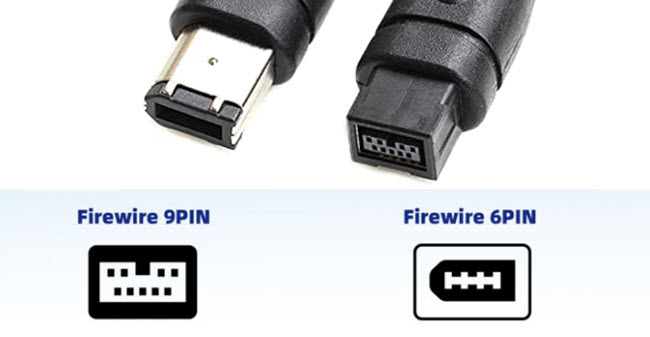
Most MiniDV cameras have a small 4-pin FireWire port. Older computers often had a 6-pin or 9-pin FireWire port. If you're using a newer Mac or PC, you'll likely need an adapter such as a Thunderbolt to FireWire converter.
If your computer has no way to connect through FireWire, you can still capture using an analog USB capture device. It works, but quality will be lower because the video signal becomes analog again before it's re-digitized.
Many users solve this by borrowing an older Mac or using a Windows desktop with a FireWire card to convert MiniDV cassettes to digital videos.
Step 1: Find a computer with FireWire.
If your current computer doesn't have FireWire, don't panic. The simplest fix is to use an older computer that does.
Many YouTubers and video archivists now recommend hunting down an older PC or Mac with built-in FireWire support. They're cheap, reliable, and perfect for the job. You can find them on eBay, Amazon, Craigslist, or local store.
For Macs: Most Apple computers from the early 2000s to around 2012 included FireWire. If you have one, it probably has either a 6-pin or 9-pin port. You'll just need the right cable to connect it to your camcorder's smaller 4-pin port. The best part? Macs already come with iMovie, which can automatically detect your camcorder and import footage directly.
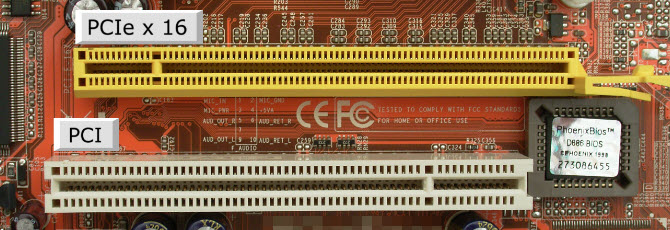
For PCs: If you have a desktop with an open PCI or PCIe slot, just buy a FireWire expansion card online. They're usually under $20. If you're using an older laptop, look for one with an ExpressCard or PCMCIA slot, as these can accept FireWire cards too.
Step 2: Add a FireWire card if you don't already have one.
If your computer doesn't have FireWire, here's the process to add one.
1)Shut down the computer, unplug it, and open the side panel.
2)Find an empty PCI or PCIe slot, then remove the metal cover plate on the back.
3)Insert the FireWire card into the slot and press until it clicks.
4)Secure it with a screw, close the case, and turn the computer back on.
Windows should recognize it right away. To make sure, open Device Manager and look under IEEE 1394 Bus Host Controllers. If you see it listed, you're good to go.
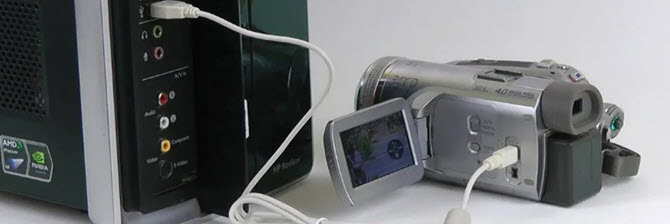
Step 3: Connect the camcorder.
Once your computer has FireWire ready, connect your MiniDV camcorder. Power everything off first before plugging in. This is crucial. Some users have reported fried ports from plugging or unplugging FireWire cables while devices were on.
The cable can get hot, and once the port burns out, it's done for good. So always turn off both your computer and camcorder before connecting. Once plugged in, power them on and switch the camcorder to playback mode.
Step 4: Capture the Footage to convert MiniDV to digital.
On a Mac, just open iMovie. It will usually detect your camcorder automatically. You can import the entire tape or just select clips.
On Windows, you have a few software options that still work well:
- WinDV or HDVsplit: Both are lightweight, reliable, and designed specifically for DV capture.
- Windows Live Essentials 2012 (Photo Gallery): Surprisingly effective for importing MiniDV footage. It walks you through the process and supports both DV and HDV formats.
- SplitCam: Useful if you want to stream directly from your camcorder, especially when OBS doesn't recognize the device. You might need a separate microphone for audio though.
When you capture, your footage will usually be saved in AVI on Windows or MOV on Mac. These are large files, but they preserve full quality.
Step 5: Transfer to a Modern Computer.
After you've captured all your tapes, you'll likely have large video files sitting on your old machine. Make sure to transfer them to your main computer.
2. After Digitizing: What's the Best Format to Save Your Videos
Once your MiniDV footage is safely on your computer, it's time to future-proof it. For long-term archiving, keep one copy of the original DV files on an external drive, and another set of MP4 versions for everyday use.
If you're cleaning up or enhancing your footage, you can use a modern AI video enhancer to fix colors, reduce noise, or upscale older recordings.
How to Enhance Your Digitized MiniDV Footage
Once your MiniDV tapes are safely digitized, you might notice the image isn't quite what you remembered. It's not your memory playing tricks on you, as MiniDV was limited by the technology of its time.
Most MiniDV cameras recorded at 720x480 (DV) or 1440x1080 (HDV) resolution, depending on the model. That was perfectly fine for tube TVs, but on today's 4K displays, those videos can look soft, noisy, or full of faint horizontal lines caused by interlacing.

Enhance and Upscale for the Modern Screen
Aiarty Video Enhancer is one of the best tools for video restoration. It uses machine learning to rebuild missing detail while keeping textures like skin, fabric, and hair natural. The software was trained on millions of real and animated videos, from dimly lit home movies to bright daylight scenes.
That makes it especially good for MiniDV footage, which often suffers from low light, visible grain, and faded color.
Here's how it works in practice:
Step 1. Download and install Aiarty Video Enhancer, then import your footage.
Step 2. Pick an AI model that fits your footage.
- moDetail-HQ v2 sharpens fine detail like hair or fabric while lightly cleaning up noise.
- Smooth-HQ v2 focuses on natural restoration, great for interviews or family events.
- superVideo vHQ handles the dark, grainy stuff most cameras struggled with indoors.
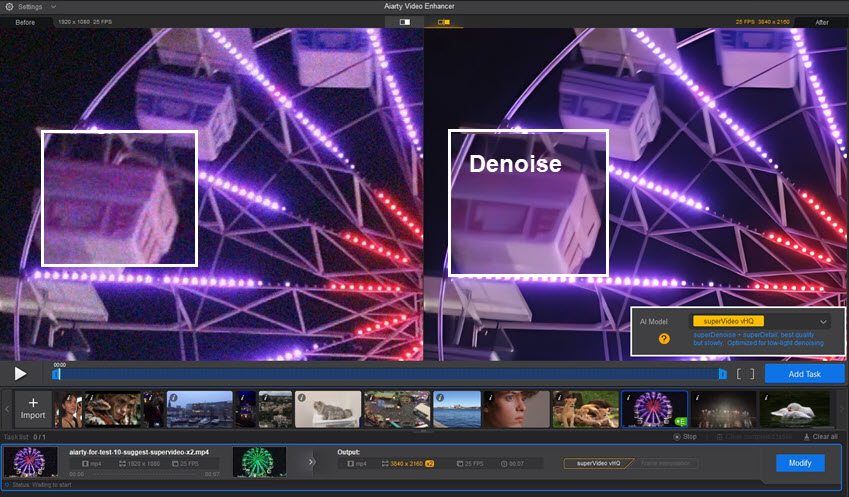
Step 3. Choose your target resolution.
You can double or quadruple your original size, upscale to 4K UHD. If you just want cleaner results without resizing, select 1x.
Step 4. Preview and export the enhanced MiniDV video.
Preview before you export. Aiarty lets you see a live preview, so you can compare different settings side by side before running the full enhancement. Then you can export in formats such as H.264, H.265, or AV1.
3. Troubleshooting: Common Problems and Fixes
Digitizing old tapes isn't always smooth. Here are the most common issues people run into, and how to fix them.
1. The camera isn't showing up on the computer.
Unplug any other webcams or video devices. They can interfere with detection. If that doesn't help, open Device Manager and disable other video inputs temporarily.
2. The software detects the camera but shows no video.
Sometimes it lists your camcorder by model name, but that option doesn't work. Look for a generic input name like Microsoft DV Camera and VCR instead.
3. The connection keeps dropping or flickering.
Try a different FireWire cable or port. Faulty cables are more common than you think.
4. The computer doesn't install the FireWire card correctly.
If the drivers don't install automatically, look for legacy IEEE 1394 drivers online. Windows 7 and 8.1 tend to handle older hardware better than newer versions like Windows 11.
5. The video looks glitchy or has missing frames.
This usually happens when the tape or heads are dirty. Clean your camcorder's tape heads using a MiniDV cleaning cassette before trying again.
A Quick Safety Note
Avoid hot-plugging FireWire devices. Always power off your camcorder and computer before connecting or disconnecting cables. A single spark or surge can kill your camera's FireWire port permanently.
If the cable feels warm to the touch, stop immediately and unplug it.
You May Also Like
This post was written by Brenda Peng who is a seasoned editor at Digiarty Software who loves turning ordinary photos into extraordinary works of art. With AI assistance for brainstorming and drafting, the post is reviewed for accuracy by our expert Abby Poole for her expertise in this field.