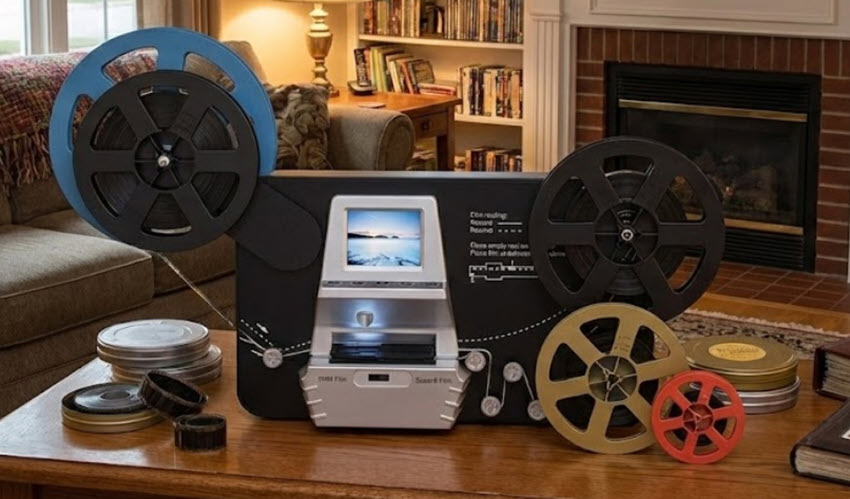
Many families are looking for reliable ways to convert Super 8 to digital, transfer 8mm film to digital, or preserve aging home tapes before they degrade further. Before choosing a service, it helps to understand what format you actually have.
- Regular 8mm and Super 8 are motion picture film formats stored on reels or cartridges. They are silent or magnetic sound films that must be scanned frame by frame to preserve image quality.
- Video8 and Hi8 are videotape formats. They look similar in size but store analog video signals on magnetic tape, much like VHS restoration.
Mixing these formats up is one of the most common mistakes people make when trying to digitize old media. In this blog, we will cover everything you need to know to transfer Super 8 and 8mm film to digital format. You will learn what to watch out for before digitizing, how to choose the right method, and how to enhance your footage.
Before Digitizing: Pitfall to Watch Out For
Before you choose a service, here are some common pitfalls to watch out for. Some services only handle one type. Sending Super 8 film to a Video8 digitizer can lead to rejection, delays, or poor results.
Also, film detail is lost forever if scanned too low, make sure you always have the original copy of the film reels. Many budget services digitize at SD or 720p. It would be great to scan at 1080p for casual archiving. Once you have the digital format, you can follow the tips below to enhance video quality.
Original Scan and Enhanced Versions
When poorly done, the digitized footage may have wax-like faces, smudged grain, flickering edges, or noticeable color shifts. These artifacts are often caused by aggressive noise reduction or over-sharpening during the digitization process.
For color correction, look out for yellow or magenta tint, crushed blacks, washed-out highlights, and changes that vary inconsistently from clip to clip. Poor color handling can permanently alter the look of your memories.
Ask the services if they can provide both raw scans and enhanced versions.
Frame Rate Concerns
8mm film was typically shot at 16fps and 18fps, sometimes 24fps. If the frame rate of the digitized version has an incorrect match, it can lead to issues such as faster or slower motion, audio and video out of sync, or duplicated and dropped frames.
Delivering Format
Ask what file formats you will receive. high-bitrate MP4 and MOV are ideal for long-term storage and ProRes for future editing. Avoid heavily compressed formats that permanently reduce quality.
5 Best Services to Convert 8mm to Digital Formats
With the pitfalls and quality trade-offs above in mind, choosing the right 8mm digitizing service really comes down to how much you value image quality, turnaround time, and careful film handling.
We tested multiple 8mm-to-digital transfer services and cross-checked our results with real-world feedback from Reddit discussions, Trustpilot ratings, and YouTube FAQs and reviews. Based on hands-on results, consistency, and community consensus, here are five of the best services worth considering.
Pro8mm
- In business for over 50 years, serving families since 1972.
- Turnaround time for digitization: 7–10 business days in regular season; 10-14 business days in peak season.
- Is it done in-house: yes, all processing and scanning are handled at their Burbank, CA facility.
Pro8mm is one of the longest-running names in small-format film services, with roots stretching back decades and a reputation built on film expertise, camera services, and digital conversion. Their digitizing workflow is robust: films are prepped, cleaned, and scanned with options from standard HD up to professional-grade formats, including high-resolution scans and advanced color-correction workflows.
Many film enthusiasts and hobbyists praise the company for fast turnaround, wide range of scanning options, and solid quality transfers, especially compared to basic consumer-grade converters or cheap mail-in kits.
Overall, Pro8mm is a legit choice for 8mm and Super 8 digitizing, especially if you value control over scan resolution and turnaround speed.
Just8mm
- In business for over 20 years.
- Turnaround time for digitization: around 7 -14 business days.
- Is it done in-house: yes. Files are handled at their facility at Newton, MA.
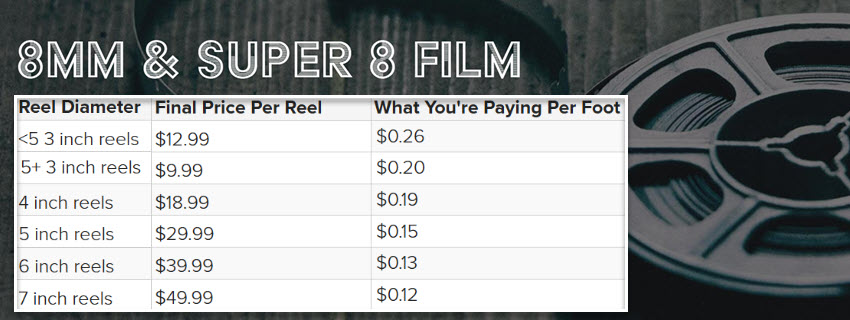
Just8mm is a specialized film-only digitization service focused on 8mm and Super 8 transfers, and they emphasize an authentic telecine-style method that aims to replicate motion, color, and clarity faithfully with minimal artificial processing. Pricing is straightforward and scales with the amount of film you have, with volume pricing and optional 2K HD upgrades.
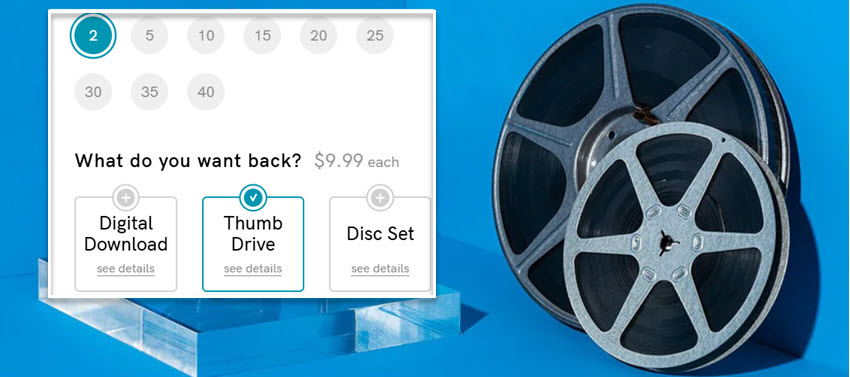
They include cloud backup for 60 days with digital products and return your originals safely post-transfer, with options for DVD, USB, and downloadable files.
Southtree
- In business for: Over 10 years as a consumer media digitization provider.
- Turnaround time for digitization: Typically 4 – 6 weeks once your filled kit arrives. 8 – 12 weeks in peak season.
- Is it done in-house: Yes, all conversions are handled at their facility in Chattanooga, Tennessee.
Southtree offers a mail-in digitization kit that covers consumer film formats including 8mm, Super 8, and 16 mm. You pack your reels into their branded box with safety barcodes, ship it back with the prepaid label, and then they handle the media digitized by hand, with regular email updates and a personal concierge available during processing.
Southtree's pricing is at a base of around $25 per film reel, with add-ons for digital download, USB, or DVD at checkout. It offers decent quality transfers and a smooth process for turning old home movies into digital files, with helpful packaging and return of originals.
Laserfilmlab
- In business for: over a decade of small-gauge film transfer.
- Turnaround time for digitization: 2–8 weeks depending on volume and restoration work.
- Is it done in-house: Yes. Transfers are handled on-site in Texas using professional motion-picture scanning gear.
Laser Film Labs specializes in converting small-gauge film, including 8mm and Super 8, to digital formats, along with other media like videotapes and 35 mm slides, emphasizing careful inspection and prep before scanning.
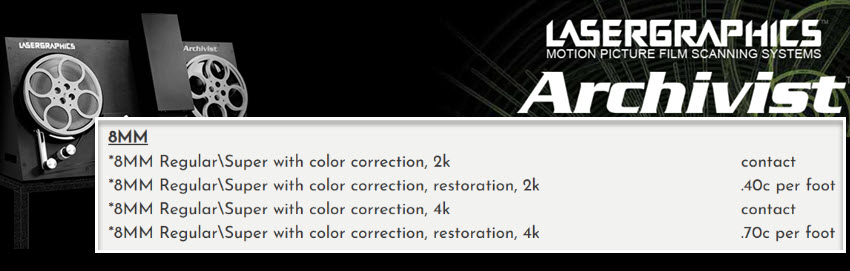
The lab uses a Lasergraphics Archivist motion-picture scanner capable of high-resolution output and advanced scanning features like sprocketless transport and HDR capture, which theoretically produces smoother, broadcast-quality transfers and can handle warped or fragile film better than basic telecine setups.
Legacybox
- In business for over 10 years.
- Turnaround time for digitization: 4–6 weeks.
- Is it done in-house: Yes, items are shipped to their facility for processing.
Legacybox has been around for over a decade, digitizing analog media from VHS and 8mm film to photos. In my own experience with their 8mm service, the ordering and packaging process was straightforward, and they provide regular email updates as the order moves through their facility.
The service returns your originals plus digital copies on cloud storage, thumb drives, or other media you choose at checkout. Besides 8mm, super 8, it also works for vhs digitizing.
Converting 8mm Film to Digital Yourself at Home
If you are the hands-on type who enjoys geeking out and loves DIY projects, you can convert 8mm film to digital yourself at home. There are two main DIY methods, each with its own pros and limitations.
Option 1: Use a Consumer 8mm Film Scanner
Dedicated 8mm and Super 8 film scanners are designed specifically for home users. These machines scan film frame by frame and export a digital video file.
Pros
- Simple setup and beginner friendly
- No projector required
- Frame by frame capture reduces flicker
Cons
- Limited color correction and dynamic range
- Slower scanning process for long reels
- Results are often below professional archival quality
This option works well for casual viewing, family sharing, and basic archiving.
Option 2: Camera Capture Method with the Projector
For this method, you need to play the reel on an 8mm projector, then record it with a digital camera on a tripod.
Pros
- Very low cost if you already own a projector and camera
- Flexible resolution depending on camera quality
- Hands-on control of exposure and focus
Cons
- Flicker and frame rate mismatch are common
- Requires careful alignment and calibration
- Image sharpness depends heavily on projector lens quality
- Film wear increases due to repeated projection
This method is best for experimentation or short reels rather than large collections.
What You Still Need to Watch Out For
Even when digitizing at home, the same pitfalls apply:
- Incorrect frame rate conversion can cause jerky motion
- Over-sharpening or noise reduction can permanently damage detail
- Low-resolution scans limit future restoration options
- Always keep the original film reels after digitization
If you also have old video formats like MiniDV, learn how to transfer MiniDV to digital format.
After Digitizing: Save and Enhance Your 8mm Film
Once your 8mm or Super 8 film has been digitized, the process does not have to stop there. How you store, enhance, and future-proof the digital files matters just as much as the initial transfer.
Typical transfer resolutions include DVD quality around 480 lines, HD 720p for most 8mm film, and some professional transfers for 8mm or Super 8 scans that can match Full HD 1080p or even 2K 1556-line quality.
Enhance 8mm Film Video Quality with Aiarty Video Enhancer
If you want to display your digitized footage on modern 4K screens, traditional digitizing services may not be sufficient enough to restore lost details. You need AI inference to resampling the digitized Super 8 or 8mm film with realistic pixels restored.
Aiarty Video Enhancer works nicely for video upscaling and old video restoration, from 480p, 720p to 1080p, 2K, and 4K quality. You can do it yourself at home without technical know-hows. Here are three easy steps.
After downloading and installing Aiarty on your Windows or Mac computers:
Step 1. Launch it and drag and drop the digitized Super 8 or 8mm film.
It also supports digitized VHS, MiniDV, DVD, and general digital formats.

Step 2. Choose the suitable AI models and resolution.
- moDetail-HQ: Restore for more details, sharpness, and clarity.
- Smooth-HQ: Focuses on faithful video restoration, with natural deblurring and denoising for general scenes.
- superVideo vHQ: Tackles the most difficult scenarios, especially low-light, grainy scenes.
For resolution, you can choose x2, x4, or a target 2K, 4K upscaling. To enhance quality only, select x1 to keep the original resolution. You can also run x2 twice, which delivers better quality that directly jumping to x4.
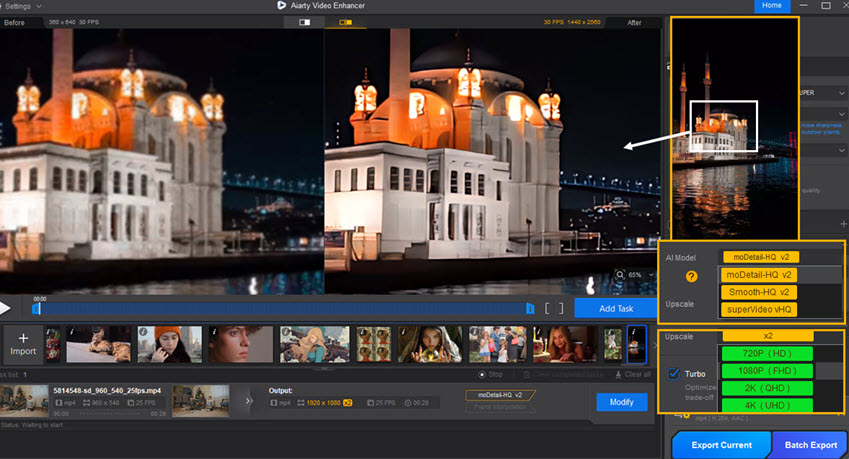
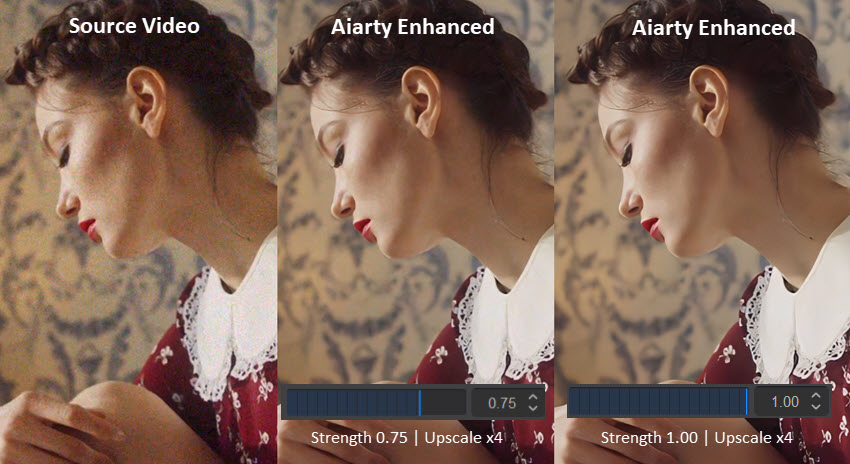
Step 3. Preview in realtime and adjust AI enhancement strength.
You can preview and compare the before and after enhancement for each frame, and drag the strength slider to control intensity. For instance, 0.55 strength makes it look more natural and keeps the original feel of the footage.
Once you are happy with the enhancement, you can click the button to export the footage to MP4 or MOV format. Aiarty supports H264, H265, AV1, and ProRes codec for different scenarios such as sharing, further editing, or long-term archiving.
You May Also Like
This post was written by Brenda Peng who is a seasoned editor at Digiarty Software who loves turning ordinary photos into extraordinary works of art. With AI assistance for brainstorming and drafting, the post is reviewed for accuracy by our expert Abby Poole for her expertise in this field.