Crafting smooth slow-motion footage in video editing is a crucial skill for adding drama, emphasis, and polish to your projects. In this comprehensive guide, you'll learn how to master the various slow-motion techniques available in DaVinci Resolve, the industry-leading video editing software. Whether you're a beginner looking for a quick and simple fix or a seasoned editor aiming for seamless, cinematic results, this post will walk you through three distinct methods, from the most basic to the most advanced.
There are several methods for creating slow motion in DaVinci Resolve, ranging from simple speed changes to more advanced effects like smooth speed ramps with Optical Flow. The best method depends on whether you want to slow down an entire clip or just a specific section, and the original frame rate of your footage.
Check them now.
Method 1: How to Do Slow Motion in Davinci Resolve Quickly and Constantly
This method is the most straightforward for creating constant slow motion on an entire clip. It is best used for clips that have been shot at a higher frame rate than your timeline's frame rate (e.g., 60fps footage in a 24fps project) for the smoothest results.
Here are the step-by-step instructions for this method.
Step 1. Select the clip: In the Edit page, click on the clip in your timeline that you wish to slow down.
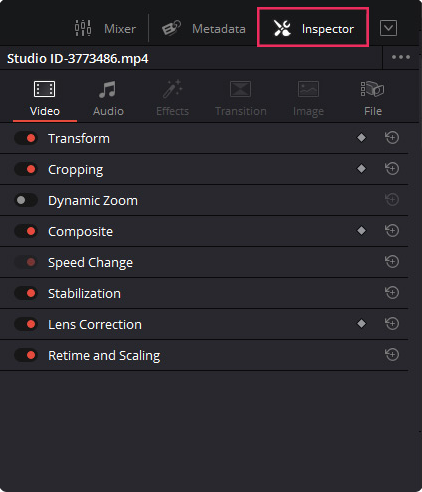
Step 2. Open the Inspector: In the top-right corner of the interface, click the Inspector button. This will open a panel with settings for your selected clip.
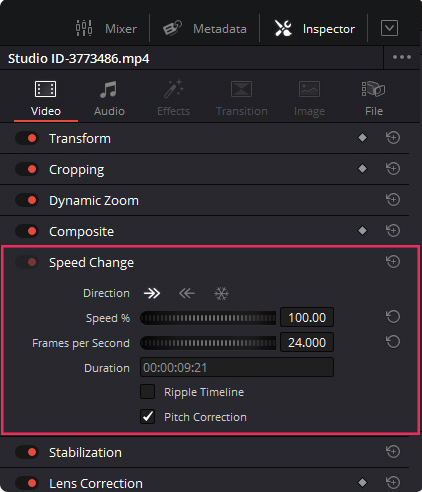
Step 3. Adjust the speed: Within the Inspector panel, scroll down to the Speed Change section. The default speed is 100%. Click and drag the speed percentage to the left to slow down your clip. For example, setting the speed to 50% will make the clip play at half its original speed and double its duration.
Step 4. Use the Change Clip Speed window (optional): For more precise control, right-click the clip and select Change Clip Speed from the menu.
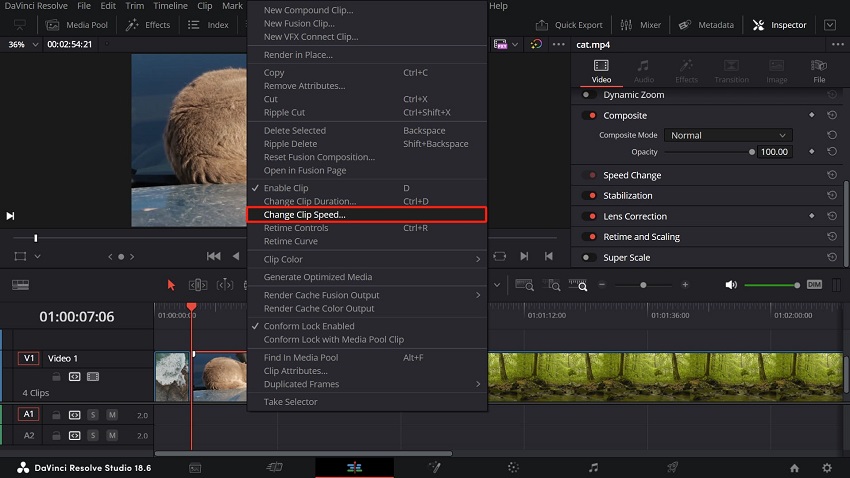
This opens a pop-up window where you can: Type in the exact speed percentage or duration you want. Then check the Ripple Timeline box. This is important if you want all subsequent clips on your timeline to automatically shift to make room for your longer slow-motion clip. Choose to reverse the speed or freeze a specific frame.
davinci-resolve-change-clip-speed-settings.jpg DaVinci Resolve Change Clip Speed settingsStep 5. Separate audio (optional): If your clip has audio, changing the video speed will also alter the pitch of the audio, often resulting in a "chipmunk" effect. To avoid this, you can: Unlink the clip: Right-click the clip and uncheck Link Clips. You can then delete the audio or keep it at its normal speed. Or correct the pitch: In the Change Clip Speed window, check the Pitch Correction box to mitigate some audio pitch changes.
Step 6. Refine the look: If you slowed down footage that was shot at a standard frame rate (like 24 or 30fps), it may appear choppy or stutter.
To make it look smoother, in the Inspector, find the Retime and Scaling section.
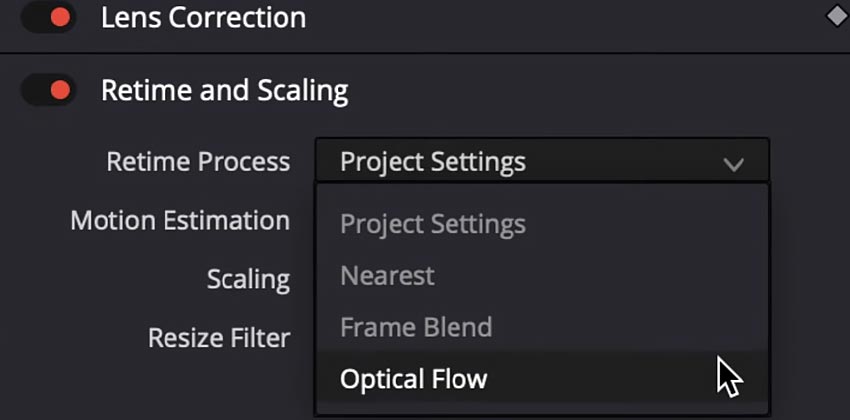
For Retime Process, change the setting from "Nearest" to Frame Blend or Optical Flow (which we will cover in the third method below). Frame Blend mixes frames together for a smoother look, while Optical Flow is a more advanced technique that generates new frames to fill in the gaps, though it is more processor-intensive and sometimes exclusive to the paid DaVinci Resolve Studio version.
Method 2: How to Do Slow Motion in Davinci Resolve with Retime Controls for Specific Sections
Retime Controls are perfect for creating variable speed effects, allowing you to slow down a specific moment in your clip while keeping the rest at normal speed. This is ideal for adding dramatic emphasis to a particular action.
Here are the step-by-step instructions for this method.
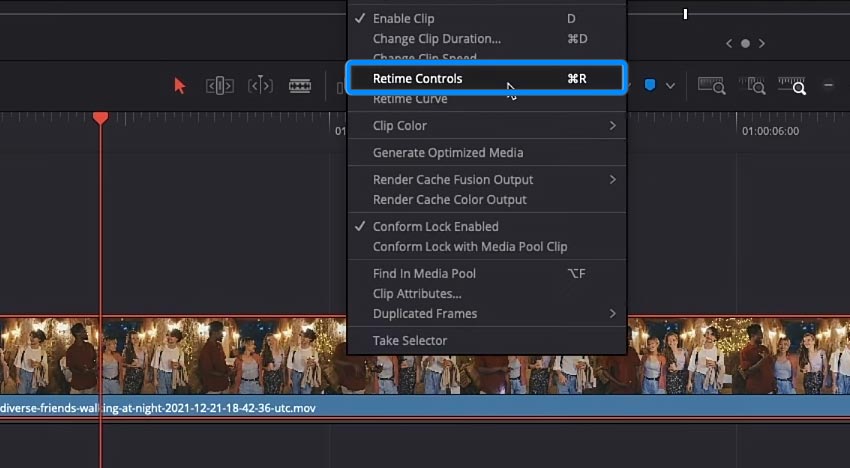
Step 1. Activate Retime Controls: Select the clip on your timeline that you want to edit. Then, either right-click and choose Retime Controls or use the keyboard shortcut Ctrl+R (Cmd+R on Mac).
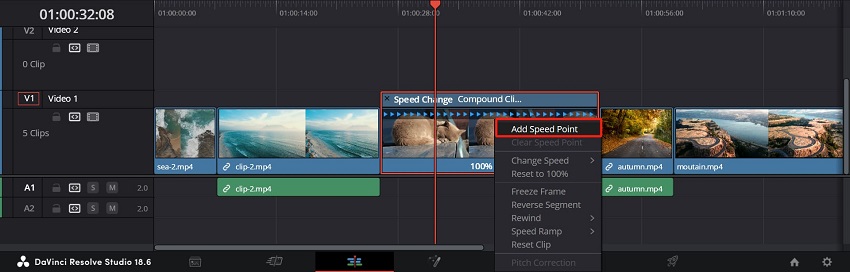
Step 2. Add Speed Points: This step breaks your clip into distinct segments, each with its own speed control. To make it, move the playhead to the exact frame where you want the slow motion to begin. Click the small arrow next to the speed percentage (e.g., "100%") that appears on the clip in your timeline. Select Add Speed Point from the menu. A small triangle will appear to mark the point. Repeat this process for the end of the slow-motion section to create a second speed point.
Step 3. Adjust the speed: You can now change the speed of the clip section you have isolated. Click the speed percentage on the middle segment—the one between your two speed points. Drag the number down to a lower percentage to slow down the clip. For instance, dragging to 50% will cut the speed in half.
Step 4. Adjust speed point positions: If needed, you can click and drag the speed point markers along the clip to adjust where your slow-motion segment begins and ends.
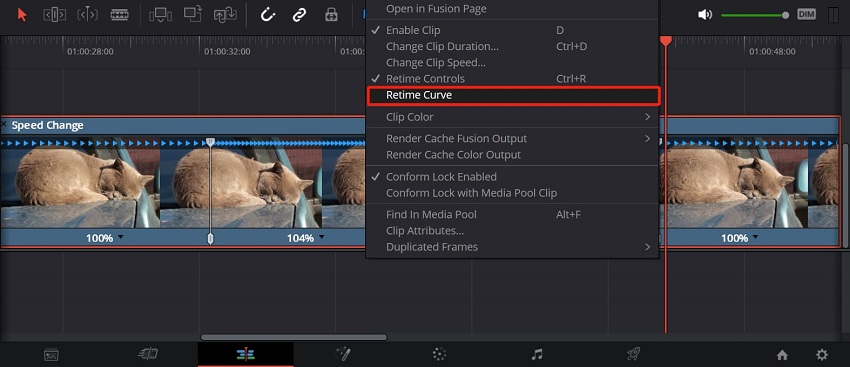
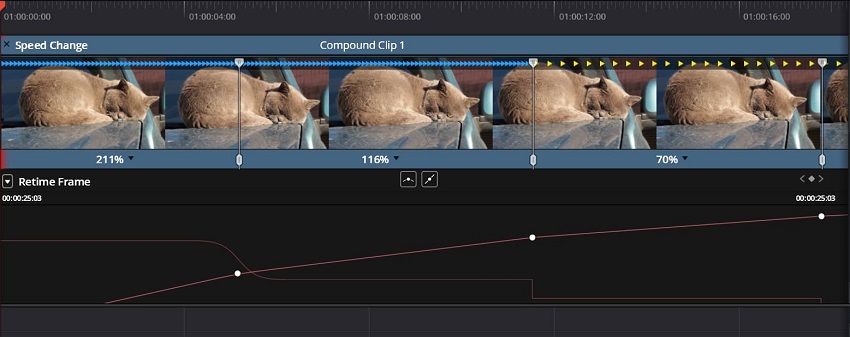
Step 5. Refine the effect: For a softer shift between speeds, you can create a "speed ramp." To do this, switch to Retime Curve by right-clicking the clip. In the curve editor, you can adjust Bezier handles on the keyframes to smooth out the speed transition.
If the slow motion looks choppy, particularly on lower frame rate footage, improve it by adjusting the Retime Process in the Inspector panel. Set it to Optical Flow or Frame Blend for better results.
Also see: How to Speed Up or Slow Down Clips with Premiere Pro Rate Stretch Tool
Method 3: How to Do Slow Motion in Davinci Resolve with Optical Flow
Optical Flow is an advanced, AI-based method for creating extremely smooth slow motion, even with footage that was shot at a standard frame rate (e.g., 24fps). It works by using AI to analyze pixel movement between frames and intelligently create brand-new, in-between frames to fill in the gaps, rather than simply duplicating existing frames. The result is fluid motion that appears as though it was captured with a high-speed camera.
Note: The highest quality Optical Flow option, Speed Warp, is only available in the paid DaVinci Resolve Studio version. However, excellent alternatives are available in the free version.
Here are the step-by-step instructions for this method.
Step 1. Prep your clip for variable speed. Enable Retime Controls by selecting your clip and pressing Ctrl+R (Cmd+R on Mac).
Add Speed Points at the beginning and end of the segment you want to slow down. Use the speed controls on the clip itself to set the slow-motion segment to your desired speed, such as 50% or 25%.
Step 2. Activate Optical Flow. Ensure your clip is selected, then navigate to the Inspector panel. Scroll down to the Retime and Scaling section and expand it. In the Retime Process dropdown menu, select Optical Flow.
For the best results, select Speed Warp under the Motion Estimation setting. If you are using the free version of Resolve, you can choose "Enhanced Better".
Step 3. Refine the speed transition with the Retime Curve. Right-click the clip on your timeline and select Retime Curve from the menu.
This opens the curve editor below your timeline. In the editor, make sure the dropdown menu is set to Retime Speed. Click on the keyframes (the small diamonds) that correspond to your speed points. Click the Curve icon above the graph (or use the keyboard shortcut Ctrl+C or Cmd+C) to change the keyframes from sharp linear points to smooth, curved ramps. You can now click and drag the Bezier handles to adjust the curve and control the acceleration and deceleration of the speed change.
Step 4. Render for a smooth preview. Because Optical Flow is computationally intensive, your playback may be choppy. To see the effect in full quality, you can render a specific section of your timeline by marking an "in" and "out" point, or you can right-click the clip and select Render in Place. This generates a new, rendered clip with the final effect applied.
While DaVinci Resolve offers powerful tools like Optical Flow for speed effects, sometimes you just need a quick, easy, and exceptionally smooth slow-motion clip without getting bogged down in a complex editor. That's where a dedicated AI tool like Aiarty Video Enhancer comes in.
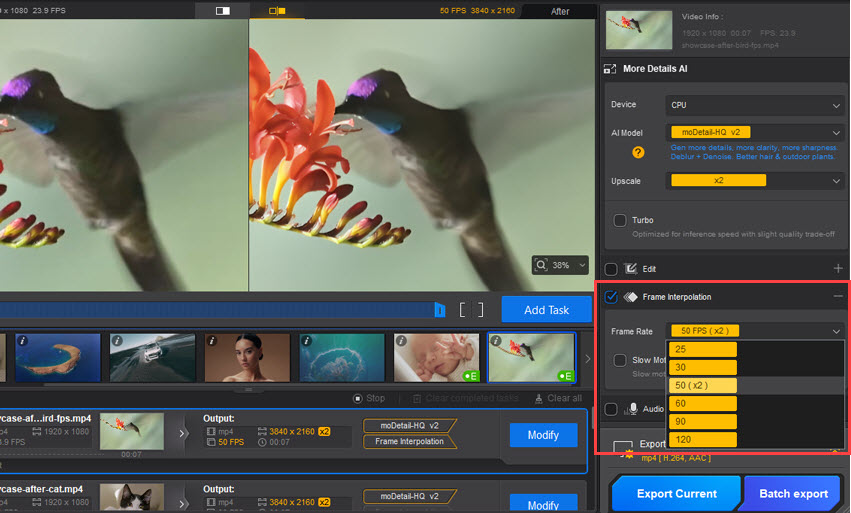
Instead of navigating retime controls and tweaking settings, Aiarty uses cutting-edge AI frame interpolation to generate new frames, effortlessly transforming standard footage into cinematic, high-frame-rate slow-motion.
- For the editor who values speed: Skip the complex timeline edits. Just load your clip into Aiarty Video Enhancer, choose your target frame rate (from 25 fps to 120 fps), and let the AI do the heavy lifting.
- Perfect for difficult footage: Did you forget to shoot in high frame rate? No problem. Aiarty's AI models can create smooth, natural-looking motion even from lower frame-rate video, a task where traditional software often produces choppy or "ghosted" results.
- More than just slow motion: Aiarty is a complete enhancement tool. While it's creating your silky-smooth slow-motion clip, it can also upscale its resolution, remove noise, and sharpen details - all in one streamlined process.
So, if you're looking for the fastest, most automated path to professional-grade slow-motion, give your clips an upgrade with Aiarty Video Enhancer. You can export a beautifully enhanced, ready-to-use asset and bring it back into Resolve for your final edit.
Conclusion
Now that you have explored the different methods for creating slow motion in DaVinci Resolve, you have the tools to achieve a wide range of effects. From a quick and simple constant-speed change to a highly cinematic speed ramp using advanced Optical Flow technology, the best approach depends on your project's needs and the source footage. By mastering these techniques, you can add dramatic emphasis to action sequences, create dreamy visuals, and control the pace of your narrative with precision.
Whether you are a beginner or a professional, understanding when to use each method will help you elevate your video editing and create stunning, professional-looking results. So, start experimenting with your footage, practice these skills, and add another powerful technique to your video editing toolkit.
You May Also Like
This post was written by Ashley Brown, a videographer turned AI explorer. As an associate writer at Digiarty Software, she dives into the latest AI-powered tools for video enhancement and content creation, offering practical insights and unbiased commentary. Accuracy confirmed by Abby Poole.