


Motion blur can turn a photograph that feels static into one that immediately suggests speed. It works especially well with cars, cyclists, runners, dancers, and other subjects where the original frame captured the action a little too cleanly.
Photoshop gives you several ways to create the effect. For straightforward movement, the standard Motion Blur filter is usually enough. If you want to simulate a panning shot while keeping the subject sharp, it takes a little more work with selections and masks. For movement that bends or changes direction, Path Blur gives you much finer control.
The mechanics are simple. The harder part is making the blur agree with the photograph. Direction, strength, subject edges, and the type of motion all matter. A technically correct blur can still look obviously artificial if those pieces do not line up.
Quick answer: To add motion blur in Photoshop, select your layer and go to Filter > Blur > Motion Blur. Set the Angle to follow the direction of movement, then adjust Distance until the streaking looks natural. For a non-destructive workflow, convert the layer to a Smart Object first so you can change the effect later.
What Is Motion Blur in Photoshop?
Real motion blur happens when something moves relative to the camera while the shutter is open. Instead of recording the subject at a single perfectly defined position, the camera records some of its movement across the frame. Depending on the shutter speed and the type of motion, this can appear as directional streaking, a blurred background, spinning wheels, soft limbs, or a combination of several effects.
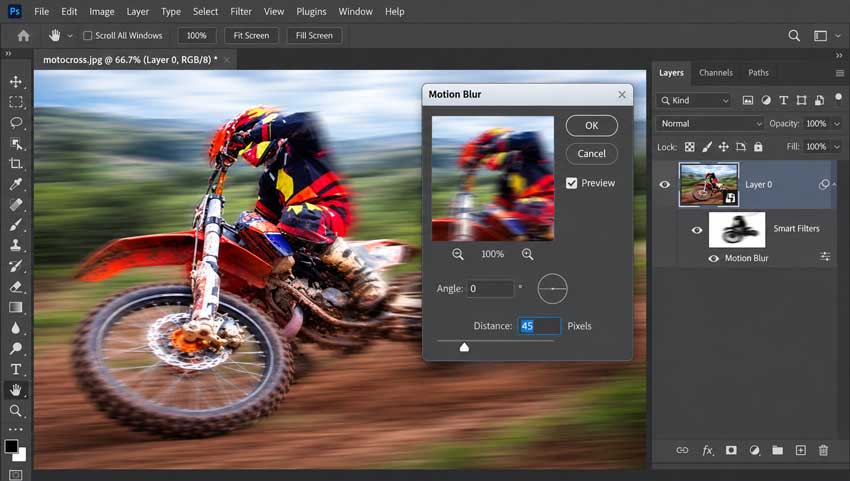
Photoshop’s Motion Blur filter recreates the simplest version of that behavior digitally. It stretches image detail along a chosen direction. Two controls do most of the work: Angle, which defines the direction of the blur, and Distance, which determines how far the pixels are spread.
That makes Motion Blur quite different from a general softening filter.
| Blur Type | What It Does | Best Used For |
|---|---|---|
| Motion Blur | Stretches detail in one direction | Cars, runners, cyclists, panning effects |
| Gaussian Blur | Softens detail evenly | Depth effects, soft backgrounds, masks |
| Path Blur | Creates blur along one or more custom paths | Curved or irregular movement |
| Spin Blur | Simulates rotational movement | Wheels, fans, propellers |
If the subject is simply moving left to right, the standard Motion Blur filter is usually the quickest choice. Once the movement becomes more complex, however, a single direction can start to look too mechanical.
Method 1: How to Add Motion Blur in Photoshop with the Motion Blur Filter
This is the basic method and the one worth learning first. It works well when you want to add directional movement to an entire layer or apply the effect selectively with a mask.
Step 1. Convert the Image to a Smart Object
Open the photograph in Photoshop and locate the image layer in the Layers panel. Right-click the layer and choose Convert to Smart Object.
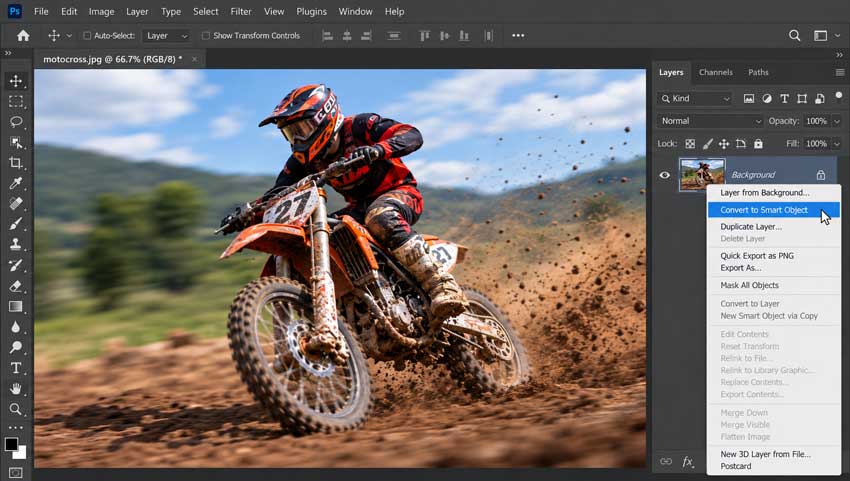
You can technically apply Motion Blur directly to a normal raster layer, but there is little reason to do that for this kind of edit. Applying the filter to a Smart Object turns it into a Smart Filter, which means the blur remains editable. If the effect turns out to be too strong after you look at the image at full size, you can reopen the filter and change it rather than starting again.
This also gives you a Smart Filter mask automatically, which becomes useful when parts of the photograph need to stay sharp.
Step 2. Open the Motion Blur Filter
With the Smart Object selected, go to:
Filter > Blur > Motion Blur
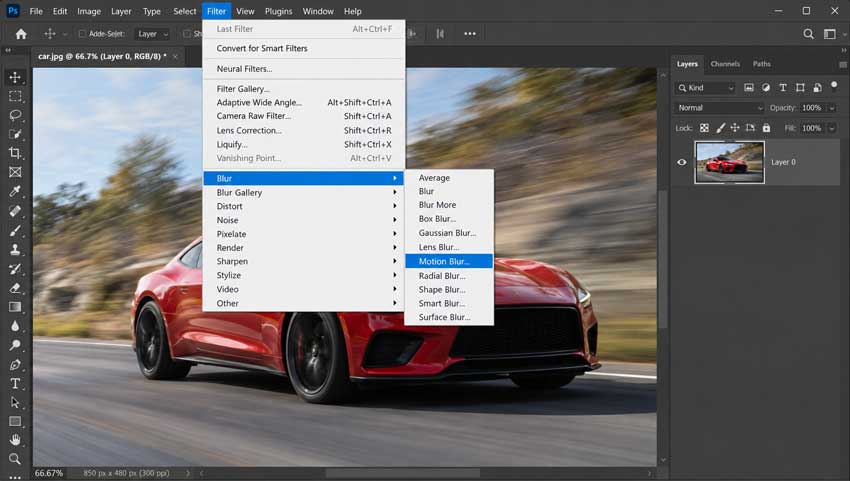
The Motion Blur dialog is deliberately simple. Photoshop gives you an Angle control and a Distance slider, along with a preview of the result.
Before touching Distance, get the direction right. An exaggerated blur pointing in the correct direction often looks more convincing than a subtle blur pointing the wrong way.
Step 3. Match the Angle to the Movement
The Angle setting tells Photoshop which way the motion is traveling.
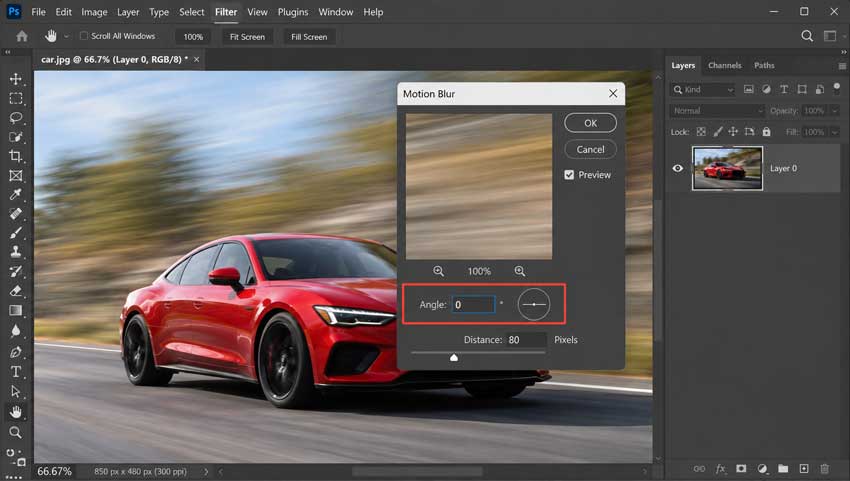
For a car moving horizontally across the frame, an angle near 0° may be appropriate. For something moving vertically, the angle will be closer to 90°. Diagonal movement needs an angle that follows the actual trajectory of the subject.
Do not treat those values as presets. Look at the photograph instead.
Road edges, clothing, hair, body position, wheel orientation, shadows, and perspective can all give clues about the direction in which the subject is supposed to be moving. If a cyclist is descending diagonally through the frame, a perfectly horizontal blur will immediately feel disconnected from the action even if the viewer cannot explain exactly why.
For realistic motion blur in Photoshop, direction matters more than simply making the background look fast.
Step 4. Adjust the Distance
Distance controls the length of the blur streak.
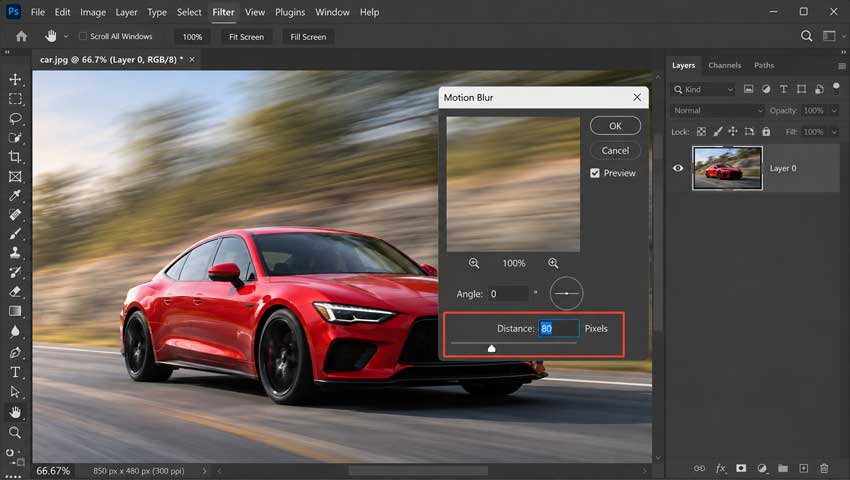
This is where many motion blur effects become overdone. Moving the slider farther does create a stronger sensation of speed, but after a certain point the photograph stops looking like a long exposure and starts looking like a Photoshop effect.
There is no universally correct Distance value. A 50-pixel blur behaves very differently on a 1000-pixel image than on a 6000-pixel photograph. Subject size, output resolution, background texture, and intended speed all affect how much blur feels believable.
Start lower than you think you need, then increase the value gradually while watching recognizable details in the background. Straight edges, road markings, buildings, trees, and lights are particularly useful reference points.
If everything turns into long featureless streaks, pull the effect back.
Step 5. Mask Areas That Should Stay Sharp
Applying Motion Blur to the whole image is fine for some abstract effects, but it is rarely the most convincing treatment for a photograph with a clear subject.
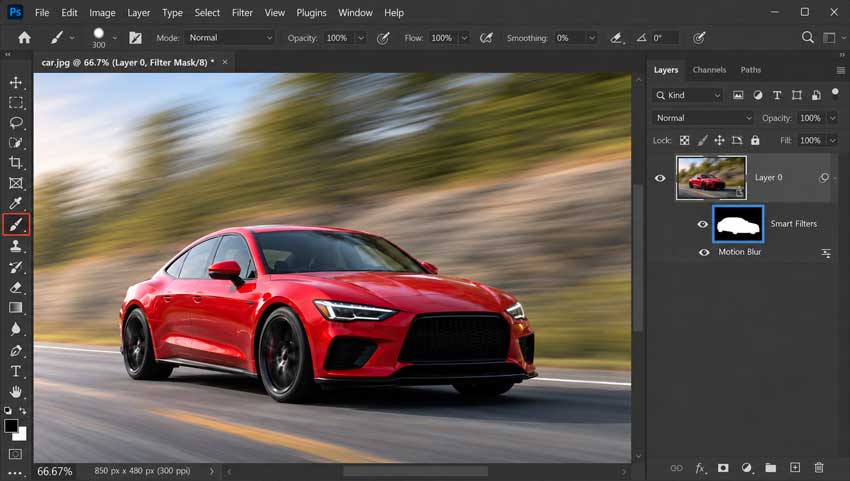
Because the effect was added as a Smart Filter, Photoshop places a white mask beneath the Smart Object. Click the Smart Filter mask, choose the Brush Tool, set the foreground color to black, and paint over the areas where you want to hide the blur.
Faces, eyes, logos, product details, and major subject edges are usually good candidates for protection. Adobe’s current workflow also recommends using the Smart Filter mask to isolate the blur while preserving detail in important parts of the frame.
Avoid making every edge perfectly sharp, though. Real moving subjects are not cutouts. Hair, loose clothing, hands, feet, and other fast-moving parts may still need a small amount of softness to fit naturally into the scene.
A Quick Note Before Adding Blur to a Low-Quality Image
Motion effects are much easier to control when the source photograph is already reasonably clean. If you are starting with a heavily cropped image, noisy high-ISO shot, compressed JPEG, or photograph with slight overall softness, consider fixing those problems before adding intentional motion blur.
This is one situation where Aiarty Image Enhancer can fit naturally into the workflow. It can denoise, reduce minor blur and compression artifacts, and enhance image detail before the creative edit begins. If you do not need a larger file, its x1 enhancement option lets you improve image quality without changing the original resolution; higher scaling options are available when a crop also needs more pixels.
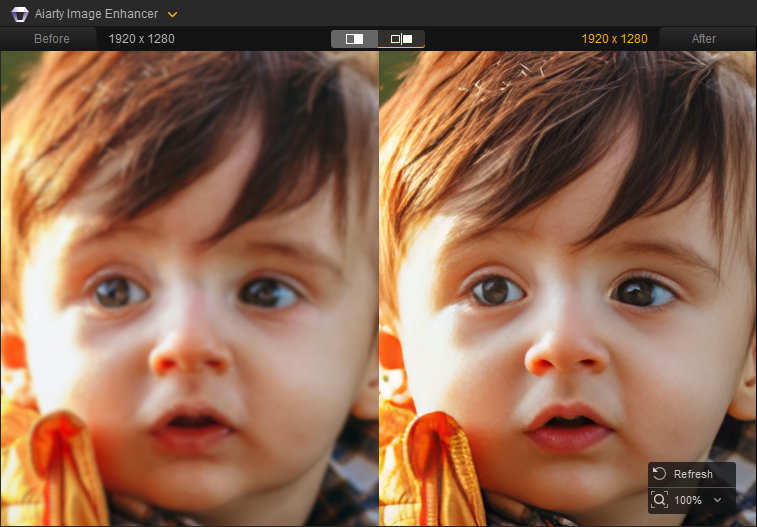
The important distinction is that enhancement should improve detail that is supposed to be sharp. Do not try to "fix" genuine or intentionally added motion trails afterward. Clean the source first, then build the motion effect in Photoshop.
Method 2: How to Add Motion Blur to a Background in Photoshop
For sports, automotive, cycling, and action photography, a more useful technique is often to keep the main subject relatively sharp while blurring the environment behind it.
This mimics the look of a panning photograph: the camera follows the subject during the exposure, so the subject remains comparatively defined while the background stretches in the direction of travel.
Simply applying Motion Blur to the background sounds straightforward, but there is one problem. If the original subject is still present inside the background layer, Photoshop will blur that copy as well. Once you place a sharp subject over it, a smeared duplicate may show around the edges.
That is where the familiar "Photoshop halo" around cars, people, and bikes often comes from.
Step 1. Select the Subject
Start with the original photograph and use Select Subject or the Object Selection Tool to isolate the moving subject.
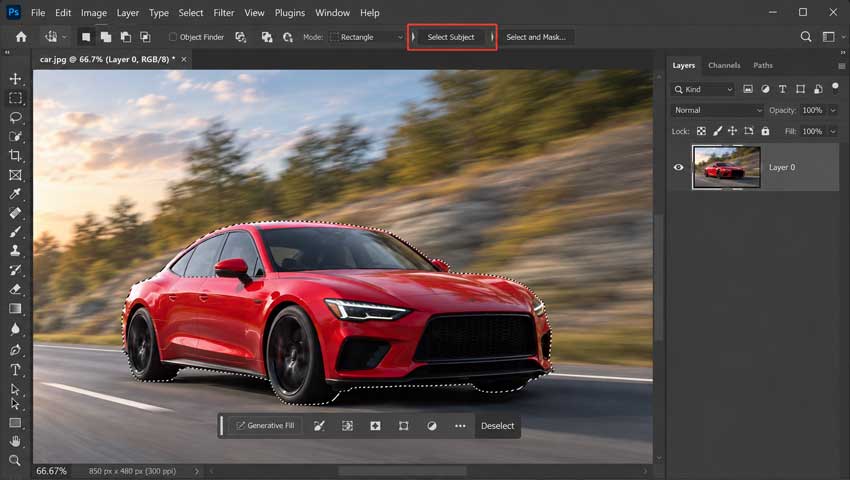
Automatic selections are often a useful starting point, but do not assume the first result is finished. Zoom into areas such as hair, spokes, clothing, mirrors, handlebars, or any gap where the background shows through the subject.
For complicated edges, open Select and Mask and refine the selection before continuing.
You do not necessarily need a perfect studio-grade cutout, but the cleaner the separation is, the easier it will be to hide the transition later.
Step 2. Separate the Subject and Background
With the subject selected, place it on its own layer. You can use a layer mask rather than permanently deleting the surrounding pixels.
You now need a background layer that does not contain an intact copy of the subject. If you simply duplicate the original photograph and blur it, the hidden subject will stretch outward underneath the sharp foreground version.
Fill or reconstruct the subject area on the background layer before applying the blur. Depending on the scene, Photoshop’s content-aware or generative removal tools can help, but the replacement does not need to be perfect. Much of this area will be blurred and then covered again by the sharp subject.
What matters is removing enough of the original subject that its shape does not reappear as a directional streak.
Step 3. Apply Motion Blur to the Background
Convert the cleaned background layer to a Smart Object, then choose:
Filter > Blur > Motion Blur
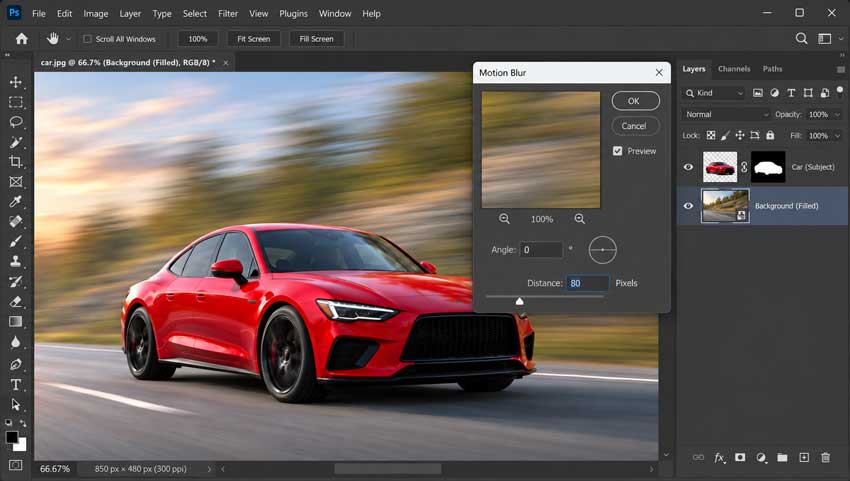
Set the Angle so that it follows the apparent movement through the scene.
If a vehicle is traveling from left to right, the background should normally streak along that direction rather than vertically or toward the camera. Perspective can complicate the result, so pay attention to visual clues in the scene rather than relying only on the subject’s orientation.
Increase Distance until the background develops a clear sense of movement but still retains enough structure to read as a real place.
This balance is particularly important with trees, buildings, spectators, and textured ground. If all of them collapse into perfectly smooth bands, the image can start to resemble a digital backdrop rather than a panning photograph.
Step 4. Bring the Sharp Subject Back
Place the isolated subject above the blurred background.
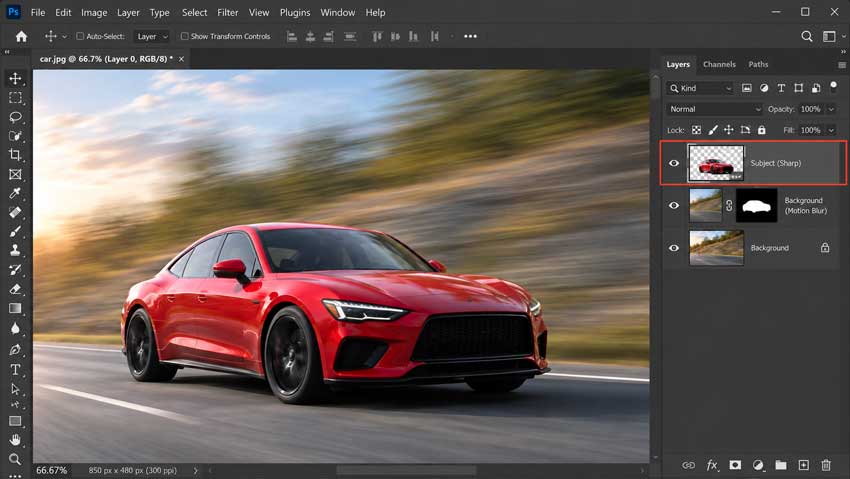
At this stage the basic illusion should already work: sharp subject, directional environment.
Now look at the image at both 100% and normal viewing size. Edge problems that seem obvious when zoomed in may disappear at normal scale, while large halos that are easy to miss at 200% can become obvious when you step back.
Pay particular attention to the rear edge of a moving subject. Motion blur often creates a visible trail behind objects, so a completely hard edge around the entire subject can actually look too clean.
Step 5. Refine the Edges
Use the subject’s layer mask and a soft brush to blend the transition.
You may want the face, vehicle body, or torso to stay sharply defined while allowing a small amount of blur around hair, clothing, hands, legs, or wheels. Lowering brush opacity helps make these transitions gradual.
The goal is not to create a perfectly isolated cutout floating over a blurred photograph. It is to make the subject feel as though it was photographed in the same exposure.
For a car, for example, the body may remain largely sharp while the wheels show rotation and the road carries strong horizontal movement. Those differences are what make the image believable.
Method 3: Use Path Blur for Curved or More Natural Motion
The regular Motion Blur filter has one obvious limitation: it assumes the blur travels in one direction.
That works for a passing car or a straightforward pan. It is less convincing for a dancer turning through a frame, fabric swinging in an arc, a runner whose limbs are moving in different directions, or a photograph where perspective causes the movement to change across the image.
For those situations, try Path Blur.
Go to:
Filter > Blur Gallery > Path Blur
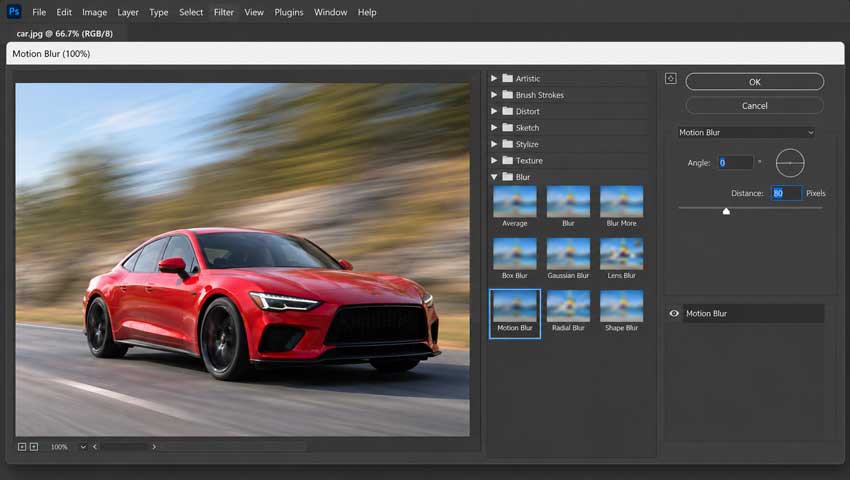
Photoshop places a directional path over the image. You can drag its endpoints and handles to define how the blur moves, and you can add additional paths in other areas when the scene contains more than one direction of movement. Adobe specifically recommends Path Blur for movement that follows curved paths or multiple directions.
Final Thoughts
The Motion Blur filter itself is one of the simpler tools in Photoshop. The quality of the result comes from everything around it: choosing the right direction, keeping the correct parts sharp, controlling the amount of streaking, and making sure the subject does not leave an obvious blurred duplicate behind.
For simple movement, start with Filter > Blur > Motion Blur and work non-destructively with a Smart Object. If you are trying to recreate a panning shot, separate the subject and background before applying the effect. When the motion curves or changes direction, move to Path Blur rather than forcing a single linear blur to fit the scene.
Most importantly, do not judge a motion effect by how dramatic it looks at 200% zoom. View the finished photograph at its intended size. If the first thing you notice is the Photoshop blur rather than the movement itself, the effect probably needs to come down a little.
You May Also Like


This post was written by Brenda Peng who is a seasoned editor at Digiarty Software who loves turning ordinary photos into extraordinary works of art. With AI assistance for brainstorming and drafting, the post is reviewed for accuracy by our expert Abby Poole for her expertise in this field.
