How to Remove Background Noise in Davinci Resolve
The day of the shoot was perfect—the lighting was soft, the performance was spot-on, and the framing was immaculate. But when you got back to the editing suite and put on your headphones, a chilling realization hit you: the sound was a mess. A distracting hum, a sudden gust of wind, or the chatter from a nearby café threatens to derail your hard work. This is the moment every video editor dreads.
But what if you could have the perfect audio to match your perfect visuals? Read on to discover how you can remove background noise using DaVinci Resolve's powerful built-in audio tools.
Part 1. How to Remove Background Noise in Davinci Resolve For All Users (including the Free Version)
We will first for three methods which can work for both Davinci Resolve free users and Studio users.
Method 1: Standard Noise Reduction Effect
This method involves "teaching" DaVinci Resolve what your specific background noise sounds like and then having the program remove it. It is highly effective for constant, low-level noises like fan hums, air conditioning, or consistent room tone. For the best results, you need a small section of audio that contains only the unwanted noise, with no speech or other sounds.
Here are the step-by-step instructions for this feature.
Step 1. Switch to the Fairlight page. Click the music note icon at the bottom of the screen.
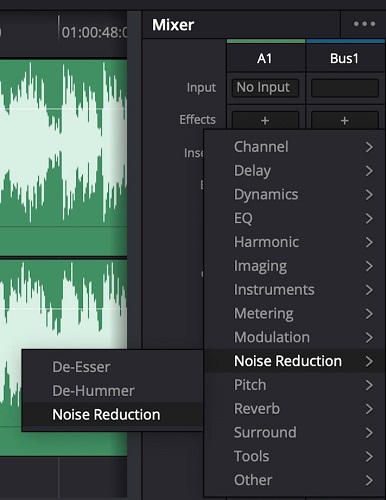
Step 2. Open the Mixer panel if it's not already visible. Go to Workspace > Show Panel > Mixer > Noise Reduction. Then out of the three options presented, select Noise Reduction again.
Step 3. Find a "noise print". In your audio clip on the timeline, find a moment of silence where you can only hear the background noise. This is your "noise print".
Step 4. Use the "Learn" function. Highlight the section of your timeline that contains only the noise. In the Noise Reduction window, ensure "Manual" mode is selected. Click the Learn button. Play the highlighted section of your audio. Resolve will listen to the noise and analyze its frequency pattern. When the playback finishes, click the Learn button again to turn it off. The noise profile is now set.
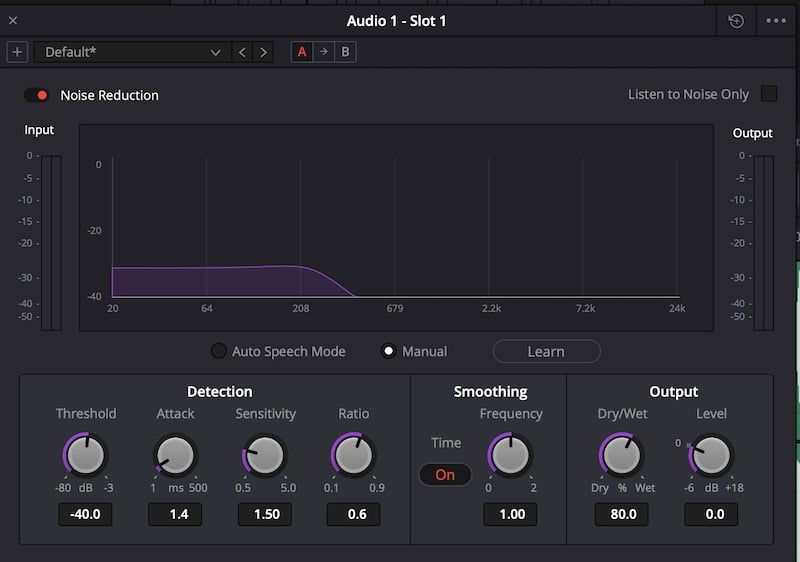
Step 5. Adjust the settings. Start by increasing the threshold slowly. The threshold determines the level at which the noise reduction is applied. Increase it just enough to cover the volume level of the background noise. If you set it too high, you risk removing parts of your voice.
Then use the Listen to Noise Only button (in the top right of the Noise Reduction window) to toggle between hearing the final audio and hearing only the sound that is being removed. This allows you to fine-tune your settings to ensure you are only eliminating unwanted noise.
Step 6. Fine-tune other parameters:
- Attack: Controls how quickly the filter responds to noise. For consistent noise like a fan, you don't need a fast attack. For more varied, sporadic noise, a faster attack is better.
- Sensitivity: Determines how sensitive the tool is to the noise it's detecting. You can boost it if the tool is having a hard time picking up the noise.
- Ratio: Controls how strongly the noise is reduced once the threshold is met. A higher ratio results in more aggressive noise reduction.
- Smoothing: Helps create a more natural sound by smoothing the reduction over time.
Tips for the Best Results
First, be subtle with your adjustments. Excessive noise reduction can make your voice sound artificial, thin, or garbled. It's often better to have a little bit of noise than to have unnatural-sounding dialogue.
If you have a specific type of noise, such as a hiss or rumble, you can try one of the presets in the Noise Reduction window to get a good starting point.
And for very stubborn noise, you may get better results by combining Noise Reduction with a Noise Gate or EQ. For example, use EQ to cut low-end rumble and Noise Reduction for higher-frequency hiss.
Also see: How to Remove White Noise from Audio: 4 Easy Methods
Method 2: Use an Equalizer (EQ)
An equalizer (EQ) is a powerful tool for manipulating the frequency content of your audio. While not a dedicated "noise removal" tool like the Fairlight FX Noise Reduction, it can be very effective at eliminating specific types of background noise that exist within certain frequency ranges, like a low-frequency rumble or high-frequency hiss. This method requires you to listen closely to your audio to identify the problem frequencies.
Here are the step-by-step instructions for this feature.
Step 1. Go to the Fairlight page. Click the music note icon at the bottom of the DaVinci Resolve interface.
Step 2. Open the EQ panel. In the Fairlight Mixer on the right, you will see an EQ button on each audio track. Double-click on it to open the Equalizer window.
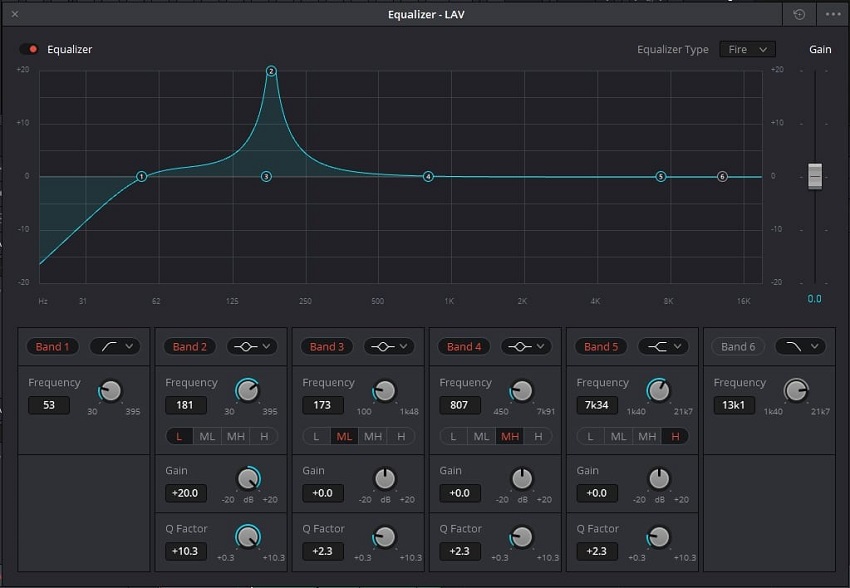
Step 3. Use a High-Pass Filter for low-end rumble. A "High-Pass Filter" (also called a "low-cut" filter) allows frequencies above a certain point to pass through while cutting frequencies below it. This is perfect for removing low-end rumble from things like air conditioners or traffic.
In the EQ window, click the first band (Band 1). Select the High-Pass filter option from the dropdown menu, if it's not already enabled. Click and drag the point to the right. As you play your audio, slowly move the filter up until the low-frequency rumble disappears, but before you start affecting the natural "body" of the voice. A good starting point for dialogue is often around 80-100 Hz.
Step 4. Use a Low-Pass Filter for high-end hiss. A "Low-Pass Filter" (also a "high-cut" filter) works the opposite way, cutting high frequencies. This can help remove high-pitched electronic hissing or static.
Select the last band (Band 4, for example). Choose the Low-Pass filter. Drag the point to the left, listening carefully until the hiss is gone. For dialogue, avoid cutting too much above 10 kHz to preserve clarity.
Step 5. Use a Parametric EQ for specific frequency issues. If the noise is isolated to a specific frequency (like a computer fan or electrical hum), you can "sweep" for it and remove it with a narrow cut, known as a "notch filter".
Select an available band in the middle (Band 2 or Band 3). Make a dramatic boost in gain (+10dB). Reduce the Q factor (bandwidth) to make the filter very narrow. Play your audio and drag the frequency point slowly back and forth across the spectrum. Listen for the moment when the unwanted noise becomes significantly louder.
Once you find the frequency, pull the gain down significantly to cut out the noise. Adjust the Q factor to be just wide enough to remove the problem without affecting too much of the surrounding audio.
Step 6. Use a De-Hummer filter (Studio version only): For a constant 50 or 60 Hz hum (common electrical noise), the De-Hummer is the fastest and most effective solution.
In the Mixer's effects slots, add the De-Hummer Fairlight FX plugin. It will automatically identify and remove the electrical hum, with options for fine-tuning if needed.
Tips for the Best Results
Use high-quality headphones to accurately identify the frequencies of the unwanted noise.
Making extreme EQ adjustments can make your audio sound unnatural or "phasey." Don't overdo it. Subtle cuts are usually more effective.
EQ is a non-destructive way to clean up audio and can make subsequent noise reduction or gating more effective. It's often best to address specific frequency issues with EQ before using more aggressive tools.
Method 3: Use a Noise Gate
A noise gate is a dynamics processor that can silence or reduce the volume of an audio signal when it falls below a certain threshold. It is highly effective for removing unwanted background noise in the quiet gaps between speech or other intentional sounds. For example, you can use a noise gate to eliminate a persistent room hum that is only audible when the speaker is silent.
In DaVinci Resolve's Fairlight page, the Noise Gate is part of the Dynamics panel.
Here are the step-by-step instructions for this feature.
Step 1. Go to the Fairlight page. Click the music note icon at the bottom of the DaVinci Resolve interface.
Step 2. Access the Dynamics panel. In the Mixer on the right, find the track with your audio. If you don't see the Dynamics panel, you may need to scroll up in the Mixer, or click the three-dot menu at the top right of the Mixer and make sure "Dynamics" is enabled.
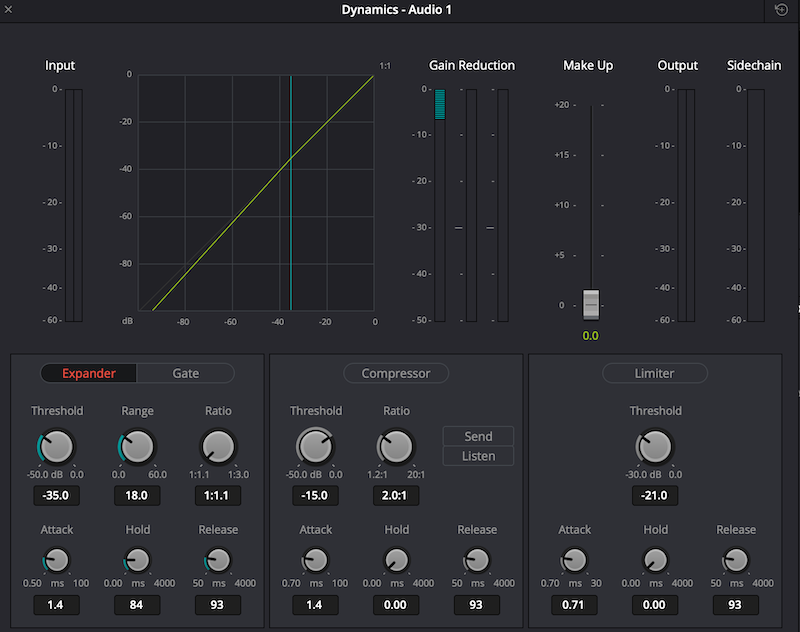
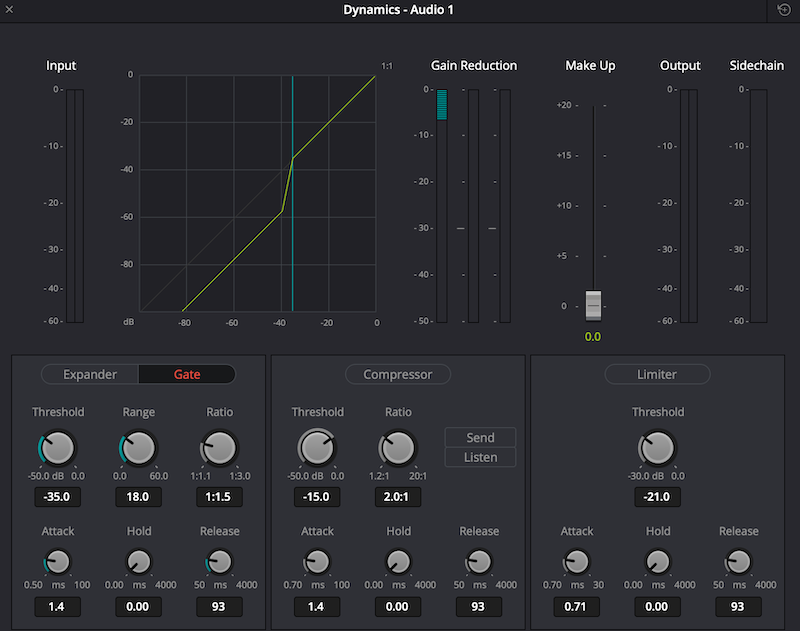
Step 3. Activate the Gate. Double-click the word "Dynamics" or the Dynamics icon to open the full processor window. Click the Gate button at the bottom of the window to activate it.
Step 4. Set the Threshold. The threshold is the most important control. It determines the volume level that triggers the gate to "close" (reduce the audio).
Find a section of your audio that contains only the background noise. Watch the audio meters on the track to see the noise floor level. Set the Threshold just above the noise floor. For dialogue, you want it to be below the level of the voice but above the level of the background noise.
Step 5. Adjust the other parameters.
- Range: Controls how much the audio volume is reduced when it falls below the threshold. A setting of -60 dB or -80 dB will effectively silence the background noise. For a less jarring effect, you can use a smaller range to simply reduce the noise rather than eliminate it completely.
- Attack: Sets how quickly the gate opens after the audio crosses the threshold. A fast attack time is best for catching the beginning of speech, while a slower attack can be used for things like pads or sound effects. For dialogue, a fast attack (e.g., 5-10 ms) is usually recommended to avoid cutting off the first words.
- Hold: Determines how long the gate remains open after the sound drops below the threshold, preventing it from rapidly opening and closing between short phrases or even breaths.
- Release: Controls how quickly the gate closes once the hold time has expired. A longer release time will create a smoother fade out of the noise, which can sound more natural than an abrupt cutoff.
Tips for the Best Results
Use high-quality headphones and loop a section of your audio with both dialogue and a silent gap. This allows you to hear how the gate is affecting your audio in real-time.
A noise gate works best when combined with EQ and other Fairlight tools. You can use EQ first to remove problematic frequencies, and then use the gate to eliminate the remaining background noise in the silent sections.
An overly aggressive gate can cause a "pumping" or "breathing" effect and may cut off the beginning or end of words. Start with a conservative threshold and adjust the attack and release for a smooth, natural-sounding result.
Noise Gate vs. Expander
The Dynamics processor also features an Expander, which is a more subtle version of a gate. An expander reduces the volume of signals below the threshold by a set ratio, rather than muting them completely.
Use a Gate when: You need to completely silence the background noise in the gaps. For example, if you have very loud fan noise and a clear gap in the dialogue, a gate is ideal.
Use an Expander when: You want a more natural transition and only want to reduce the background noise, not eliminate it. This is useful for preserving the room's natural ambience wi
thout the noise being too prominent.Part 2. How to Remove Background Noise in Davinci Resolve For DaVinci Resolve Studio Users
Different from free users, DaVinci Resolve Studio users can access an AI-powered tool that is specifically designed to recognize and separate human speech from other sounds. And it is the Voice Isolation feature. It is highly effective and simple to use, often providing excellent results with minimal effort. This is the best method for removing a wide variety of background noises like traffic, air conditioners, and general room ambience.
And here are the step-by-step instructions for it.
Step 1. Navigate to the Fairlight page. This is where all the professional audio tools are located. Click the music note icon at the bottom of the screen.
Step 2. Locate the audio track that contains the dialogue you want to clean up. In the Mixer panel, you will see your audio tracks, labeled A1, A2, etc.. If you can't see the Mixer, go to Workspace > Show Panel > Mixer in the top menu.
Step 3. Activate Voice Isolation. In the track's effects panel, click the + sign and go to Restoration > Voice Isolation.
Alternatively, you can apply the effect directly from the Edit page. Select the audio clip on your timeline, open the Inspector panel in the top-right corner, and click the Audio tab. You'll find the "Voice Isolation" toggle there.
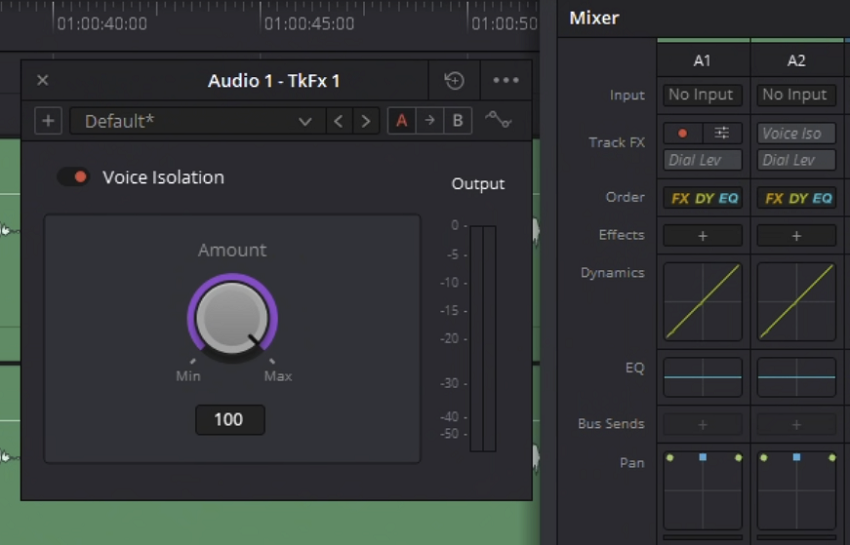
Step 4. Adjust the slider. A window with a single slider will appear. Play your audio clip and slowly adjust the slider to control the intensity of the noise reduction.
A good starting point is between 35% and 50% for typical background noise. For very noisy recordings, you might need to increase it to 100%, but this can sometimes introduce audio artifacts or make the voice sound unnatural.
Step 5. Fine-tune and listen. The key is to find the sweet spot where the background noise is sufficiently reduced without negatively affecting the quality of the dialogue. Turn the effect on and off to compare the original audio with the processed audio.
Also see: Best software to remove background noise (real-time and post-processing)
Common Issues and Troubleshooting for This Feature
1. Voice Isolation is not Appearing
First check your version, since the feature is exclusive to the paid Studio version of Resolve. If you have a video and audio clip linked together, try unlinking them by right-clicking on the clip and selecting Unlink Clips. For multi-channel clips, you may need to go to Clip Attributes to split the audio into separate mono tracks.
Lastly, enable Track FX. In the Fairlight Mixer, click the three-dot menu in the top-right corner and ensure that Track Effects is checked.
2. Audio Sounds Distorted or "Robotic"
This can happen if the slider is set too high. Use your ears to find a more moderate setting that still removes most of the noise without introducing artifacts.
3. Doesn't Work on Short Clips
Some users have reported issues with Voice Isolation not working on very short clips (under 3 seconds). If this happens, try applying it to a longer version of the clip or to the entire track.
4. Forgetting Settings on Export
A reported bug can sometimes cause Voice Isolation settings to be forgotten when rendering individual clips. To fix this, enable the "Render timeline effects" option on the Video tab of the Deliver page before exporting.
Pro Tip: For a Fast, Effortless, and Automated Approach - Aiarty Video Enhancer
Don't have time for complex audio mixing, training noise profiles, or juggling multiple effects in DaVinci Resolve? For content creators who just need their clips cleaned up and ready to go, Aiarty Video Enhancer offers a superior, hands-off solution.
With Aiarty Video Enhancer, you can bypass the technical learning curve of a professional editor and get straight to enhancing your content.
Leave the noise to the AI. Aiarty Video Enhancer's AI-driven audio denoise module:
- Automatically detects and removes background noise, microphone hums, and hiss with just one click.
- Intelligently distinguishes between your voice and background noise, ensuring your dialogue stays crisp and natural-sounding.
Get to the Finish Line Faster
- Streamlined workflow: Simply import your videos, select your desired enhancements (including audio denoise), and export. It's a single, fast process that saves you from jumping between multiple tools.
- Batch processing: Process multiple video clips at once with consistent, high-quality results. Perfect for cleaning up a full day's worth of noisy footage.
- Offline processing: Unlike cloud-based tools, Aiarty runs locally on your machine. Your files stay private, and you're not held back by slow upload speeds.
More Than Just Audio
Aiarty Video Enhancer is an all-in-one enhancement tool. While it cleans your audio, it can simultaneously:
- Upscale low-resolution clips to crisp 4K.
- Reduce video grain and blur.
- Smooth motion for better slow-mo effects.
- ...
For creators who prioritize speed and simplicity without sacrificing quality, Aiarty Video Enhancer delivers clean, professional-sounding audio with minimal effort. It's the ideal choice for quickly fixing imperfect footage and getting back to creating.
Conclusion
DaVinci Resolve's Fairlight page offers a powerful, multi-faceted approach for audio professionals and serious hobbyists who need granular control over their sound. The AI-powered Voice Isolation, available in the Studio version, delivers incredible results with minimal effort, while the Standard Noise Reduction, EQ, and Noise Gate provide surgical precision for all users.
However, if you're a content creator who prioritizes speed and simplicity, especially when dealing with large volumes of footage, the dedicated AI-driven approach of Aiarty Video Enhancer may be your best bet. By handling audio denoise and video enhancement in a single, automated process, it frees you from the complexities of audio mixing.
You May Also Like
This post was written by Ashley Brown, a videographer turned AI explorer. As an associate writer at Digiarty Software, she dives into the latest AI-powered tools for video enhancement and content creation, offering practical insights and unbiased commentary. Accuracy confirmed by Abby Poole.