Canva Video Upscaler: How to Upscale Videos in Canva
A blurry, low-resolution video can instantly ruin an otherwise perfect Canva design. If you've uploaded a clip only to find it pixelated or grainy, you are likely looking for a straightforward way to fix it.
Can you upscale video in Canva? Yes.
In this quick guide, we will cut straight to the chase and show you exactly how to enhance your video quality in Canva.
How to Upscale Video in Canva (Full Workflow)
Using the built-in AI tools in Canva to enhance your video is straightforward. Here is the complete, step-by-step workflow from creating a project to exporting your final 4K video:
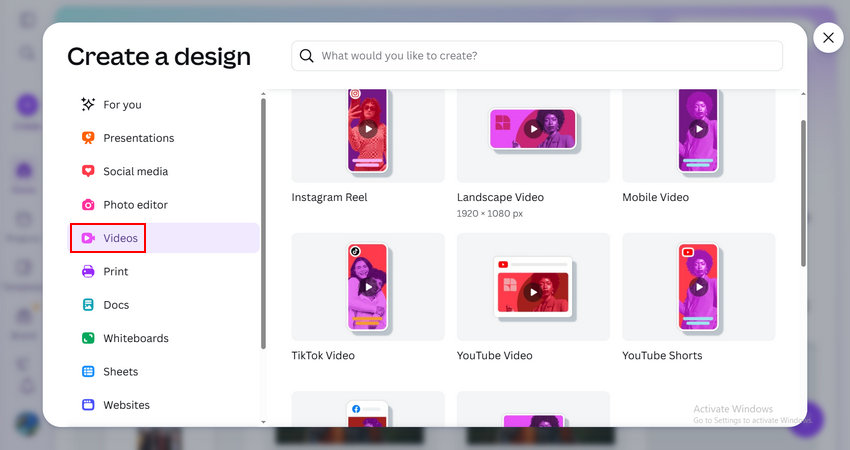
Step 1: Create a New Video Project
Go to canva.com and log into your account. Click the + Create button in the left panel and select the Videos tab.
Then, choose your target layout based on your needs (e.g., Instagram Reel, TikTok Video, YouTube Shorts). For this guide, we will select Landscape Video (1920 x 1080) as an example.
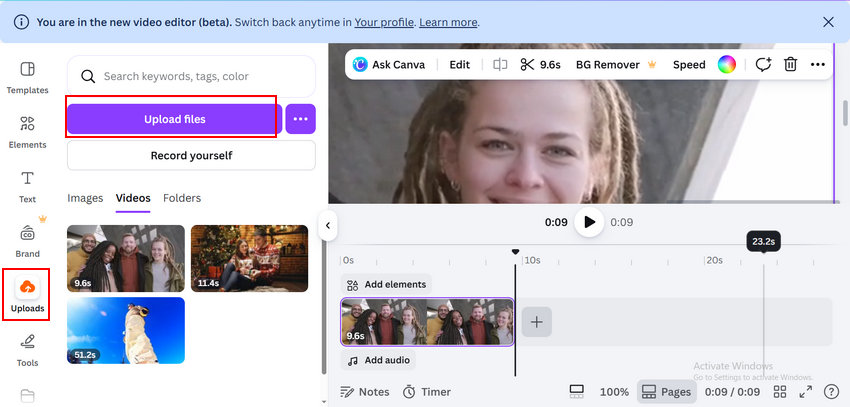
Step 2: Upload Your Low-Resolution Video
Click on Uploads in the left-hand menu bar, click the Upload files button, and select the blurry or low-res video from your local drive that you want to upscale.
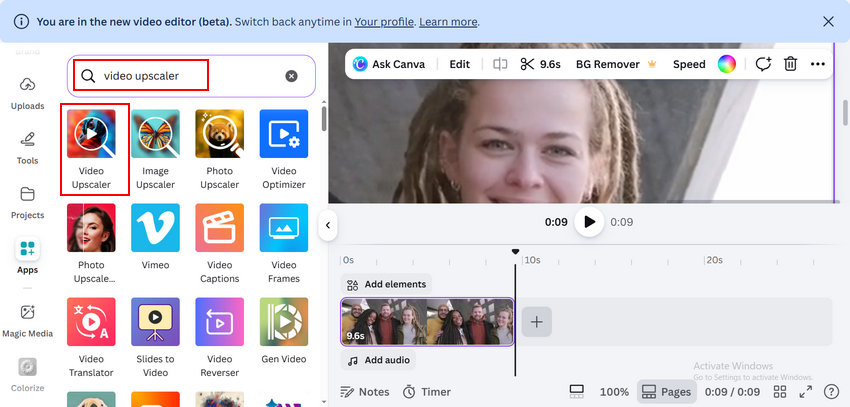
Step 3: Open the Video Upscaler App
Navigate to Apps in the left panel, type "video upscaler" into the search bar, and click to open the app.
Once the Video Upscaler panel opens, click Choose file to select the video you just uploaded.
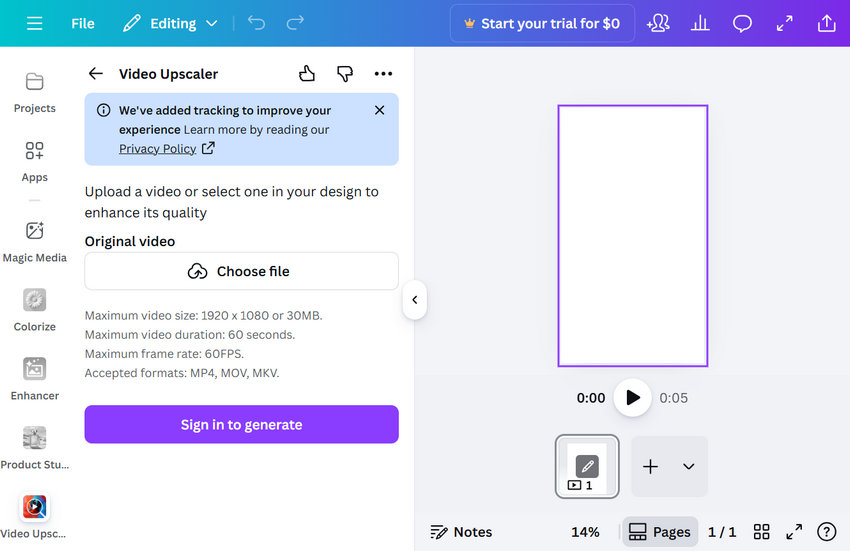
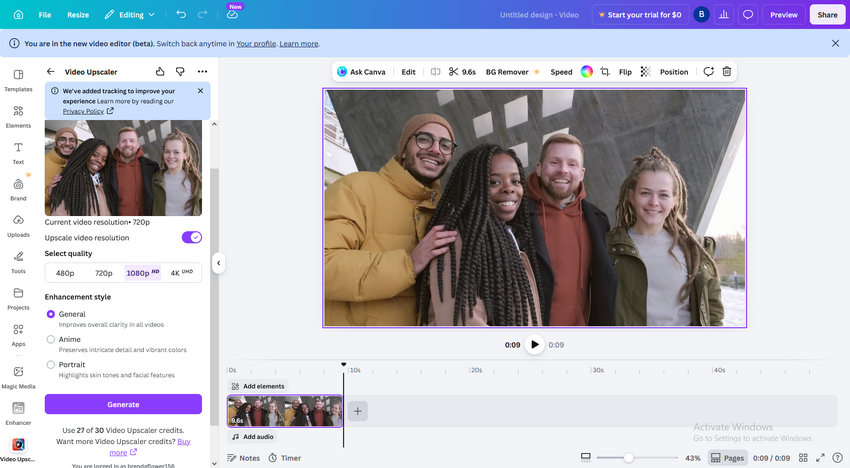
Step 4: Configure AI Enhancer Settings & Generate
Customize the upscaling parameters according to your preferences:
- Toggle Upscale Video Resolution option on and select your desired output quality (480p, 720p, 1080p, or 4K).
- Choose an Enhancement Style (General, Anime, or Portrait) that matches your content.
- Click Generate. Keep in mind that this process consumes Canva credits depending on your video length and target resolution (for instance, a short clip can cost around 27 credits).
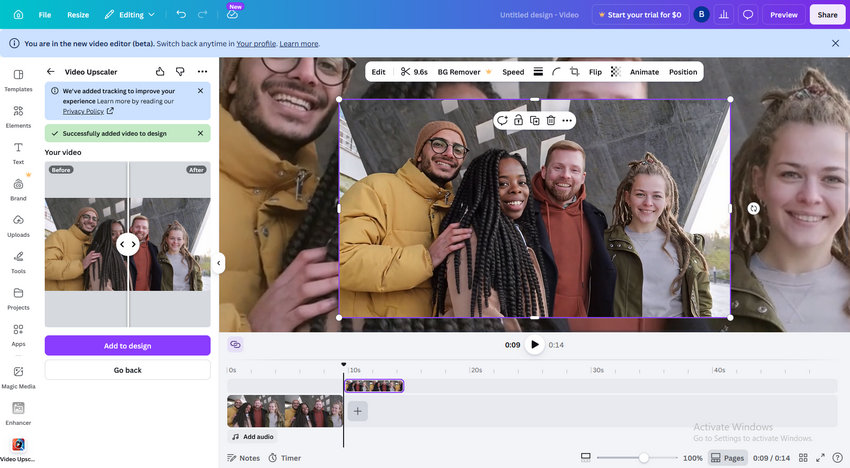
Step 5: Apply to Canvas and Export
Wait for the AI processing to finish. Once completed, click Add to design to place the enhanced video onto your canvas.
To make it fit perfectly, right-click the video on the canvas and select Set video as background.
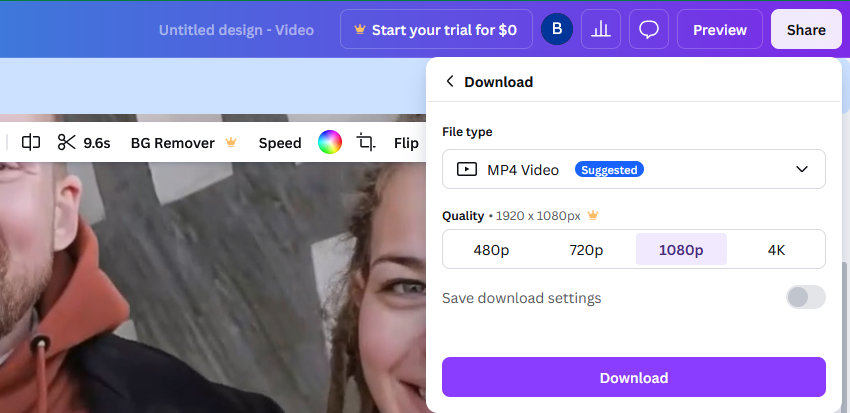
Finally, click Share in the top right corner and then click Download. Next, choose your preferred file type and quality, and click the Download button to save your upscaled video.
Canva Video Upscaler Pros and Cons
Before deciding whether Canva is the right tool for your project, it is worth understanding both its strengths and limitations.
- Beginner-friendly interface with no learning curve.
- Fully web-based, no software installation required.
- Supports upscaling up to 4K resolution.
- Multiple enhancement styles for different content types.
- Integrates seamlessly with Canva's editing ecosystem.
- Suitable for quick social media content enhancement.
- Credit-based system can become expensive for frequent use.
- Processing speed depends on internet connection.
- Limited ability to recover lost details.
- Few advanced controls for fine-tuning results.
- Long videos may require significant credits and processing time.
- Less effective for old videos, low-bitrate footage, and restoration projects.
Canva Video Upscaler is a convenient option for creators who already use Canva and need a quick way to improve video quality without leaving the platform.
However, its AI enhancement is primarily designed to increase resolution and improve visual clarity rather than perform deep restoration. If your footage suffers from severe blur, compression artifacts, noise, or missing details, the results may fall short of expectations.
Canva Video Upscaler vs Aiarty Video Enhancer
If Canva's built-in upscaler doesn't provide the results you're looking for, a dedicated AI video enhancer may be worth considering.
One example is Aiarty Video Enhancer, a desktop-based solution designed specifically for video upscaling and restoration.
While Canva focuses on accessibility and convenience, Aiarty is built for users who need greater control over video restoration and enhancement quality.
Its AI models are designed to recover fine details, reduce noise, improve textures, and process challenging footage that may exceed the capabilities of basic online upscalers.
How to Upscale Videos with Aiarty Video Enhancer
Step 1: Import Your Video
Launch Aiarty Video Enhancer and drag your video files directly into the workspace. The software supports a wide range of formats, including MP4, MOV, MKV, AVI, and more.
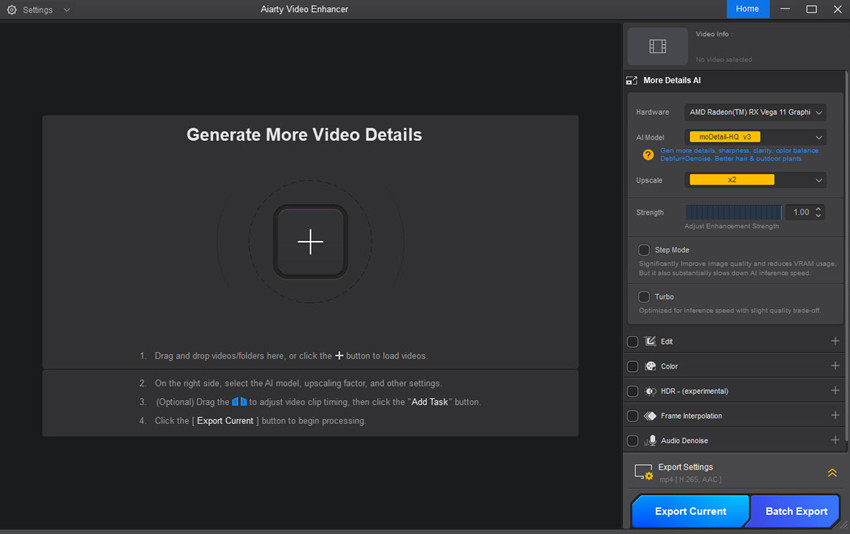
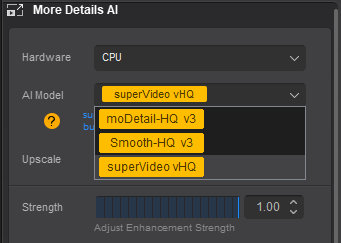
Step 2: Choose an AI Model
Select the AI model that best matches your footage. For example, use moreDetail-HQ for recovering textures and details, or choose superVideo when working with noisy or low-light videos.
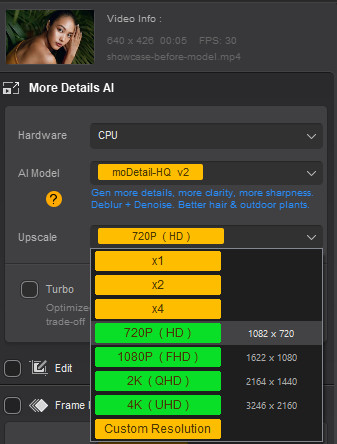
Step 3: Select the Target Resolution
Choose your desired output resolution from the Upscale menu. You can upscale videos by 2× or 4×, or export directly to 1080p, 2K, or 4K depending on your project requirements.
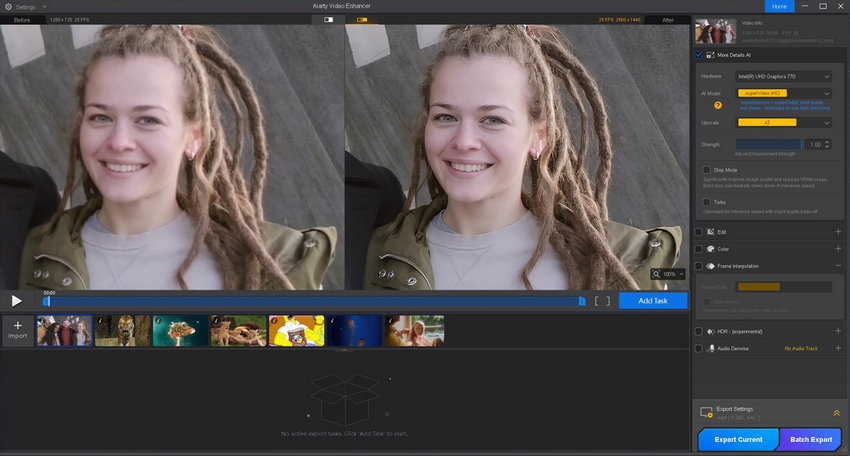
Step 4: Preview the Results
Use the built-in preview feature to compare the original and enhanced frames before processing the entire video.
Step 5: Export the Enhanced Video
Once satisfied with the settings, click Export Current to start processing. Aiarty will use your GPU to upscale and enhance the video locally on your computer.
Final Thoughts
Canva Video Upscaler is a convenient option for quickly improving video quality within Canva's design ecosystem. It is easy to use, requires no installation, and works well for basic social media content.
However, if you're dealing with old recordings, heavily compressed footage, AI-generated videos, or projects that require stronger detail recovery, a dedicated AI video enhancer such as Aiarty may provide noticeably better results and greater flexibility.
 FAQs
FAQs
Canva Video Upscaler is not completely free. While Canva offers some free features, the Video Upscaler relies on Canva Credits. Each upscaling task consumes credits based on factors such as video length, resolution, and selected enhancement settings. Once your credits are used up, you will need to purchase additional credits or subscribe to a Canva plan that includes them.
Yes. Canva Video Upscaler supports output resolutions up to 4K. When generating an enhanced video, you can choose from multiple resolution options, including 720p, 1080p, and 4K. However, the final quality improvement depends largely on the condition of the original footage. Upscaling a low-quality video to 4K does not automatically restore all lost details.
Yes, Canva can improve video quality to a certain extent. Its AI enhancement tools can increase resolution, sharpen edges, and improve overall visual clarity.
However, Canva is primarily an upscaling tool rather than a full video restoration solution. If the source footage contains severe blur, heavy compression artifacts, noise, or missing details, the improvement may be limited.
Not necessarily. The two tools are designed for different users and use cases.
Canva focuses on simplicity and convenience. It is ideal for creators who want a quick, browser-based solution integrated into their existing design workflow.
Topaz Video AI is a dedicated video enhancement and restoration application. It offers more advanced AI models, greater control over enhancement settings, and stronger capabilities for recovering details, reducing noise, and restoring old footage. However, it also comes with a significantly higher price tag.
If you only need occasional upscaling for social media content, Canva may be sufficient. For professional restoration work, Topaz Video AI generally delivers better results.
The best alternative depends on your needs.
If you want a dedicated AI video enhancement tool with stronger detail recovery, local GPU processing, batch upscaling, and no credit-based limitations, Topaz Video and Aiarty Video Enhancer are solid options.
You May Also Like
This post was written by Brenda Peng who is a seasoned editor at Digiarty Software who loves turning ordinary photos into extraordinary works of art. With AI assistance for brainstorming and drafting, the post is reviewed for accuracy by our expert Abby Poole for her expertise in this field.