4DDiG Video Enhancer Review – Features and Performance
Tenorshare’s 4DDiG lineup is mostly known for its data recovery and file repair tools. If you’ve ever tried fixing a corrupted video or photo, chances are you’ve come across 4DDiG File Repair. But what some users might not know is that last year, Tenorshare added an AI-powered video enhancer feature to this software — aimed at improving video quality with just a few clicks.
On paper, it promises to upscale resolution, reduce noise, remove blur, and fix compression artifacts. But how well does it actually work in practice? In this review, we’ll take a close look at what 4DDiG Video Enhancer offers, how it performs, and whether it’s really worth your time — especially compared to other tools out there.
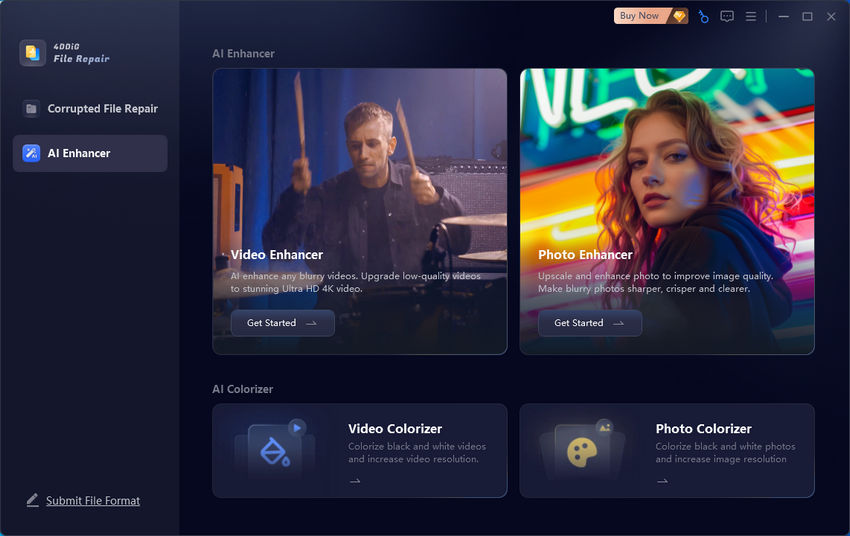
4DDiG Video Enhancer Features Overview
4DDiG Video Enhancer is a multifunctional AI-powered tool designed to improve video quality through several specialized models.
AI Upscaling
The enhancer can upscale your video resolution up to 4K by enlarging it 2× or 4×. You won’t be picking a specific resolution like 1080p or 4K directly — instead, you choose the scale factor, and the AI takes care of the rest. There’s also an option to prioritize either quality or speed during processing.
Denoising & Deblurring
This feature helps reduce digital noise and correct blurry frames, which is especially useful for old home videos, low-resolution phone clips, or footage shot in poor lighting.
Face Enhancement
4DDiG Video Enhancer has a separate Face Model. It can improve skin clarity and sharpen facial details, making it ideal for close-up shots, interviews, or vlogs. You can choose between a Soften or Sharpen mode depending on the look you’re going for.
Enhance Animated Content
For animated content, there's a dedicated anime model that enhances line definition and texture without ruining the original style. It's tailored for animation and works differently from the general model.
While the features look promising, how well do they actually work in a real-world test? Let’s go through the workflow in the next section and see what it’s like to use.
How 4DDiG Video Enhancer Works
Using 4DDiG Video Enhancer is pretty straightforward, though there are a few things you might not expect at first.
1. Download and Install
When you download the software, you’re actually getting the installer for 4DDiG File Repair — not something labeled specifically as a video enhancer. This might confuse some users, but it’s normal: the video enhancement feature is built into the File Repair tool. Installation is quick and doesn't require any complex setup.
2. Open the AI Enhancer Tab
Once the software is running, head over to the AI Enhancer tab and select Video Enhancer. You can then upload the video(s) you want to enhance.
3. Choose a Model and Start Enhancement
Next, you’ll need to pick one of the three AI models, depending on your content:
- General Model – Best for regular footage. You can choose to upscale 2× or 4×, and also decide whether to prioritize quality or speed.
- Face Model – Tailored for videos with faces. You can choose between Sharpen or Soften modes, but can’t set the upscale factor manually — it automatically applies a 2× enhancement.
- Anime Model – Designed specifically for animation and cartoon-style visuals.
The first time you use any model, the software needs to download and build it. These models are quite large — for example, the face model I tested was 1.55 GB, and it took around 11 minutes to prepare on my machine.
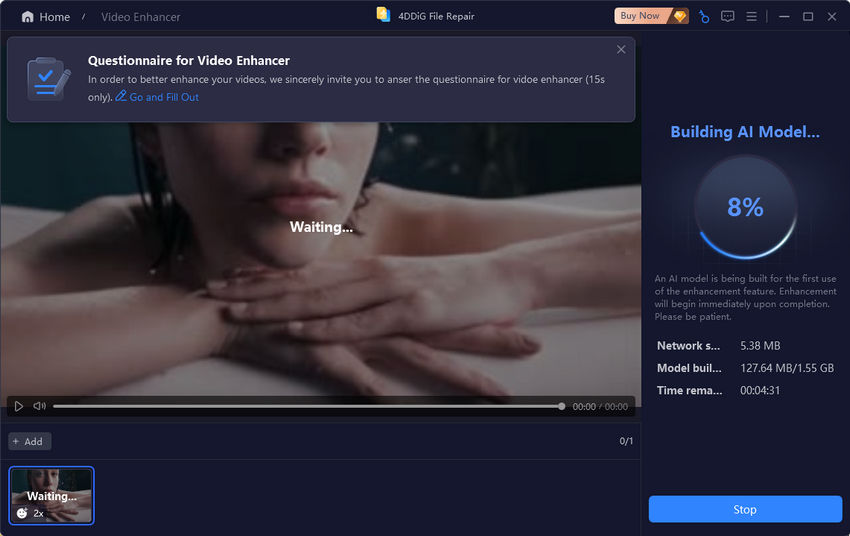
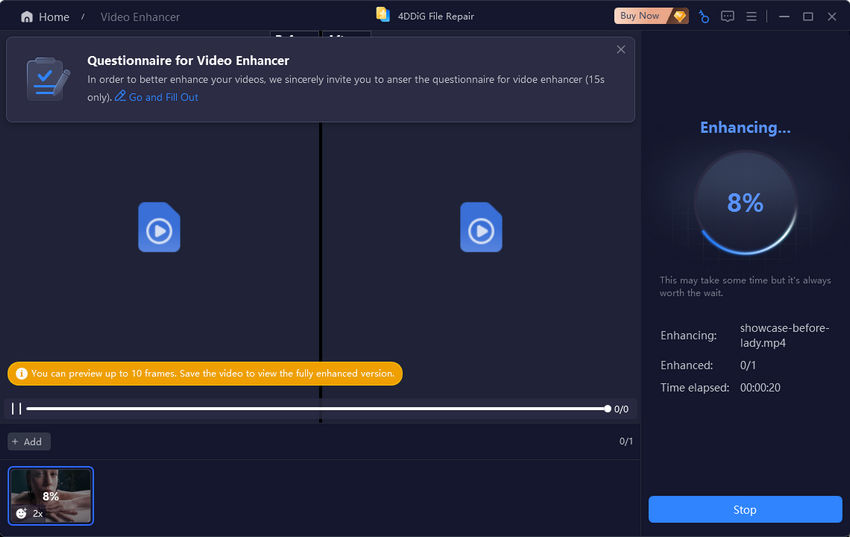
Once the model is ready, the enhancement process kicks in automatically. My test video took about 5 minutes to process, which felt reasonable given the size and resolution.
4. Preview and Export
After processing, the software gives you a short preview of 10 frames so you can see how the enhancement turned out. In my case, the preview looked promising — the image was sharper, with cleaner facial details. However, the preview cannot be zoomed to 100%, making it difficult to accurately evaluate fine details.
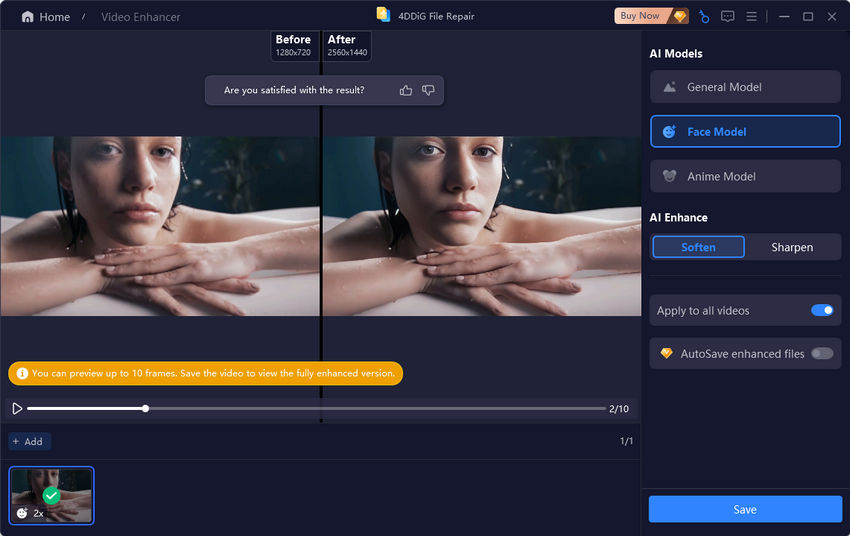
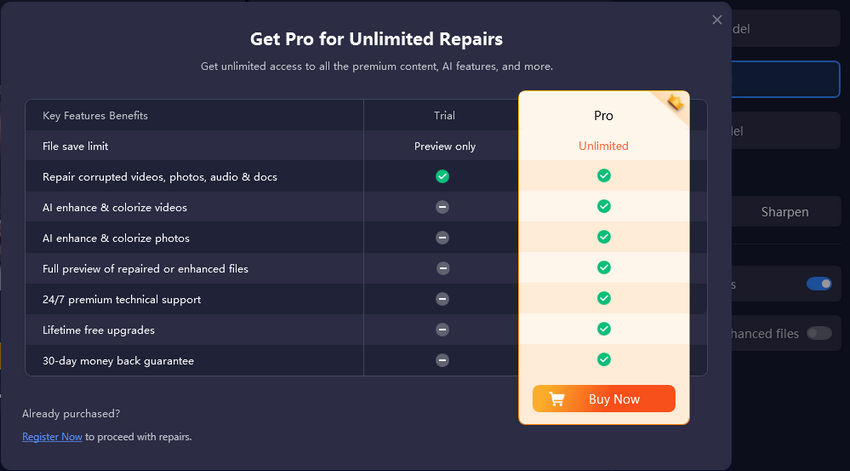
If you're happy with the result, you can click Save to export the video. But here’s the catch: you need a paid license to save anything. Free users can only preview 10 frames — no exports allowed unless you upgrade.
4DDiG Video Enhancer Review: Strengths and Weaknesses
Like most AI-based video tools, 4DDiG Video Enhancer has a mix of things it does well — and a few areas where it still feels a bit rough around the edges.
- Clean, beginner-friendly interface: The layout is simple and uncluttered. Even if you’ve never used a video editor or AI tool before, you’ll find your way around without much effort.
- Easy to operate: The enhancement process is mostly click-and-go. Once you upload a video and pick a model, the tool takes care of the rest. You don’t need to mess with complicated settings or manual adjustments.
- Covers common enhancement needs: Whether you’re dealing with blurry faces, noisy footage, or old low-res clips, the available models — General, Face, and Anime — cover most everyday use cases well.
- Large AI models take time to build: The first time you use a model, the software needs to download and load it, which can be slow — especially if you’re on a slower network connection or older machine. Some models are over 1GB in size, and building them may take 10 minutes or more.
- Limited free trial: While you can test the enhancement process, free users are only shown a 10-frame preview. You can’t export or save the enhanced video without buying a license — which makes it hard to fully evaluate the results unless you’re ready to pay upfront. Additionally, the preview cannot be zoomed to 100%, making it hard to assess how well fine details are actually handled.
- No control over output format: Unlike some advanced tools, there’s no option to customize the output format or encoding settings. If you need more control over file size or compression, you’ll need to use another tool afterward.
A Better Alternative to 4DDiG Video Enhancer
If you’re curious about AI video enhancement but feel held back by 4DDiG’s limitations — like long model loading times or the inability to export without paying — you might want to consider an alternative that’s more flexible and user-friendly.
Aiarty Video Enhancer is another AI-powered tool that focuses specifically on improving video quality, and it comes with a few key advantages right out of the box.
Why Aiarty Video Enhancer Stands Out
- Faster processing – Aiarty loads its models quickly and applies enhancements at noticeably faster speeds, even on average hardware.
- More control – You can set custom resolutions, and even tweak output details depending on your needs.
- Audio denoising included – Unlike 4DDiG, Aiarty also cleans up noisy background audio — a big plus for restoring interviews, vlogs, or family videos.
- AI frame interpolation – It can intelligently add extra frames to make your videos smoother, great for converting 30fps to 60fps and making slow-motion footage.
- Save without restrictions – The trial version of Aiarty allows you to save enhanced videos, not just preview them.
Side-by-side Comparison
How to Use Aiarty Video Enhancer
Aiarty Video Enhancer is designed to make video enhancement easy, even if you’ve never worked with this kind of tool before. The process is straightforward from start to finish.
Step 1: Download and Install
Aiarty is available for both Windows and macOS. Just click the button below to download the installer that matches your system.
Step 2: Add Your Video
Launch the program and click the “+” button on the main screen to import the video you’d like to enhance. Aiarty supports a wide range of video formats, so most files should work without any issues.
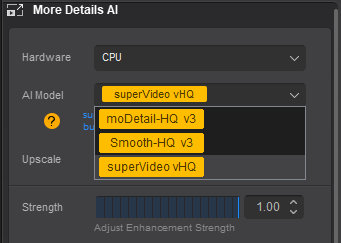
Step 3: Choose an AI Model
Aiarty offers three AI models, each tuned for a specific type of video. Whether you’re working with real-life footage, animated clips, or older low-quality videos, there’s a model that fits. Simply pick the one that best matches your content.
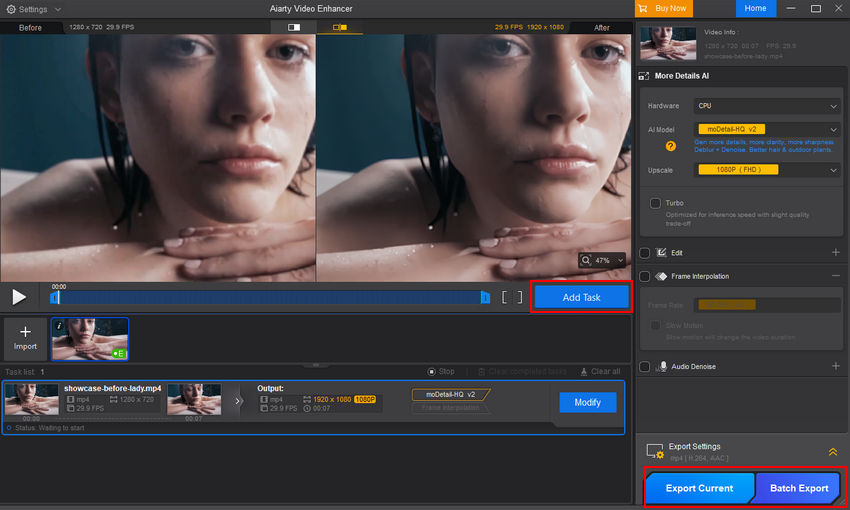
Step 4: Set Your Upscale Preferences
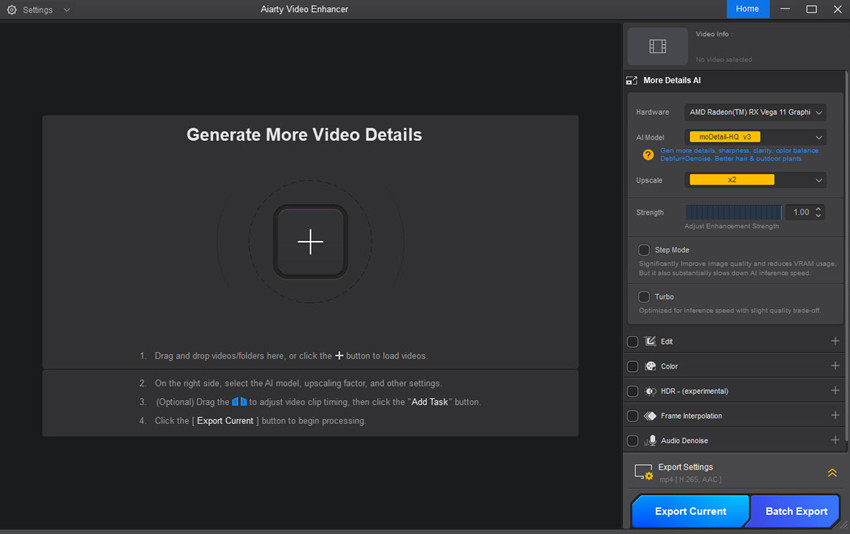
Next, choose how much you want to upscale the video. You can pick from preset options like 720p, 1080p, 2K, or 4K, or go with scale factors like 2× or 4×. There’s also a custom resolution option if you need more control over the final output.
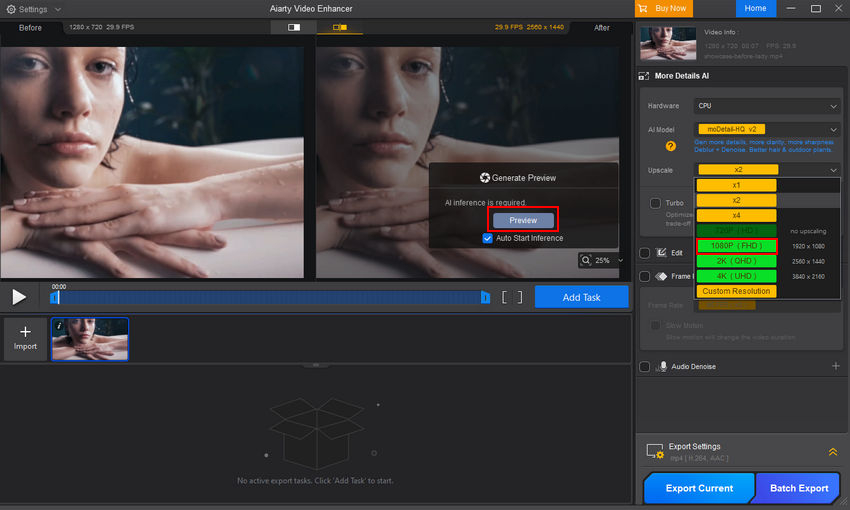
Step 5: Preview Before Exporting
Before committing to a full export, Aiarty lets you generate a side-by-side preview of the enhanced video. This is useful for checking sharpness, detail restoration, and artifact removal before spending time on full processing.
Step 6: Export the Enhanced Video
When you’re happy with the result, click Add Task, then hit Export Current to begin processing. During export, Aiarty automatically applies enhancement features like deblurring, noise reduction, artifact cleanup, and detail recovery — all at once, with no manual tweaking required.
Here's a YouTube video reviewing Aiarty Video Enhancer. You can watch it to see how it restores and upscales videos to 4K.
 FAQs
FAQs
No, 4DDiG Video Enhancer is not free. You can preview enhanced videos in the trial version, but saving or exporting the final results requires purchasing a license.
Yes, it is safe. During our testing, no antivirus software flagged the installer or program as harmful. However, since the video enhancer is bundled within the 4DDiG File Repair tool, some users may initially be confused by the download package name.
It can improve video quality in many cases, especially with noise reduction, deblurring, and upscaling. However, results vary depending on the original video’s condition, and enhancement might not always be noticeable.
You May Also Like
This post was written by Brenda Peng who is a seasoned editor at Digiarty Software who loves turning ordinary photos into extraordinary works of art. With AI assistance for brainstorming and drafting, the post is reviewed for accuracy by our expert Abby Poole for her expertise in this field.