Blurry photos caused by shaky hands are one of the most common frustrations in photography. I've seen it happen to beginners shooting with entry-level cameras, experienced photographers working in low light, and even professionals using expensive telephoto lenses. The good news is that shaky hands do not mean you can't take sharp, professional-looking images.
In real-world photography, sharpness is rarely about having perfectly steady hands. It comes down to understanding camera movement, using the right settings, improving your shooting technique, and knowing how to work around physical limitations when necessary.
Over the years, I've tested handheld shooting in everything from street photography and wildlife sessions to indoor portraits and night scenes. In many situations, I intentionally shoot without a tripod to move faster and stay flexible. The techniques below are the exact methods photographers use to consistently reduce camera shake and capture sharper images.
What Causes Shaky Hands in Photography
Before fixing blurry photos, it's important to understand what actually causes camera shake. Even small movements become visible once the shutter opens. The longer the exposure lasts, the more movement your camera records.
Natural Hand Tremors
Every photographer has small hand movements. This is completely normal. Factors that commonly increase hand shake include:
- Fatigue
- Stress
- Cold weather
- Heavy camera gear
- Too much caffeine
- Muscle strain from long shooting sessions
Some photographers also have naturally stronger tremors or medical conditions that make handheld shooting more difficult. Modern photography tools and techniques can still make sharp photography absolutely achievable.
Slow Shutter Speeds
The number one cause of blurry handheld photos is using a shutter speed that is too slow. When your shutter remains open longer, tiny movements from your hands become visible in the final image. For example:
- 1/20s handheld is difficult for most people
- 1/200s is much safer
- Longer focal lengths require even faster speeds
The relationship between focal length and shutter speed is one of the most important concepts in photography.
Minimum handheld shutter speed ≈ focal length1
This means:
- 50mm lens → use at least 1/50s
- 85mm lens → use at least 1/100s
- 200mm lens → use at least 1/200s
Personally, I often shoot even faster than this rule suggests, especially when using high-resolution cameras where tiny motion blur becomes more noticeable.
Long Lenses Magnify Camera Shake
Telephoto lenses amplify movement dramatically. At 24mm, slight hand movement may barely be visible. At 300mm, the same movement can ruin sharpness instantly. This is why wildlife, sports, and bird photographers rely heavily on:
- Fast shutter speeds
- Stabilized lenses
- Proper stance
- Monopods or tripods
Poor Camera Holding Technique
A surprising number of blurry photos come from improper posture and grip rather than camera limitations. Common mistakes include:
- Holding elbows outward
- Shooting one-handed
- Jabbing the shutter button
- Leaning backward while shooting
- Using the rear LCD instead of the viewfinder
Good technique alone can improve sharpness significantly.
How to Fix Shaky Hands Photography
Use Faster Shutter Speeds
If there's one setting that matters most for shaky hands photography, it's shutter speed. Many beginners try to keep ISO low at all costs, but sharpness should always come first. A slightly noisy photo can often be improved in post-processing. A blurry photo usually cannot.
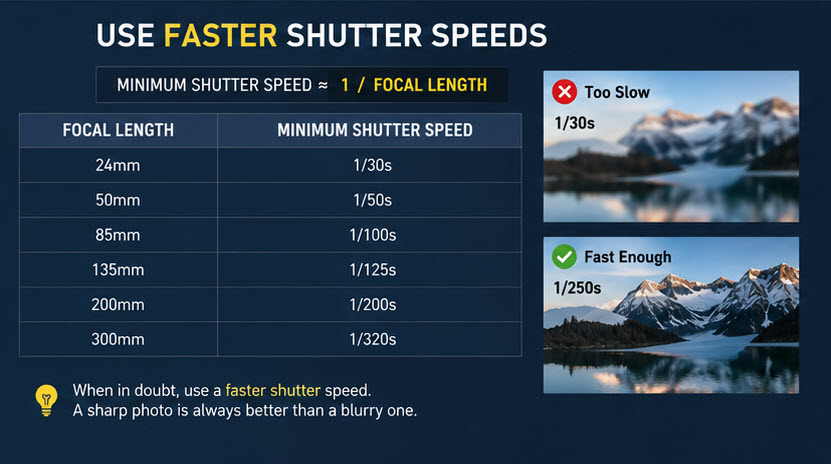
Recommended Shutter Speeds for Handheld Photography
Here are the handheld shutter speeds I commonly recommend in real-world shooting:
If your photos still look soft, increase shutter speed further. Modern cameras handle higher ISO much better than older cameras, so don't be afraid to prioritize sharpness.
Improve Your Camera Holding Technique
Professional photographers don't simply "hold still." They build stability into their shooting posture. Small changes make a huge difference.
Use a Stable Two-Hand Grip
Your right hand should grip the camera body firmly. Your left hand should support the lens from underneath, not from the side. This creates a more balanced center of gravity and reduces unwanted movement.
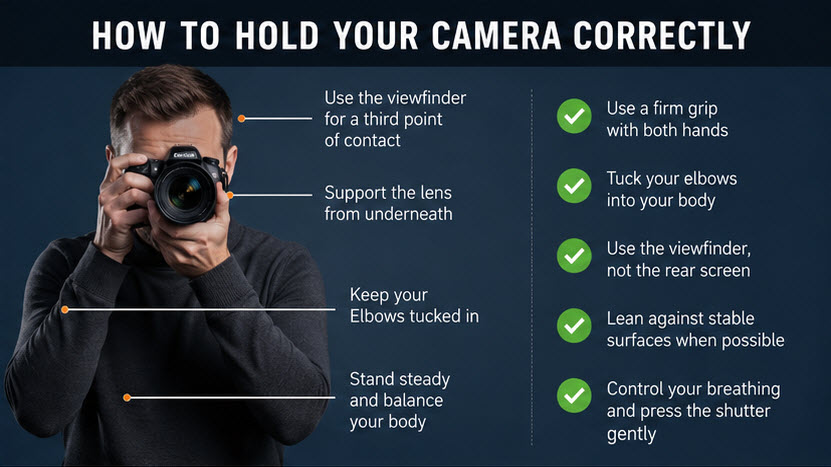
Tuck Your Elbows In
Keeping your elbows close to your body creates natural stabilization. Think of your torso as a support structure. When elbows float outward, your arms become less stable and amplify movement.
Use the Viewfinder Instead of the Rear Screen
Using the electronic viewfinder or optical viewfinder adds a third point of contact:
- Left hand
- Right hand
- Face/head
This stabilizes the camera significantly compared to shooting with arms extended.
Lean Against Stable Objects
One of the most effective tricks in handheld photography is using environmental support. Lean against:
- Walls
- Trees
- Railings
- Poles
- Door frames
Even slight external support can dramatically improve sharpness.
Control Your Breathing
Breathing technique matters more than most photographers realize. Sharp shooters in photography, sports shooting, and videography all use controlled breathing to minimize movement.
The Half-Exhale Method
This is the technique I personally use when shooting handheld in low light: 1. Take a breath > 2. Exhale halfway > 3. Pause briefly > 4. Gently press the shutter
Avoid stabbing the shutter button aggressively. Smooth shutter control reduces tiny vibrations that can soften images.
Turn On Image Stabilization
Modern stabilization systems are incredibly effective. Depending on your camera and lens, stabilization may appear as:
- IBIS (In-Body Image Stabilization)
- IS (Image Stabilization)
- VR (Vibration Reduction)
- OSS (Optical SteadyShot)
With stabilization enabled, many photographers can shoot several stops slower than normal handheld limits.
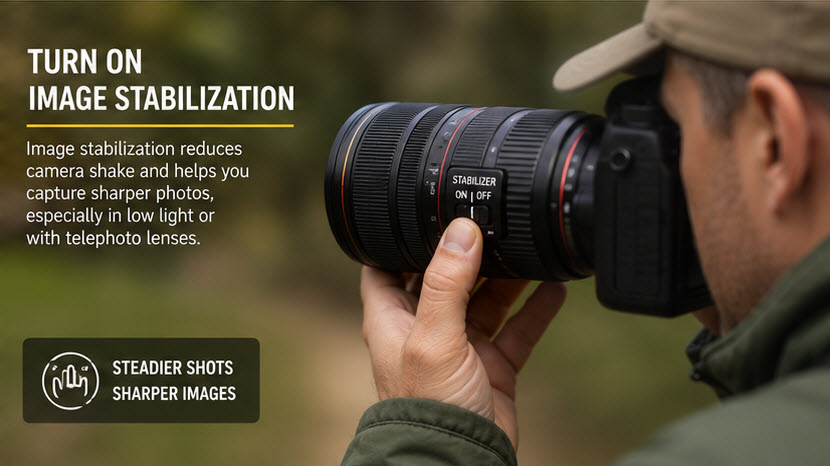
When Stabilization Helps Most
Stabilization is especially useful for:
- Low-light photography
- Travel photography
- Indoor shooting
- Telephoto lenses
- Handheld video
However, stabilization does not freeze subject motion. If your subject moves, you still need adequate shutter speed.
When to Disable Stabilization:
In some situations, stabilization should be turned off:
- When using a tripod
- During certain panning shots
- If stabilization creates micro-jitters on locked setups
Always test your specific camera and lens combination.
Raise ISO Instead of Accepting Blur
One of the biggest mindset shifts in photography is understanding this: Sharp photos matter more than perfectly clean photos. I would rather shoot: ISO 3200 and sharp than ISO 100 and blurry. Modern AI denoise tools and RAW editing software have made high ISO far less problematic than motion blur.
Best ISO Strategy for Handheld Photography
When light drops:
- Increase shutter speed first
- Open aperture second
- Raise ISO third
Avoid sacrificing shutter speed too early. This single adjustment dramatically improves handheld consistency.
Use Burst Mode for Better Sharpness
Burst shooting increases your chances of capturing a critically sharp frame. Interestingly, the first frame in a burst is often softer because pressing the shutter introduces movement. The middle frames are frequently sharper. I use this technique regularly for wildlife photography, low-light street photography, telephoto portraits, and event photography. Even shooting short 3–5 frame bursts can noticeably improve keeper rates.
Use Wider Apertures
Wider apertures allow more light into the camera, enabling faster shutter speeds. Examples: f/1.8, f/2, f/2.8. These are extremely useful for handheld photography. Fast lenses are particularly valuable indoors or at night where shutter speed becomes difficult to maintain.
Best Gear for Photographers with Shaky Hands
Good technique matters most, but certain gear genuinely helps.
Camera Settings for Sharp Handheld Photography
Here are the settings I recommend most frequently.
Use Continuous Autofocus
Continuous autofocus helps maintain subject sharpness when either you or the subject moves. Depending on your camera brand:
- AF-C
- AI Servo
- Continuous AF
Shoot RAW
RAW files preserve more detail and provide better recovery flexibility during editing. This becomes especially useful when correcting:
- Slight blur
- Noise
- Missed exposure
How to Fix Slightly Blurry Photos in Post Processing
Not every blurry image is recoverable. But slight handheld softness can often be improved. One effective tool is Aiarty Image Enhancer, which uses AI models to enhance image clarity, recover fine textures, and improve overall sharpness while maintaining natural detail.
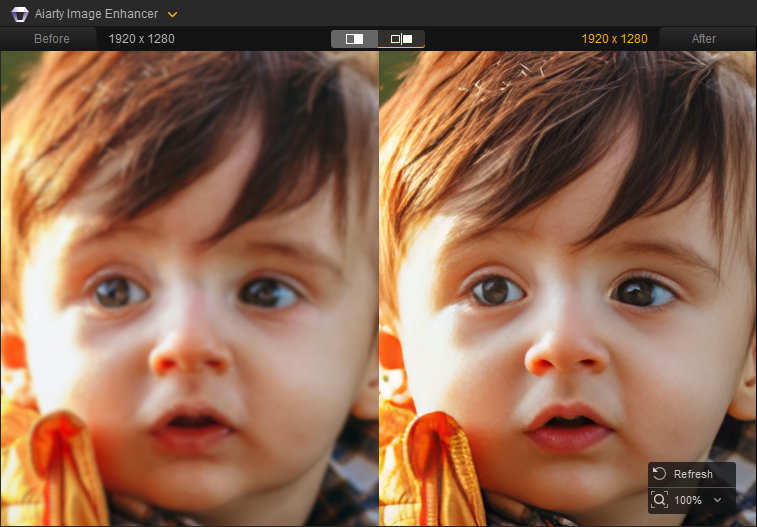
In practice, Aiarty Image Enhancer works particularly well for:
- Slightly soft handheld portraits
- Travel and street photography
- Lightly blurred telephoto shots
- Everyday photos with minor motion softness
Also See: How to Unblur an Image with the Best Photo Enhancer
With the right input image, AI enhancement can bring out clearer edges, improved texture, and a more defined overall look, making handheld shots appear significantly more polished after processing.
 FAQs
FAQs
The most common causes are slow shutter speeds, poor camera handling, or movement during exposure.
Yes. Modern stabilization systems can improve handheld shooting dramatically, especially in low light or with telephoto lenses.
AI tools can improve slight blur and softness, but severe motion blur usually cannot be completely restored.
Yes. Every photographer experiences some level of hand movement. Technique and settings matter far more than perfectly steady hands.
This post was written by Brenda Peng who is a seasoned editor at Digiarty Software who loves turning ordinary photos into extraordinary works of art. With AI assistance for brainstorming and drafting, the post is reviewed for accuracy by our expert Abby Poole for her expertise in this field.