How to Enhance a Photo: 14 Easy Methods for Better Photos
In a world where visuals dominate social media, websites, and marketing, a well-enhanced photo can instantly capture attention. Even a simple image can stand out with a few thoughtful edits - better lighting, balanced colors, and sharper details. Learning how to enhance a photo isn't just about filters; it's about bringing out the best in what's already there.
From product shots to travel photos and portraits, small adjustments can make your pictures look more refined and professional. This guide walks you through practical ways to improve photo quality without losing authenticity and explore creative photo editing ideas that help your photos feel more intentional and visually appealing.
By the end, you'll know how to turn an ordinary shot into one that looks crisp, balanced, joyful, and ready to share - whether it's for social media, your portfolio, or a brand project.
Quick Summary: 14 Ways to Enhance a Photo
Before we dive into each method in detail, here’s a snapshot of the 14 techniques you can use to enhance your photos and make them look more professional:
- Enhance a Blurry Photo for Better Clarity – Emphasize textures and edges.
- Reduce Noise and Grain – Smooth out imperfections for a cleaner image.
- Retouch Imperfections and Blemishes – Clean up small distractions.
- Upscale or Enhance Resolution with AI Tools – Improve clarity and detail, e.g., with Aiarty Image Enhancer.
- Crop and Straighten the Image – Refine composition and remove distractions.
- Adjust Brightness and Exposure – Balance light for clarity and mood.
- Boost Contrast for More Depth – Make your subject stand out.
- Fine-Tune Colors and White Balance – Correct colors for a natural look.
- Enhance Saturation and Vibrance – Make colors pop without looking artificial.
- Improve Composition with Framing and Alignment – Guide the viewer’s eye naturally.
- Apply Filters or Presets Wisely – Add style while keeping it subtle.
- Blur the Background to Highlight the Subject – Draw attention to the main subject.
- Use Light and Shadow Adjustments for Mood – Create depth and atmosphere.
- Remove or Replace the Background – Focus attention and add creative flexibility.
1. Enhance a Blurry Photo for Better Clarity
Sharpening helps restore fine details in a blurry photo, making edges crisper and textures more defined. This improvement is especially noticeable in portraits, landscapes, and product photos, where image clarity has a direct impact on overall quality.
Most traditional photo editors rely on manual sharpening sliders, requiring you to fine-tune the strength yourself. While this works in some cases, it can easily introduce halos or noise if overapplied.
In contrast, AI-powered photo sharpening analyzes the image automatically and enhances details without manual adjustments, helping preserve a more natural look while reducing the risk of artifacts.
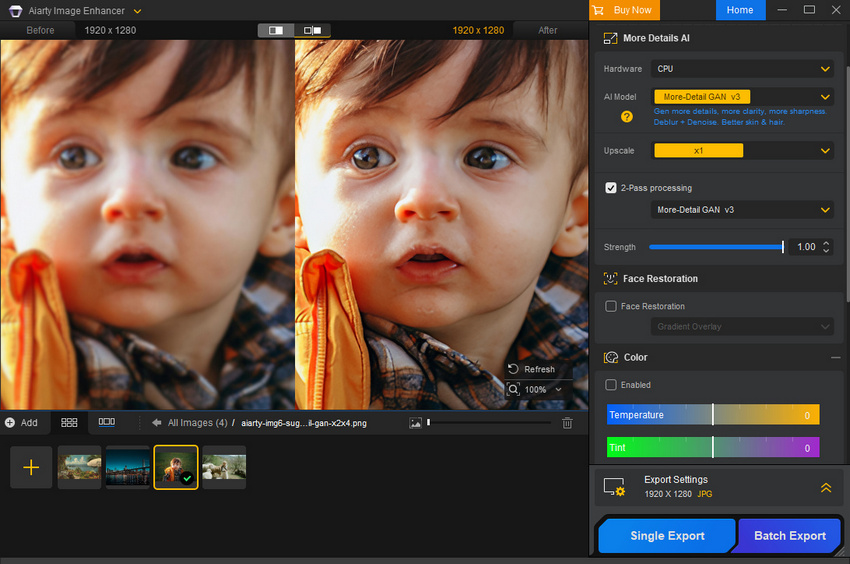
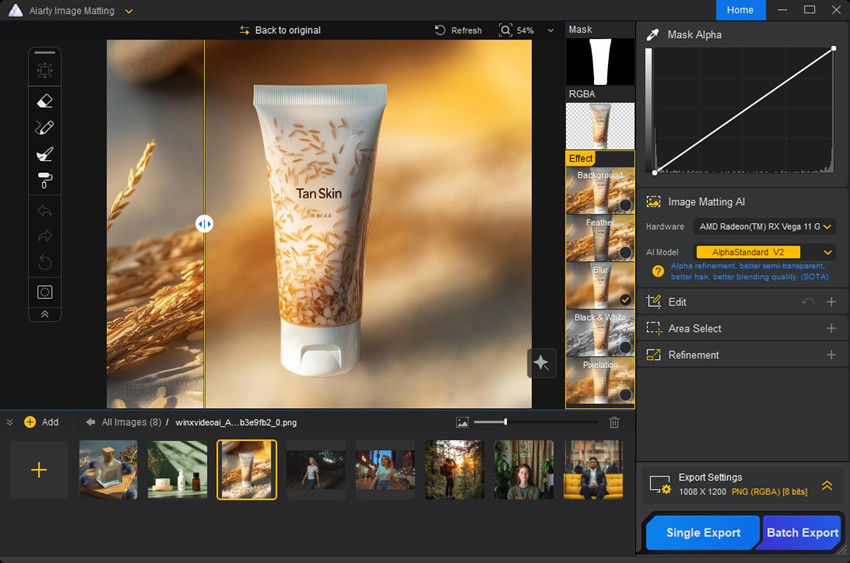
Take Aiarty Image Enhancer as an example. Fixing a blurry photo only takes a few simple steps:
- Import your blurry images into Aiarty (single or batch upload supported).
- Select an AI model based on your image type.
- Choose the Upscale option. If you only want to sharpen the image without increasing resolution, select ×1. This avoids unnecessary resizing while still improving clarity.
- Click Start to process and preview the result. Aiarty will automatically sharpen the image using AI, with instant preview so you can check if the results look natural before exporting.
- Export the enhanced image individually or in batches.
You can download Aiarty Image Enhancer for free to see how well it improves blurry photos. Beyond sharpening, it also supports denoising, depixelation, upscaling, color enhancement, and AI-powered object removal for unwanted objects, people, text, or blemishes.
2. Reduce Noise and Grain from Photos
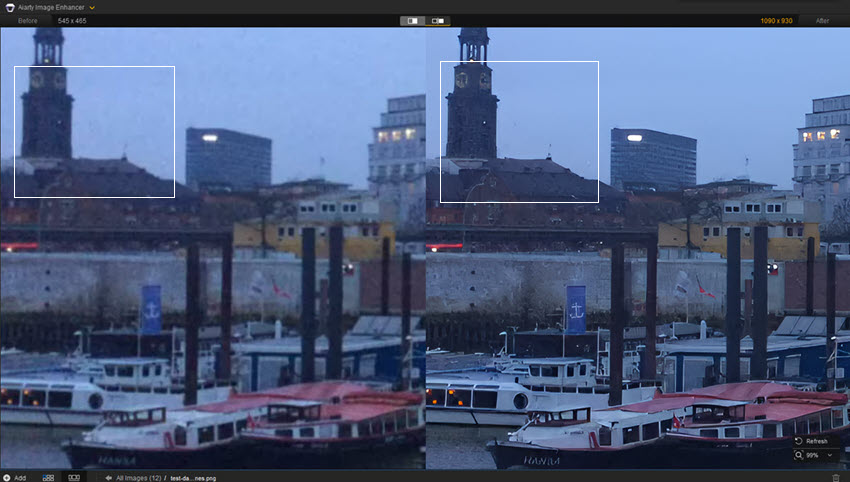
Noise, often seen as tiny speckles or grain in an image, can make even a well-composed photo look unpolished. It's especially common in low-light shots or photos taken with high ISO settings. Reducing noise not only improves the overall clarity but also helps your images look more professional and clean.
Most traditional editing tools offer noise reduction or denoise features that allow you to smooth out grainy areas without losing important details.
AI-powered photo denoising tools take this a step further, automatically detecting noise and adjusting it intelligently for a cleaner result. The key is balance - removing too much noise can make the photo look overly soft and unnatural, while leaving too much can distract from your subject. AI tools help maintain this balance by preserving textures and important details while minimizing grain.
Free download Aiarty Image Enhancer to remove noise and grain from your photos with AI.
3. Retouch Imperfections and Blemishes
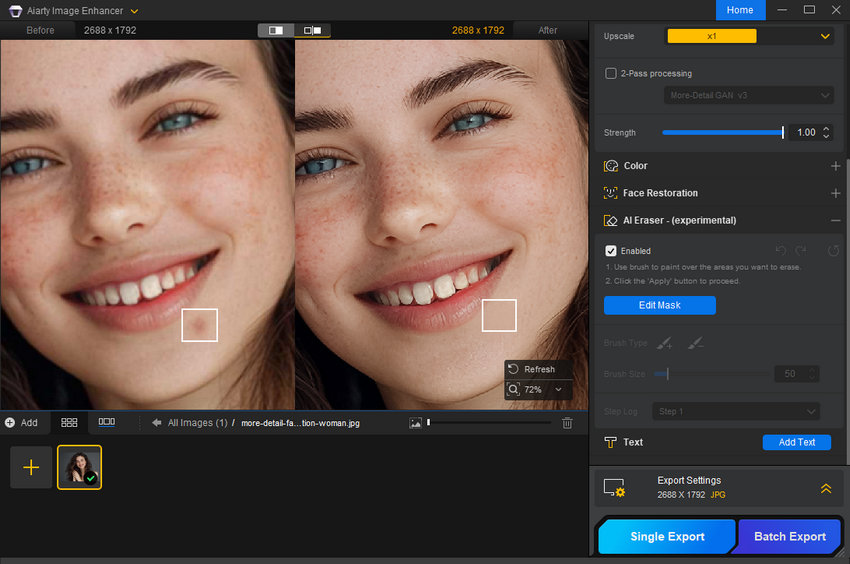
Retouching is a subtle yet essential step in making your photos look professional, particularly for portraits and product shots. Small imperfections like blemishes, dust, scratches, or minor distractions can draw attention away from the main subject. Carefully removing them improves the overall polish of your image without making it appear artificial.
Most AI photo editing tools offer spot healing, clone, or patch tools to address imperfections. For portraits, this might include smoothing skin, reducing under-eye shadows, or removing stray hairs, while for product photos, it could involve cleaning up dust, scratches, or reflections. The key is subtlety - over-retouching can make the image look unnatural and diminish its authenticity.
Retouching, when combined with other enhancements like color adjustments, sharpening, and lighting correction, ensures your photos appear refined, clear, and professional. This step helps maintain focus on your subject while elevating the overall quality and presentation of your images.
Want flawless portraits in seconds? Try an online AI face retouching tool or the AI eraser feature in Aiarty Image Enhancer.
4. Enhance Photo Resolution for Printing or Sharing
Low-resolution photos often look acceptable on small screens, but problems become obvious when you try to print them or share them on larger displays. Common issues include pixelation, soft edges, and a noticeable loss of detail.
Simply resizing or stretching an image does not truly improve its quality—it only enlarges existing pixels. To genuinely enlarge photos for printing, AI upscaling is required. AI-based tools analyze image content and intelligently generate new pixels, restoring details that would otherwise be lost.
AI upscaling is especially useful when you need to:
- Print photos in larger sizes
- Share images on high-resolution screens
- Improve old or low-quality images
- Prepare visuals for presentations or online platforms
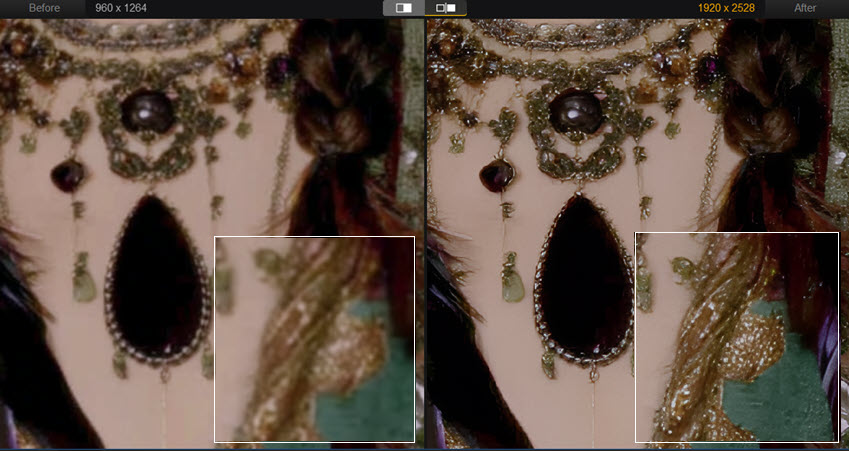
Aiarty Image Enhancer uses advanced AI upscaling models to increase image resolution while preserving natural details and textures. Unlike traditional upscaling methods, it minimizes artifacts and avoids the overly smooth or artificial look.
To enhance photo resolution with Aiarty, follow these steps:
- Import your low-resolution images into Aiarty (single or batch upload supported).
- Select an AI model suitable for your image type.
- Choose an Upscale level such as ×2, ×4, or higher, depending on your output needs.
- Preview the enhanced result and fine-tune settings if needed.
- Export the high-resolution image for printing or sharing.
You can try Aiarty Image Enhancer for free to see how effectively it boosts photo resolution.
5. Crop and Straighten the Image
Cropping is one of the simplest yet most powerful ways to enhance an image. It helps remove distractions, improve composition, and draw attention to the subject that matters most. A well-cropped photo naturally feels cleaner and more intentional.
When cropping, aim to follow the rule of thirds - place key elements along the grid lines or at their intersections to create balance and flow. Straightening the horizon or correcting a tilted frame can also make a huge difference, especially for landscapes, architecture, or product shots.
This small adjustment can instantly make your photo look more professional, even before you touch lighting or color settings.
6. Adjust Brightness and Exposure
Lighting can completely change the mood and quality of an image. A photo that's too dark looks flat, while one that's overexposed loses detail. Adjusting brightness and exposure helps you find the right balance, making your photo look clearer and more professional.
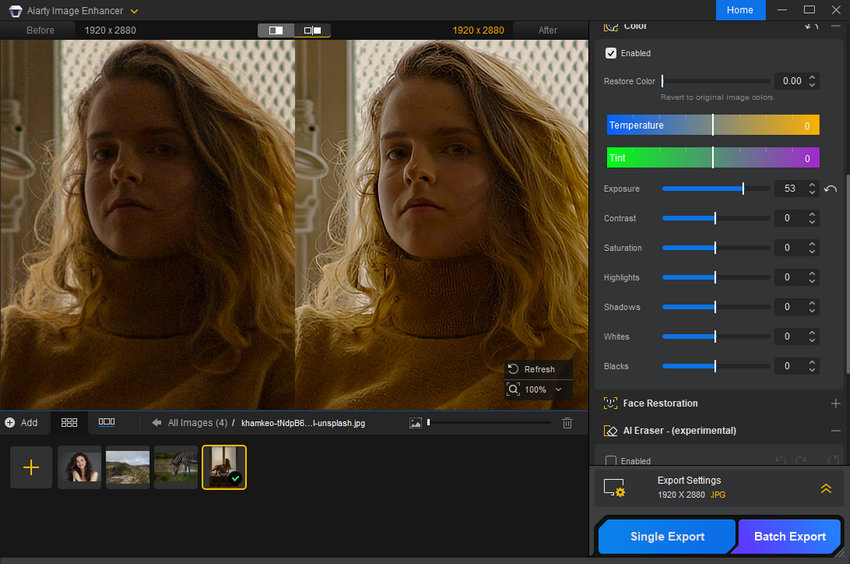
Start by slightly increasing exposure to bring out details in darker areas, then fine-tune brightness to keep tones natural. Use the highlight and shadow sliders to restore lost details and add depth. A balanced image should have visible texture in both bright and dark regions without looking washed out.
Small, subtle tweaks usually work best - you want your photo to feel naturally lit, not overly edited. Once the light looks right, every other enhancement step becomes easier and more effective.
7. Boost Contrast for More Depth
Contrast enhances the difference between the light and dark areas of your image, giving it more dimension and visual impact. Increasing contrast can make colors pop and subjects stand out, helping your photos look sharper and more professional.
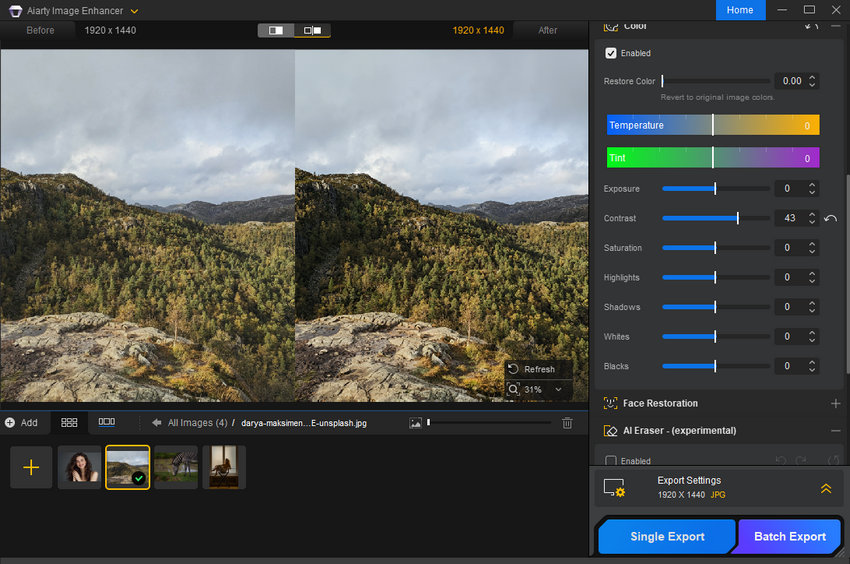
When adjusting contrast, start subtly - too much can make shadows too dark or highlights too bright. Aim for a balanced look that adds depth without losing detail. Combined with proper brightness and exposure, a well-contrasted image feels more vibrant, polished, and engaging.
8. Fine-Tune Colors and White Balance
Colors play a huge role in how a photo is perceived. Adjusting white balance ensures that whites appear true to life, which in turn makes all other colors more accurate. A photo with incorrect white balance can look too warm (yellow/orange) or too cool (blue), making it feel unnatural or unprofessional.
Most editing tools allow you to correct this by selecting a neutral area in your image or using temperature and tint sliders. Once white balance is set, you can fine-tune colors to make them richer and more appealing. Slight adjustments to vibrance or saturation can enhance tones without making the image look overdone.

Balancing colors and white balance not only improves realism but also enhances the mood of your photo. A well-colored image draws attention, conveys the right atmosphere, and ensures your photos look polished and professional.
9. Enhance Saturation and Vibrance
Saturation and vibrance control the intensity of colors in your image, helping it feel lively and engaging. Saturation affects all colors equally, while vibrance targets muted tones, boosting them without oversaturating already vivid areas.
Use these adjustments to make your colors pop subtly - for instance, enhancing the blue of the sky or the green of foliage - without making the photo look artificial. A small increase can make your image more visually appealing and professional, while maintaining a natural look.
When used carefully, boosting saturation and vibrance can turn a dull image into one that immediately catches the viewer's eye.
10. Improve Composition with Framing and Alignment
Good composition is one of the most important factors in making a photo look professional. Even a well-lit, sharp image can feel unbalanced if the subject isn't framed correctly. Enhancing composition involves both how the subject is positioned and how the overall elements in the frame interact with each other.
Start by reviewing your photo's alignment and framing. Use guidelines like the rule of thirds or leading lines to create a sense of balance and direction. Placing the main subject slightly off-center can make an image more dynamic, while ensuring that horizons and vertical lines are straight adds stability and professionalism.

Framing also includes considering what's inside and outside the shot. Removing distracting elements or repositioning the subject to include complementary surroundings can improve visual flow. For portraits, ensure there's enough space around the subject's face or body to avoid a cramped feel.
Attention to composition and alignment not only guides the viewer's eye but also elevates the overall quality of your photo. When combined with proper cropping, lighting, and color adjustments, it ensures your images feel intentional, well-planned, and visually appealing.
11. Apply Filters or Presets Wisely
Filters and presets are powerful tools that can quickly enhance your photos, giving them a cohesive style or mood. They adjust multiple aspects of an image at once, such as color, contrast, exposure, and tone, making them especially useful for batch editing or creating a consistent look across a series of images.
However, using filters or presets requires care. Overapplying a filter can make photos look artificial or overly stylized, while subtle adjustments often produce the most professional results. It's a good idea to start with a filter or preset as a base, then fine-tune individual settings like brightness, contrast, or saturation to suit your specific image.

Filters are also a creative way to enhance mood. Warm filters can evoke coziness, cool filters can create a calm atmosphere, and black-and-white presets emphasize texture and composition. By applying filters thoughtfully, you not only improve the visual appeal but also strengthen the emotional impact of your photo.
Using filters and presets wisely allows you to save time while maintaining a polished, professional look. When combined with other enhancement techniques - like cropping, sharpening, and color correction - they help transform ordinary shots into striking, visually cohesive images.
12. Blur the Background to Highlight the Subject
Blurring the background, also known as creating a shallow depth of field, is an effective way to make your subject stand out. By reducing distractions in the surroundings, the viewer's attention naturally focuses on the most important part of the image, whether it's a person, product, or detail.
With AI-powered photo editing tools, you can easily blur backgrounds while keeping your subject in sharp focus. For portraits, this highlights the face and adds a professional, magazine-quality feel. In product photography, AI background blur makes items pop, creating a clean and polished look without any complicated manual editing.
Try the best AI to blur the background of an image >>
When applying blur, balance is key. Too much can look artificial, while too little might not achieve the desired focus. Combining background blur with good lighting, sharp subject details, and proper composition ensures your photo appears professional and visually compelling. This technique is especially useful for social media images, marketing visuals, and portfolio shots where attention to the main subject is critical.
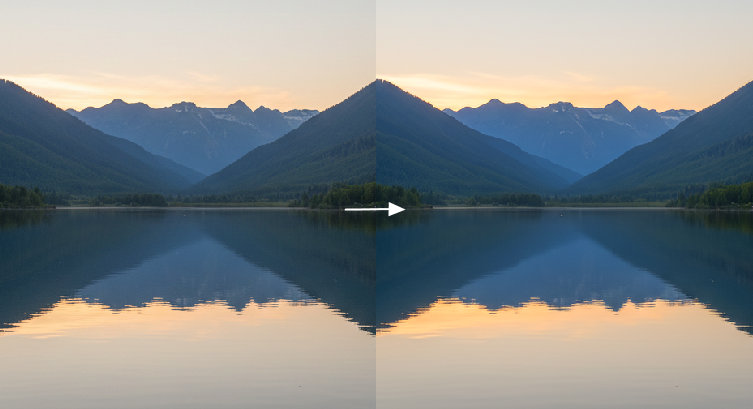
13. Use Light and Shadow Adjustments for Mood
Light and shadow play a crucial role in setting the mood and depth of an image. Adjusting these elements can turn a flat, ordinary photo into a visually dynamic and professional-looking one. By carefully balancing light and shadow, you can emphasize your subject, add dimension, and create a particular atmosphere that enhances the story your photo tells.
Most photo editing tools allow you to adjust highlights, shadows, and midtones independently. Increasing shadows can reveal hidden details in darker areas, while toning down highlights prevents bright spots from looking blown out. You can also use dodging and burning techniques to selectively lighten or darken specific areas, guiding the viewer's eye and enhancing the three-dimensional feel of the scene.

Mood is also influenced by how light interacts with your subject. Soft lighting can create a gentle, airy look, while stronger contrast between light and dark can evoke drama or intensity. Experimenting with these adjustments allows you to match the visual tone of your photo to your intended message, whether it's a serene landscape, a moody portrait, or a vibrant product shot. By thoughtfully manipulating light and shadow, your images gain depth, character, and professionalism. Combined with other enhancement techniques like color correction, sharpening, and background blur, this step ensures that your photos are not just clear but emotionally compelling as well.
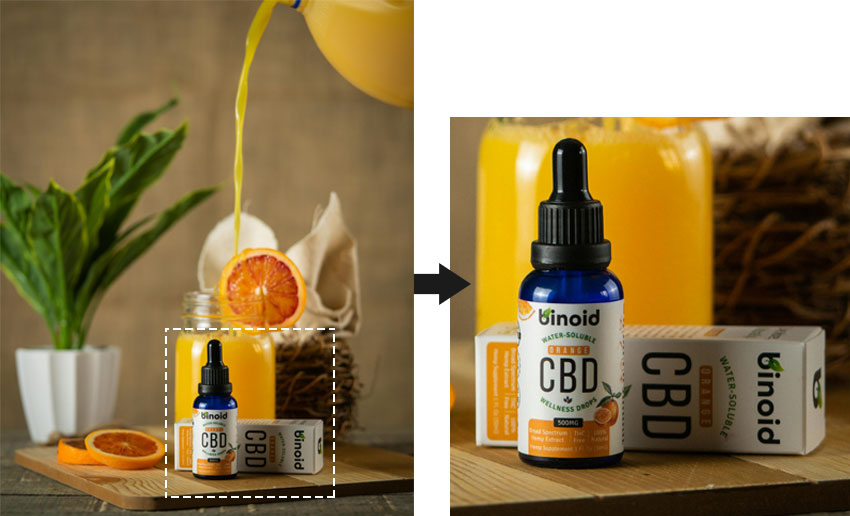
14. Remove or Replace the Background
Removing or replacing the background is a powerful technique for giving your images a clean, professional look. It's especially useful for product photography, portraits, and marketing visuals where you want the focus entirely on the subject without distractions.
AI-powered bg remover apps and traditional editing tools make it easy to isolate your subject and remove the background. After removal, you can replace it with a solid color, gradient, or an entirely new scene that enhances your photo. This technique not only gives your images a polished, professional look but also opens up creative possibilities, like placing a product in a lifestyle context or positioning a portrait in a custom-themed environment.
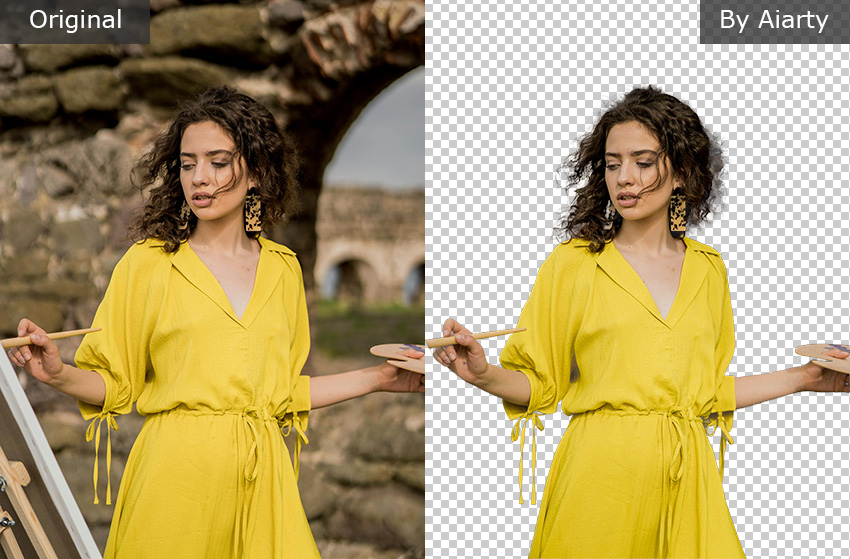
Easily remove backgrounds with Aiarty Image Matting - the smart choice for professional-quality edits.
While background removal can be simple with modern tools, precision matters. Pay attention to edges, hair, or intricate details to avoid unnatural outlines. Blending the new background with appropriate lighting and shadows ensures a realistic and professional appearance. Using this technique thoughtfully can dramatically elevate your photos, making them suitable for e-commerce listings, social media promotions, presentations, or any context where a clean, distraction-free look is essential.
 FAQs
FAQs
Using AI-powered image enhancement software like Aiarty Image Enhancer is often the easiest way. These tools can automatically fix common issues like blur, noise, and low resolution with just a few clicks.
Yes. While traditional resizing often degrades quality, advanced AI upscaling intelligently adds detail, enhancing resolution without significant loss. Tools like Aiarty Image Enhancer can even improve perceived quality by reconstructing details, offering a superior way to enlarge images compared to basic methods.
While Photoshop is a powerful tool for detailed and artistic enhancements, it's not always necessary for many common image improvements. Tasks like noise reduction and resolution upscaling can often be effectively handled by dedicated AI image enhancement software. These AI tools offer a more streamlined and often faster workflow for specific enhancement needs.
There are countless good reasons to enhance your images. For your personal photos, it means reliving vibrant vacation memories exactly as you remember them. On social media, sharper, more detailed pictures grab attention and boost engagement, because better visuals naturally attract more interest.
But the advantages go beyond personal use. For e-commerce businesses, clear, crisp product photos are essential; blurry or unprofessional images can deter potential buyers. Similarly, sharp visuals ensure effective communication in professional presentations. Plus, image enhancement offers the incredible ability to bring old or damaged family photos back to life, preserving precious memories for generations to come.
You May Also Like
This post was written by Brenda Peng who is a seasoned editor at Digiarty Software who loves turning ordinary photos into extraordinary works of art. With AI assistance for brainstorming and drafting, the post is reviewed for accuracy by our expert Abby Poole for her expertise in this field.