How to Add Topaz Photo AI to Lightroom Classic
Lightroom is where many photographers begin and finish most of their editing, but there are moments when its built-in tools don’t fully resolve issues like noise, softness, or missing detail, especially with high-ISO shots or older camera files. That’s why many users look for ways to pair Lightroom with external enhancement tools such as Topaz Photo AI.
In this guide, we’ll show you how to add Topaz Photo AI to Lightroom and fix some common issues.
How to Add Topaz Photo AI to Lightroom Classic
Below is a practical guide that walks you through the exact workflows Lightroom Classic (LrC) supports with Topaz Photo AI. It explains which plugin to use for which file types, how files are returned to Lightroom, batch notes, and common pitfalls to avoid.
What you need to know before you start
- Only Lightroom Classic (LrC) supports the Topaz Photo AI plugins. The Lightroom Creative Cloud (Lr) is not supported.
- Topaz installer adds two Lightroom plugins automatically: a RAW plugin and an external editor plugin. Make sure the Topaz installer completed successfully and that you can see the plugin menu entries described below.
- Max image size: 512 megapixels (512,000,000 pixels). Larger files will not be processed by the plugin.
Which plugin to use
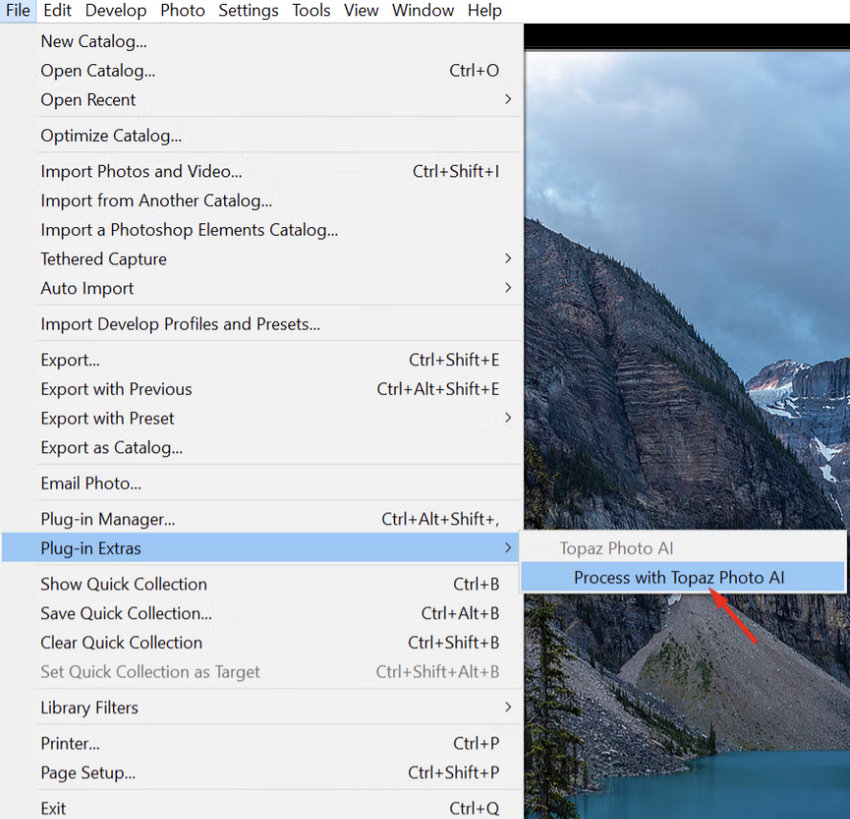
For RAW files, use the RAW plugin via File > Plug-in Extras > Process with Topaz Photo AI. This path is essential if you want access to Topaz’s RAW Denoise and to keep a DNG RAW workflow.
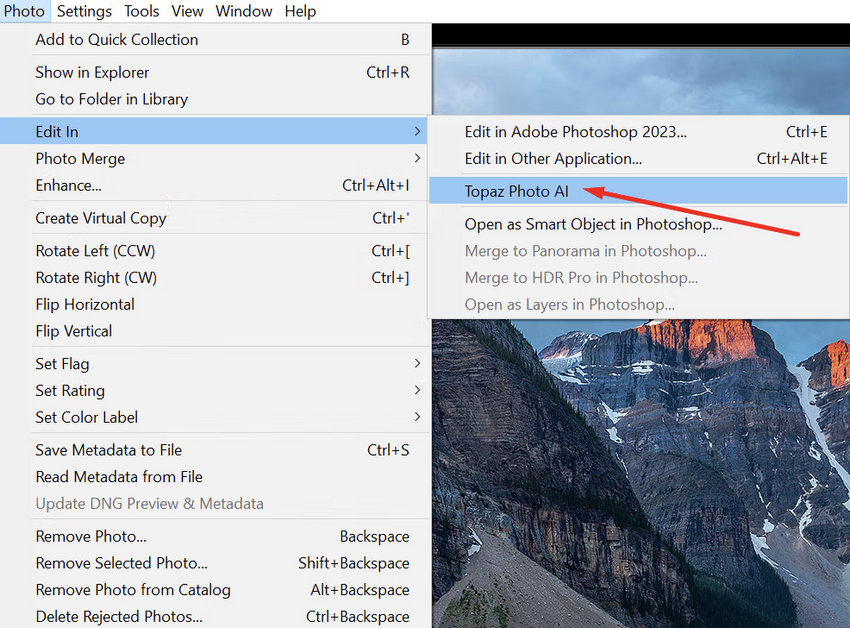
For non-RAW files (JPEG/TIFF/PNG/etc.), use the External Editor via Photo > Edit In > Topaz Photo AI. This path converts files to TIFF for processing.
Important: Do not use the External Editor path for original RAW images — that revokes access to RAW Denoise and will usually give weaker results. Use path #1 (the RAW plugin) for RAW images.
RAW plugin workflow (best quality for RAW files)
Use this when you have original RAW/DNG files and want maximum quality (RAW denoise, detail recovery, and a DNG return).
Step 1: In Lightroom Classic, select one or more unedited RAW images in Library or Grid view.
Send unedited RAW files because Photo AI does not read LrC develop adjustments. Do your final light & color edits in Lightroom after you get the DNG back from Photo AI.
Step 2: Choose File > Plug-in Extras > Process with Topaz Photo AI. This launches Photo AI and sends the RAW/DNG for processing.
Step 3: In Photo AI, choose the denoise/sharpen/upscale settings you want and run the enhancement.
Step 4: Save/Export in Photo AI.
If you use "Adjust Lighting" or "Balance Color" inside Photo AI the plugin will export a TIFF.
If you do not use those particular enhancements, the plugin will export a DNG (preserving a RAW format), which is usually preferable for further Lightroom editing.
Step 5: Back in Lightroom Classic the processed file will be imported into your catalog. If it’s a DNG it will appear like a RAW image; if it’s a TIFF it will appear as a raster file.
Notes & tips
- Lightroom sometimes prompts Overwrite or Edit a Copy for certain file types. Proprietary RAWs that cannot be overwritten will always create a DNG copy.
- Because Photo AI ignores LrC develop edits for RAWs, the usual best practice is: Send original RAW > Process in Photo AI > Return DNG > finish color/light edits in Lightroom.
External Editor workflow (for JPEG/TIFF/PNG)
Use this when your source files are non-RAW or you intentionally want to edit the raster copy.
Step 1: Select your image(s) in Lightroom Classic.
Step 2: Choose Photo > Edit In > Topaz Photo AI (or right-click > Edit In > Topaz Photo AI).
Lightroom will typically convert the file to a TIFF and open it in Photo AI.
Step 3: Edit in Photo AI and save. The edited TIFF will be added back to your Lightroom catalog (as a copy or overwrite depending on your choice and file type).
Important cautions
- If an image was originally a RAW but you send it via Photo > Edit In, you will lose access to RAW Denoise (because the plugin will operate on a converted TIFF). For RAW images, prefer the RAW plugin path.
- PSD files are not compatible with the Photo AI Lightroom Classic plugin.
 FAQs
FAQs
- Corrupted installation – The most common fix is simply reinstalling Photo AI. Many users report that uninstalling and reinstalling Photo AI immediately restores the plug-in.
- The plug-in was not installed automatically – During installation, Photo AI normally installs both Lightroom plugins. If this step was skipped or blocked, a reinstall usually resolves it.
- Looking in the wrong Lightroom version – Only Lightroom Classic (LrC) supports Topaz plugins. The cloud-based Lightroom (Lr) does not support plug-ins at all.
Topaz Photo AI does not appear as a traditional "Add-on" inside Plug-in Manager. The plugins install automatically and appear directly in Lightroom’s menus:
- RAW plug-in: File > Plug-in Extras > Process with Topaz Photo AI
- External editor plug-in: Photo > Edit In > Topaz Photo AI
If you’re checking Plug-in Manager and don’t see a Topaz entry, that’s normal. It isn’t managed from there.
This occurs when:
- Your RAW was processed in a way that returns a TIFF instead of a DNG, or
- You used the "Edit In" workflow for RAW files.
For RAW files, always use: File > Plug-in Extras > Process with Topaz Photo AI. This ensures the file returns as a DNG, preserving Lightroom’s full range of masking options. If you used Edit In, Lightroom creates a TIFF — masking tools behave differently on TIFF files.
For best results, send unedited RAW files to Photo AI. Lightroom edits on RAW files are not read by Photo AI. Apply Lightroom tonal/color edits after the enhanced DNG returns.
If you prefer seeing Lightroom adjustments inside Topaz, use the Edit In workflow — but note it converts the RAW to a TIFF and disables RAW Denoise.
This usually happens when Photo AI saves with a filename change (prefix or suffix). Lightroom considers this a new file, so it won’t automatically appear in the catalog.
Fix: Use "Synchronize Folder":
- In Lightroom’s Folder panel, right-click the folder containing the original file.
- Choose Synchronize Folder…
- Lightroom detects the new Topaz-generated file and imports it.
If you save without renaming the file inside Photo AI, Lightroom normally updates it automatically.
iPhone images (HEIC/ProRAW) may require the correct plug-in path:
- RAW plug-in for ProRAW
- External editor plug-in for HEIC/JPEG
Using the wrong workflow can prevent Lightroom from locating or reimporting the processed file.
This usually happens when Lightroom Classic fails to register Photo AI as an external editor. Common causes include:
- Lightroom Classic was open during Photo AI installation
- The plugin module didn’t install correctly
- OS permissions blocked the module
- You’re using Lightroom (cloud) instead of Lightroom Classic
Fix:
- Reinstall Topaz Photo AI using the latest installer
- Make sure Lightroom Classic is closed during installation
- Relaunch Lightroom Classic and check Photo > Edit In
If Photo AI still doesn’t appear, you can add it manually:
- Go to Preferences > External Editing
- Add Topaz Photo AI as a new secondary editor
- Save it as a preset
This creates a permanent "Edit in Topaz Photo AI" entry in Lightroom.
The RAW workflow is not under Edit In. The RAW plugin only appears under: File > Plug-in Extras > Process with Topaz Photo AI. Using Edit In for RAWs forces Lightroom to create a TIFF and bypasses RAW Denoise.
Both plugins support batch processing, but you must use the correct workflow for your file type:
- RAW files: Select multiple RAW images in the Library Grid or Filmstrip, then File > Plug-in Extras > Process with Topaz Photo AI.
- JPEG, TIFF, PNG, and other non-RAW files: Select your images, right-click (or use the Photo menu), and choose Edit In > Topaz Photo AI.
Note: Do not use Photo > Edit In > Topaz Photo AI while in the Develop module if you intend to send multiple files — that method only sends the single currently viewed image, not the whole selection.
- DNG returned: Happens when you send RAW files via the RAW plugin and you do not use Photo AI’s “Adjust Lighting” or “Balance Color” outputs. Returning a DNG preserves a RAW-style file ideal for further Lightroom edits.
- TIFF returned: Happens when you send non-RAW files via Edit In, or when using Photo AI’s Adjust Lighting / Balance Color enhancements. TIFFs are raster files and behave differently from RAW/DNG in Lightroom.
If Adding Topaz to Lightroom Doesn’t Work for You
Sometimes, despite following all the steps, integrating Topaz Photo AI into Lightroom Classic can be tricky. Plugin installation may fail. RAW/DNG workflows can feel cumbersome. If you encounter these kinds of workflow challenges, using a standalone desktop enhancer may be a simpler solution.
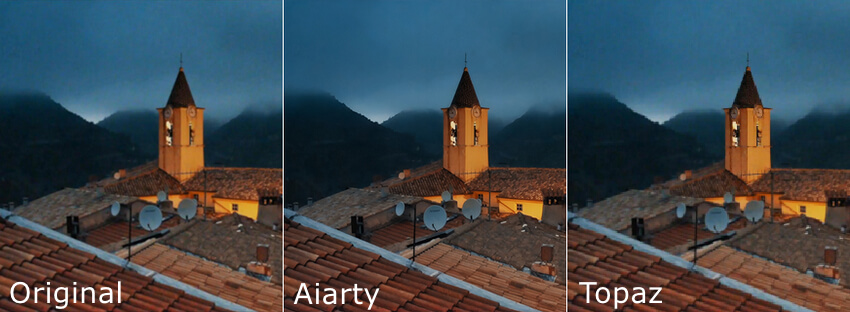
Aside from Topaz, you might also consider Aiarty Image Enhancer. Like Topaz, Aiarty offers core AI-based features such as AI Upscale, Denoise, and support for RAW, TIFF, and JPEG files, along with batch processing.
Aiarty provides flexible pricing plans, offering both a subscription plan and a one-time lifetime license for just $99 that supports up to 3 devices, compared with Topaz’s $199 per year subscription.
For a detailed feature and performance comparison, see our Aiarty vs Topaz article.
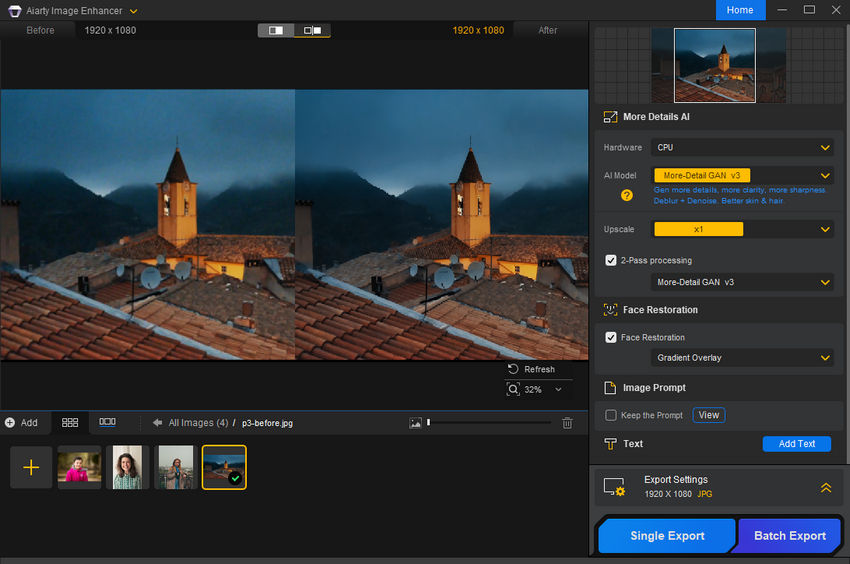
Aiarty Image Enhancer Workflow Overview:
- Download and install Aiarty Image Enhancer on your computer.
- Open the app and import your images (RAW, JPEG, TIFF, or other supported formats).
- Choose an AI model to enhance and upscale your images.
- Set the upscale factor or specify the target resolution.
- Preview the results. If needed, try different models, adjust the upscale factor, or tweak the enhancement strength.
- Export the processed images in your preferred format.
After exporting, you can import the enhanced images back into Lightroom for further editing, color adjustments, or organization.
You May Also Like
This post was written by Brenda Peng who is a seasoned editor at Digiarty Software who loves turning ordinary photos into extraordinary works of art. With AI assistance for brainstorming and drafting, the post is reviewed for accuracy by our expert Abby Poole for her expertise in this field.