


Converting VHS to MP4 is possible, but you can't do it with software alone. VHS tapes store video as an analog signal, so you first need a VCR to play the tape and a USB video capture device to digitize the signal on your computer.
The basic process is:
VHS Tape → VCR → RCA/S-Video → USB Capture Device → Computer → Capture Software → MP4
Once the VHS footage is captured, you can save it as an MP4 file for easier playback, sharing, and long-term storage. In this guide, we'll show you what equipment you need, how to connect everything, the best capture settings to use, and how to get the best possible quality from your old VHS tapes.
What You Need to Convert VHS to MP4
Before you start, make sure you have the following equipment and software. You don't need an expensive setup for basic VHS digitization, but every item in the signal chain has a specific job.
| What You Need | What It Does |
|---|---|
| VHS tape | The source video you want to digitize. |
| VCR | Plays the VHS tape and outputs its analog video and audio signals. |
| RCA or S-Video cable | Connects the VCR to the video capture device. S-Video can provide better video quality when both your VCR and capture device support it. |
| USB video capture device | Converts the analog signal from the VCR into a digital signal that your computer can record. |
| Windows or Mac computer | Receives and stores the captured video. Make sure you have enough free storage space. |
| Capture software | Records the incoming video and audio and saves the footage as a digital video file, such as MP4. |
| Power and adapters | Keeps the VCR, capture device, and any required converters powered during the transfer. |
Do You Need a VCR to Convert VHS to MP4?
Yes, in most cases. A computer cannot read a VHS tape directly. The VCR is what reads the magnetic tape and converts its stored information into an analog video signal.
You then send that signal through a capture device:
VHS tape → VCR → Capture device → Computer
If you no longer have a working VCR, you can either borrow or purchase a compatible one, or use a professional VHS conversion service instead.
Do You Need a VHS-to-USB Converter?
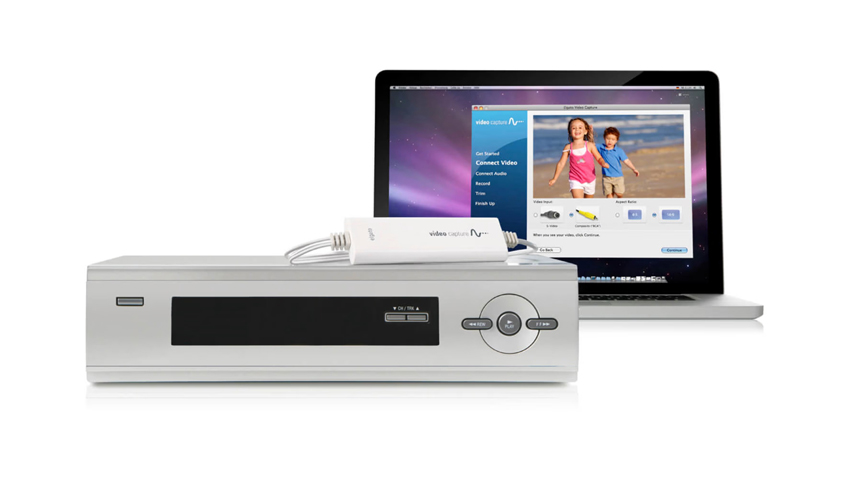
If by "VHS-to-USB converter" you mean a USB video capture device, yes, this is the key piece of hardware for a DIY transfer. It receives the analog output from your VCR and makes it available to capture software on your computer.
Be careful with the terminology, though. A USB capture device does not read a VHS tape by itself. You still need a VCR to play the tape.
RCA vs. S-Video: Which Should You Use?
If your VCR and capture device both have S-Video connections, S-Video is generally the better choice for video. It keeps the luminance and chrominance signals separate, which can help preserve cleaner detail and reduce color artifacts compared with composite RCA video.
If S-Video isn't available, the standard RCA connection is perfectly suitable for most VHS transfers.
For either connection, make sure the left and right RCA audio cables are connected correctly so that the captured MP4 includes sound.
How to Convert VHS to MP4 at Home
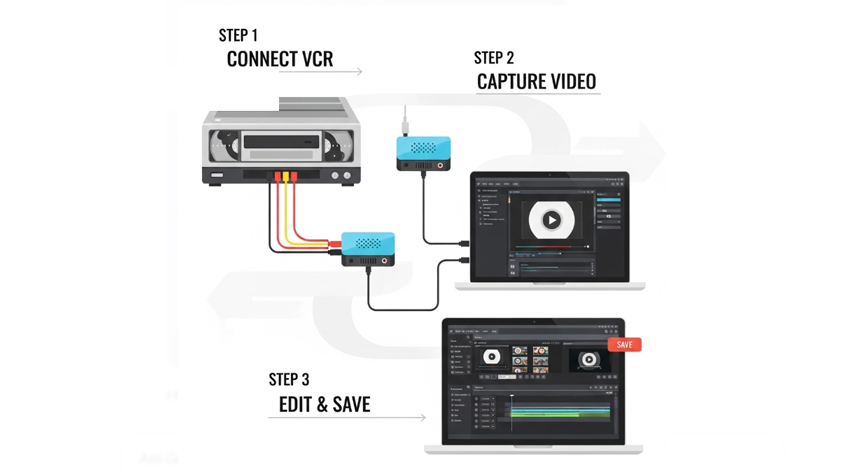
The easiest DIY method is to connect your VCR to a USB video capture device, then use capture software on your computer to record the VHS playback as a digital video file.
The setup is straightforward:
VHS Tape → VCR → USB Capture Device → Computer → Capture Software → MP4
The exact menus may vary depending on your VCR, capture device, and software, but the basic workflow is the same.
Step 1. Connect Your VCR to the Capture Device
Insert the VHS tape into your VCR and connect the VCR's video and audio outputs to the capture device.
For a standard composite connection:
- Yellow RCA → Video
- White RCA → Left audio
- Red RCA → Right audio
If your equipment supports S-Video, use an S-Video cable for video instead of the yellow composite cable. Keep the red and white RCA cables connected for audio.
Your connection should look like this:
VCR → RCA/S-Video cables → USB capture device → Computer
Make sure the VCR is powered on and set to the correct playback/input mode.
Step 2. Connect the Capture Device to Your Computer
Connect the USB capture device to your Windows or Mac computer.
Depending on the device, your operating system may automatically detect it as a video capture source. Some devices may require a driver or manufacturer-provided software.
Before moving on, check that the computer recognizes the capture device. If it doesn't appear in your capture software, try another USB port or install the required driver.
Step 3. Open Your Video Capture Software
You need software that can receive the video signal from the capture device and record it to your computer.
Popular options include:
- OBS Studio — free and available for Windows, macOS, and Linux.
- VirtualDub — a lightweight option for Windows users who want more control over video capture.
- Capture software included with your device — some USB capture devices come with their own recording software.
Open your preferred program and add the USB capture device as the video source.
For example, in OBS Studio, you can add a Video Capture Device source and select your connected capture device.
Step 4. Select the Video and Audio Sources
Make sure the capture software is receiving both video and audio from the VCR.
You should see the VHS footage in the preview window when the tape is playing.
Check these before recording:
- Video source: Your USB capture device
- Audio source: The capture device or its corresponding audio input
- Video standard: NTSC or PAL, depending on your VHS tape
- Aspect ratio: 4:3 for standard VHS
- Resolution: Use the native capture resolution supported by your video standard and capture device
If you see a black screen, distorted colors, or no audio, stop here and troubleshoot the connection before recording the entire tape.
Step 5. Choose Your VHS Capture Settings
VHS is a low-resolution analog format, so you don't need to capture it at an unnecessarily high resolution. In most cases, the goal is to preserve as much of the original signal as possible rather than artificially increasing its resolution during capture.
As a general starting point:
- NTSC: 720 × 480
- PAL: 720 × 576
- Aspect ratio: 4:3
- Frame rate: Match the source standard, typically 29.97 fps for NTSC or 25 fps for PAL
- Format: MP4 for convenient playback and sharing
- Codec: H.264 is a practical choice for broad compatibility
We'll cover these settings in more detail in the Best VHS to MP4 Settings section below.
Step 6. Start the VHS Playback and Recording
Rewind the VHS tape to the point where you want to begin.
Then:
- Start recording in your capture software.
- Press Play on the VCR.
- Watch the preview for the first few minutes to make sure the video and audio are being captured correctly.
- Let the tape play through in real time.
- Stop the recording when the VHS segment is finished.
Unlike converting a modern digital video file, VHS digitization generally happens in real time. A two-hour VHS tape can therefore take roughly two hours to capture.
Avoid using the computer for demanding tasks while recording. Dropped frames or interruptions during capture can affect the final file.
Step 7. Save and Check the MP4 File
After recording, stop the capture and save the resulting video.
If your software records to another format first, you can convert the captured footage to MP4 afterward. Keep the original capture file if you have enough storage, especially if the VHS contains important or irreplaceable footage.
Finally, open the MP4 and check:
- Is the entire video present?
- Is the audio synchronized?
- Does the video maintain the correct 4:3 aspect ratio?
- Are there dropped frames or glitches?
- Are there visible interlacing lines?
- Is the image too dark, bright, or washed out?
If everything looks good, you now have a digital MP4 copy of your VHS tape that you can back up, transfer, and play on modern devices.
Best VHS to MP4 Settings
Choosing the right capture settings can help you preserve the original VHS signal without introducing unnecessary quality loss. The key is to capture the tape correctly first, then enhance or upscale the video afterward if needed.
There is no benefit to forcing a VHS tape into 1080p or 4K during the initial capture. VHS is an analog format with far less detail than modern HD video, so capturing at an appropriate source resolution is usually the better approach.
Recommended VHS to MP4 Settings
| Setting | NTSC VHS | PAL VHS |
| Capture resolution | 720 × 480 | 720 × 576 |
| Frame rate | 29.97 fps | 25 fps |
| Aspect ratio | 4:3 | 4:3 |
| Video format | MP4 | MP4 |
| Video codec | H.264 | H.264 |
| Audio sample rate | 48 kHz | 48 kHz |
| Audio codec | AAC | AAC |
These settings are a practical starting point for creating MP4 files that are easy to play, edit, back up, and share.
NTSC vs. PAL: Which Setting Should You Choose?
Your capture standard should match the VHS tape and the VCR you are using.
NTSC is commonly used in the United States, Canada, Japan, and some other regions, while PAL is widely used across Europe, Australia, and many other countries.
If you select the wrong video standard, you may see problems such as:
- Incorrect colors
- Flickering
- Distorted or unstable video
- Incorrect frame rate
- Playback problems
If you're unsure which standard your tape uses, check the label on the tape, the VCR specifications, or the original recording equipment.
Should VHS Video Be 4:3 or 16:9?
Standard VHS footage is normally 4:3, so you should preserve that aspect ratio unless the original recording was intentionally produced in another format.
Do not stretch a 4:3 VHS recording to fill a 16:9 screen. Doing so makes people and objects appear wider than they should.
If you are watching the video on a modern widescreen display, black bars on the left and right are normal.
What About Interlaced VHS Video?
VHS recordings are typically interlaced. Depending on your capture device and software, the resulting video may show horizontal comb-like lines around moving objects, especially when played on a progressive display.
This is an interlacing artifact, not necessarily a problem with the original tape.
If you see noticeable horizontal lines, enable deinterlacing during capture or processing, depending on your workflow.
For the best results, avoid applying aggressive processing during the initial capture. Keeping a clean original capture gives you more flexibility to experiment with deinterlacing and other restoration methods later.
Should You Use H.264 or H.265 for VHS?
For most users, H.264 is the safer choice for the final MP4 because it offers broad compatibility across computers, TVs, phones, editing software, and media players.
H.265/HEVC can provide better compression efficiency, which may reduce file size, but compatibility can vary depending on the playback device and software.
If you're digitizing irreplaceable family recordings, consider keeping a higher-quality original capture in addition to your convenient MP4 copy.
Don't Delete the Original Capture
An important rule when digitizing old VHS tapes is: Keep a high-quality master whenever possible.
Your MP4 can be the convenient copy for everyday playback and sharing, while the original capture serves as a backup for future restoration, editing, or upscaling.
This matters because you cannot recapture the same footage if the VHS tape later becomes unreadable.
A good preservation workflow is:
VHS → Original Capture → MP4 → Edited/Enhanced Copies
This way, you can create new versions in the future without repeatedly compressing an already compressed video.
Why Does VHS Look Blurry After Converting to MP4?
If your VHS-to-MP4 video looks blurry, noisy, or low-resolution, that does not necessarily mean the conversion failed. Converting VHS to MP4 digitizes the original analog signal; it does not restore detail that was already lost on the tape.
VHS was designed for analog television and has far less visible detail than modern HD or 4K video. Decades of storage, repeated playback, tape wear, recording conditions, and the quality of the original VCR can further reduce image quality.
If your goal is to watch old VHS footage on a modern TV, preserve it for future use, or make old family recordings easier to view, performing video enhancement can make a noticeable difference.
Aiarty Video Enhancer can be used after the VHS digitization process to improve the quality of your captured video. Instead of simply increasing the resolution, it uses AI models to reduce noise, recover visual details, sharpen soft footage, and upscale videos to higher resolutions.
What Can Aiarty Help With?
Depending on the quality of your source footage, Aiarty can help with common problems found in digitized VHS videos, including:
- Low resolution: Upscale old footage to 1080p, 2K, or 4K.
- Soft details: Improve perceived sharpness and restore clearer edges.
- Video noise: Reduce noise that becomes more noticeable after digitization.
- Compression artifacts: Reduce some blockiness and other digital artifacts.
- Poor facial detail: Improve the appearance of faces in suitable footage.
- Old footage: Make low-quality recordings look cleaner and more suitable for modern screens.
The result depends heavily on the condition of the original VHS tape and the quality of the digital capture. AI enhancement cannot recover information that has been completely lost, but it can produce a cleaner and more watchable version from a usable source.
How to Enhance Your VHS-to-MP4 Video
- Capture the VHS tape and save it as an MP4 or a high-quality master file.
- Open the digitized video in Aiarty Video Enhancer.
- Choose an appropriate AI model based on the type and quality of your footage.
- Select an output resolution, such as 1080p or 4K.
- Preview the result before processing the entire video.
- Export the enhanced version while keeping your original capture unchanged.
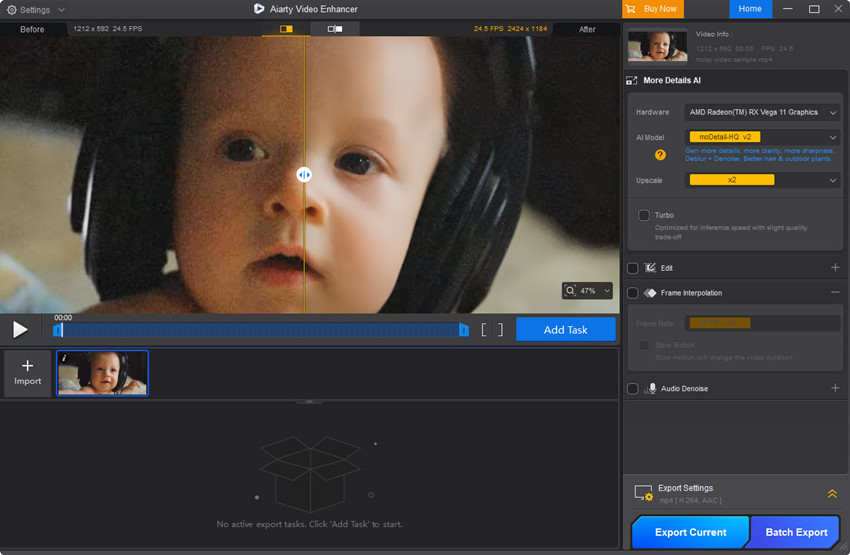
For irreplaceable family recordings, keep both versions: original VHS capture and enhanced copy.
The original gives you a permanent source file, while the enhanced version is optimized for watching, sharing, or displaying on modern screens.
Want to see how much an old video can improve? Free download and try Aiarty Video Enhancer on a short section of your digitized VHS footage first, then compare the original and enhanced results before processing the entire tape.
 FAQ about Converting VHS to MP4
Usually, no. A computer cannot read a VHS tape directly because VHS stores video as an analog signal. For a DIY transfer, you typically need a VCR to play the tape and a USB video capture device to send the analog signal to your computer, where capture software records it as a digital video file.
For most DIY setups, you need a video capture device to convert the analog signal from your VCR into a digital signal that your computer can record. Some devices are sold as "VHS-to-USB converters", but they are essentially USB video capture devices. You still need a VCR to play the VHS tape.
For standard VHS, 720×480 is a common capture resolution for NTSC tapes, while 720×576 is commonly used for PAL tapes. Capturing VHS at 1080p or 4K does not create additional detail that was not present on the original tape. It is generally better to capture the source correctly first and upscale it later if needed.
For the initial capture, 720×480 is generally more appropriate for NTSC VHS than 1080p. PAL VHS is commonly captured at 720×576. Recording directly at 1080p does not add real detail to the VHS footage. If you want to watch the video on a modern HD or 4K display, you can upscale the captured video afterward using a video enhancement tool.
Yes. After converting VHS to a digital video file, you can upscale the footage to 1080p or 4K. However, simply changing the output resolution does not restore missing detail. For better results, use a video enhancement tool that can reduce noise, improve soft details, and reconstruct some visual detail during the upscaling process.
VHS digitization generally takes place in real time. A one-hour VHS recording usually takes about one hour to capture, while a two-hour tape can take roughly two hours. The exact time may vary depending on your VCR, capture device, software, and whether you need additional processing or conversion afterward.
The file size depends on the capture resolution, codec, bitrate, and recording length. A compressed H.264 MP4 is relatively storage-friendly, but a higher-quality master capture can require significantly more space. If the footage is important, keep the original capture file when possible and create a smaller MP4 copy for everyday playback and sharing.
Black bars are often normal when playing standard 4:3 VHS footage on a modern 16:9 widescreen display. The bars preserve the original aspect ratio and prevent the video from being stretched. Avoid cropping or stretching the footage simply to fill the screen, as this can cut off part of the image or make people and objects look distorted.
You May Also Like


This post was written by Brenda Peng who is a seasoned editor at Digiarty Software who loves turning ordinary photos into extraordinary works of art. With AI assistance for brainstorming and drafting, the post is reviewed for accuracy by our expert Abby Poole for her expertise in this field.
