Summary: Reducing wind noise in Premiere Pro involves several methods like the Essential Sound panel, DeNoise effect, High-Pass filter, and more. For faster, more effective results, Aiarty Video Enhancer's Audio Denoise feature uses advanced AI to automatically identify and reduce wind noise while preserving speech quality.
Wind noise can significantly degrade the audio quality of your video projects, making dialogue hard to understand and overall sound unpleasant. Fortunately, Adobe Premiere Pro offers several powerful tools to help you minimize or eliminate wind noise effectively.
In this guide, we'll walk you through five practical methods, including using the Essential Sound panel, the DeNoise effect, the High-Pass filter, the Parametric Equalizer tool, and the Dynamics effect, to clean up your audio and ensure your videos sound professional and clear.
Check them now.
Find Adobe Premiere Pro Hard to Follow? You Need Aiarty Video Enhancer!
Reducing wind noise in Premiere Pro can involve multiple steps and techniques, such as using the Essential Sound panel, applying the DeNoise effect, the High-Pass filter, Parametric Equalizer, or the Dynamics effect. While these tools are powerful, they sometimes require a steep learning curve or significant manual tweaking to achieve optimal results.
This is where Aiarty Video Enhancer's Audio Denoise feature becomes a game-changer. Leveraging advanced AI algorithms specifically trained to identify and eliminate unwanted ambient noises like wind, Aiarty Video Enhancer offers users a fast, automated, and highly effective solution to enhance audio clarity even before importing clips into Adobe Premiere Pro.
Key advantages of Aiarty Video Enhancer's Audio Denoise feature include:
- Intelligent Wind Noise Identification: Aiarty Video Enhancer's AI model distinguishes wind noise from important audio content such as speech or natural sound effects, ensuring minimal loss of dialogue quality.
- Automatic Adaptive Reduction: Instead of a one-size-fits-all filter, Aiarty Video Enhancer adapts the noise reduction intensity dynamically across the audio clip, preserving natural sound while removing distracting wind disturbances.
- Time Efficiency: By preprocessing your audio with Aiarty Video Enhancer, you can reduce the need for extensive noise reduction within Premiere Pro, saving valuable editing time and workflow complexity.
- User-Friendly Interface: Even for creators new to audio editing, Aiarty Video Enhancer's intuitive design requires just a few clicks to achieve professional-grade audio enhancement.
- Versatility Across Audio Types: Beyond wind noise, Aiarty Video Enhancer effectively eliminates other common background noises, making it a versatile tool for improving audio quality overall.
Incorporating Aiarty Video Enhancer's Audio Denoise feature into your workflow means you get cleaner, clearer soundtracks with less manual effort, allowing you to focus on creating stunning video content without audio distractions. Whether you're capturing outdoor interviews, capturing nature footage, or producing any video project prone to wind interference, Aiarty Video Enhancer is a reliable partner to elevate your audio standards.
Method 1. How to Reduce Wind Noise in Premiere Pro within the Essential Sound Panel
The Essential Sound panel is a great starting point for audio editing in Premiere Pro, especially for reducing wind noise, even if you're a beginner. It simplifies complex audio effects and presents them in a user-friendly way. The panel helps achieve professional-quality sound without needing extensive knowledge of audio production.
Here's a step-by-step breakdown:
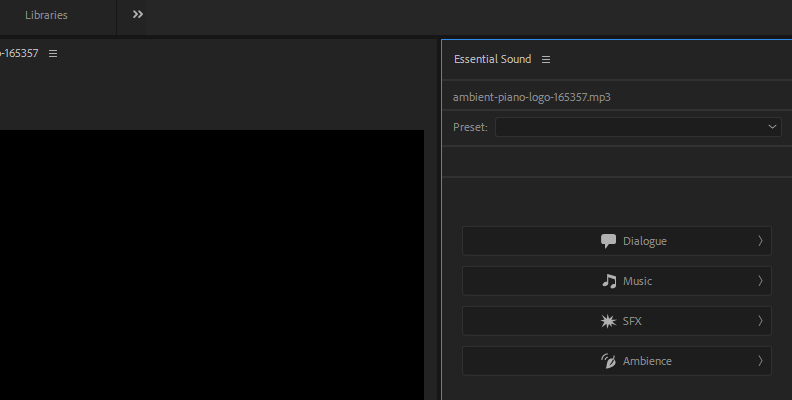
Step 1. Access the Essential Sound Panel
First, ensure the Essential Sound panel is visible. If not, go to the Window menu at the top of the Premiere Pro interface and select "Essential Sound". Then in your timeline, choose the specific audio clip you want to edit. The Essential Sound Panel will light up once a clip is selected.
Step 2. Tag Your Audio
The panel will prompt you to tag your audio clip as either: Dialogue, Music, SFX (Sound Effects), or Ambience. For wind noise reduction, you'll most likely be working with dialogue, so select "Dialogue". This unlocks a set of tools specifically designed for editing speech.
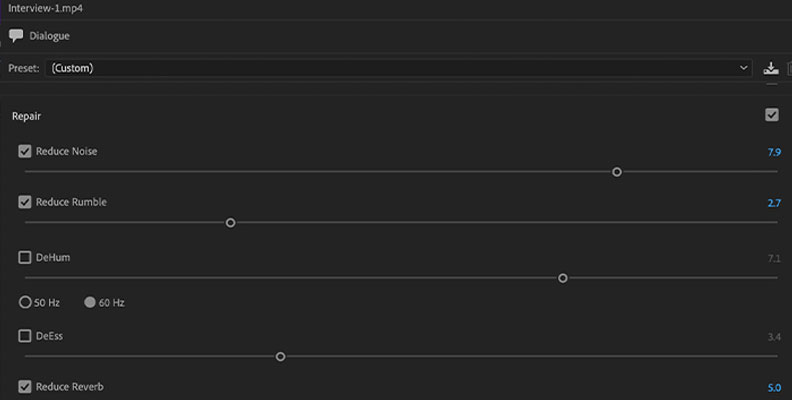
Step 3. Reduce the Wind Noise
The Essential Sound panel features several sections. Find and expand the "Repair" section. Wind noise often manifests as a low-frequency rumble or hiss. Check the box next to "Reduce Rumble" to activate the effect. Slowly increase the "Reduce Rumble" slider and continuously preview your audio. The more you increase it, the more low-frequency rumble reduction you'll get.
Important tips for Beginners
- Listen carefully: Pay close attention as you adjust the slider. You're aiming to reduce the wind noise without making the dialogue sound thin, muffled, or artificial.
- Start with small adjustments: Instead of drastically increasing the slider, make small increments and listen for the impact.
- Don't overdo it: Sometimes, it's better to leave a slight amount of wind noise than to aggressively remove it and degrade the overall audio quality.
What if "Reduce Rumble" isn't enough?
- Reduce Noise: If the wind noise has a broader frequency range than just low frequencies, try enabling and adjusting the "Reduce Noise" slider in the "Repair" section.
- Clarity Tab > EQ: If the wind noise reduction affects the voice's clarity, you can use the EQ option in the Clarity tab to boost frequencies that restore natural voice quality. Experiment with EQ presets like "Podcast Voice" and adjust the amount slider as needed.
- Adobe Audition for advanced situations: For complex or persistent wind noise, consider exporting the audio to Adobe Audition for more precise control using tools like spectral frequency display and noise print capture.
Method 2. How to Reduce Wind Noise in Premiere Pro Using the DeNoise Effect
The DeNoise effect in Premiere Pro provides a more direct way to target and reduce various types of background noise, including wind noise, compared to the broader Essential Sound panel settings.
Here's how to apply and fine-tune it:
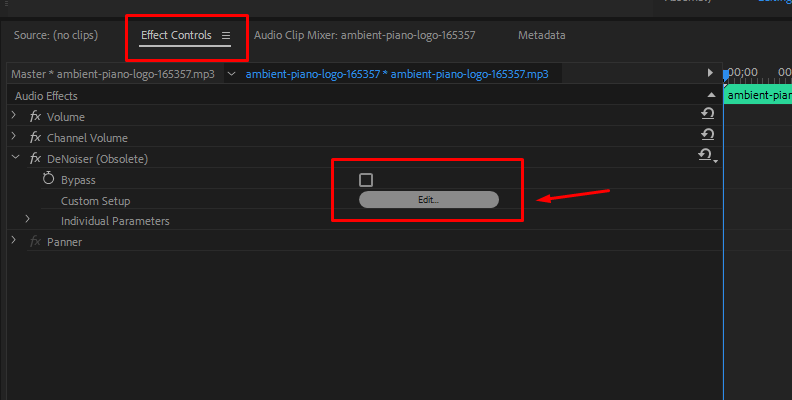
Step 1. Locate the Effect
If it's not already open, go to Window > Effects to open the Effects panel. In the Effects panel, type "DeNoise" into the search bar or navigate to Audio Effects > Noise Reduction/Restoration > DeNoise.
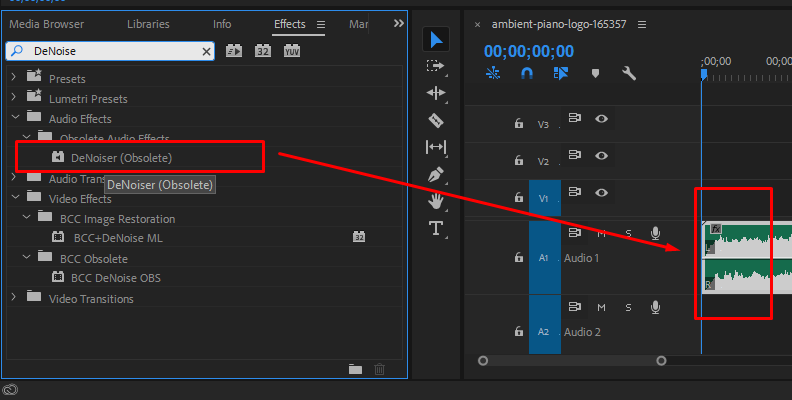
Step 2. Apply and Access Settings
Select the audio clip with wind noise on your timeline and drag the DeNoise effect from the Effects panel onto it. Go to the Effect Controls panel and locate the DeNoise effect you just applied. Click the "Edit" button to open a new window where you can adjust the noise reduction settings.
Step 3. Adjust the Reduction Level
The main control in the DeNoise window is the "Amount" slider, which determines the intensity of the noise reduction. Start with a lower setting (around 30-40%) and incrementally increase the slider, listening carefully to the audio. The goal is to reduce wind noise without making the dialogue sound unnatural or affecting desired audio elements like music. Remember that excessive noise reduction can sometimes introduce artifacts or make the audio sound muffled.
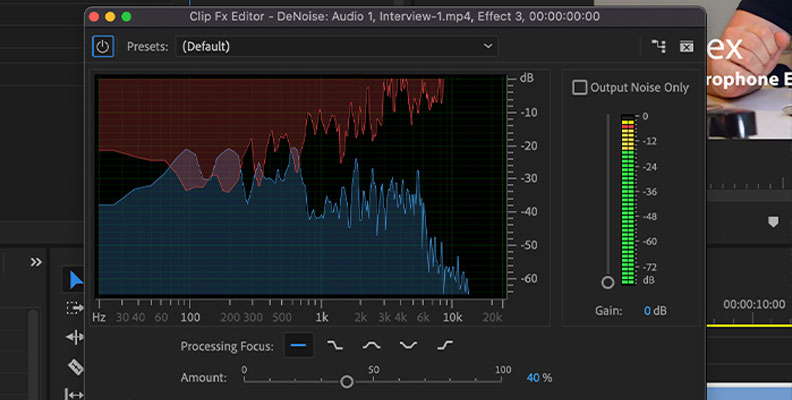
Step 4. (Optional) Fine-tune with Advanced Controls
If the wind noise is particularly stubborn, explore the "Processing Focus" options within the DeNoise effect (e.g., "Light Noise", "Heavy Noise"). This allows the DeNoise algorithm to target specific frequency ranges more aggressively. Experiment with the available presets to see if any provide a suitable starting point for your audio.
Step 5. Review and Refine
After making adjustments, play back your audio clip to assess the effectiveness of the DeNoise effect. If needed, return to the DeNoise settings and make additional tweaks to achieve a balance between noise reduction and audio quality. For more challenging cases, you might want to combine the DeNoise effect with other tools like the High-Pass Filter for low-frequency wind rumble.
Also see: Best software to remove wind noise (real-time and post-processing)
Method 3. How to Reduce Wind Noise in Premiere Pro Applying the High-Pass Filter
The High-Pass Filter is a simple but powerful tool for tackling wind noise, especially the low-frequency rumble often associated with it. It works by allowing high frequencies to "pass" through while cutting out or attenuating lower frequencies below a specified point.
Here's how to use it:
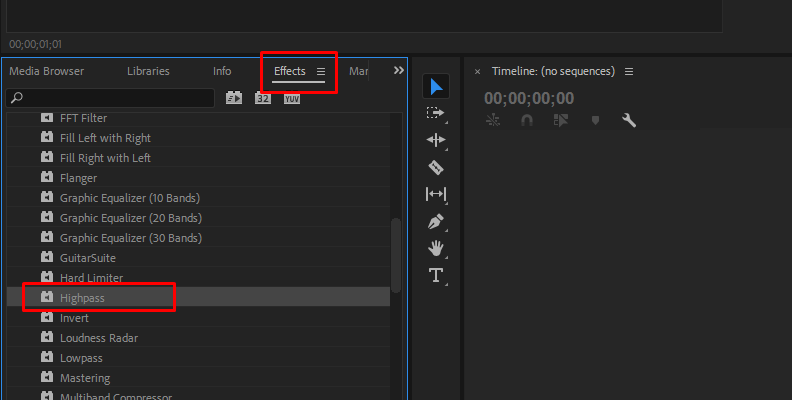
Step 1. Locate the High-Pass Filter
Go to Window > Effects. Then type "HighPass" into the search bar, or navigate to Audio Effects > Filter and EQ > HighPass.
Step 2. Apply and Adjust the Filter
Select the audio clip with wind noise on your timeline and drag the HighPass filter onto it. Go to the Effect Controls panel and locate the HighPass filter you just applied.
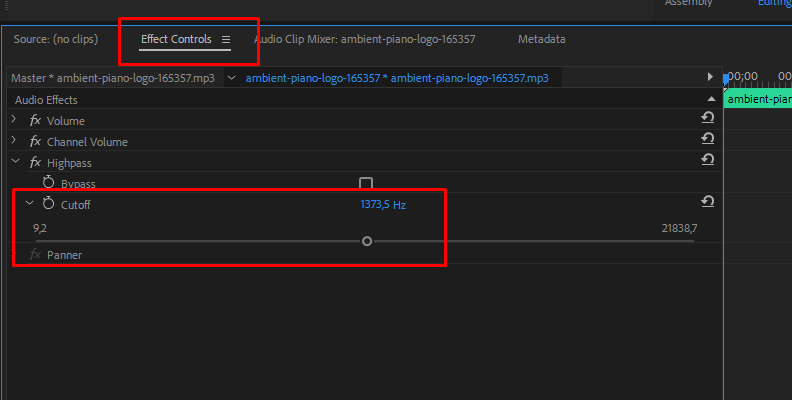
Then it is the most crucial setting - adjust the "Cutoff" frequency.
Start with a low frequency, such as 10 Hz, and gradually increase it while listening to your audio. The goal is to find the sweet spot where the wind noise is reduced without making your dialogue sound thin, unnatural, or affecting the desired audio.
Tip: Wind noise typically resides below 200 Hz, so try to keep your cutoff frequency below that to avoid impacting voice frequencies.
While the cutoff frequency is the most important, some High-Pass filters offer a "Slope" setting, which determines how gradually or sharply the filter cuts off frequencies below the cutoff point.
- Gentler slopes: A gentler slope (e.g., 6 dB per octave) will gradually roll off the low frequencies, resulting in a more natural-sounding effect.
- Steeper slopes: A steeper slope (e.g., 24 dB or 48 dB per octave) will cut off frequencies more abruptly, which can be useful for more aggressive noise reduction but might sound less natural.
It may take some time before you get the best result. What you need to do is previewing and refining. Constantly play back your audio and evaluate the results after each adjustment. Make small tweaks until you achieve the desired balance between wind noise reduction and audio quality.
What if It's Still not Perfect?
- Combine with other effects: If the High-Pass filter alone isn't enough, consider combining it with the DeNoise effect (as discussed previously) to address the remaining wind noise.
- Adobe Audition for precision: For particularly challenging wind noise issues, exporting the audio to Adobe Audition can provide even finer control through tools like spectral frequency display and noise print capture.
Method 4. How to Reduce Wind Noise in Premiere Pro Utilizing the Parametric Equalizer
The Parametric Equalizer is a versatile tool that offers fine control over the frequency spectrum, allowing you to surgically target and reduce wind noise without affecting the clarity of your dialogue. It's particularly useful when the wind noise isn't simply a low-end rumble but has specific frequency characteristics you want to eliminate.
Here's a step-by-step approach:
Step 1. Locate and Ppply the Parametric Equalizer
Still go to Window > Effects to open the Effects panel. Type "Parametric Equalizer" or navigate to Audio Effects > Filter and EQ > Parametric Equalizer. Drag the Parametric Equalizer effect onto the audio clip in your timeline that contains the wind noise.
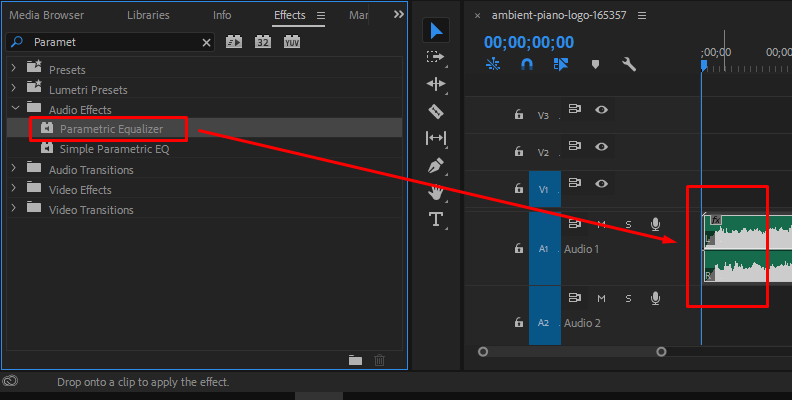
Step 2. Access the Equalizer Interface
Go to the Effect Controls panel and locate the Parametric Equalizer effect. Click the "Edit" button to open the Parametric EQ window, which displays a graph of frequencies and their corresponding levels.
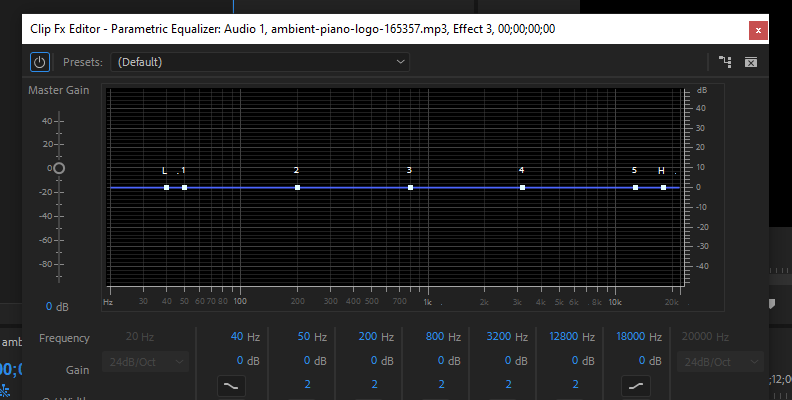
Step 3. Identify and Address Problem Frequencies
Wind noise often manifests as low-frequency rumble, so examine the lower end of the frequency spectrum in the EQ graph (around 20 Hz to 250 Hz). Use the low-cut band (often labeled "HP" for High-Pass or "Low") and slowly decrease the gain to attenuate the low-end frequencies. Start around 80 Hz and gradually increase the cutoff frequency while listening for the reduction of wind noise without negatively impacting the dialogue.
If the wind noise extends beyond the low-frequency rumble, you'll need to use the bell filters to identify and reduce those specific frequencies.
- Sweep and identify: Set a narrow Q-factor (bandwidth) and a high gain boost (e.g., 6-10 dB) on a band to make the problematic frequencies more apparent. Slowly sweep the center frequency across the lower and mid-range frequencies, listening for areas where the wind noise becomes more pronounced.
- Cut problem frequencies: Once you've identified the problem frequencies, reduce the gain (e.g., by 3-5 dB) using a narrow or medium Q-factor to eliminate the wind noise while minimizing its impact on the rest of the audio.
Step 4. Fine-tune for Balance
Constantly monitor the audio as you adjust the EQ settings to ensure you are only reducing wind noise and not affecting dialogue or other desired elements.
Do not forget to experiment with Q-factor. The Q-factor controls the width or sharpness of the filter curve. A higher Q-factor creates a narrower band, offering more precise control, while a lower Q-factor creates a wider band, affecting a broader range of frequencies.
Please remember excessive EQ cuts can make the audio sound unnatural, thin, or hollow. Strive for subtle adjustments that achieve the desired noise reduction without compromising overall audio quality. Besides, you can also toggle the Parametric Equalizer on and off to compare the processed audio with the original and ensure your adjustments are having a positive effect.
Additional Tips
- Subtractive EQ: Whenever possible, prioritize subtractive EQ (cutting frequencies) over additive EQ (boosting frequencies) for a cleaner and more natural sound.
- Combine with other effects: The Parametric Equalizer can be combined with the High-Pass Filter and DeNoise effect for a comprehensive approach to wind noise reduction.
- Adobe Audition for advanced analysis: For extremely challenging wind noise, consider using Adobe Audition's spectral frequency display to visually identify the frequencies that need to be removed.
Method 5. How to Reduce Wind Noise in Premiere Pro Using the Dynamics Effect (with Noise Gate)
The Dynamics effect in Premiere Pro includes a Noise Gate, which can be useful for reducing wind noise in certain situations. Unlike other effects that actively try to remove noise from the audio, a Noise Gate works by setting a threshold: if the audio signal falls below that threshold, the gate closes, effectively silencing the audio. When the audio rises above the threshold (e.g., when someone speaks), the gate opens, allowing the sound to pass through.
Here's how to use it:
Step 1. Locate and Apply the Dynamics Effect
Go to Window > Effects. Type "Dynamics" into the search bar, or navigate to Audio Effects > Amplitude and Compression > Dynamics. Then drag the Dynamics effect onto the audio clip in your timeline that contains the wind noise.
Step 2. Access the Dynamics Settings
Go to the Effect Controls panel and locate the Dynamics effect. Click the "Edit" button to open the Dynamics settings window.
Step 3. Configure the Noise Gate
Check the box next to "AutoGate" to activate the noise gate feature within the Dynamics effect.
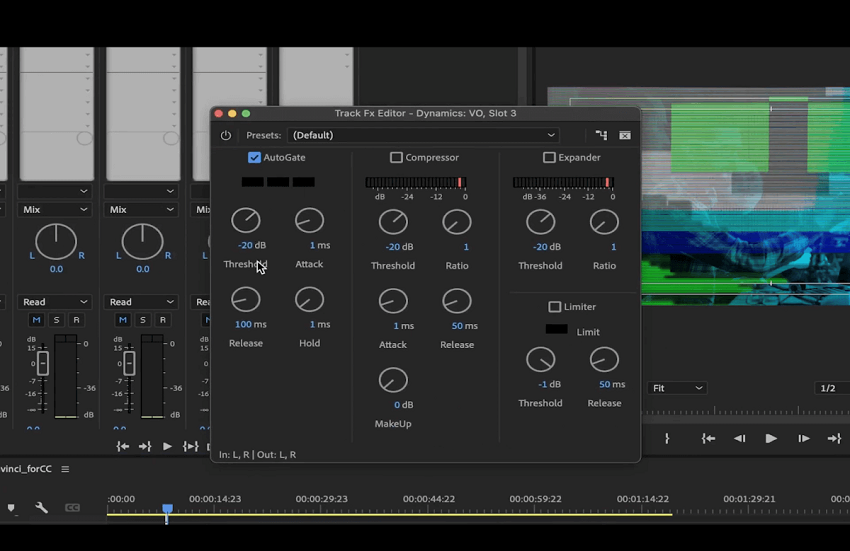
Then set the Threshold: This is the most crucial setting for the Noise Gate.
- Listen to the wind noise: Play back your audio clip and pay close attention to the level of the wind noise during sections where there is no dialogue.
- Adjust the Threshold: Slowly increase the threshold until the wind noise is silenced during the quiet sections. You'll see a meter that helps you visualize the audio level. Set the threshold just above the wind noise level but below the level of the dialogue.
- Tip: If the threshold is set too high, parts of the dialogue might get cut off (known as "chattering"). If it's too low, the wind noise won't be suppressed effectively.
Next what you need to do is adjusting the Attack and Release (this is optional):
- Attack: Determines how quickly the gate opens when the audio level rises above the threshold. A fast attack ensures that the beginning of a word isn't cut off.
- Release: Determines how quickly the gate closes when the audio level falls below the threshold. A too-fast release can create an abrupt cut, while a too-slow release might allow some wind noise to linger. Experiment with these settings to achieve a natural-sounding transition.
Step 4. Preview and Refine
After setting the threshold, attack, and release, play back your audio clip to assess the effectiveness of the noise gate. Ensure that no dialogue is being cut off and that the gate opens and closes smoothly. If needed, return to the Dynamics settings and make additional tweaks to the threshold, attack, and release to achieve the desired balance.
Important Considerations
- Best for consistent noise: The Noise Gate is most effective when the wind noise is relatively consistent and predictable, with clear gaps between dialogue.
- Less effective for fluctuating wind: If the wind noise is sporadic, strong, or constantly fluctuating, a Noise Gate might struggle to differentiate between the wind and the desired audio, leading to unnatural-sounding transitions.
- Can cause abrupt cuts: If not set carefully, the Noise Gate can create an unnatural "chopping" effect on the audio, especially at the beginning and end of words.
- Combine with other effects: The Noise Gate is often best used in conjunction with other noise reduction tools like the DeNoise effect or a High-Pass filter for a more comprehensive approach to wind noise reduction. For instance, using a High-Pass filter first can eliminate the low-end rumble, making the Noise Gate's job easier for any remaining wind noise.
How to Choose from These Five Tools and Techniques to Get the Best Wind-noise Reduction Result
The key to choosing the right tool is to understand the nature of your wind noise and the degree of control you need. Here's a suggested workflow, moving from simple to more advanced techniques:
1. Start with the Easiest Solution
Take Essential Sound panel (Reduce Rumble). This is the most beginner-friendly option. Wind noise often manifests as low-frequency rumble, which this tool is specifically designed to address. When to use? For light or moderate wind noise, especially if it's primarily a low-end rumble.
2. If Essential Sound isn't Enough, Try These
First try the High-Pass filter. This is a good next step for targeting low-frequency wind noise without affecting higher frequencies. The High-Pass filter can be a quick and easy way to remove wind noise, but it might thin out your vocals if overused. When to use? If the wind noise is predominantly in the low frequencies and the Essential Sound panel doesn't quite do the job.
Next take the DeNoise effect. This tool is effective for removing background noise like wind, hum, and other ambient sounds using intelligent noise reduction techniques. DeNoise is more advanced than "Reduce Noise" in the Essential Sound panel. When to use? If the wind noise has a broader frequency range or is more persistent than what the Essential Sound panel or High-Pass Filter can handle.3. For More Precise Control
Parametric Equalizer - This allows you to pinpoint the specific frequencies where the wind noise is most prominent and reduce their gain without affecting adjacent frequencies as much. The Parametric Equalizer gives you fine control over frequency bands to reduce low-frequency noise while preserving mid and high frequencies. When to use? If the wind noise has a distinct frequency signature or if the previous methods haven't yielded satisfactory results.
4. When Gaps in Audio are Present
Dynamics Effect (Noise Gate) - A Noise Gate is effective at eliminating wind noise during silent portions of the recording, but it can cut off dialogue if the threshold isn't set carefully. Remember that it's best to use the correct microphone for windy conditions in the first place. When to use? If there are clear sections of the audio where only wind noise is present and no dialogue or desired sounds.
5. If All Else Fails
For exceptionally challenging wind noise, consider exporting the audio to Adobe Audition for more precise and advanced noise reduction tools like spectral frequency display and noise print capture.
Important Considerations
- Subtlety: Always strive for minimal adjustments and listen carefully to avoid making the audio sound unnatural, muffled, or robotic.
- A/B Testing: Toggle effects on and off to compare the processed audio with the original and ensure positive results.
- Combine Effects: For better results, try combining two or more effects, such as the High-Pass Filter and DeNoise effect.
Conclusion
Reducing wind noise in your video projects can greatly enhance the clarity and professionalism of your audio. By utilizing Premiere Pro's Essential Sound panel, the DeNoise effect, the High-Pass filter, the Parametric Equalizer tool, and the Dynamics effect, you can effectively minimize unwanted wind sounds and improve dialogue quality. Experiment with these tools to find the best combination that suits your specific audio needs, ensuring your final video delivers crisp and clear sound every time.
You May Also Like
This post was written by Brenda Peng who is a seasoned editor at Digiarty Software who loves turning ordinary photos into extraordinary works of art. With AI assistance for brainstorming and drafting, the post is reviewed for accuracy by our expert Abby Poole for her expertise in this field.