How to Fix Out-of-Focus Photos with Natural Clarity
Ever dealt with a blurry photo that just doesn't do justice to the moment? It's frustrating, right? When a photo's out of focus, the subject looks soft and the whole image feels off. If you're trying to salvage those blurry shots and make them clearer, you're in the right place. This guide is designed for photographers of all levels. We will walk you through everything you need to:
- Diagnose the different types of blur in your photos.
- Learn powerful techniques using both AI and manual tools.
- Choose the best software for your specific needs and budget.
Why Is Your Photo Out of Focus
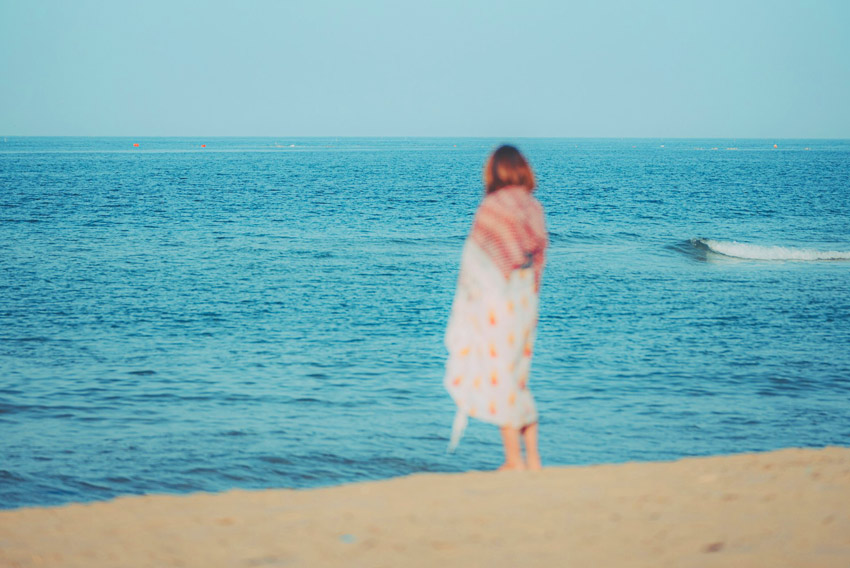
When a photo is out of focus, it simply means the camera wasn't able to lock onto the subject properly, leaving the image blurry. Instead of the sharp details you want, you're left with a fuzzy picture where the subject doesn't stand out. So, what went wrong? Here are a few common reasons why your photos might end up out of focus:
Incorrect Focus Point Selection
Most cameras, especially smartphones and digital cameras, let you choose a focus point. If you don't select the right focus point, or if the camera guesses wrong, it might focus on the background or something else instead of your main subject. For example, if you're photographing a person, you want to make sure the focus point is on their face or eyes, not the background.
Shallow Depth of Field
"Depth of field" refers to how much of your photo is in focus from front to back. A shallow depth of field means only a small slice of your image is sharp, and the rest is blurry. Using a wide aperture (like f/1.8, f/2.8) creates a shallow depth of field, which is great for portraits to blur backgrounds, but it also means focus needs to be very precise. If you slightly miss focus with a shallow depth of field, the blur will be very noticeable.
Subject or Camera Movement
Even with perfect initial focus, the moment the shutter opens, time elapses. If anything within the scene changes its position relative to the camera's focal plane during this exposure, the captured image will show motion blur, and the originally sharp point of focus will appear soft.
Minimum Focus Distance
Every lens has something called a minimum focus distance. Essentially, it's the closest distance you can shoot a subject while still keeping it sharp. This limitation comes from the way a lens is designed—how its internal elements move to focus light on the camera's sensor. If you try to photograph something closer than this distance, the image will end up blurry.
Sometimes, a dirty lens, a fingerprint smudge, or even a lens malfunction can throw off the focus, making your photos come out unclear. Understanding these common causes of out-of-focus photos is key. Not only can it help you figure out why your shots are blurry, but it also gives you a heads-up to prevent it from happening next time you're shooting.
Now that we know why photos can go out of focus, let's talk about how to fix them and bring that sharpness back.
4 Methods to Fix Out-of-Focus Photos Effeciently
While preventing shooting out of focus photos in the first place is ideal, sometimes you can't avoid it, or you have existing photos that are already out of focus. Thankfully, there are a range of software tools designed to help fix out of focused photos. Let's explore some of the most effective software solutions.
Reduce Blurriness and Fix Out-of-Focus Photos with AI
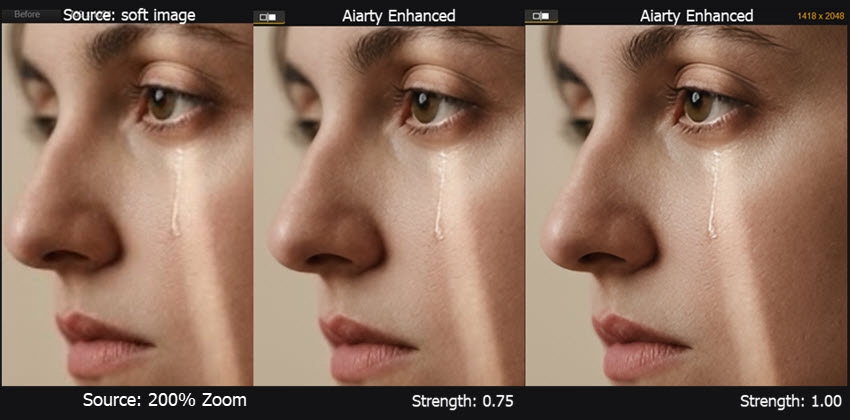
For low-resolution, blurry, soft, and noisy photos, using Aiarty Image Enhancer to improve photo clarity and enhance overall quality is an efficient solution. Besides fixing softness and slightly blurred images, this desktop-based software also allows you to reduce image noise, upscale to 2K, 4K, 8K and higher resolutions, and restore natural details to the image.
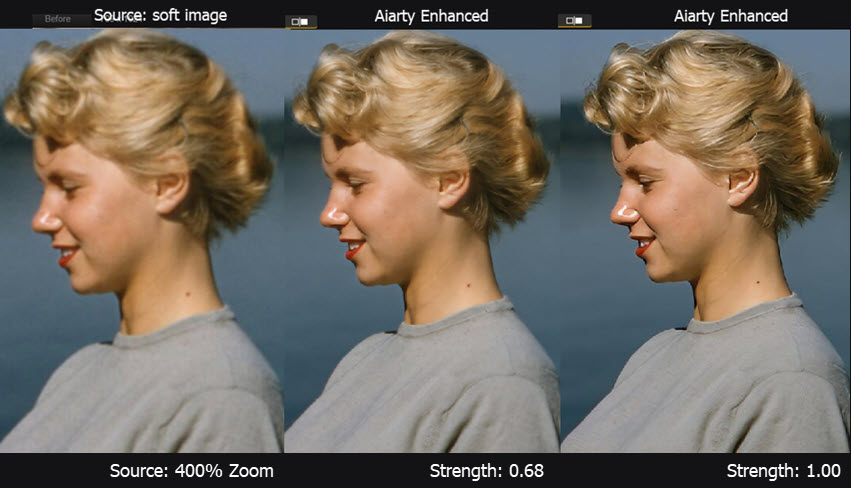
To avoid over-sharpening and retain the good "grains" and "textures", you can flexibly adjust the enhancement strength. Below is a comparison of a portrait photo, deblurred and enhanced with Aiarty using different strength.
You can also get test images to try it out yourself. You can check this story from Photographer Bill Maynard, who shared hands-on test of Aiarty when improving the quality of wildlife photos.
Highlighted features of Aiarty:
- Fix imperfections like soft focus and compression artifacts while restoring details.
- Feature 5 advanced AI models optimized for diverse image enhancement.
- Upscale photos by 2x, 4x, or 8x to achieve astonishing 4K, 8K, or 32K.
- Restore natural and realistic details for skin, hair, textures, with strength control.
- Batch deblur, enhance, upscale, and restore images securely offline.
Free download Aiarty Image Enhancer and fix out-of-focus photos now!
Step 1. Import the soft, out of focus photos.
Download, install, and run Aiarty Image Enhancer. Drag and drop your original, out-of-focus photos directly into the program to import them.
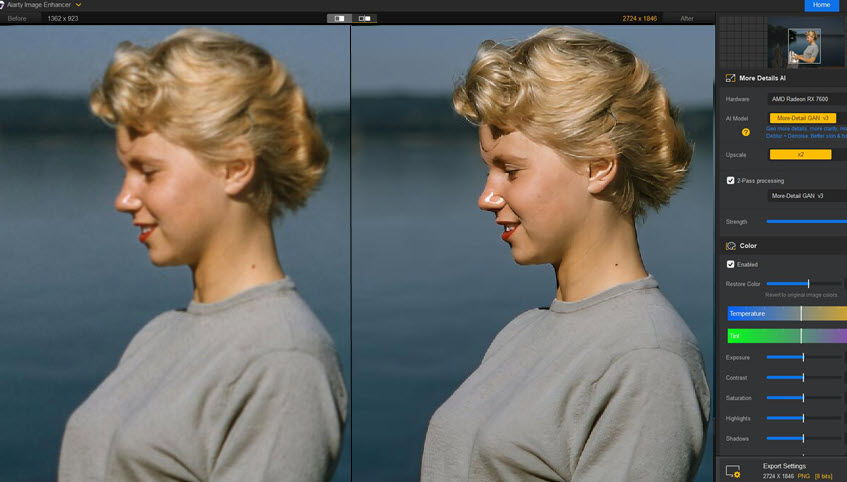
Step 2. Choose the AI Model.
Aiarty Image Enhancer provides five advanced AI models, each designed to optimize image quality for different photo types. For fixing out-of-focus photos, I highly recommend choosing between More-Detail GAN v3 and Real-Photo v3:
- More-Detail GAN v3 excels at enhancing detail-rich photos, such as those showcasing hair and fur. It significantly improves sharpness and clarity in these types of images.
- Real-Photo v3 is the best pick for photorealistic images. This model prioritizes clarity and natural fidelity while effectively deblurring and reducing noise.
Pro Tips: You can drag the Strength slider to control how strength the algorithms are applied. Then zoom-in on photos to inspect closely in real-time. For instance, I tested the following portrait photo, and strength around 0.6-0.8 works more naturally that pushing up to 1.00 value.
Step 3 (Optional). upscale your photo with details.
If you want to upscale your image, simply go to the Upscale section. There, you can choose a preset upscaling ratio, like 2x to double the resolution, or enter your desired target resolution by specifying the exact width and height in pixels.
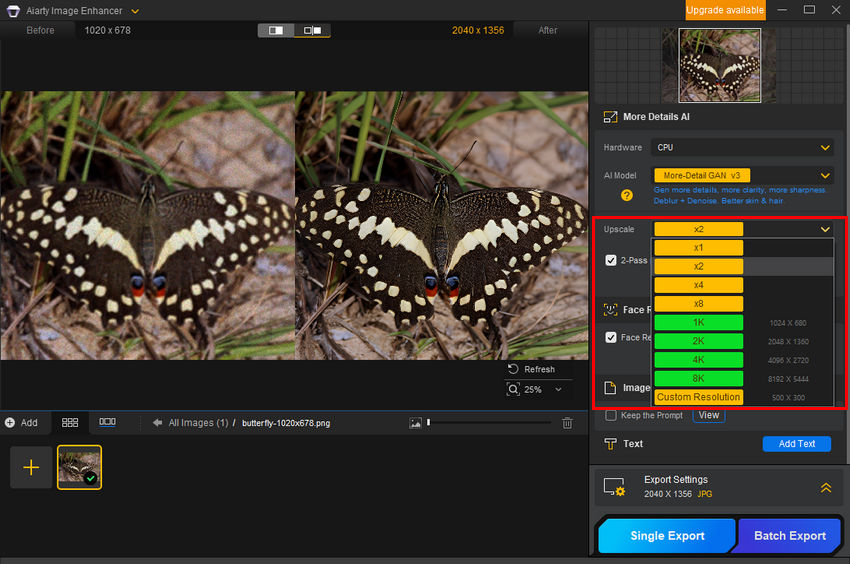
Step 4. Export the enhanced photo with a better clarity.
For even better image quality, try the 2-Pass processing. If faces in your photo are blurry, you can also select Face Restoration. Once the preview looks good, simply hit Export. Your previously out-of-focus photo will then be processed and saved – clear and sharp!
Fix Out-of-Focus Photos with Adobe Photoshop (for Pro Users)
Adobe Photoshop is the industry-leading photo editing software, trusted by professionals for its precision and versatility. It offers advanced tools like Unsharp Mask, Smart Sharpen, and High Pass Filter, which allow granular control over sharpening adjustments—ideal for salvaging mildly out-of-focus photos. Photoshop's non-destructive workflows (e.g., Smart Objects, layer masks) ensure edits remain reversible, making it a top choice for high-stakes projects.
However, it's steep subscription cost (starting at $20.99/month), complex interface, and slow performance - especially with large files or older hardware—make it impractical for casual users or those needing quick fixes.
Step 1. Subscribe to Adobe Photoshop
Visit the Adobe website and choose a Photoshop plan that fits your needs. You will need to create an Adobe account and enter your payment information to subscribe.
Step 2. Download and Install Photoshop
Once you have a subscription, download the Adobe Creative Cloud desktop application. Install the Creative Cloud app, then use it to download and install Adobe Photoshop onto your computer. This installation process may take a significant amount of time depending on your internet speed and computer specifications.

Step 3. Open Your Image as a Smart Object
Launch Adobe Photoshop. Open your out-of-focus photo by navigating to File > Open. Immediately convert the image layer to a Smart Object (Right-click on the Background layer in the Layers panel > Convert to Smart Object). This crucial step is essential for non-destructive filter adjustments, but is not immediately obvious to new users.
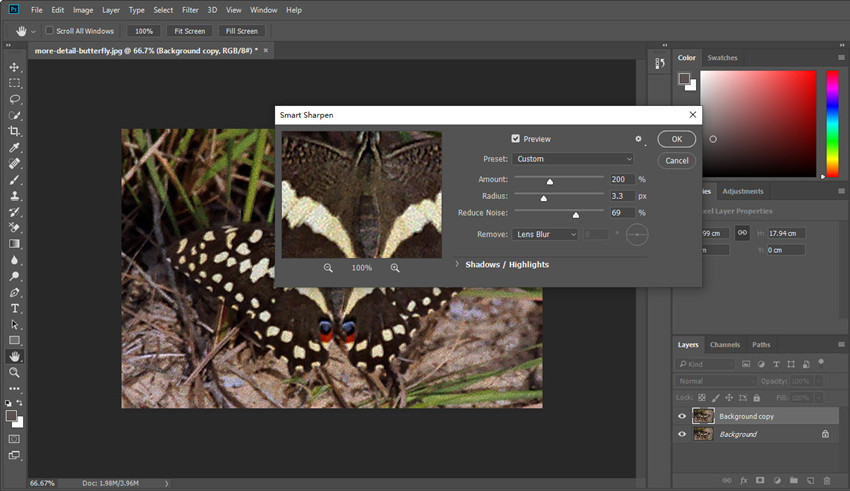
Step 4. Apply the Smart Sharpen Filter
Navigate through the menus to Filter > Sharpen > Smart Sharpen. Within the Smart Sharpen dialog box, begin experimenting with the Remove dropdown menu. Try both Lens Blur and Gaussian Blur options to discern which best matches the type of blur in your image. This process often requires experience and visual judgment. Carefully adjust the Amount and Radius sliders to subtly increase sharpness.
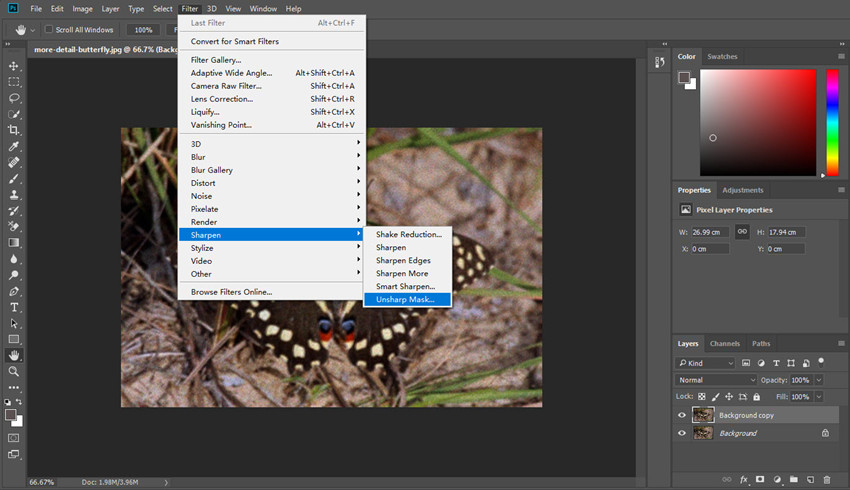
Step 5. Refine with Unsharp Mask
Click on Filter > Sharpen and choose Unsharp Mask. Use this filter sparingly, with very low Amount and Radius values, to add delicate edge detail without creating harsh halos or unnatural image artifacts.
Step 6. Selective Sharpening with Mask Layer
Add a layer mask to your sharpening layer by selecting the layer and clicking the mask icon in the Layers panel. This creates a white mask, making the sharpening visible everywhere. To target sharpening, select the mask and paint with black to hide the sharpening effect on unwanted areas and with white to reveal it on blurry areas.
Step 7. Save Your Enhanced Photo
To retain all your layered adjustments for potential future revisions, remember to save your file in Photoshop's native PSD format. If you need a flattened, shareable image for web or print, use Save As and carefully choose your desired format (JPEG, TIFF, PNG, etc.), understanding that saving as a flattened format will discard your layer-based editing workflow.
Verdict: Choose Photoshop when you have a mildly out-of-focus photo and need maximum manual control. Its filters are excellent for subtle sharpening but will not reconstruct detail in severely blurred images.
Fix Out-of-Focus Photos with Topaz Photo AI
Topaz Photo AI offers impressive AI blur and noise reduction for quickly fixing out-of-focus photos. The Autopilot will analyze your photo to detect flaws and select a corresponding model. Though this may not always working, and you can switch models and re-analyze to check the results. Using the Focus mode, Topaz Photo will try to correct soft photos, while you can also combine sharpen and grain sliders to balance the enhancement.
Step 1. Visit the Topaz Labs website to purchase and download the software installer. Follow the installation prompts to set up Topaz Photo AI on your computer.
Step 2. Launch Topaz Photo AI and open your out-of-focus photo by dragging your image file into the program window.
Step 3. Topaz Photo AI will automatically analyze your image and engage its Autopilot feature. Review the Autopilot recommendations in the right panel, particularly the suggested Sharpen model.
Step 4. Experiment with models like Standard, Strong, Motion Blur, or Lens Blur to determine which AI model yields the best visual results for your specific out-of-focus image. Use the Strength slider to adjust the intensity of the sharpening effect and the Noise Reduction slider to manage any noise.
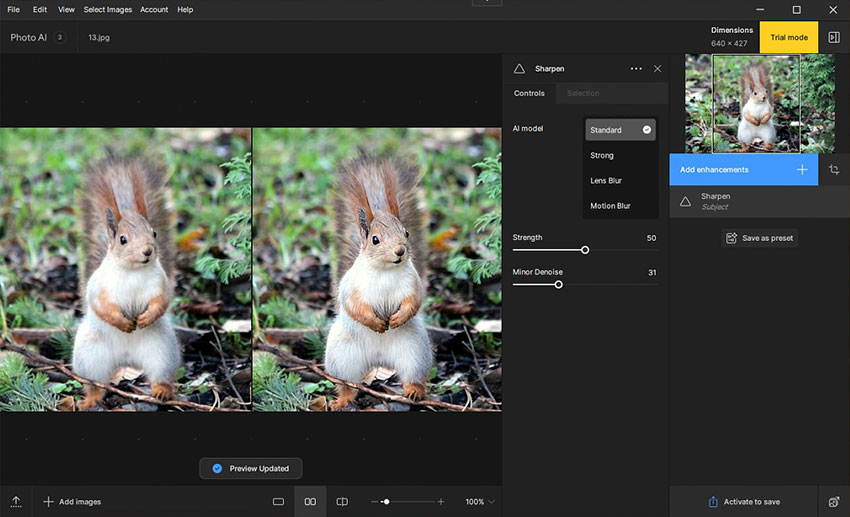
Step 5. If applicable to your image, review and adjust the Face Refinement settings. Access the Masking tool if you wish to apply sharpening selectively to specific areas of your photo, rather than globally.
Step 6. After you're happy with the deblurring and any other fixes for your out-of-focus photo, click Save Image to export the sharpened result. Select your desired file format and save location.
Note that Topaz demands significant processing power, and it can slow down performance, especially for batch processing or on lower-spec computers.
Fix Out-of-Focus Photos Online with Fotor
Fotor offers a convenient, web-based option for basic sharpening of out-of-focus photos, accessible on any internet-connected computer without downloads. Its ease of use makes it practical for quick, minor blur correction, especially for online or social media images. However, its free version has limited sharpening capabilities and may not achieve the refined results of premium desktop software, making it best suited for basic corrections rather than significant deblurring or professional restoration of out-of-focus photos.
Step 1. Go to the official Fotor website, hover over AI Tools in the top menu, and select Sharpen Image.
Step 2. Click Sharpen Image Now and upload the out-of-focus photo you want to fix. Confirm your selection by clicking Start Now.
Step 3. Fotor will automatically deblur your out-of-focus photo, restoring clarity to unclear areas. Click Apply to accept the adjustments. Be aware that this online tool might sometimes over-sharpen or slightly smear details.
Step 4. Click the Download button in Fotor to save your enhanced image. Choose your preferred web-friendly format (like JPEG or PNG) and download the sharpened photo to your computer.
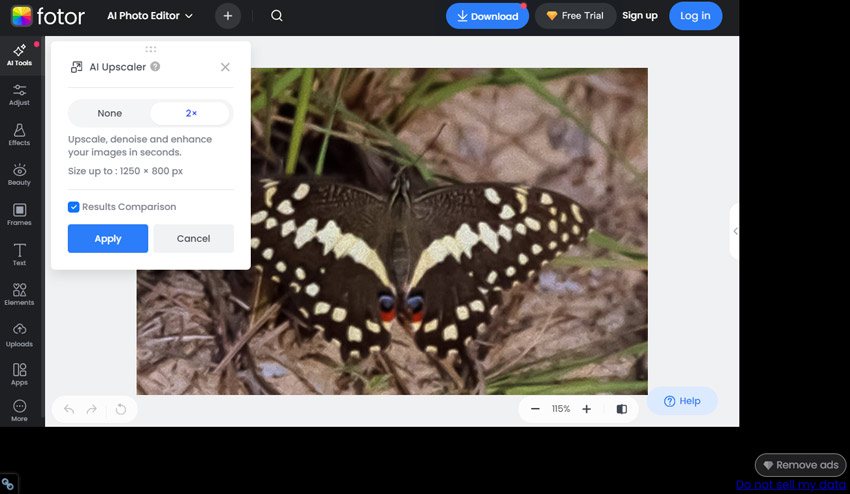
Verdict: Use Fotor for a free and fast fix for photos that are only slightly soft. It's ideal for casual image posts where perfection isn't the goal. Do not expect it to salvage significantly blurry photos.
If you are working with macOS, you can use the native Photos app or Preview app to edit photos on Mac, including steps to fix soft, blurry photos, sharpen with fine-tuning parameters (intensity, edges, falloff), and remove blemishes.
 FAQs
FAQs
Yes, AI, especially advanced tools like Aiarty Image Enhancer, can achieve remarkable results in fixing severely out-of-focus photos, going far beyond what traditional methods can do. Aiarty's generative AI is specifically designed to intelligently reconstruct lost details and tackle various types of blur, making it the best tool for bringing clarity back to even significantly blurred images.
Some sharpening methods, especially traditional ones or aggressive AI settings, can introduce artifacts, halos, or an overly "digital" look. High-quality AI tools are designed to add details and sharpen while maintaining a natural appearance, but results can vary depending on the tool and the original image quality.
It is always better to get the focus right in the camera. Software can help salvage photos, but it cannot perfectly recreate details that were never captured. Getting focus correct during shooting ensures the best possible starting point for your image.
You May Also Like
This post was written by Brenda Peng who is a seasoned editor at Digiarty Software who loves turning ordinary photos into extraordinary works of art. With AI assistance for brainstorming and drafting, the post is reviewed for accuracy by our expert Abby Poole for her expertise in this field.