Your final video resolution can determine everything from its aspect ratio to its quality, and getting it right is a crucial step in the editing process. While it's best to set your project's resolution from the start, there are times you'll need to change it mid-project. Whether you're repurposing a widescreen video for a vertical platform like TikTok or simply made a mistake with your initial setup, DaVinci Resolve offers multiple flexible methods to change your video's resolution.
This guide will walk you through the three primary ways to change resolution in DaVinci Resolve, from adjusting your entire project's settings to making a quick change in the Cut page. Understanding these methods will give you complete control over your video's output, ensuring your content always fits its intended destination perfectly.
3 Methods to Change Resolution in Davinci Resolve
Method 1: Change Resolution for the Entire Project
This is the most common and recommended approach, especially when starting a new project. Changing the resolution in the Project Settings applies the new dimensions to every timeline within that project.
Step-by-step instructions:
Step 1. Locate Project Settings: In the bottom-right corner of the DaVinci Resolve interface, click the gear icon to open the Project Settings menu. You can do this from any of the workspace pages, such as Edit, Cut, or Color.
Step 2. Navigate to Master Settings: The Project Settings window defaults to the Master Settings tab. If you've clicked elsewhere, return to this tab.
Step 3. Adjust Timeline Format: Scroll down to the Timeline Format section.
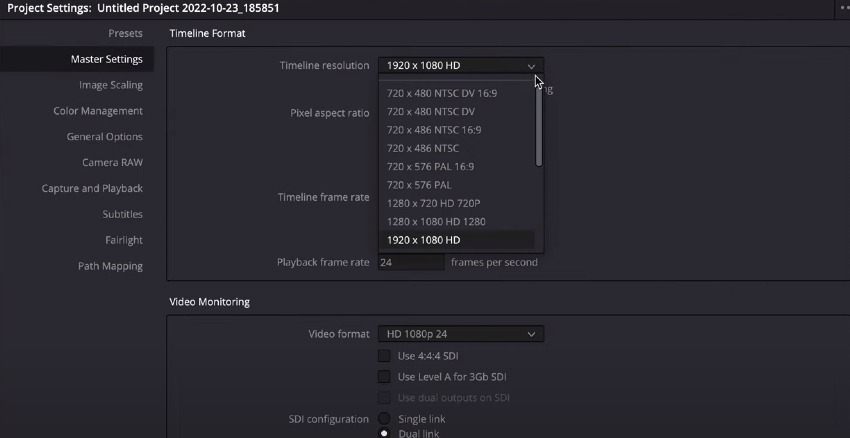
Step 4. Select a Resolution: Click the dropdown menu next to Timeline resolution. You can choose a preset: Pick from common presets like 1920x1080 (HD), 3840x2160 (Ultra HD / 4K), or 1080x1920 (Vertical); Or enter a custom resolution: If your desired resolution isn't listed, select Custom and type in the specific width and height.
Step 5. Review Mismatched Resolutions (Optional): In the Image Scaling section, you can define how clips that do not match the timeline resolution should behave.
- Scale Entire Image to Fit: This is the default. It will resize your clip to show the full image, adding black bars (letterboxing or pillarboxing) if the aspect ratios don't match.
- Scale Full Frame with Crop: This will zoom in on your clip to completely fill the frame, cropping the sides that fall outside the new aspect ratio.
- Stretch Frame to All Corners: This stretches the image to fill the frame, which can cause visual distortion.
Step 6. Apply changes: Click Save in the bottom-right of the Project Settings window to apply the new resolution to all timelines in your project.
Also see: 12 Best Open Source Video Editors like Davinci Resolve
Method 2: Change Resolution for a Single Timeline
This method gives you more precise control over individual timelines. It's particularly useful for creating multiple versions of a single project, such as a cinematic widescreen edit for YouTube and a vertical version for social media, without affecting your main project.
Step-by-step instructions:
Step 1. Access the Media Pool: Click on the Media Pool in the top-left section of the interface if it isn't already open. If you can't see it, toggle it on by clicking the "Media Pool" button (a button with three squares) in the top-left menu bar.
Step 2. Locate your Timeline: In the Media Pool, find the timeline you want to modify. You can have multiple timelines in a single project.
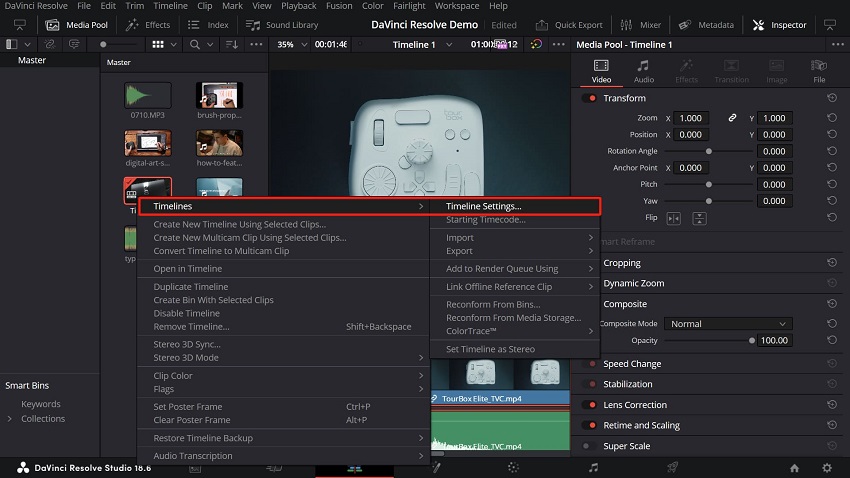
Step 3. Open Timeline Settings: Right-click on the desired timeline and select Timelines > Timeline Settings.
Step 4. Uncheck "Use Project Settings": When the Timeline Settings window appears, you will see that most options are grayed out because they are locked to the project's Master Settings. To make changes, uncheck the box next to Use Project Settings.
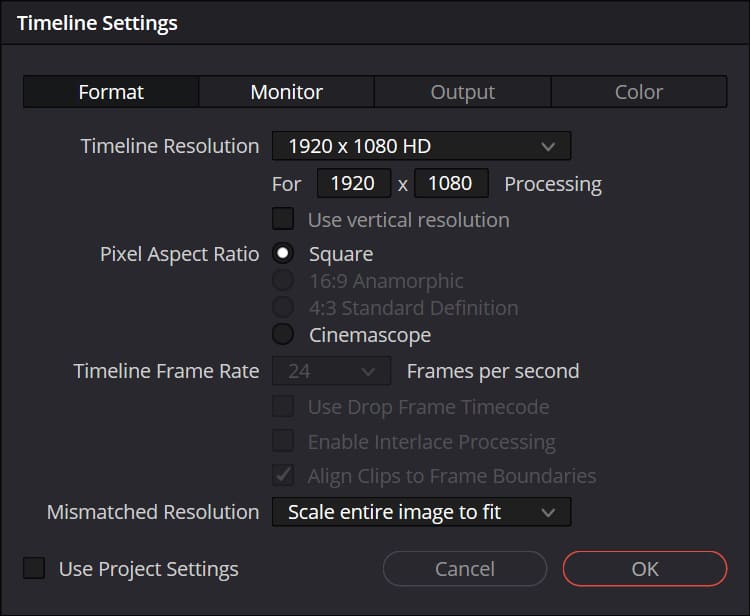
Step 5. Set the New Resolution: The resolution options will now be available. Click the dropdown menu next to Timeline resolution to choose from common presets like 1920x1080 (HD), 3840x2160 (Ultra HD), or 1080x1920 (Vertical). To set a custom size, select Custom from the dropdown menu and enter your desired width and height values.
Step 6. Review Mismatched Resolutions (Optional): If you are using clips with different dimensions than your new timeline, you can control how they are displayed in the Image Scaling section. The settings here will only apply to this specific timeline.
Step 7. Apply Changes: Click OK to save the new resolution for this timeline.
Method 3: Change Resolution Using the Cut Page
This method is the quickest way to change the aspect ratio for your entire timeline using common presets, like changing a horizontal video to a vertical one for social media. It's a faster route to achieve the same result as Method 2 for the current timeline, without the extra clicks.
Step-by-step instructions:
Step 1. Open the Cut page: Click the Cut page icon at the bottom of the DaVinci Resolve interface. It is located to the left of the Edit page icon.
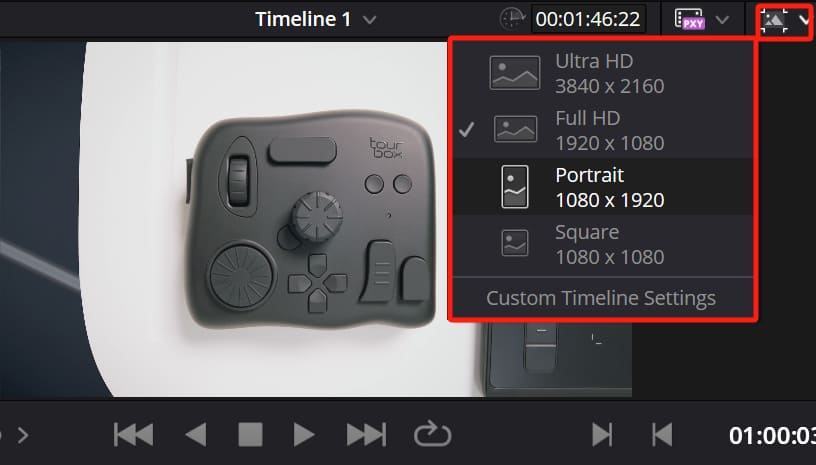
Step 2. Access the Timeline Resolution menu: Look in the top-right corner of the viewer, just below the "Fullscreen" button. You will see a button with a dropdown arrow and the current timeline's aspect ratio.
Step 3. Select a preset: Click the dropdown arrow to reveal a list of preset resolutions. You can choose from standard sizes like: 3840x2160 (Ultra HD / 4K), 1920x1080 (HD), 1080x1920 (Vertical), 1080x1080 (Square), etc.
Step 4. Create a new timeline: Selecting a new preset will automatically create a new timeline in your Media Pool with the new resolution. Your original timeline will remain untouched.
Step 5. Access custom settings: For a specific or custom resolution, select Custom Timeline Settings from the same dropdown menu. This will open the Timeline Settings panel (the same one used in Method 2) where you can make precise adjustments.
Pro Tip: How to Change Resolution with Much Higher Quality
Are your videos suffering from jerky motion, stuttering, or an unappealing "slideshow" look? Traditional video editors like DaVinci Resolve can change a clip's frame rate, but this often leads to quality loss through basic frame blending or duplication. The result is often unnatural motion, especially in fast-paced scenes or when creating slow motion.
That is where AI video enhancers come in. And a big star of them is Aiarty Video Enhancer.
Aiarty is totally different from DaVinci Resolve. Powered by a sophisticated AI interpolation engine, it intelligently analyzes the movement between frames and generates entirely new, realistic frames to fill in the gaps.
Unlock the power of AI frame interpolation and get cinematic results:
- Change video resolution from 720p to 4K, or customize it in any option you prefer.
- Buttery smooth motion: Convert standard 24fps or 30fps footage into seamless 60fps or even 120fps video for professional-grade fluidity.
- Stunning slow motion: Achieve dramatic, super-smooth slow-motion effects without the stuttering or artifacts common with lesser methods.
- No more guesswork: Aiarty's AI handles the complex motion prediction for you, ensuring every new frame is consistent and visually natural.
- Enhance and upscale in one tool: Use Aiarty's AI models to not only increase your frame rate but also denoise, deblur, and upscale your video to 4K or higher for a complete visual makeover.
Don't settle for frame duplication or motion blur. Give your video motion the AI upgrade it deserves. With Aiarty Video Enhancer, you can fix choppy footage and produce silky-smooth results with just a few clicks.
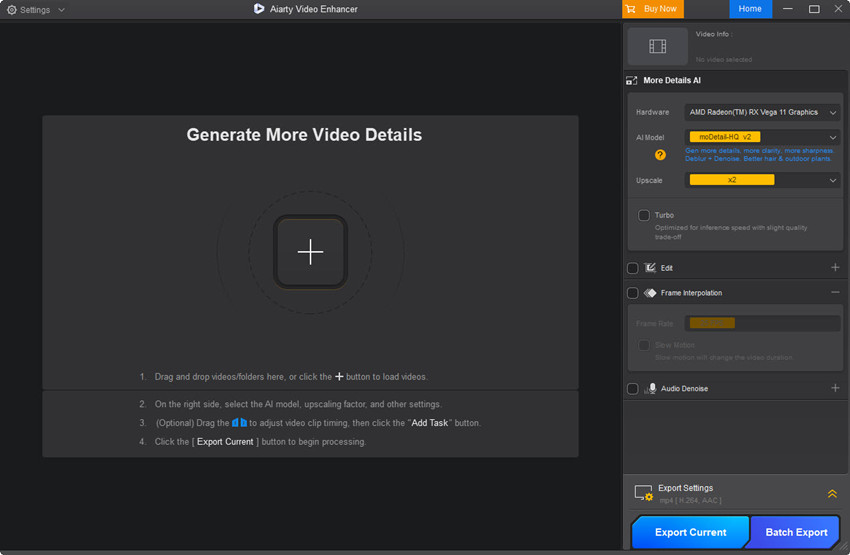
Step 1. Run Aiarty Video Enhancer on your computer after installation finishes.
Step 2. Drag your video file into the workspace. Multiple videos can be loaded if you want to run batch processing.
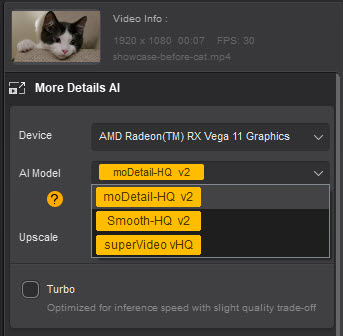
Step 3. From the AI Model drop-down menu, on the left panel, pick the option that best fits your footage.
Step 4. In the Upscale menu, choose a target resolution as the output resolution.
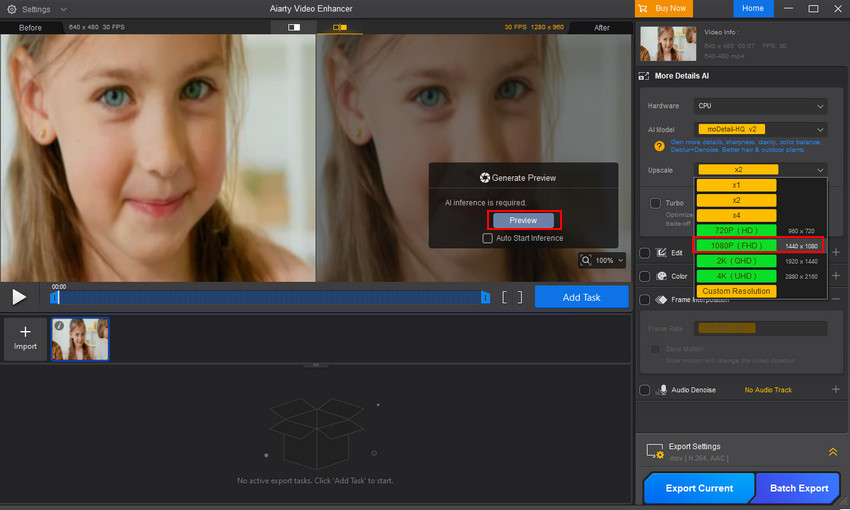
Step 5. Choose the Export Current button for one clip or Batch Export button for multiple files to export your video with a new resolution.
Conclusion
Ultimately, DaVinci Resolve offers a robust and flexible set of tools for managing your project's resolution. Whether you need to set a standard resolution for a brand new project, adjust a specific timeline for a social media export, or quickly reframe in the Cut page, the software provides the right method for the task.
By understanding the purpose of each approach, you can maintain full creative control and ensure your video looks exactly as intended for its final destination. As a final best practice, it's always a good idea to set your resolution at the beginning of a project to save time on reframing later, but now you know how to adapt your workflow no matter when the need arises.
You May Also Like
This post was written by Ashley Brown, a videographer turned AI explorer. As an associate writer at Digiarty Software, she dives into the latest AI-powered tools for video enhancement and content creation, offering practical insights and unbiased commentary. Accuracy confirmed by Abby Poole.