Changing a video's frame rate is a fundamental editing task, but it can be a source of frustration if you don't know the proper methods. In a powerful and feature-rich program like DaVinci Resolve, there's more than one way to get the job done, depending on your workflow and the stage of your project. Whether you're starting fresh, adjusting an existing timeline, or conforming a high-frame-rate clip for a stunning slow-motion effect, knowing the right technique is key.
This guide will walk you through the three primary methods for changing frame rates in DaVinci Resolve. We'll start with the most basic approach for new projects, then cover the necessary workarounds for existing edits, and finally show you how to interpret clip attributes for cinematic slow-motion. By the end, you'll have all the tools you need to take control of your frame rates and ensure a smooth, professional result every time.
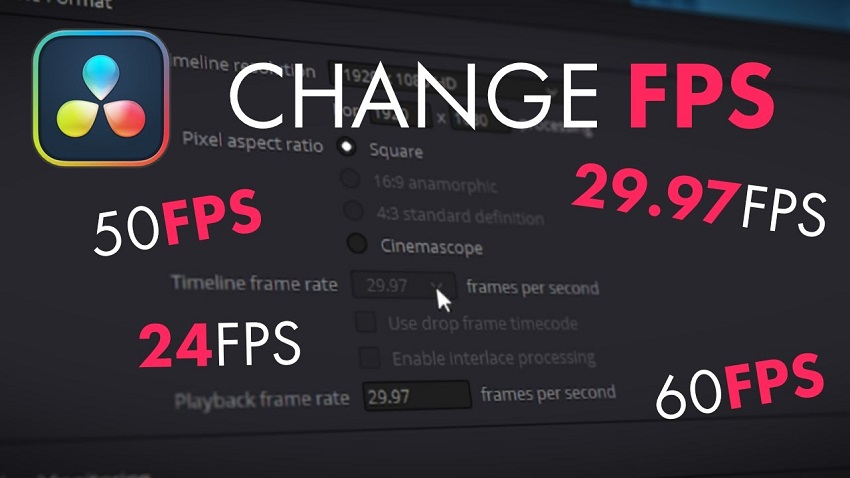
3 Methods to Change Frame Rate in Davinci Resolve
Method 1: Change the Project FrameRate (Before Importing Media)
This is the most straightforward method and should be the one you use when starting a new project. Setting the project frame rate before you import any footage prevents potential frame rate conflicts and quality issues later on. This setting will be applied by default to every timeline you create within that project.
How to set your project frame rate:
Step 1. Open the Project Manager. Launch DaVinci Resolve. The first window you see is the Project Manager, which displays all your projects. If you are already inside a project, you can navigate back by clicking on the home icon in the bottom-right corner.
Step 2. Create a new project. Click the "New Project" button. Name your project and click Create.
Step 3. Access Project Settings. Before importing any media, click the cogwheel icon in the bottom-right corner of the interface. This will open the Project Settings window.
Step 4. Navigate to Master Settings. The Project Settings window will open to the Master Settings tab by default. You can find the frame rate option here.

Step 5. Set the Timeline Frame Rate. Under "Timeline Format," use the "Timeline frame rate" dropdown menu to select your desired frame rate. Common options include:
- 23.976 fps: The standard for feature films in the US and most online content.
- 24 fps: Used for film and sometimes for stylistic purposes.
- 25 fps: The standard for TV and video in Europe and other PAL regions.
- 29.97 fps (30 fps): The standard for TV and video in North America and NTSC regions.
- 50, 59.94, or 60 fps: Higher frame rates that are great for capturing fast action, like sports or gaming footage, and can be used to produce smooth slow-motion effects when conformed to a lower frame rate.
Step 6. Match Playback Frame Rate (Recommended). For best playback performance, ensure that your "Playback frame rate" also matches your "Timeline frame rate." This is not essential for the final export but can help with smooth editing.
Step 7. Save your settings. Click the Save button to lock in your frame rate for the project. After this, you can import your media and begin editing with confidence.
Important Considerations if You are Beginners
- You can't go back: Once you import any media or place a clip on the timeline, this project-level frame rate setting becomes locked and grayed out. If you later realize you need a different project frame rate, you will have to create a new timeline with custom settings and copy your work, as outlined in Method 2.
- The first imported clip sets the rate: If you forget to set your project frame rate and import a clip, DaVinci Resolve will automatically detect the clip's frame rate and prompt you to either "Change" the project settings to match or "Don't Change". This happens only for the first clip. Choosing "Change" can save time, but it's best to be intentional about your frame rate from the start.
- Best practice: When you are starting a new project, always navigate to Project Settings immediately after creating it to confirm your frame rate. It only takes a moment and will prevent headaches later on.
Method 2: Change an Existing Timeline's Frame Rate
This method is for when you have already started editing and can no longer change your project's main frame rate settings. DaVinci Resolve locks the project frame rate once a clip has been added to a timeline to prevent issues with existing edits. The workaround is to create a new timeline with the desired frame rate and copy the contents from your old timeline into the new one.
How to create a new timeline with a different frame rate:
Step 1. Open the Media Pool. You can find the Media Pool panel in the top-left corner of the Edit page. If you can't see it, make sure the "Media Pool" button is enabled in the top-left section of the interface.
Step 2. Create a new timeline. Right-click inside the Media Pool panel, and navigate to Timelines > Create New Timeline. Alternatively, use the shortcut Ctrl+N (Windows) or Cmd+N (Mac).
Step 3. Name your new timeline. In the dialog box that appears, give your new timeline a descriptive name, like "My Edit 24fps" or "Final Version 30fps".
Step 4. Set the custom frame rate. Uncheck the box labeled "Use Project Settings". This is the critical step that allows you to override the locked project frame rate. Go to the Format tab. Use the "Timeline frame rate" dropdown menu to select the new frame rate you want for this timeline.
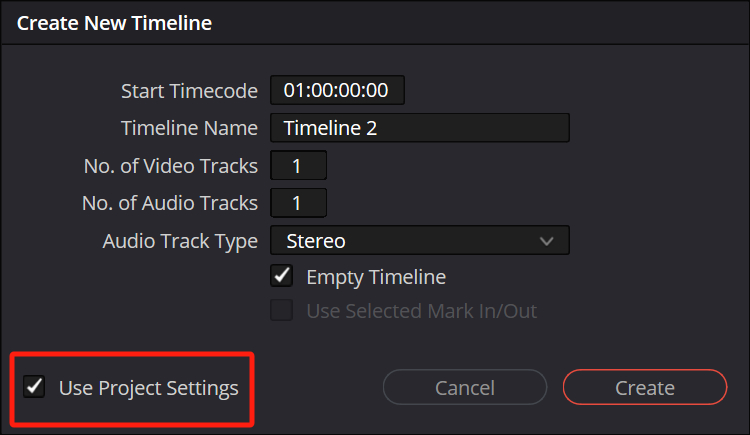
Step 5. Create the timeline. Click the Create button. The new timeline will appear in your Media Pool.
Next it's time to copying your edits to the new timeline.
Step 1. Open your original timeline. Use the timeline dropdown menu located above the viewer to switch from your new, empty timeline back to your old one.
Step 2. Select all clips. Click anywhere on your timeline and press Ctrl+A (Windows) or Cmd+A (Mac) to select all the clips on your timeline.
Step 3. Copy the clips. Press Ctrl+C (Windows) or Cmd+C (Mac) to copy everything you have selected.
Step 4. Open your new timeline. Switch back to your newly created timeline.
Step 5. Paste the clips. Click on the first track of your empty timeline and press Ctrl+V (Windows) or Cmd+V (Mac) to paste your edits.
What to Expect and Consider
- Edits will be preserved: All your cuts, transitions, effects, and audio adjustments will be copied over to the new timeline.
- Frame interpolation: The pasted clips will now conform to the new frame rate. For example, if you copy from a 30fps timeline to a 24fps timeline, Resolve will drop extra frames. If you are going from a lower to a higher frame rate, it will duplicate frames.
- Best for finishing: This method is ideal when you've done the majority of your editing and need to export a final version in a different frame rate for a specific platform or delivery requirement.
Method 3: Interpret a Clip's Frame Rate (for Slow-Motion)
This method, often called "conforming," changes how an individual clip is interpreted within your project. It is most useful for creating high-quality slow-motion footage, especially when you have shot your clip at a higher frame rate (e.g., 60fps or 120fps) than your project's timeline frame rate (e.g., 24fps). By changing the clip's attributes in the Media Pool, you force DaVinci Resolve to play every single frame, resulting in a smooth, cinematic slow-motion effect.
How to interpret a clip for slow motion:
Step 1. Locate the clip in the Media Pool. Go to the Media page or the Media Pool panel in the Edit page. Find the specific video clip you shot at a high frame rate.
Step 2. Access Clip Attributes. Right-click the clip and select Clip Attributes... from the context menu.
Step 3. Change the Video Frame Rate. In the "Video" tab of the Clip Attributes window, find the "Video Frame Rate" dropdown menu.
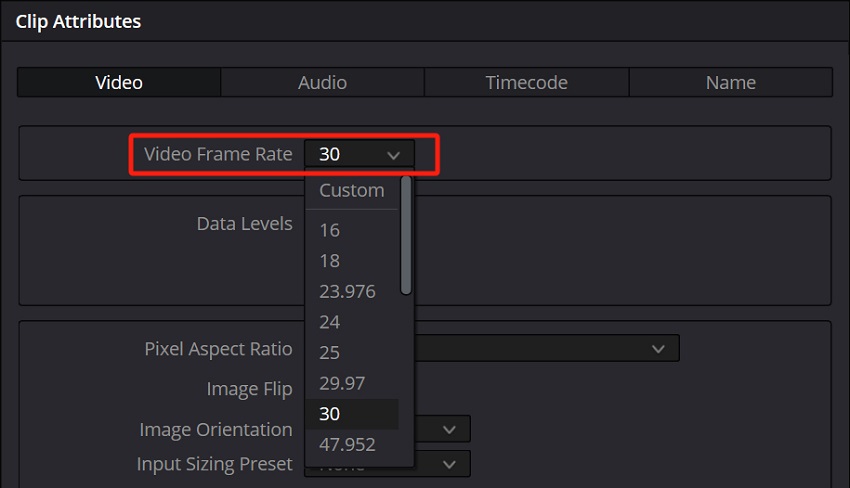
Step 4. Match the timeline frame rate. Change the frame rate of the clip to match your timeline's frame rate (e.g., set a 60fps clip to 24fps). This tells DaVinci Resolve to play the clip at the new, slower speed, using all the extra frames you captured.
Step 5. Confirm the change. Click OK. The clip will now appear longer in the Media Pool and, when you drag it into your timeline, it will play back in smooth slow motion.
Important Considerations if You are Beginners
- Make the change before editing: For best results, change the clip attributes before you add the clip to your timeline. If you change the frame rate after the clip has been edited, it will affect the clip's duration and could throw off your edit points.
- Affects all instances: Changing the clip's frame rate in the Media Pool affects every instance of that clip in your project. If you want to use the same clip at both normal speed and slow speed, you will need to duplicate the clip in the Media Pool and interpret the duplicate copy.
- Audio sync is lost: This method only affects the video. The audio will not be adjusted and will no longer sync with the video. For slow-motion shots, this is usually not an issue as dialogue or synchronized sound is typically not needed. For clips with important audio, consider detaching the audio before interpreting the video. When to use other methods: The "retime controls" feature is better for slowing down a clip that wasn't shot at a higher frame rate. While it can produce good results using "Optical Flow" and "Speed Warp," a clip with a natural high frame rate will always look smoother when simply interpreted.
Pro Tip: How to Change Frame Rate with An AI Way
DaVinci Resolve's methods often leave you with artifacts like ghosting and unnatural-looking motion, especially when you're trying to push your frame rate higher. You deserve better. You deserve professional results, without the steep learning curve.
Unlock truly fluid motion with Aiarty's AI frame interpolation.
Aiarty Video Enhancer uses advanced, AI-powered technology to generate brand-new, highly realistic frames in between the existing ones. Instead of just blending pixels or duplicating frames like traditional software, our hybrid AI models intelligently analyze movement to produce motion that is buttery smooth and natural-looking, even in fast-paced scenes.
The Aiarty Advantages
- Super-smooth slow motion: Create stunning, ultra-fluid slow-motion effects up to 120fps with just a few clicks. The AI intelligently handles motion, so you can forget about the jittery, distorted results of traditional speed changes.
- Simple, intuitive workflow: Forget navigating complex timelines and project settings just to change a frame rate. With Aiarty, you simply drag and drop your video, enable the frame interpolation feature, and export. It's a one-click process that saves you valuable time and effort.
- Restore old footage: Bring new life to your old, low-quality video files. Aiarty's suite of AI tools works in tandem, so you can increase the frame rate while also upscaling to 4K, removing noise, and restoring lost details—all at once.
- Offline privacy and power: All processing happens locally on your computer, so your private or client files are never uploaded to the cloud. With optimized GPU utilization, Aiarty delivers unmatched speed and security.
Stop wrestling with complicated settings and start creating breathtakingly smooth video. Download the free trial today and experience the difference AI-powered motion interpolation can make.
Step 1. Lauch Aiarty Video Enhancer on your computer. And then import your video clips into it.
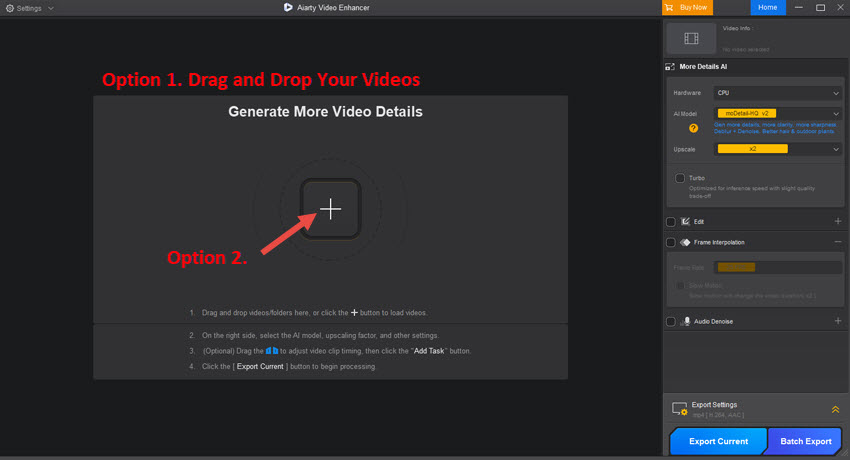
Step 2. Select the video which you want to change frame rate.
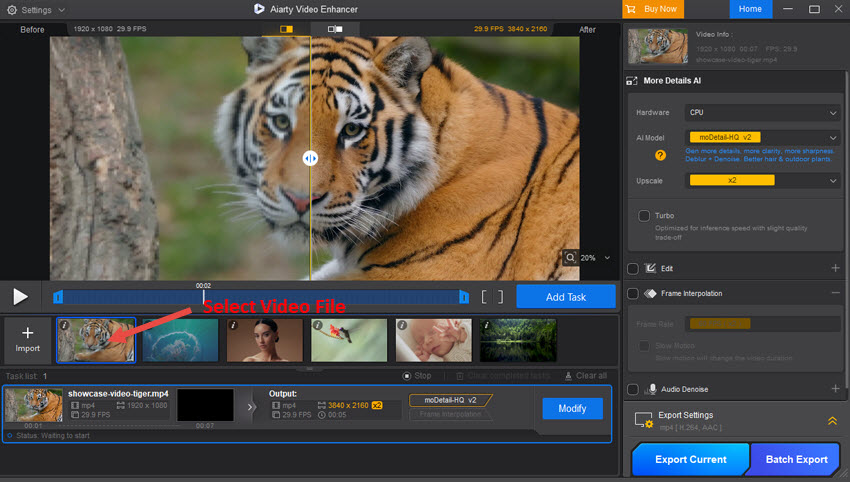
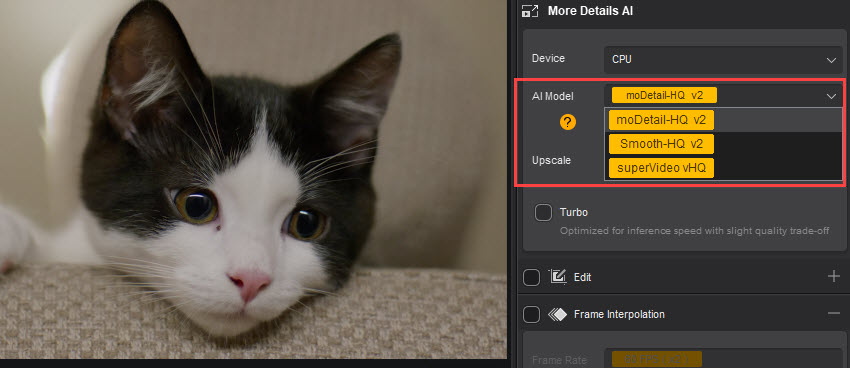
Step 3. In the right panel, choose an AI model, if you also want to enhance your video.
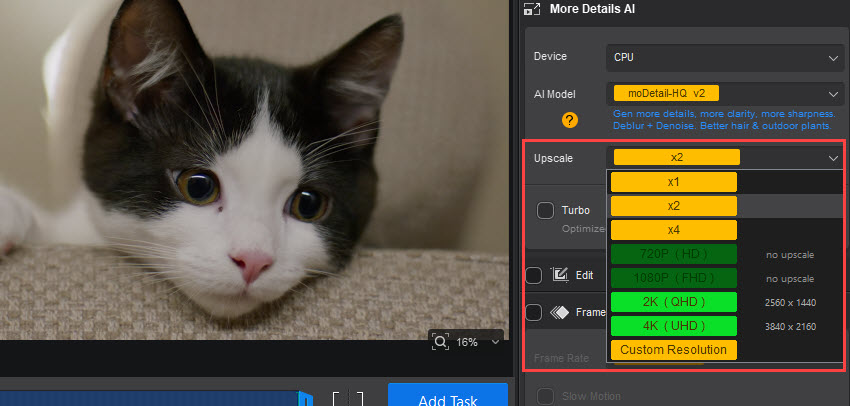
Step 4. Right below it, choose an upscaling option for your video. If you have no plan for it, simply choose the x1 option.
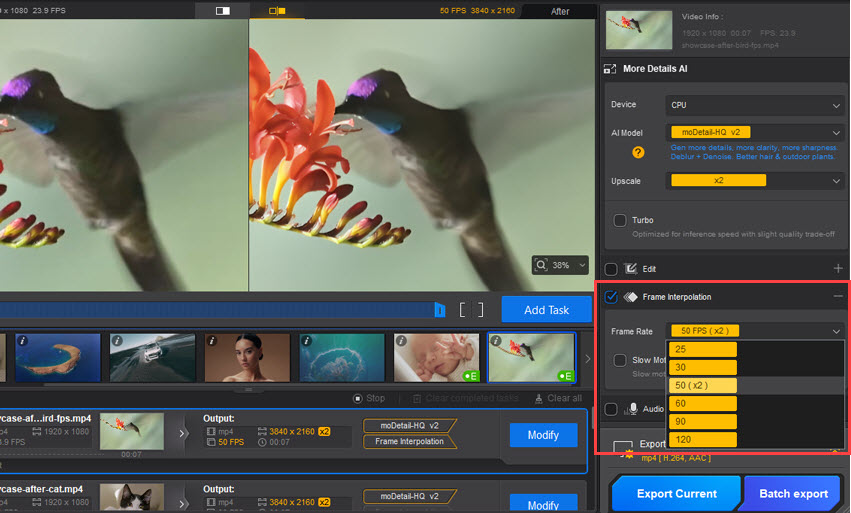
Step 5. Now move to the Frame Interpolation section. Check it, and then you can choose the frame rate option for your video in the drop-down menu of Frame Rate. Available options include standard rates like 25, 30, 50, 60 (x2), 90, and 120 FPS.
If you are creating a slow motion video, please check the Slow Motion feature, which will slow down the video's playback speed, enabling the creation of epic slow-motion sequences with AI-level smoothness.
Step 6. Simply click the Export Current or Batch Export button to save your videos.
Conclusion
With a solid understanding of these three methods, you are now equipped to handle virtually any frame rate scenario in DaVinci Resolve. For new projects, establishing your project frame rate from the start is the most seamless approach. When you're further along in your edit, you can use the new timeline method to adapt without disrupting your progress. And for creating breathtaking slow-motion effects, interpreting your clip's frame rate offers a powerful and precise way to manipulate time.
The key takeaway is that planning is paramount. By thinking about your desired frame rate and the effect you want to achieve before you begin editing, you can save a lot of time and potential headaches. Whether you're working on a cinematic 24fps project or a high-action 60fps video, mastering these techniques will give you full creative control over the motion and timing of your edits. Now, go and create something amazing!
You May Also Like
This post was written by Ashley Brown, a videographer turned AI explorer. As an associate writer at Digiarty Software, she dives into the latest AI-powered tools for video enhancement and content creation, offering practical insights and unbiased commentary. Accuracy confirmed by Abby Poole.