


If you want to know how to blur background in Lightroom, the easiest method in current versions is Lens Blur. Lightroom builds a depth map of the photo, keeps your subject or chosen focus area sharp, and applies progressively stronger blur to areas farther from that focus plane.
On Lightroom desktop, go to Edit > Lens Blur. In Lightroom Classic, open the Develop module and expand Lens Blur, then click Apply. On Lightroom Mobile, open Edit > Blur.
That is the method I use first now. The older masking technique still has its place, especially for small local adjustments, but Lens Blur usually gives a more convincing shallow-depth-of-field effect because the blur can follow depth rather than simply softening the entire background equally.
How to Blur Background in Lightroom with Lens Blur
Lens Blur works best when the photo already has a reasonably clear subject and some visual separation between foreground and background. Portraits are the obvious example, but it can also work well for wildlife, products, street photography, and even busy travel shots.
The key is not just turning the blur up. Most of the work is getting the focus range and depth map right.
Step 1: Open Lens Blur
Open your photo and find Lens Blur.
Lightroom will analyze the image and generate an AI-based depth map. On a straightforward photo, this is usually quite fast. Once the analysis finishes, you will see the main blur controls. If you cannot find Lens Blur at all, check that Lightroom is up to date. Older tutorials often use the Adjustment Brush, Radial Gradient, or a background mask because Lens Blur either did not exist yet or was still much more limited.
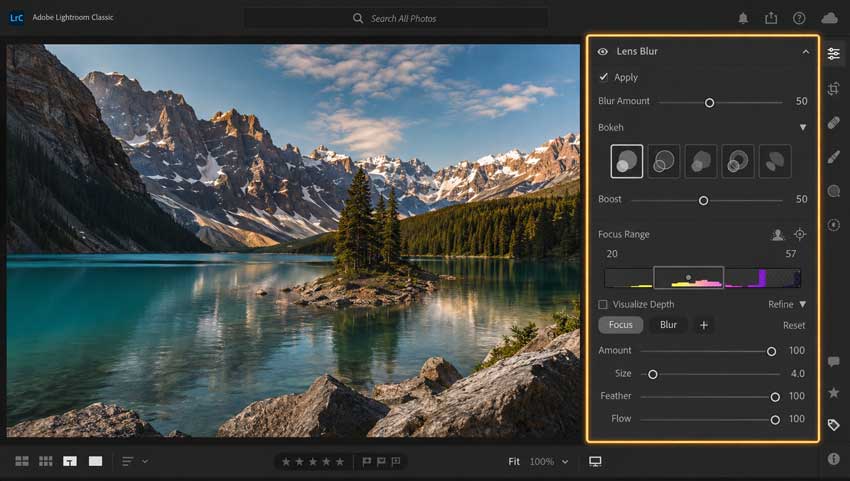
Step 2: Tell Lightroom What Should Stay in Focus
This is the part I check before touching the Blur Amount slider.
Lightroom usually does a good job of identifying the main subject, but I would not assume the first result is correct, especially when there are several people, an animal surrounded by grass, or a subject close to objects in the background.
Use Subject Focus when the obvious subject should remain sharp. If Lightroom chooses the wrong plane, use Point or Area Focus and click directly on the part of the image that should remain sharp.
For a portrait, I normally click around the face or eyes if the automatic result looks questionable. For a product shot, I choose the front surface or logo area rather than letting Lightroom guess.
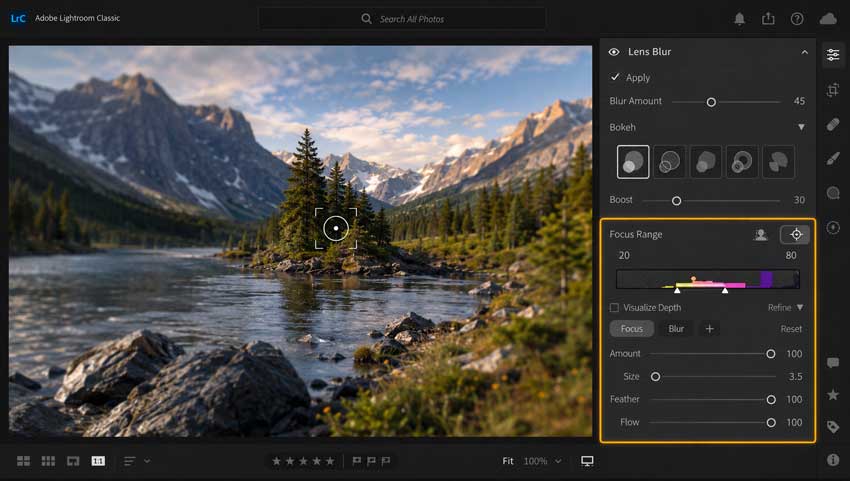
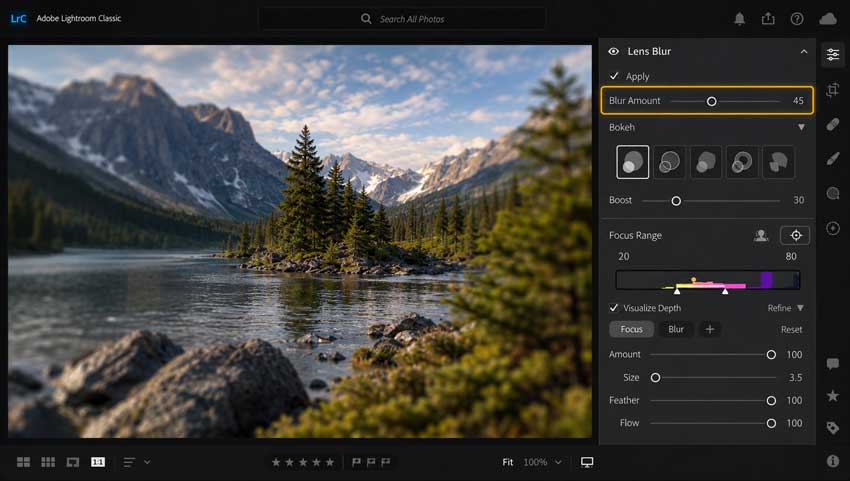
Step 3: Increase Blur Amount Slowly
Now adjust Blur Amount. There is no universal "best" setting. The right amount depends on:
- how much blur was already captured in-camera;
- the distance between the subject and background;
- the focal length and perspective of the original photo;
- how complicated the subject edges are.
I usually start lower than I think I need. That matters because Lens Blur can look impressive at first when you push it hard, but excessive blur is also where the effect begins to look artificial. You can end up with a perfectly sharp cutout floating in front of a background that looks like it was smeared onto another layer.
For a photo that already has some depth of field, a relatively small boost can be enough to clean up a distracting background without making the edit obvious.
Use the before/after toggle often. If the first thing you notice is "that background has been blurred," I would usually back it off.
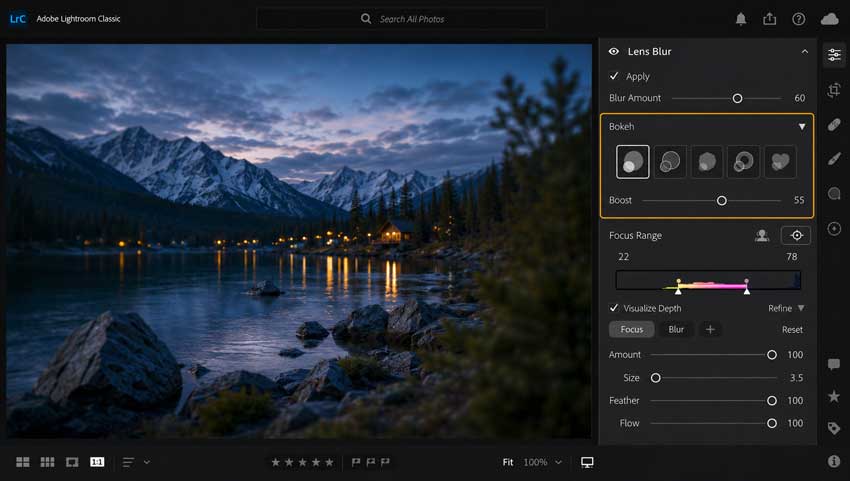
Step 4: Adjust the Bokeh Only When It Actually Helps
Lens Blur also includes Bokeh controls.
Bokeh refers to the appearance of out-of-focus points and highlights rather than simply the amount of softness in the image. These controls are most noticeable when the background contains lights, reflections, bright leaves, or other specular highlights.
For example, a night portrait with streetlights behind the subject gives you much more to work with than a portrait against a flat gray wall. You can experiment with the available bokeh styles and Bokeh Boost, but I tend to be conservative here too. Strong, bright bokeh can quickly become the most obvious part of the edit.
If the original background contains no meaningful out-of-focus highlights, changing the bokeh style may make very little practical difference.
Step 5: Check Focus Range and Visualize Depth
This is the control that makes Lens Blur much more useful than the old "mask the background and lower Sharpness" trick.
Open Focus Range and use Visualize Depth.
Lightroom will show you how it has interpreted the distance between objects in the scene. Instead of thinking of the photo as only "subject" and "background," Lens Blur is trying to understand multiple depth zones. That distinction matters. Imagine a portrait where the person is standing two meters from the camera, a table is immediately behind them, and trees are another twenty meters away.
A natural-looking result should not necessarily blur the table and distant trees by exactly the same amount. The transition should follow the scene's depth. If Lightroom has placed part of the background inside the focused range, narrow or reposition the Focus Range. If part of your subject has been classified as background, fix that before increasing Blur Amount.
Step 6: Refine the Depth Map Around Difficult Edges
Automatic depth mapping is good, but it is not magic.
The areas I check most carefully are:
- loose hair;
- animal fur;
- feathers;
- tree branches;
- grass crossing the subject;
- glasses;
- bicycle spokes;
- gaps between a person's arm and body;
- transparent or translucent objects.
Use the Refine controls and switch between Focus and Blur.
- Use Focus to paint over an area that Lightroom mistakenly pushed out of focus.
- Use Blur when something should belong to the blurred depth range but Lightroom has left it sharp.
Keep the brush reasonably soft around hair and fur. A hard correction around fine edges is one of the quickest ways to create a halo. I also prefer using a lower Flow and building the correction gradually rather than painting one aggressive stroke.
After refining, check the photo both:
- fitted to the screen; and
- at 100% zoom.
The full view tells you whether the depth effect feels natural. The 100% view exposes edge problems.
Alternative Method: Blur a Background in Lightroom with Masking
Lens Blur is not always the best answer. Sometimes I do not want to simulate shallow depth of field at all. I just want to make a distracting wall, shelf, crowd, or patch of foliage less noticeable.
That is where Masking is still useful.
Step 1. Select the Background
Open Masking and choose Select Background. Lightroom will automatically create a mask covering the background while leaving the main subject out. If the result is imperfect, use Add or Subtract with the Brush. Another option is to use Select Subject first and invert the mask, particularly if Lightroom identifies the subject more accurately than the background.
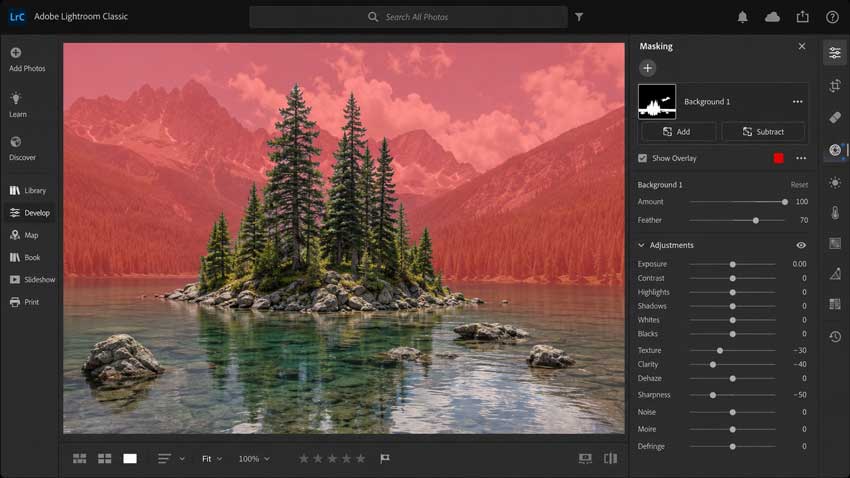
Step 2. Soften the Background
Once the background mask is active, reduce Sharpness. You can also reduce Texture or Clarity slightly, but I would not push all three aggressively. That often gives skin, foliage, architecture, and other textures an odd waxy appearance. There is an important difference here:
Masking softens the selected area. Lens Blur simulates depth-aware optical blur.
A background mask can be perfect when you only need to reduce distraction. It is less convincing if your goal is to recreate the look of a portrait shot wide open with a fast lens.
Lightroom Desktop vs Classic vs Mobile: Where Is Background Blur
The tool works similarly across Lightroom versions, but Adobe does not place it in exactly the same location.
| Lightroom Version | Background Blur Path |
|---|---|
| Lightroom desktop | Edit > Lens Blur |
| Lightroom Classic | Develop > Lens Blur > Apply |
| Lightroom Mobile | Edit > Blur |
How to Blur Background in Lightroom Classic
Open the photo in the Develop module. Expand Lens Blur and click Apply to let Lightroom generate the depth map.
From there, the workflow is essentially the same:
- Choose the correct subject or focus area.
- Set the Focus Range.
- Increase Blur Amount.
- Adjust bokeh if needed.
- Refine any incorrectly focused or blurred areas.
Classic users will still find plenty of tutorials recommending Radial Filters and negative Sharpness. Those methods still work, but they would no longer be my first choice for creating actual depth-of-field blur.
How to Blur Background in Lightroom Mobile
For Lightroom Mobile background blur, open your photo, tap Edit, and choose Blur.
You can adjust the overall blur strength and control which depth range remains in focus. The mobile interface is more compact, but the basic idea is the same as desktop: Lightroom estimates scene depth, then you decide what should remain sharp. Depending on the current mobile interface available on your device, you may also see a faster background-blur option under Quick Actions.
That shortcut is convenient for a quick social post. For difficult hair, objects crossing the subject, or a photo where depth matters, I still prefer the full Blur controls.
If the Photo Is Soft or Noisy Before You Blur It
One thing Lens Blur cannot fix is a weak source image.
If the subject itself is noisy, slightly soft, low-resolution, or lacking fine detail, increasing background blur can actually make the problem more obvious because the viewer's attention becomes concentrated on the sharp area.
In that situation, I treat background blur and image restoration as two separate jobs.
Lightroom is where I would handle exposure, color, masking, local edits, and depth-of-field effects. If I need stronger noise cleanup, enlargement, or detail reconstruction, I may process the finished image with something like Aiarty Image Enhancer afterward.
For example, on a cropped wildlife photo, I might use Lightroom to establish the color and background separation first, then use Aiarty Image Enhancer to upscale the final crop and recover more usable feather or fur detail. It can also be useful when the source image needs stronger noise reduction before final output.
The important distinction is that Aiarty is not a replacement for Lightroom's Lens Blur. It is more useful when the photo itself needs better detail, resolution, or noise handling after the creative edit is already where you want it.
 FAQs
FAQs
Yes. Current versions of Lightroom include Lens Blur, which uses an AI-generated depth map to keep a selected subject or focus range sharp while blurring areas at other depths.
You can also soften a background manually using Lightroom's Masking tools.
Yes. On Lightroom desktop and Lightroom Classic, the feature is called Lens Blur. On Lightroom Mobile, you will find the equivalent controls under Blur.
Use Lens Blur and set the subject as the focus area with Subject Focus or Point/Area Focus. Then check Focus Range and Visualize Depth before increasing Blur Amount. If Lightroom still blurs part of the subject, use the Focus refinement brush to correct it.
Open the photo in the Develop module, expand Lens Blur, and click Apply. Lightroom will generate a depth map. Select the correct focus area, adjust Blur Amount and Focus Range, then refine any incorrectly focused or blurred regions.
Open the image in Lightroom Mobile, tap Edit > Blur, then adjust the blur strength and focus range. For simple photos, Lightroom may automatically identify the subject. For more complicated images, check the depth overlay and refine the focus area manually.
Yes. Lens Blur includes bokeh controls that change the appearance of out-of-focus highlights. They work best on photos containing visible background lights or reflections. Bokeh Boost can increase the effect, but subtle settings usually look more realistic.
For creating a realistic shallow-depth-of-field effect, Lens Blur is usually better because it uses scene depth rather than applying the same softening to one flat mask.
Masking is better when you only need to soften a specific distracting area or when the Lens Blur depth map struggles with the scene.
Usually because the blur is too strong or the depth map is incorrect. Check the Focus Range, inspect hair and edge transitions, and make sure nearby and distant background objects are not being blurred identically. Reducing Bokeh Boost can also help.
Yes. Lens Blur works well for enhancing background separation that already exists in the original photo. In fact, I generally find the most convincing results come from strengthening natural depth of field rather than trying to create extreme blur from a completely sharp scene.
Not completely.
Lens Blur can create a convincing shallow-depth-of-field effect in many photos, especially when the subject and background are clearly separated. But real optical blur is created by the lens at the moment of capture, so complex overlapping objects, fine hair, transparent materials, and unusual depth relationships can still reveal the difference.
For me, the best use of Lightroom Lens Blur is not turning an f/8 photo into an imaginary f/1.2 shot. It is taking a background that is slightly too busy and giving the subject just enough extra separation that the edit disappears into the photograph.
You May Also Like


This post was written by Ashley Brown, a videographer turned AI explorer. As an associate writer at Digiarty Software, she dives into the latest AI-powered tools for video enhancement and content creation, offering practical insights and unbiased commentary. Accuracy confirmed by Abby Poole.
