


How to Make a White Background Transparent in IrfanView



IrfanView can make a white background transparent using its Replace Color feature, as long as the image supports transparency. The process involves converting the image to 32 BPP with an alpha channel, setting white as the transparent color, and saving the result as a PNG.
This method works best for images with solid white backgrounds, such as logos and simple graphics. If the background is uneven or the subject contains white details, some areas may remain visible or become transparent unintentionally. Here's how to do it step by step, along with ways to troubleshoot common issues and handle multiple images.
How to Make a White Background Transparent in IrfanView
In IrfanView 4.76, you can make a white background transparent by converting the image to 32-bit color with an alpha channel and using the Replace Color feature. Follow these steps to remove a solid white background and save the result as a transparent PNG.
Step 1. Open Your Image in IrfanView
Launch IrfanView and open the image you want to edit by selecting File > Open. This method works best for images with a solid white background, such as logos, icons, and simple graphics.
Step 2. Convert the Image to 32 BPP with an Alpha Channel
Before setting white as transparent, make sure the image supports transparency.
- Go to Image > Increase Color Depth.
- Select 32 BPP (with alpha layer).
- Click OK to apply the change.
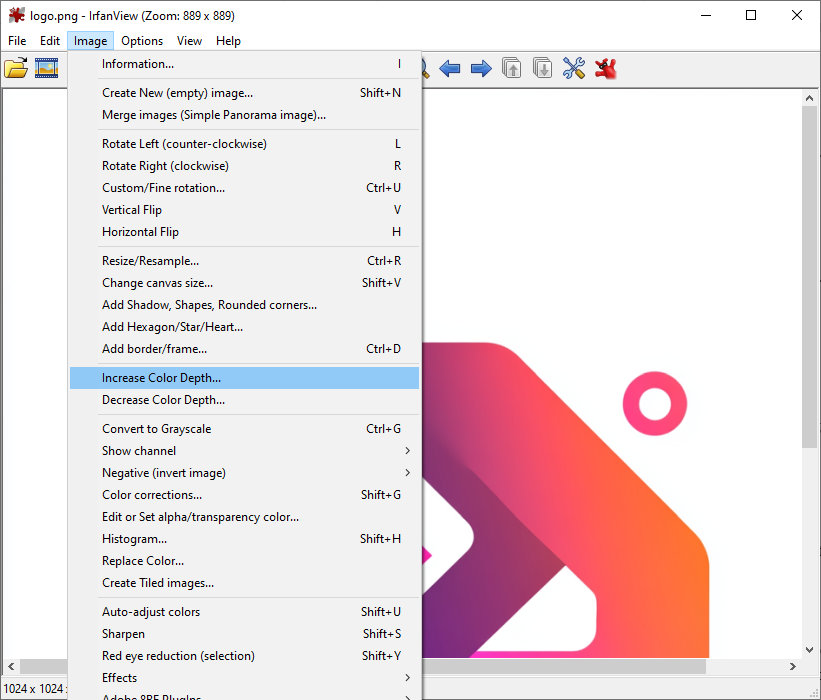
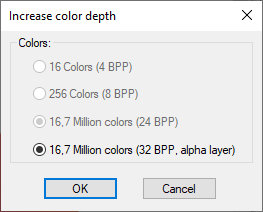
The alpha channel stores transparency information, allowing parts of the image to become transparent instead of being replaced with another visible color.
Step 3. Set White as the Transparent Color
With the image converted to 32 BPP, use IrfanView's Replace Color feature to set white as transparent.
- Go to Image > Replace Color.
- Under Replace source color, click Choose and select white. For a pure white background, the RGB value is 255, 255, 255.
- Check Set new color as transparent (for 32 BPP image).
- Click OK to apply the changes, then check whether the white background has become transparent.
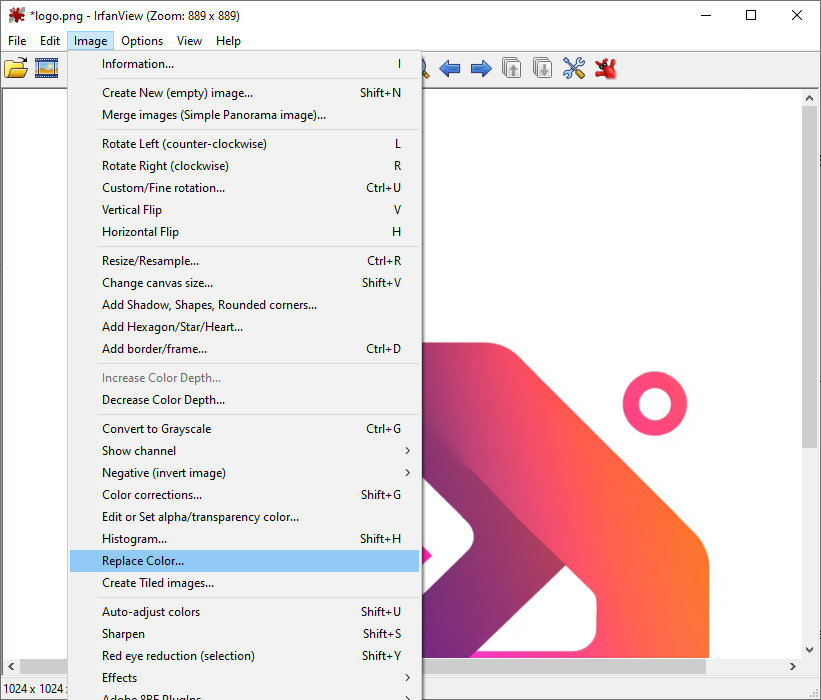
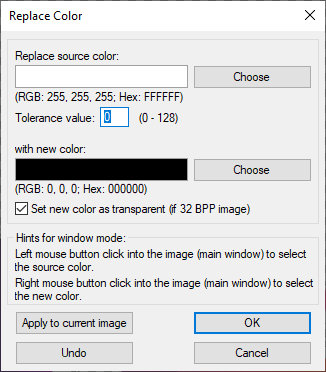
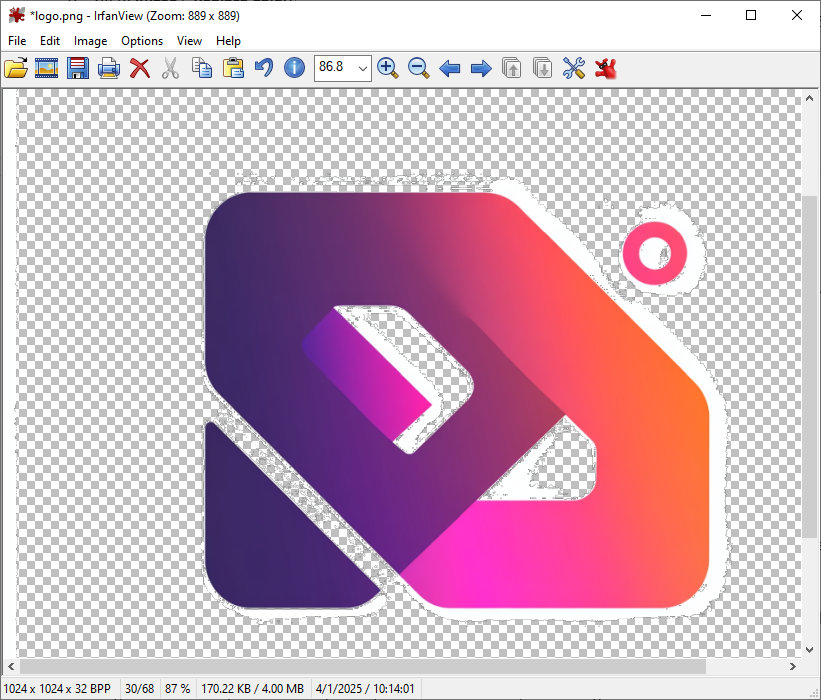
This feature is available for 32 BPP images in IrfanView 4.76. If the background is off-white or contains shadows and gradients, some areas may remain visible because their colors differ from pure white.
Step 4. Save the Image as a Transparent PNG
Once the background looks right, save the result in a format that supports transparency.
- Select File > Save As.
- Choose PNG as the output format.
- Check the PNG save options.
- Save the file under a new name so you can keep the original image.
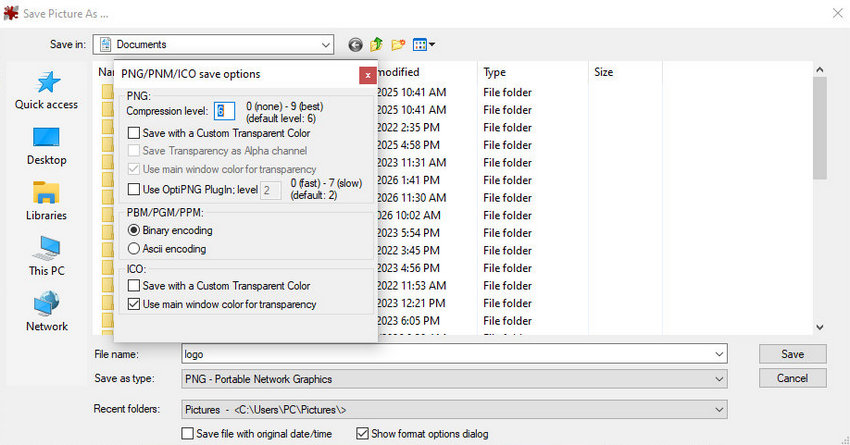
Finally, reopen the saved PNG or place it over a colored background to check the result. If the white background is still visible, verify that transparency was applied and preserved during saving.
Note: Saving as JPG will not preserve transparency. Use PNG for a transparent image.
How to Replace a Specific Color with Transparency in IrfanView
IrfanView can also make a specific color transparent, which is useful when an image has a solid background in a color other than white. The process is similar to making a white background transparent, but you need to select the actual background color you want to remove.
Set a Different Color as Transparent
- Open your image in IrfanView.
- Go to Image > Increase Color Depth and select 32 BPP (with alpha layer) if the image is not already in this format.
- Open Image > Replace Color and use Set transparent color to select the color you want to make transparent.
- Apply the change and save the image as a PNG file.
For example, if your logo has a solid blue background, select the corresponding blue color instead of white. The exact color matters, so use the color picker or the relevant RGB values when available.
What If the Background Is Off-White or Uneven?
Color replacement works best when the background consists of a single, consistent color. If the background contains off-white shades, shadows, gradients, or compression artifacts, some pixels may not match the selected color and may remain visible.
Increasing the color tolerance, if available in the relevant operation, may remove more of the background, but it can also affect parts of the subject with similar colors. This is especially noticeable around antialiased edges or on objects that contain white or other light-colored details.
If you need to preserve these details while removing a complex background, an AI background removal tool may be more suitable than replacing individual colors.
How to Batch Convert White Backgrounds to Transparent in IrfanView
IrfanView can batch-convert multiple images and set white as the transparent color using command-line options. This is useful when you have a folder of images with consistent white backgrounds. However, simply converting images to PNG will not remove their backgrounds; you must also specify the transparent color.
Use IrfanView's Command Line to Batch Remove White Backgrounds
In IrfanView 4.76, the /transpcolor option sets the transparent color when saving to supported formats such as PNG, GIF, and ICO. Follow these steps to process multiple images.
- Prepare your files. Put the images you want to process in one folder, such as C:\Input, and create a separate output folder, such as C:\Output.
- Open Command Prompt. Press Win + R, type cmd, and press Enter.
- Run the command. Replace the paths below with your actual IrfanView installation and image folders.
"C:\Program Files\IrfanView\i_view64.exe" "C:\Input\*.jpg" /transpcolor=(255,255,255) /convert="C:\Output\*.png"
If you use the 32-bit version, replace i_view64.exe with i_view32.exe. Make sure the output folder already exists.
This command processes JPG files in the input folder, sets pure white (RGB 255, 255, 255) as the transparent color, and saves the results as PNG files in the output folder. You can change the input pattern to match other supported image formats.
Important Limitations of Batch Color Replacement
This approach works best when all the images have consistent, pure white backgrounds. It does not automatically identify the subject or distinguish the background from white objects.
If the images contain off-white backgrounds, shadows, gradients, or white details on the subject, the results may be inconsistent. Review a few output files before processing an entire folder.
For mixed image collections that require different background removal settings or more precise edges, an AI background removal tool may be a more practical option.
Why Is the White Background Still Visible in IrfanView?
If the white background is still visible after you try to make it transparent in IrfanView, the image may not have been processed correctly, or the transparency may not have been preserved when saving. Here are the most common causes and how to fix them.
The Image Does Not Have an Alpha Channel
The Replace Color feature's Set transparent color option requires a 32 BPP image with an alpha channel. If the image has not been converted correctly, the white background may remain opaque.
Go to Image > Increase Color Depth and select 32 BPP (with alpha layer). Then apply the transparent color again and save the image as PNG.
The Image Was Saved as a JPEG
JPEG does not support transparency. If you save the edited image as JPG or JPEG, transparent areas cannot be preserved.
Use File > Save As and choose PNG instead. When saving, check the PNG options to make sure you are not unintentionally replacing or overriding the transparency settings.
The Background Is Not Pure White
A background that looks white may contain slightly different shades due to lighting, shadows, gradients, or image compression. Setting pure white (RGB 255, 255, 255) as transparent will not necessarily remove these nearby shades.
For simple images, try selecting the actual background color. If the background contains many shades, removing them with color replacement may also affect light-colored details in the subject.
White Halos Remain Around the Subject
White fringes can remain around the edges even after the main background becomes transparent. This often happens when antialiased edge pixels contain a mixture of the subject's color and the original white background.
Replacing only pure white pixels will not remove all these mixed-color pixels. Increasing color tolerance, where available, may help, but it can also erase white or light-colored details along the edges. For cleaner results, you may need a tool with dedicated edge-refinement controls.
The Transparent Area Looks White Only in IrfanView
A white area in the IrfanView window does not always mean the background is opaque. IrfanView can display transparent areas using the main window color, so transparency may be difficult to distinguish against a white viewing area.
To check the result, reopen the saved PNG and place it over a colored background in another application that supports transparency. If the colored background shows through, the image is transparent even if it appears white in IrfanView.
You can also check Options > Properties/Settings > Viewing and review the transparency display settings.
IrfanView Color Replacement vs. AI Background Removal
IrfanView's Replace Color feature is a practical way to make a solid white background transparent without using a dedicated background removal tool. However, color replacement works by targeting specific pixel colors rather than identifying the subject in an image. The best method depends on the background, the subject, and how much edge detail you need to preserve.
When IrfanView Is Enough
IrfanView is a good choice when:
- The background is a uniform white or another solid color.
- The subject has clear edges and contrasts strongly with the background.
- You only need to process a few images and are comfortable adjusting the settings manually.
For simple logos, icons, and flat graphics, setting white as transparent may be all you need.
When You Need More Precise Background Removal
Color replacement can be less effective when the background contains shadows, gradients, or multiple shades of white. It may also remove white details within the subject or leave pale fringes around its edges.
For these images, Aiarty Image Matting offers an alternative. Its AI models identify the foreground subject and separate it from the background, with additional tools to refine edges and adjust transparency. It is particularly useful for portraits, hair, fur, products, and objects with intricate or semi-transparent edges.
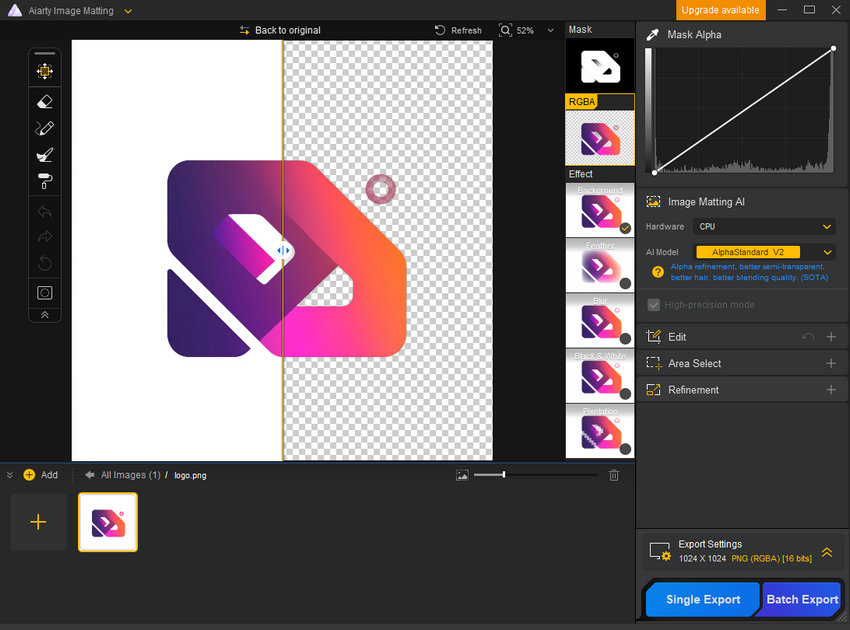
Aiarty also supports batch background removal for up to 3,000 images, which can be helpful when processing a large collection rather than manually adjusting each file.
If you only need to remove a uniform white background, IrfanView may be sufficient. If color replacement leaves unwanted edges or removes parts of the subject, try an AI-based approach instead.
You May Also Like


This post was written by Brenda Peng who is a seasoned editor at Digiarty Software who loves turning ordinary photos into extraordinary works of art. With AI assistance for brainstorming and drafting, the post is reviewed for accuracy by our expert Abby Poole for her expertise in this field.
