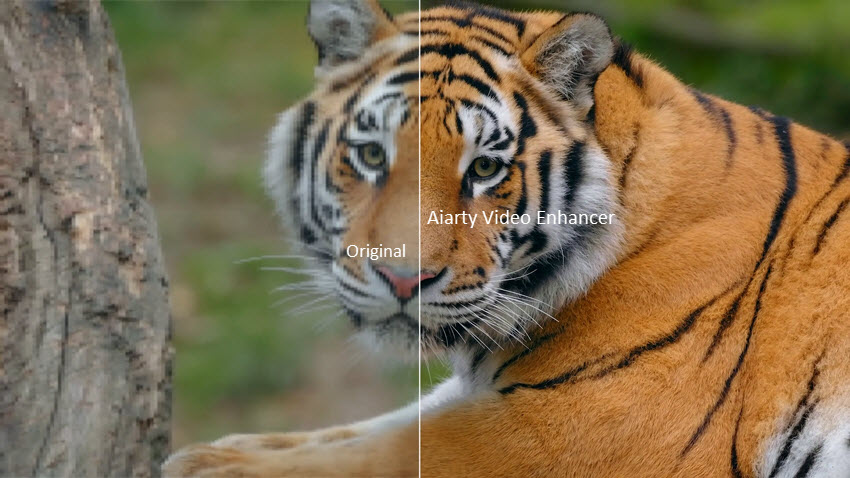
Aiarty Video Enhancer is the incredible AI video enhancer to generate details, upscale, denoise, and fix choppy, low-quality videos, preserving color fidelity and frame consistency. Leveraging a huge video training dataset, the tailored hybrid AI models can resurrect details for hair, skin, night scenes, safely processing offline at turbo speed with full GPU optimization. Here, you will find both basic tutorials and advanced techniques on this AI video enhancer. To start, please download this software.
Aiarty Video Enhancer is a powerful desktop application designed to make video enhancement easy for everyone. Thanks to advanced AI algorithms and smart optimization, it works smoothly on both Windows and Mac computers, even with moderate system configurations. To handle larger video files and achieve the fastest processing speeds for intensive tasks, we recommend a system with higher specifications. For detailed information on the minimum requirements and supported formats, please check our System Requirements Page.
1-2. Download & Install
1) Click one of the buttons below to free download Aiarty Video Enhancer. It's 100% clean and free from viruses, adware, or malware.
2) Once downloaded, proceed with the installation: on Windows, double-click the ".exe" setup file, clicking "Yes" if prompted by User Account Control; on Mac, drag the "dmg" setup file to your Applications folder. After launching the installer, simply check "I agree to the User License Agreement" and click "INSTALL" to complete the setup on your computer.
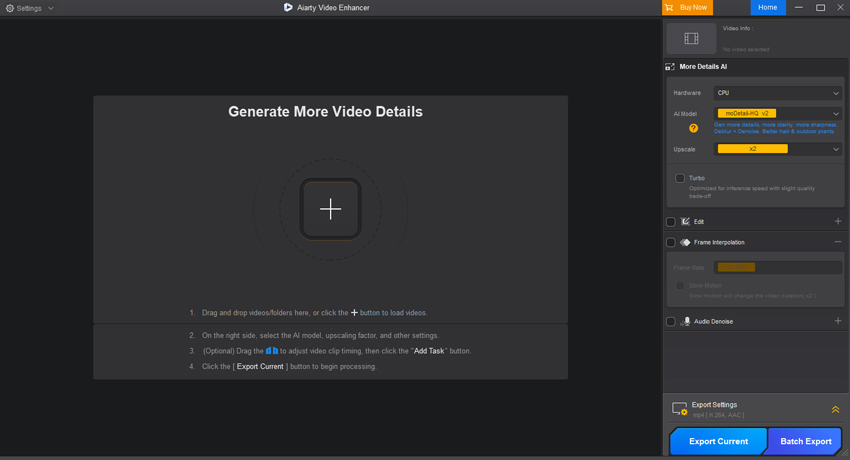
3) Once the installation is complete, click "Open" to launch the trial version of Aiarty Video Enhancer. You'll then see the main interface as below.
1-3. Register
To give you a real feel of how powerful our video enhancement technology is, Aiarty Video Enhancer offers a free trial that’s both easy to access and generous in features — no sign-up required, no credit card needed. You can freely export enhanced video(s) and experience our AI technology firsthand.
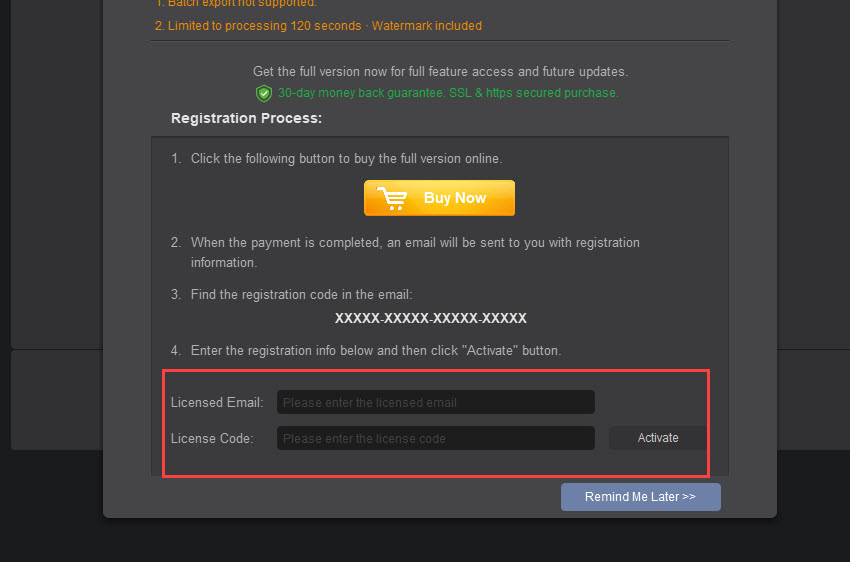
During the trial, some limitations apply:
Batch export is not supported.
Video processing is limited to 120 seconds, and a watermark will be included.
Even with these limits, the trial version provides a risk-free and hassle-free way to see the power of Aiarty in action, especially compared to other tools that impose strict caps or require upfront registration.
Once you’ve had a taste of what Aiarty can do, upgrading to the full version unlocks its full potential and exclusive advantages:
No Watermarks: Export clean, professional-quality videos without any branding.
Unlimited Length & Usage: Enhance as many videos as you like, no time limits.
Smarter AI Over Time: Access ongoing AI model updates for more accurate and refined results.
Frequent Feature Upgrades: Get the latest tools and performance improvements with every update.
Priority Support: Enjoy responsive customer service, with replies typically within 24 hours.
Here is how you can upgrade to Aiarty Video Enhancer's full version.
1. Click the "Buy Now" button below to purchase the full license code.
Or click "Buy Now" on the main UI > Buy Now button to buy Aiarty Video Enhancer full license.
2. Register.
※ You will receive product information with the license code via email once you complete the order.
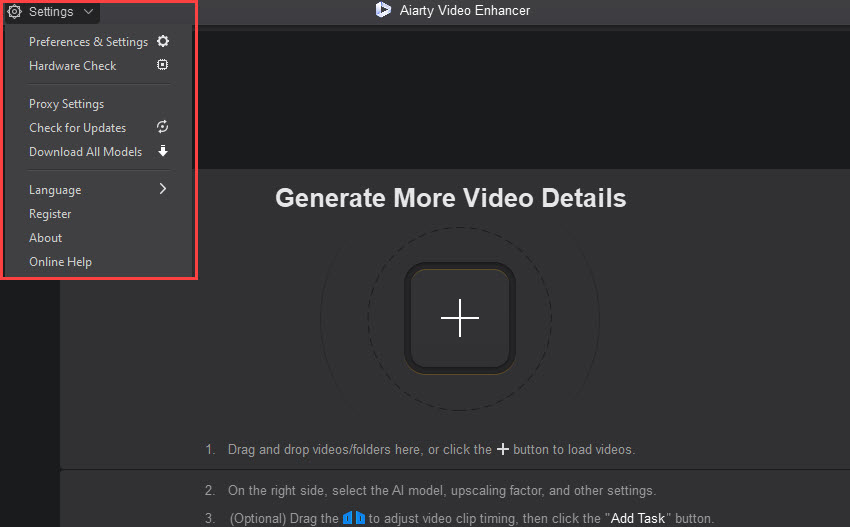
1) Open Aiarty Video Enhancer, and go to "Register" from the drop-down list of the Settings menu bar at the top left corner.
2) Input your "Licensed Email" and "License Code". Click "Activate" to complete the registration process.
Notes:
There are no spaces in the license code field. It's highly recommended to copy & paste your code to avoid any typos.
Please make sure you have a proper Internet connection when registering Aiarty Video Enhancer program.
3) When you have registered successfully, you can enjoy the full features of Aiarty Video Enhancer.
2. One-Click Workflow for Video Enhancement
Aiarty Video Enhancer uses hybrid AI models to upscale, denoise, and remaster videos to 2K/4K with optimal efficiency — delivering camera-like details at turbo speed, with up to 95% GPU utilization.
With the default settings already optimized for the best balance of quality and performance, you can start enhancing your videos quickly and effortlessly — no need to tweak anything. Here’s how to enhance your videos in just a few simple steps using Aiarty Video Enhancer.
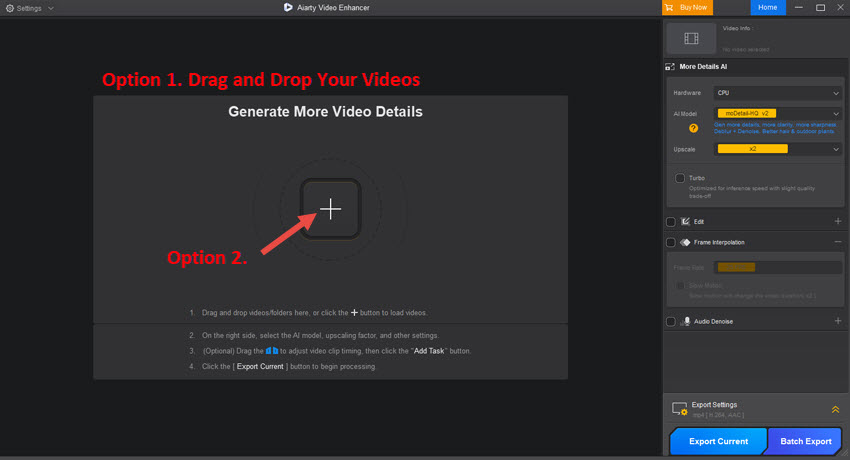
Step 1. Add Your Video(s)
Simply drag and drop one video file, multiple files, or an entire folder into the main interface. Aiarty Video Enhancer supports a wide range of video formats (Check all supported inputs & outputs format >>).
Once you've added your video(s) or folder, they will automatically load, getting ready for enhancement.
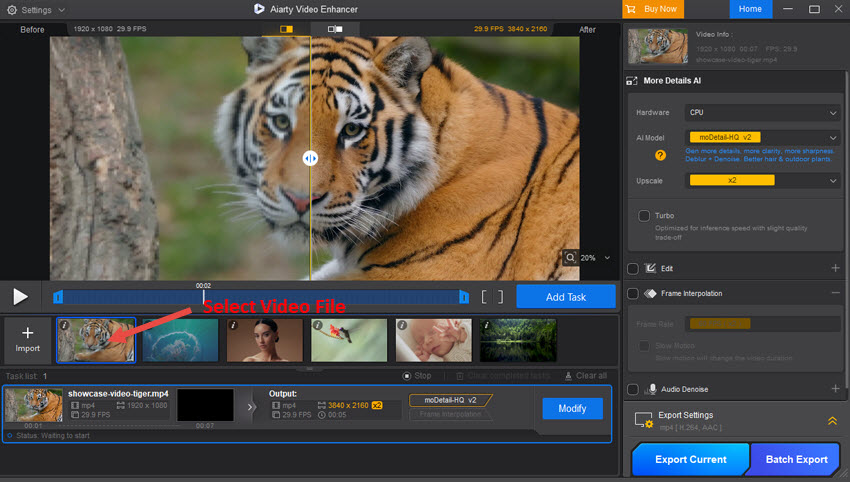
Step 2. Select the Video File
Choose the video file you wish to process. Once selected, the video will automatically load into the software preview window.
Step 3. Export Using the Default Settings
With your video loaded, click the "Export Current" button in the Export Settings panel to begin the processing and saving of your enhanced video.
The software will then process your video using the default settings (Device: CPU, AI Model: moDetail-HQ v2, Upscale: x2, Turbo mode: off, Edit/Frame Interpolation/Audio Denoise: disabled, Export format: mp4 [H.264, AAC]). Upon completion of the conversion, your enhanced file will be saved to your specified output location.
Tips: Apply Settings to Multiple Videos
When processing multiple videos, you can apply the same settings to all imported videos or configure each video individually before batch export.
① Apply the same settings to all videos:
Select any video in the media list.
Configure the processing settings, including the AI model, upscale factor, enhancement strength, and other parameters.
Click Batch Export.
Aiarty Video Enhancer will apply the current settings to all videos in the batch.
② Apply different settings to individual videos:
Select a video and configure the settings based on its content and quality.
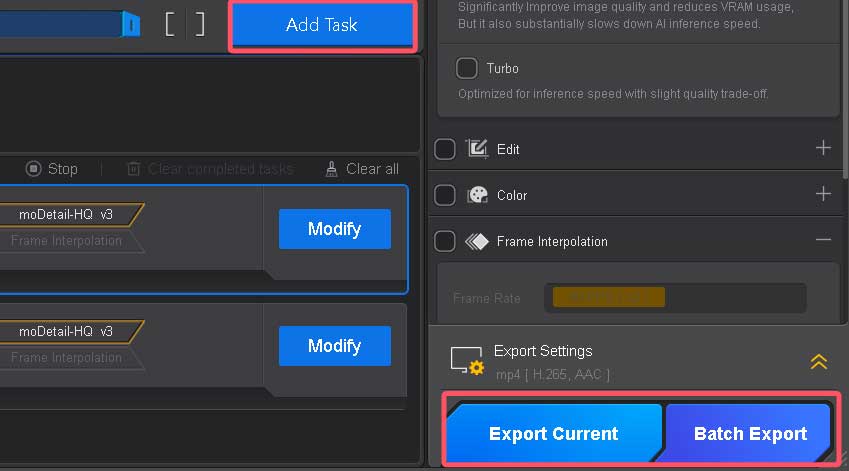
Click Add Task to add the video and its current settings to the Task List.
Repeat these steps for the remaining videos.
Click Batch Export to process and export all videos in the Task List.
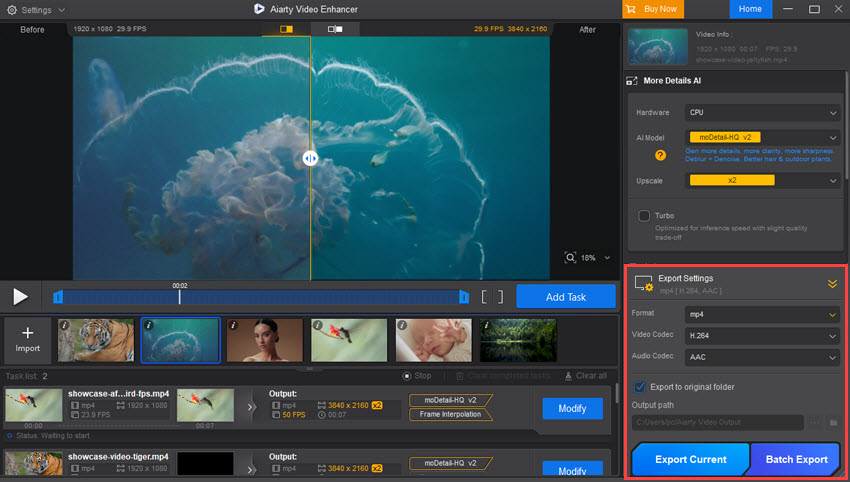
3. In-Depth Video Enhancement Walkthrough
In this section, we'll give you a comprehensive tour of Aiarty Video Enhancer, detailing every feature and setting. This will empower you to master every aspect of your video enhancement workflow.
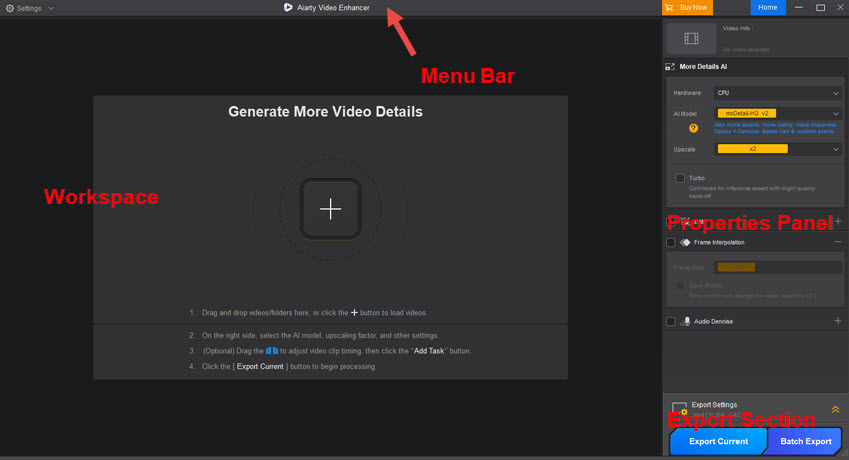
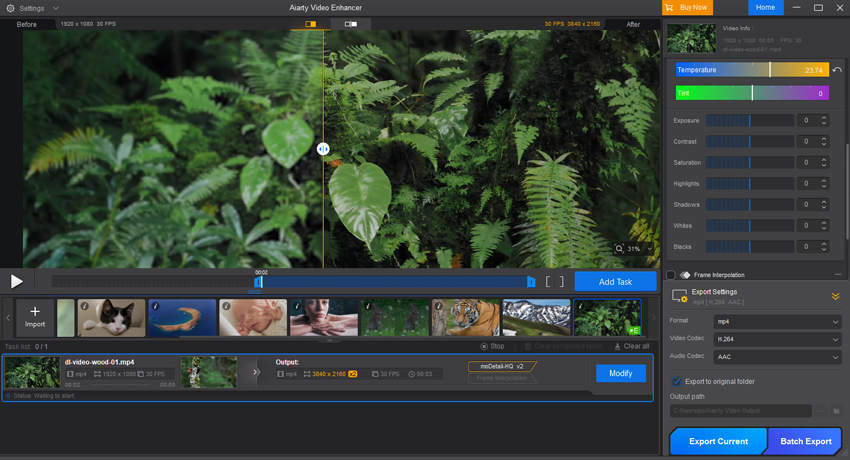
The main window of Aiarty Video Enhancer is organized into a few key areas:
Menu Bar: Contains the Settings menu, the "Buy Now" button, and the "Upgrade available" page button.
Workspace: This central area is where you'll see video previews, manage your loaded files, and view the enhancement tasks you've created.
Properties Panel: Located on the right side, this panel is dedicated to displaying and editing all the parameters for your video enhancement tasks.
Export Section: Configure the export formats, quality settings, and output destinations for videos.
3-1. Import Videos into the Workspace
To activate the Workspace and begin your enhancement process, you must first add your video files. There are three convenient methods to load your media:
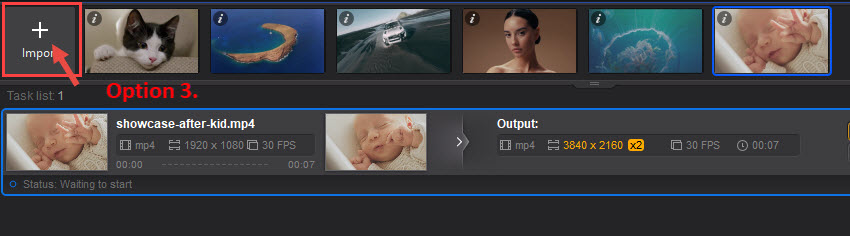
Option 1. Click the Plus button to add videos.
Option 2. Directly drag and drop the video(s) or entire folder into the main interface.
Option 3. Use the "+Import" buttons in Task Queue section (this section becomes available only after activating the workspace).
Once your videos are loaded, Aiarty Video Enhancer will automatically prepare its AI models and analyze your footage. At this point, the Workspace will be ready for use, organized into three main areas: the Preview Area, the Timeline, and the Task Queue.
3-2. Preview and Select Video Segments
After importing your video, Aiarty allows you to preview, compare, and choose specific segments to enhance.
Note: When playing your clip, please note that the right-hand side of the preview area shows the unenhanced version. To view the enhanced effect, pause the playback to see the comparison. Additionally, we recommend cutting a small segment of your video and exporting it for a detailed comparison.
Here's how to manage previews:
3-2-1. Preview Area
To view a preview, click on the Preview button in the Generate Preview window to render a preview of your video.
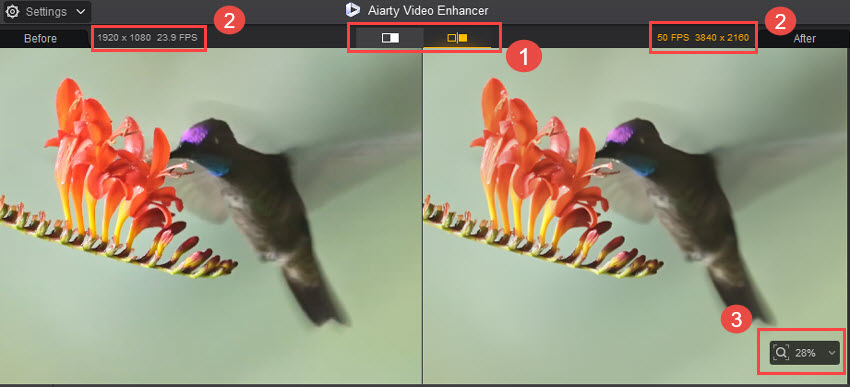
① Preview Mode: You can click the switch button to choose a preview mode.
Mode 1. Single Mode: You can drag your mouse to move the marker on the preview window to see the difference.
Mode 2. Dual Mode: This mode displays your video in two parallel windows, allowing for direct, side-by-side comparison. The original video is shown in the left window, while the enhanced video is previewed on the right, making it easy to observe the improvements.
Also, you can put your mouse onto the video and move your mouse to see specific parts.
② Frame/Res Info: This display provides vital information about your video's frame rate (FPS) and resolution. The one on the left shows the details of your original video (before processing), while the one on the right reflects the upscaled resolution and FPS of the processed output (after enhancement).
③ Zoom Functionality: You have several convenient ways to adjust the zoom level of your video preview. You can click the magnifier icon to zoom in or out. For quicker adjustments, simply scroll your mouse wheel up or down. Additionally, you can double-click on the preview area to quickly zoom in/out.
3-2-2. Timeline Controls
Timeline is your control center for video navigation and precise segment selection. It allows you to play your video, see its total duration, and most importantly, define specific portions of your footage for enhancement by using the adjustable markers. Once you've selected your desired segment, you can easily add it as a task.
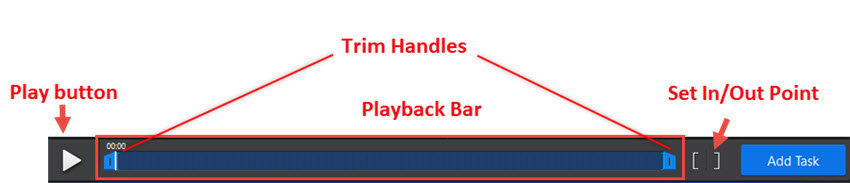
Play button: Control video playback within the preview area. Click it once to start playback of your video, and click it again to pause it.
Playback Bar: It's an interactive bar that allows you to navigate your video and see its current progress and total duration.
Trim Handles: The blue, adjustable handles on the Playback Bar are your trimmer handles. You can drag these handles inwards from either end of the bar to precisely define the start and end points of the video segment you wish to process.
Set In/Out Point Buttons: the [ (left square bracket) and ] (right square bracket) icons offer precise control for setting your clip's boundaries. Move the playback scrubber (the vertical line indicating current position) to your desired start point on the timeline, then click the [ icon to instantly snap the left (start) clip marker to that exact spot. Likewise, click the ] icon to set the right (end) clip marker to the current playback scrubber's position, allowing for highly accurate segment selection. Note: Setting the start and end points to the same timestamp will result in the export of only a single frame.
Add Task: The "Add Task" button adds the currently selected file to the task list, configured with the properties currently selected. However, tasks added via this button will not automatically begin processing; they will remain in a "Waiting to start" status until manually initiated.
3-3. Manage Enhancement Tasks
Aiarty Video Enhancer's Task Queue is where you manage all the video enhancement jobs you've configured. Each job is represented as an individual task entry, allowing you to monitor and control its settings and status.
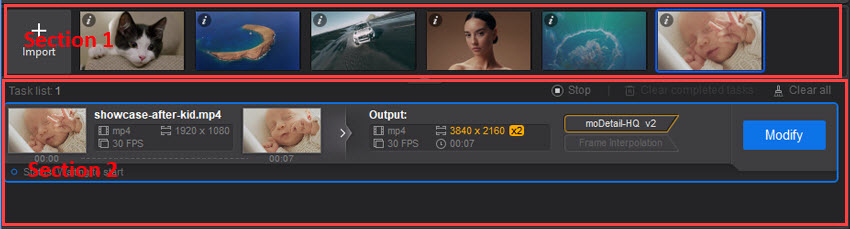
3-3-1. Task Queue Overview
Section 1.
① Import Button: The "+ Import" button is one of the primary tools for bringing video files into the software. Clicking it opens a file browser, allowing you to select the videos you wish to enhance from your computer.
② Loaded File Thumbnail: After loading, your video files appear as thumbnails next to the "Import" button, providing a quick visual reference.
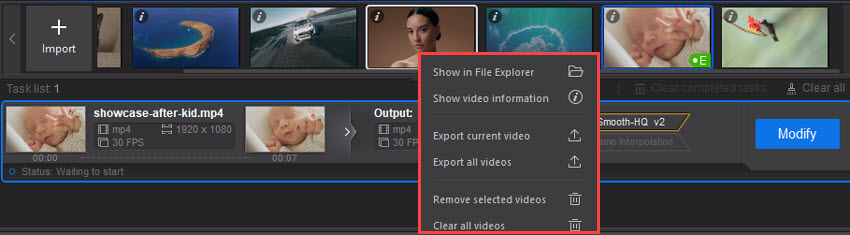
For a detailed overview of any video's properties, click the small "i" (information) icon located on the top-left corner of its thumbnail. An "E" icon will also appear in the bottom-right corner if the file has been edited.
Right-clicking a thumbnail opens a context menu with actions specific to that video, including: Show in File Explorer: Opens your system's file explorer directly to the location of the selected video file. Show video information: Displays detailed properties and metadata about the selected video. Export current video: Initiates the export process for only the video you have currently selected and configured. Export all videos: Starts the export process for all videos currently loaded in your queue. Remove selected videos: Deletes the selected video(s) from the loaded queue within the application. Clear all videos: Removes all videos from the loaded queue in the application.
Right-clicking on a blank area within the video loading section provides general management options. Select all videos: Selects all video files currently loaded in the interface. Export selected video: Initiates the export process for only the video(s) that are currently selected in the queue. Export all videos: Starts the export process for all videos currently loaded in your queue. Clear all videos: Removes all videos from the loaded queue in the application.
Section 2.
This area serves as your central hub for managing all configured video enhancement jobs. The 'Task list' counter indicates the number of individual tasks currently loaded in your queue for processing, with each row below detailing a distinct enhancement task, organized as follows:
① Input Video Details (Left Side): The left side displays a thumbnail preview of your original video, alongside its file name and original specifications (including resolution, frame rate, and duration).
② Output Specifications & Settings (Right Side):
This section details the task's output configuration, showing an output thumbnail preview, the selected output format & resolution, the chosen AI Model, any applied Feature Indicators (e.g., frame interpolation), and the expected output frame rate & duration of the enhanced video.
It also includes a Modify button for adjusting task settings. After you've modified your task and confirmed the enhancements in the preview, you can then apply these changes and proceed to export your enhanced video. Additionally, an "X" button is available to remove the task from the queue.
Located above the individual task entries, these buttons manage the entire queue:
Stop: Halts any currently ongoing processing.
Clear completed tasks: Removes all finished tasks from the queue.
Clear all: Removes all tasks from the queue, regardless of their current status.
The status bar, located at the bottom left of the queue area, provides real-time updates on the current state of your tasks or the overall queue. It displays various processing statuses.
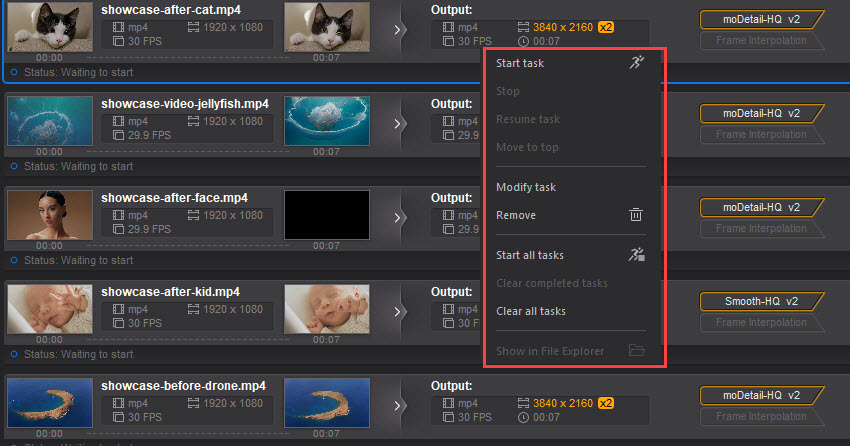
When you right-click on an individual task within the queue area, a context menu will appear offering several management options:
Start task: Initiates the processing for the selected task.
Stop: Halts the processing of the selected task.
Resume task: Continues a paused or stopped task from where it left off.
Move to top: Changes the order of the selected task, moving it to the beginning of the queue.
Modify task: Allows you to go back and adjust the enhancement settings for the selected task.
Remove: Deletes the selected task from the queue.
Start all tasks: Begins processing for all tasks currently in the queue.
Clear completed tasks: Removes all tasks that have finished processing from the queue.
Clear all tasks: Removes all tasks, regardless of their status, from the queue.
Show in File Explorer: Opens the file location of the video associated with the task in your system's file explorer.
3-4. Customize Enhancement Settings
This section guides you through customizing the enhancement options to get the best possible quality from your video.
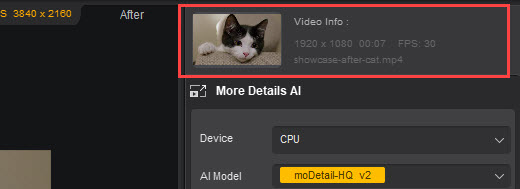
3-4-1. Video Info Overview
At the top of the settings panel, you’ll see key details about your selected video: resolution, duration, frame rate (FPS), and filename. This quick summary ensures you’re working with the correct file before making any changes.
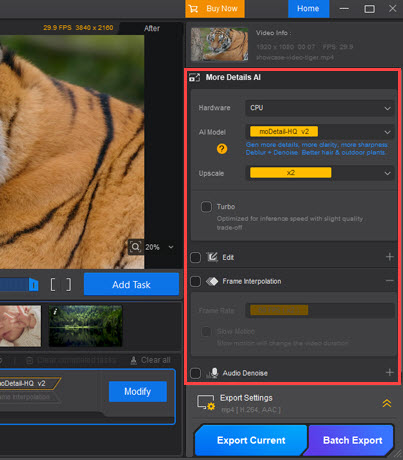
3-4-2. Core Enhancement Settings
Video Super-Resolution Checkbox:
Enabled by default to enhance and upscale images. Uncheck this option to skip the enhancement process and focus only on color correction, frame interpolation, or audio denoising as needed.
Device Selection:
Select whether to use your CPU or GPU for video enhancement. Using a GPU typically results in faster processing times.
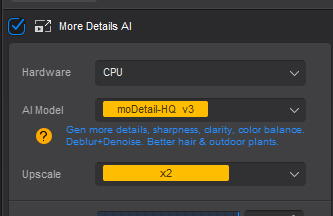
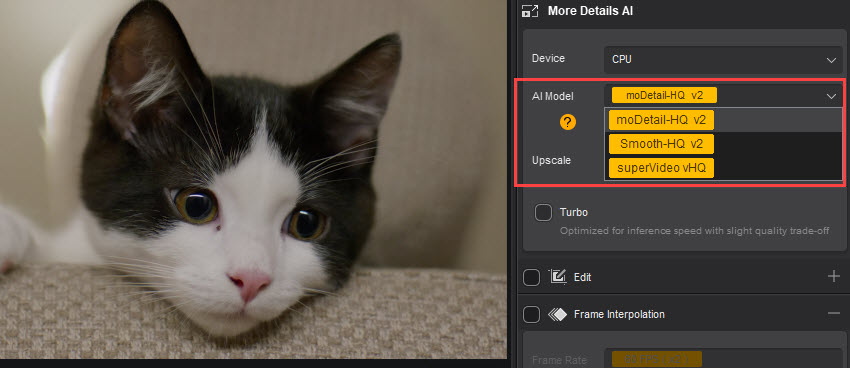
Choose an AI Model:
Pick the AI model best suited for your video’s condition and content. Click the question mark icon below the "AI Model" to view detailed descriptions:
moDetail-HQ v2: This model combines Diffusion and GAN technologies for powerful deblurring and denoising, particularly adept at recovering fine textures such as hair strands, flowers, and outdoor plants. It enhances clarity and sharpness while preserving intricate details, making it ideal for high-precision restoration, especially in daylight outdoor scenes, nature shots, and portraits where sharp texture and natural detail are essential. It supports 1x, 2x, and 4x upscaling.
Smooth-HQ v2: Utilizing pure diffusion technology, Smooth-HQ v2 focuses on balanced and natural deblurring and denoising. It excels at removing video flaws while preserving authentic color and texture continuity, ensuring smooth and clean output. This model is ideal for general video enhancement, especially useful in scenes with people, indoor lighting, or moderate imperfections that need subtle yet effective restoration. It supports 1x, 2x, and 4x upscaling.
superVideo vHQ: Leveraging Diffusion and GAN technologies, superVideo vHQ is specifically optimized for denoising under extreme low-light conditions. It delivers industry-leading noise reduction and detail recovery even in very dark scenes like night skies, urban nightscapes, or dimly lit interiors. While processing is slower, it ensures the best possible quality when denoise performance is the top priority. This model currently supports 2x scaling.
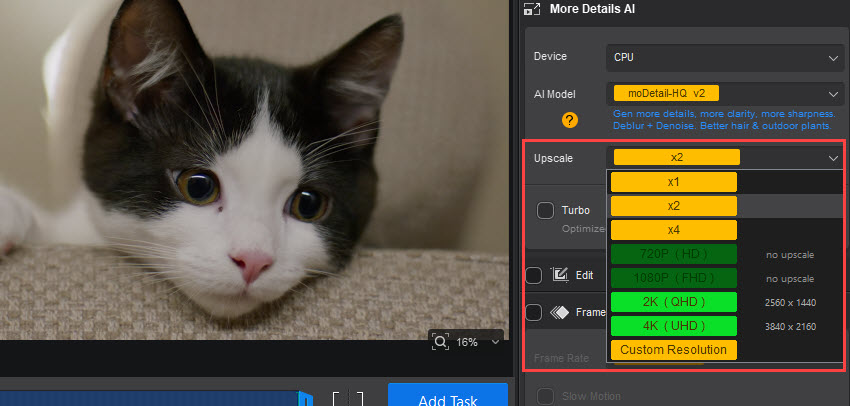
Upscaling Options:
This dropdown allows you to determine the final resolution of your enhanced video. You can choose to:
Specify a scaling factor: Select 1x, 2x, or 4x to multiply the original video's dimensions. Note that superVideo vHQ specifically supports only 2x scaling. The 1x option is ideal for enhancing video quality without changing the original resolution, perfect for blurry videos that don't need to be enlarged.
Scale to a specified resolution: Choose from preset common resolutions like 720P (HD), 1080P (FHD), 2K (QHD - 2560 x 1440), or 4K (UHD - 3840 x 2160). Options smaller than the original video's resolution will be disabled.
Custom Resolution: You can also manually specify output dimensions. The software will automatically calculate the other dimension based on the original video's aspect ratio, requiring you to specify only one side's length. The minimum custom resolution is the original video's resolution, and the maximum is limited so that the longest side of the output frame does not exceed 4096 pixels.
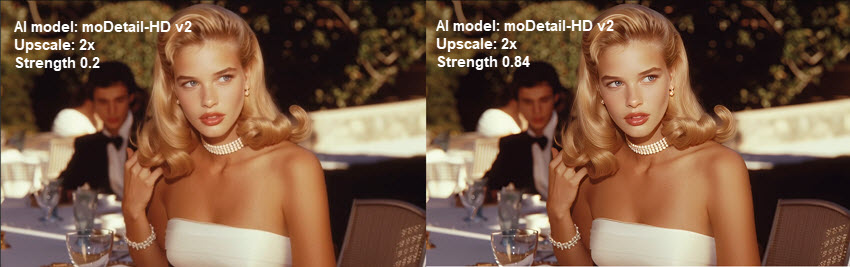
Strength Slider:
Use the Strength slider to adjust the intensity of the AI enhancement and sharpening applied to your video. Sliding it to the right increases both enhancement and sharpness for a more detailed look, while sliding it to the left reduces them for a softer, more natural effect. Experiment with the slider to find the ideal balance between improved clarity and maintaining a natural appearance.
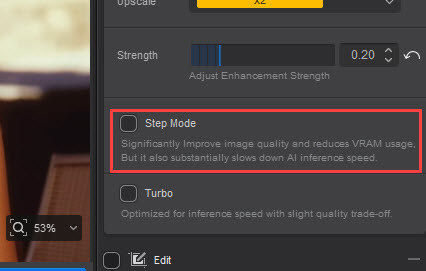
Step Mode:
When Step Mode is enabled, the AI processes videos in smaller chunks, improving image quality and reducing vRAM usage. This is especially helpful for GPUs with less than 6GB VRAM, preventing hidden inference failures and ensuring reliable exports. However, note that because the video is processed in smaller segments, inference speed may be slower. This mode is ideal for users with limited GPU memory or when working with high-resolution footage.
In contrast, Turbo Mode is optimized for maximum processing speed, making it ideal for faster results but with higher vRAM consumption and slightly less fine-grained detail.
Turbo Mode:
Enabling this feature is a way to significantly reduce system resource consumption and dramatically increase processing speed, at the cost of a slight trade-off in output image quality.
3-4-3. Basic Video Editing
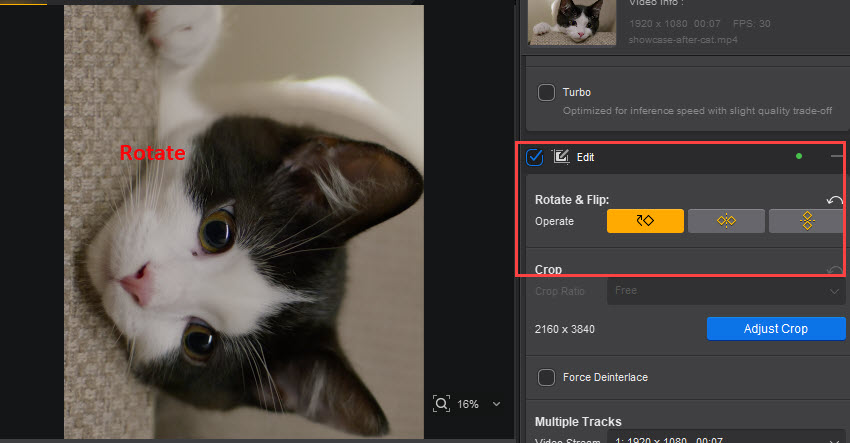
This section allows you to perform some basic edits on your video and manage its streams. To access these tools, first enable the Edit checkbox
Rotate & Flip: These intuitive icons allow you to quickly adjust your video's orientation:
Rotate: Rotates the video by 90 degrees clockwise.
Flip Horizontal: Flips the video horizontally (mirrors it).
Flip Vertical: Flips the video vertically (turns it upside down).
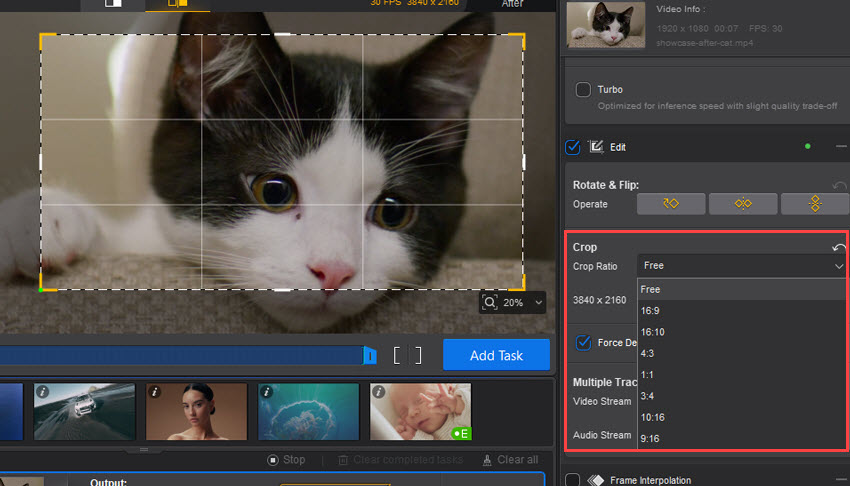
Crop:
This section allows precise control over your video's visible area. Clicking the blue Adjust Crop button activates the cropping interface.
The Crop Ratio dropdown lets you select predefined aspect ratios (e.g., 16:9, 16:10, 4:3, 1:1, 3:4, 10:16, 9:16) or set custom dimensions. The resolution displayed next to the button indicates the video's current dimensions, which will be updated as you apply cropping.
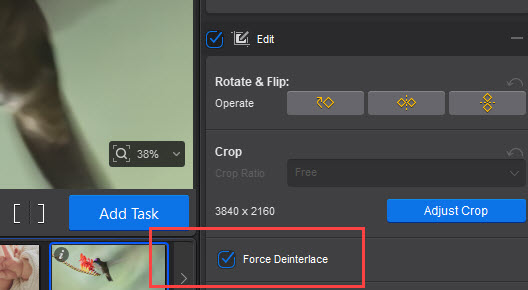
Force Deinterlace:
Interlacing is a legacy video display technology that originated in the era of limited bandwidth and CRT televisions, designed to reduce perceived flicker by splitting each image frame into two alternating 'fields' (odd and even lines). However, when viewed on modern progressive displays, interlaced content can lead to several visual issues, including 'combing' artifacts on fast-moving objects due to fields being captured at different times, reduced clarity as each field only contains half the vertical resolution, and general incompatibility with contemporary screens.
The Force Deinterlace checkbox is designed to resolve these problems by converting interlaced video signals into a progressive format. Enabling this feature effectively eliminates the 'combing' artifacts and other visual flaws, resulting in a smoother, clearer, and artifact-free image that is optimally suited for modern displays. This option is particularly useful for videos where the software might not automatically detect interlacing, requiring manual activation to correct the display issues.
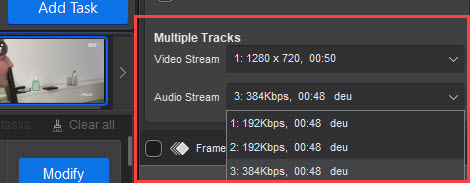
Multiple Tracks:
This section is designed to manage different video and audio streams that might be embedded within a single video file. This is common in media files that bundle multiple versions of video or audio, such as different camera angles or multiple language tracks. When a multimedia file contains multiple video and/or audio tracks, you can select the specific track(s) you wish to export here. By default, the software will select the recommended track(s).
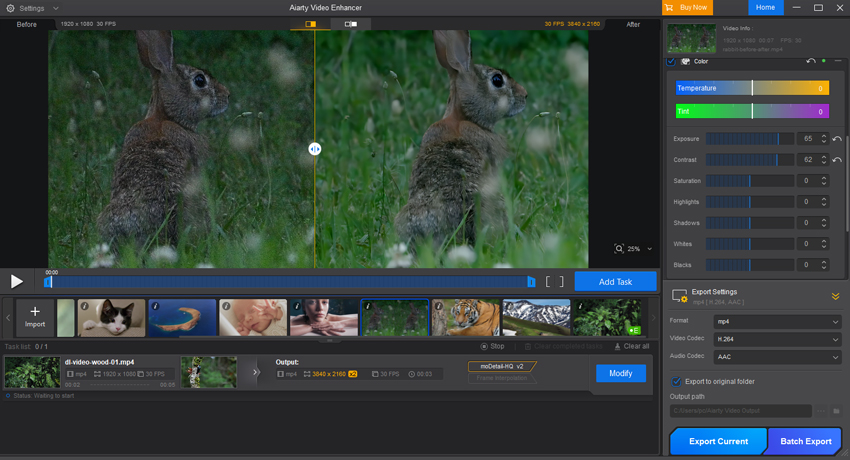
3-4-4. Color Correction
Aiarty Video Enhancer's color adjustment tools give you granular control over the look and feel of your footage, including a new Restore Color feature that lets you revert enhanced footage back to its original color profile. These tools allow you to correct color imbalances, refine exposure, and craft a specific cinematic mood. This is especially useful for footage that is overexposed, underexposed, or has a color cast, while Restore Color ensures consistent colors even after applying AI enhancements.
Restore Color
An option lets you revert enhanced footage back to its original color profile. Use the slider (0–1) to adjust the strength of the restoration according to your preference. The higher the value, the closer the footage will return to its original colors, ensuring natural and consistent color reproduction after AI enhancement.
To further refine your footage, use the following color correction sliders for precise adjustments to exposure, contrast, and color balance.
① Color Temperature & Tint
These two sliders work together to control the overall white balance of your video.
Temperature: This slider adjusts the warmth or coolness of the colors.
Moving the slider to the right (towards the orange) will make the video warmer, adding a yellowish-orange tint. This is great for recreating a "golden hour" feel or making an indoor scene look cozier.
Moving the slider to the left (towards the blue) will make the video cooler, adding a bluish tint. This can be used to correct footage shot under warm lighting or to create a cool, cinematic atmosphere.
Tint: This slider fine-tunes the green-to-magenta balance.
Moving the slider to the left adds a green tint. This can be useful for correcting magenta color casts.
Moving the slider to the right adds a magenta (purple) tint. This is helpful for correcting green casts, which can sometimes appear in footage from certain cameras or under fluorescent lighting.
② Basic Tonal Adjustments
These sliders are for adjusting the exposure and contrast of your video. They help you get the brightness and tone just right.
Exposure: Controls the overall brightness of the video.
Use this to make the entire video brighter or darker. Adjusting the exposure is a quick way to fix footage that is too dark (underexposed) or too bright (overexposed).
Contrast: Controls the difference between the brightest and darkest parts of the video.
Increasing the contrast will make the blacks darker and the whites brighter, giving the video more punch and depth.
Decreasing the contrast will flatten the image, making the colors and tones less distinct. This can be used for a vintage or film-like effect.
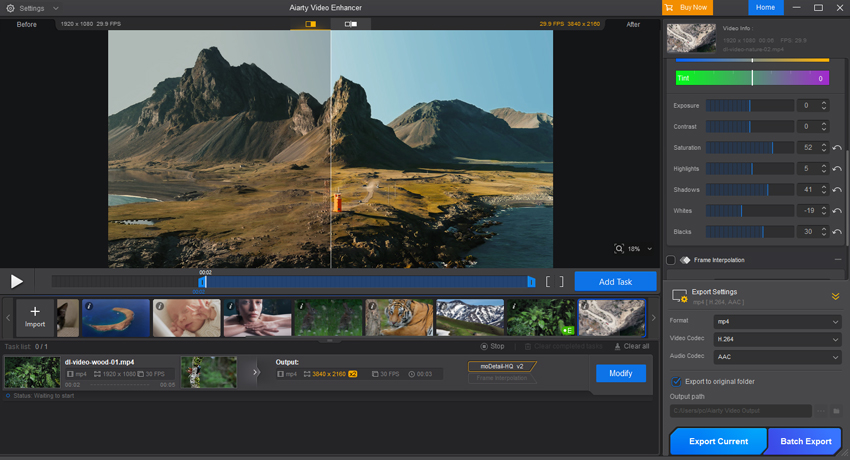
③ Advanced Tonal Adjustments
These sliders provide more precise control over specific brightness ranges in your video, allowing for more subtle and detailed corrections.
Saturation: Adjusts the intensity of the colors in the video.
Increase saturation to make colors more vivid and vibrant.
Decrease saturation to make colors more muted, or even turn the video black and white by setting it to zero.
Highlights: Targets and adjusts the brightest parts of the image.
Lowering the highlights can help recover detail in bright areas that may be overexposed, like a bright sky.
Shadows: Targets and adjusts the darkest parts of the image.
Raising the shadows can bring out details in dark areas without affecting the mid-tones or highlights. This is especially useful for footage shot in low-light conditions.
Whites: Sets the white point of the image.
Adjusting this can make the brightest points of the video appear brighter or darker.
Blacks: Sets the black point of the image.
Adjusting this can make the darkest points of the video appear darker or lighter.
By using these color and tone adjustment tools, you can not only fix common video issues but also give your videos a professional and polished look.
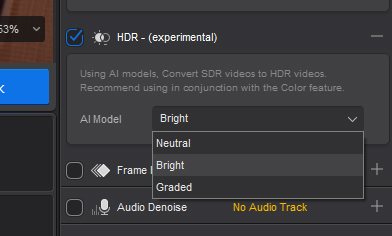
3-4-5. Convert SDR to HDR
Enabling this feature can transform your standard 8-bit SDR videos into stunning 10-bit HDR content. This intelligent conversion enhances color depth, producing smoother gradients and more natural transitions, which makes every scene look more vibrant and lifelike. It’s perfect for bringing old footage to life or giving your videos a professional, cinematic feel. For the best results, we recommend using this feature alongside the Color tool to fine-tune tones and contrast.
Note: To fully experience the SDR to HDR conversion, your setup needs to meet the following requirements:
1) Your display must support HDR
2) For Windows users, ensure HDR is enabled in your display settings by following these steps:
Right-click on your desktop and select Display Settings.
Choose the HDR-capable display from the list.
Enable HDR by toggling the setting to "On".
AI Models:
Neutral: Provides a faithful HDR conversion while staying as close as possible to your original video. Ideal if you want subtle improvements without altering the look too much.
Bright: Boosts overall brightness and highlights, giving your footage a more vivid, eye-catching appearance.
Graded: Applies gentle color grading to enrich your video: enhances saturation, deepens blues in skies, and improves overall color richness for a more polished, cinematic feel.
HDR Strength Adjustment: Use the Strength slider to adjust the HDR effect intensity, fine-tuning video quality and dynamic range to your needs.
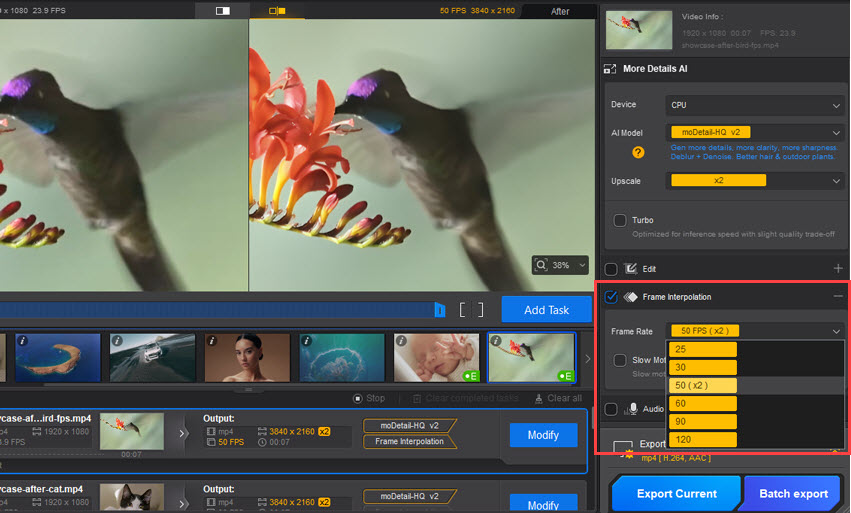
3-4-6. Frame Rate Adjustment & Slow Motion
This section is dedicated to adjusting your video's frame rate to create smoother motion or slow-motion effects. To access these features, first enable the Frame Interpolation checkbox.
Frame Rate: This dropdown allows you to adjust the video's output frame rate, directly enhancing its exceptional visual smoothness without compromising image quality. Available options include standard rates like 25, 30, 50, 60 (x2), 90, and 120 FPS.
Slow Motion: Enabling this will slow down the video's playback speed, enabling the creation of epic slow-motion sequences with AI-level smoothness. Note that applying slow motion will also change the video's overall duration.
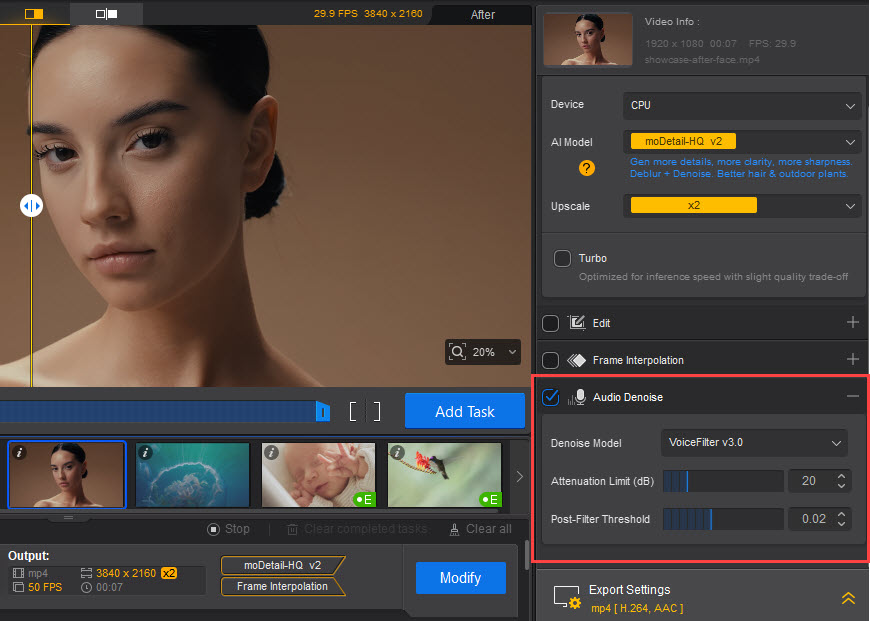
3-4-7. Audio Denoise
This section allows you to enhance your video's audio by reducing unwanted background noise. To access these settings, enable the Audio Denoise checkbox. Note: This feature is only applicable if your video file contains an audio track.
You can choose a specific AI model from the Denoise model dropdown to handle noise suppression.
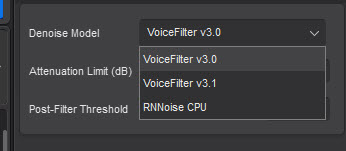
Step 1. Choose Your Denoise Model
You can select an AI model from the dropdown to best suit your audio:
VoiceFilter Model:
Purpose: Uses deep learning to intelligently separate speech from noise, even in complex environments.
Best for: Non-stationary noise (like typing or AC hum) and can use hardware acceleration for speed.
Versions (v3.0 vs. v3.1): v3.1 is lighter and better for real-time or lower-power devices, while v3.0 is designed for high-quality, non-real-time processing.
RNNoise Model:
Purpose: A lightweight model that combines traditional audio processing with deep learning for efficient noise reduction.
Best for: Low-power systems and adapting to constantly changing background noise.
Step 2. VoiceFilter Settings (If VoiceFilter is selected)
These parameters help you control how intensely VoiceFilter reduces noise:
Attenuation Limit (dB): This sets the maximum amount of noise reduction. A higher number means more aggressive noise removal, while a lower number keeps more natural ambiance. Recommendations range from 10dB to 15dB for light denoising (retaining some ambient sound, ideal for meetings), 20dB to 25dB for medium (balancing reduction with natural speech), and 30dB and above for aggressive removal in strong noise (though this may introduce distortion).
Post Filter Threshold: This fine-tunes the sound after denoising, helping to smooth out any remaining noise or fix artificial sounds. To avoid distortion, start with a low value (e.g., 20%-30%) and gradually increase it until noise is imperceptible, but the audio remains natural.
3-5. Export
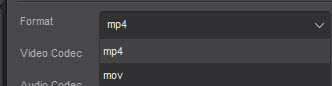
Format
Aiarty Video Enhancer supports 2 video output formats: mp4 and mov
mp4: This is the most widely compatible format, excellent for web sharing, streaming, and general playback across almost all devices and operating systems.
mov: This format is primarily associated with Apple (QuickTime). While it can offer high quality and is often used in video editing workflows, it might have less universal compatibility compared to mp4 outside of the Apple ecosystem.
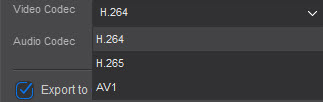
Video Codec
Aiarty Video Enhancer supports H.264, H.265, and AV1 video output codecs.
H.264 (AVC): Widely compatible, offers a good balance of quality and file size, making it a safe choice for most uses.
H.265 (HEVC): Provides better compression (smaller files for similar quality) but requires more processing power and has less universal compatibility. Choose for smaller files if supported by your playback devices.
AV1: Offers the best compression for top quality at the smallest size. It's the newest and most demanding, suitable for future-proofing or high-performance systems where file efficiency is paramount.
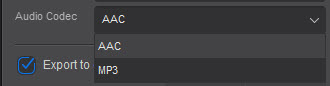
Audio Codec
Aiarty Video Enhancer supports AAC and MP3 audio output codecs.
AAC: Generally offers better audio quality at lower bitrates and is widely supported by modern devices and streaming platforms, making it suitable for most uses.
MP3: Highly compatible across almost all devices, but typically requires higher bitrates for comparable quality to AAC, potentially resulting in larger file sizes. Choose for maximum compatibility.
Output Path
The Output path field specifies the location where your enhanced video files will be saved, and it's essential to ensure you have write permissions for this directory to avoid any issues during the export process. Alternatively, by enabling the Export to original folder checkbox, you can choose to directly save the enhanced video into the same folder as your original file.
Export Current
If the task list is empty: Clicking this button will automatically add the currently selected file as a new task, configured with the properties presently displayed in the interface. This task will then begin processing immediately.
If tasks already exist in the list: If the task you have currently selected is in a "Waiting to start" status, clicking this button will initiate the processing for that specific selected task.
Batch export
It creates conversion tasks for all resources currently present in your file list.
The system intelligently avoids duplication; if a task for the same video resource already exists in the export list (regardless of its current properties or status), a new task for that resource will not be added.
All newly added tasks will be configured using the currently displayed properties (provided they meet any predefined constraints).
After tasks are created and added, all tasks in the list will automatically begin execution.
4. Customization Settings
All your software preferences and options can be accessed and customized through the Settings Menu located in the Menu Bar at the top of the application window. The Menu Bar includes three main elements relevant to customization:
Settings Menu (top left corner) — where you configure preferences and manage software features.
Buy Now button (top right) — to purchase or register the full version.
Upgrade Available button (top right) — appears when updates are available and helps you keep the software current.
4.1 Settings Menu Overview
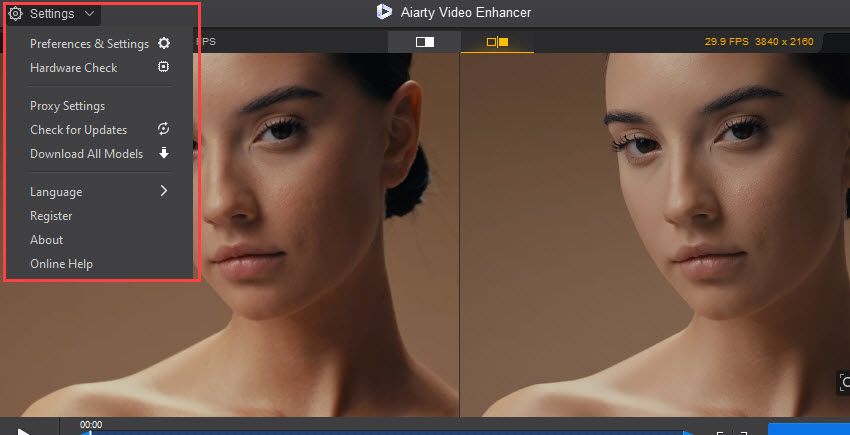
The Settings menu is located in the top left corner of the interface. It appears collapsed by default, but a simple click will expand it to display the following items:
Preferences & Settings: Configure software preferences and options.
Hardware Check: Check the device's hardware to optimize software performance.
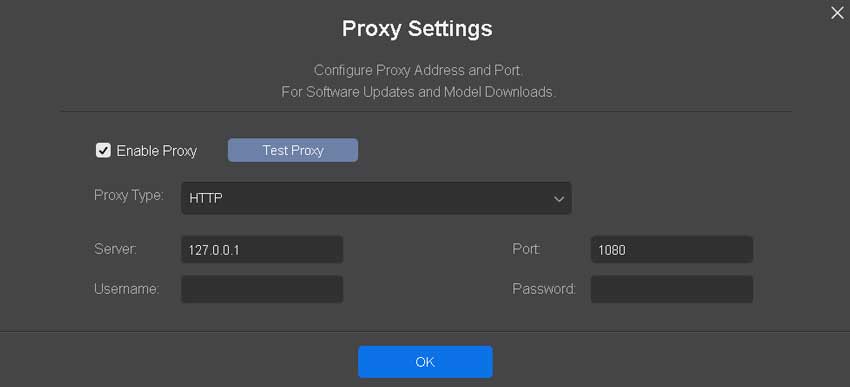
Proxy Settings: If your network requires a proxy connection, configure the proxy settings to access online services such as AI model downloads and update checks:
- Go to Menu > Proxy Settings, then select Enable Proxy.
- Choose the appropriate proxy type from the drop-down menu.
- Enter the required proxy information, or keep the default settings if no additional configuration is needed.
- Click Test Proxy to verify that the connection is working properly.
If your network does not require a proxy, or you no longer need to use one, clear the Enable Proxy option to disable it.
Check for Updates: Check for software updates and upgrade to the latest version.
Download All Models: Download the latest AI models for Aiarty Image Enhancer to access the newest enhancement features. Individual models are also downloaded automatically the first time you select and use them. The download time may vary depending on your Internet speed and network conditions. If your network requires a proxy server, configure it under Proxy Settings before downloading the models.
Register: Register or activate the full software version
Language: Select or change the software's language.
About: View version and developer information.
Online Help: Access help documentation or technical support.
4-1-1. Preferences & Settings
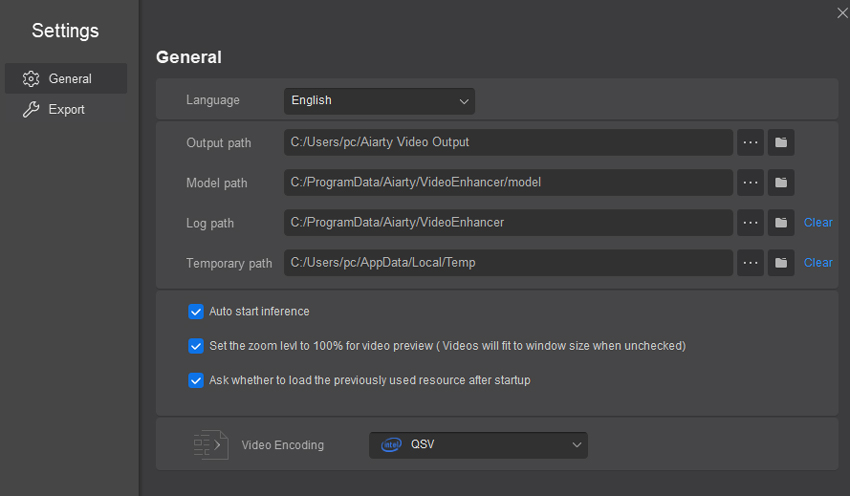
This tab enables you to configure fundamental operational preferences:
Language: A dropdown menu to select the application's display language.
Output path: Specifies the default folder where your processed videos will be saved.
Model path: Indicates the directory where AI enhancement models are stored.
Log path: Sets the location for application log files.
Temporary path: Defines the folder for temporary files generated during processing.
(Each path has associated Browse buttons to change the location and Open buttons to view the folder, with Clear options for log and temporary paths.)
Auto start inference: When checked, AI processing begins automatically after loading a file.
Set the zoom level to 100% for video preview (Videos will fit to window size when unchecked): Controls the default zoom behavior for video previews within the application.
Ask whether to load the previously used resource after startup: Determines if the application prompts to reopen prior projects or files upon launch.
Video Encoding: This dropdown typically allows you to select a hardware encoder for faster video processing by leveraging your system's GPU capabilities.
4-1-2. Export Settings
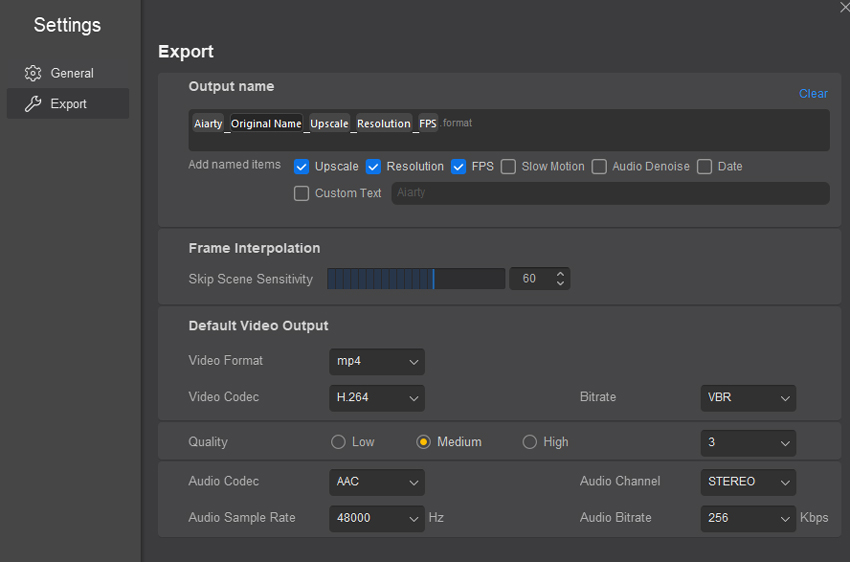
This section defines how your exported files will be named and their default technical specifications.
Output Name:
You can define a naming template for your output files. A "Clear" button is available to reset this template.
Checkboxes allow you to automatically include specific details in the output filename, such as Upscale factor, Resolution, FPS (frames per second), Slow Motion indicator, Audio Denoise status, and the Date of export.
A Custom Text checkbox enables you to add your own text prefix (e.g., Aiarty) to the filename.
Frame Interpolation:
The Skip Scene Sensitivity slider, accompanied by a numerical input (e.g., 60), allows you to adjust how sensitive the frame interpolation process is to scene changes. This helps prevent unwanted interpolation artifacts across cuts.
Default Video Output:
Video Format: A dropdown to select the default container format.
YUV Chroma Settings: Video export now includes support for multiple YUV chroma formats: 4:2:0, 4:2:2, and 4:4:4. These formats allow for more precise color sampling, ensuring better color accuracy and enhanced compatibility with professional video workflows.
Video Codec: A dropdown to choose the default video compression standard.
Bitrate: Configures the video bitrate mode and a numerical value for its setting.
Quality: Radio buttons allow you to select a general quality preset.
Audio Codec: A dropdown to select the default audio compression standard.
Audio Channel: A dropdown to choose the default audio channel configuration.
Audio Sample Rate: A numerical input to set the audio sample rate.
Audio Bitrate: A numerical input to set the audio bitrate.
4-2. "Buy Now" Button
The "Buy Now" button, located on the right side of the title bar, allows you to purchase and register the full version of Aiarty Video Enhancer.
4-3. "Upgrade available" Button
When a new version is available, an "Upgrade Available" button will appear; clicking it opens the update log window, with steps similar to the "Check for Updates" option in the menu.
If using the latest version, a "Home" button will be shown, linking to the product page.
Is this page helpful?
Thanks for the feedback. We'll continue to improve Aiarty Video Enhancer for you!