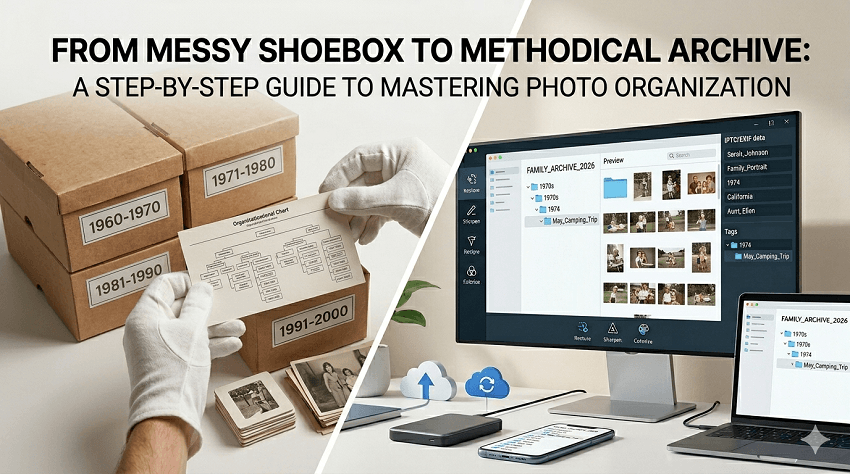
The photographs we inherit are more than just ink on paper; they are the visual DNA of our families. We've all seen them—the faded Polaroid of a parent's first car, the black-and-white portrait of a great-grandparent you never met, or the slightly blurry 4x6 prints from a 1990s road trip tucked away in a dusty shoebox.
However, these physical memories are under constant threat. Humidity, light exposure, and simple time are slowly erasing the details. Even if you've already started "digitizing" them by taking quick snaps with your smartphone, you've likely realized that a low-resolution digital copy of a faded print doesn't truly do justice to the moment.
The goal of this guide isn't just to help you "save" your photos—it's to help you curate and elevate them. In 2026, we are in a unique era where technology allows us to do more than just archive; we can now restore lost clarity and bridge the gap between generations. Whether you are dealing with a single crate of memories or a sprawling digital mess, this step-by-step workflow will take you from a chaotic "shoebox" to a professional-grade digital archive that is safe, searchable, and stunningly clear.
Step 1: The Tactical Sort (Culling & Prep)
Before you turn on a single scanner or open any software, you have to face "The Pile." It is tempting to grab the first photo you see and start scanning, but that is a recipe for burnout. Organizing is a marathon, not a sprint, and the secret to finishing is culling.
1. Prepare Your Workspace
Old photos are fragile and surprisingly dirty. Set yourself up for success:
- The Clean Zone: Use a large, flat table. Avoid eating or drinking nearby—one coffee spill can ruin a century of history.
- Tools of the Trade: Pick up a pack of lint-free cotton gloves and a microfiber cloth. Handling old negatives or glossy prints with bare hands leaves oils that can cause permanent damage over time.
- Air Duster: A simple canned air duster or a manual blower (like the ones used for camera sensors) is perfect for removing decades of dust without touching the photo surface.
2. The Art of the "Cull"
You do not need to digitize every single photo. In fact, your digital archive will be much more meaningful if it only contains the "gold." Apply a ruthless filter:
- The "S.H.A.P." Rule: Keep photos that are Significant (weddings, birthdays), High-quality (clear focus), Aesthetic (well-composed), or Personal (they tell a specific story).
- The "Trash" Pile: Safely discard (or set aside) duplicates, blurry shots where you can't see faces, and those mysterious "scenery" shots—like a blurry mountain from 1982—that hold no personal connection.
3. Categorize by "Broad Eras"
Don't get bogged down trying to figure out if a photo was taken in March or April of 1974. At this stage, speed is your friend. Create physical piles or use labeled envelopes for broad categories:
- Decades: "The 60s," "The 70s," etc.
- Life Chapters: "Early Marriage," "The College Years," "The Apartment in Chicago."
- Major Events: "The 1994 Road Trip," "Christmas 1988."
Pro Tip: If you find a photo with writing on the back, keep it at the top of its pile! That metadata is priceless and will save you hours of detective work later when you reach the digital tagging phase.
Step 2: High-Quality Digitization
Once your photos are sorted, it's time to move them into the digital realm. The method you choose depends on two things: volume and value. Are you scanning three generations of history, or just a few favorite portraits?
Also see: How to Restore and Fix Old Photos with Realistic Details
1. Choose Your Hardware
In 2026, the market for digitization has split into three distinct paths.
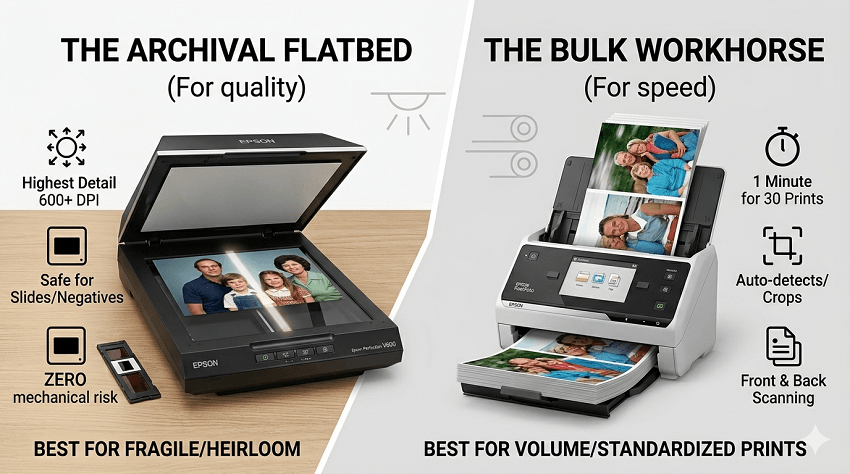
- The "Bulk" Workhorse (Best for Speed): If you have boxes with thousands of photos, a sheet-fed scanner like the Epson FastFoto FF-680W is the gold standard. It can scan a stack of 30 photos in under a minute, capturing both the front and any handwritten notes on the back automatically. Note: Avoid using this for fragile, torn, or extremely old "cabinet cards," as the rollers could damage them.
- The "Archival" Flatbed (Best for Quality): For heirloom photos and delicate prints, a flatbed scanner like the Epson Perfection V600 remains the professional's choice. Since the photo stays stationary on glass, there is zero risk of mechanical damage. It also provides the best results for slides and negatives.
- The "Camera Scanning" Setup (The Pro's Secret): Many professional archivists now use a high-resolution mirrorless camera on a tripod pointing straight down at a "copy stand." This is significantly faster than a flatbed and can capture even more detail than a traditional scanner if you use a dedicated macro lens.
2. Technical Standards: DPI and File Formats
Don't let the technical jargon scare you, but getting these settings right now prevents you from having to re-scan everything in five years.
- 300 DPI: The "Social Media" standard. Fine for viewing on phones or small prints.
- 600 DPI: The "Archival" standard. This is the sweet spot for most family projects, allowing you to enlarge a 4x6 print to a large poster without losing clarity.
- File Format: Scan as TIFF if you plan on doing heavy restoration (it preserves all the data). If you want to save space, use High-Quality JPEG (level 10-12).
3. The Mobile Alternative
If you aren't ready to invest in hardware, smartphone apps have come a long way.
- Google PhotoScan: Uses a clever multi-shot process to remove glare—perfect for photos still stuck behind glass in frames.
- Photomyne: Excellent for scanning entire album pages at once; its AI automatically detects, crops, and straightens individual photos from the page.
Warning: While convenient, mobile apps often compress images. For your most important "hero" photos, always use a dedicated scanner to ensure you have enough data for the next step: AI restoration.
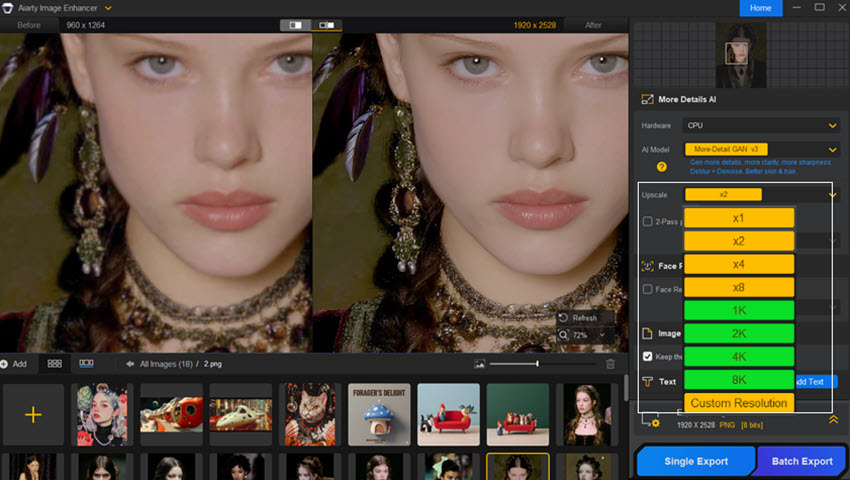
Step 3: AI Restoration with Aiarty Image Enhancer
Even with a high-end scanner, old photos often carry "baked-in" flaws: heavy film grain, motion blur from slow shutter speeds, or faces that are just a bit too soft to recognize. In the past, fixing these required hours of meticulous Photoshop work. In 2026, we use Aiarty Image Enhancer to handle this in seconds.
What makes Aiarty particularly suited for family archives is its Generative Reconstruction. It doesn't just stretch pixels; it actually understands what skin, hair, and fabric should look like and intelligently fills in the gaps.
1. The "Native Restoration" Workflow
For the most natural results, pros recommend a "Native" first step before upscaling.
- Import and Set to x1: Instead of jumping straight to 4K, run your scan through Aiarty at its original size (x1).
- More-Detail GAN v3: Select this model. It's the powerhouse of the app, designed specifically to strip away noise and JPEG artifacts while reconstructing fine details in hair and clothing textures.
- The Benefit: By cleaning the "trash" at the original resolution first, you ensure that the AI isn't accidentally enhancing noise or scratches when you eventually upscale.
2. Bringing Back the Faces
The most emotional part of any family archive is seeing a loved one's face clearly.
- Face Restoration Toggle: Enable this feature for any portrait or group shot.
- Fidelity vs. Rebuild: You can choose between "Fidelity" (keeping it very close to the original) or "Rebuild" (letting the AI reconstruct features that are heavily blurred).
- The Result: It can turn a blurry 1970s Polaroid into a sharp, expressive portrait where you can actually see the color of your grandmother's eyes.
3. Upscaling for Large Prints
Once the photo is clean, you can use the Upscale feature (2x, 4x, or even up to 8K/32K).
This is a game-changer if you want to take a small 3x5 print and turn it into a large canvas for your living room wall. The AI ensures the image stays crisp and "photographic" rather than looking like a blurry digital mess.
4. Batch Processing and Privacy
Family projects usually involve hundreds, if not thousands, of photos.
- Local Processing: Unlike many AI tools that require you to upload photos to a server, Aiarty runs 100% offline on your computer. Your private family memories stay on your hard drive, not in the cloud.
- Efficiency: Drag an entire folder of scans into the app, set your preferred model, and let it run. It uses your computer's GPU to fly through the restoration process while you grab a coffee.
Pro Tip: Use the AI Eraser tool within the app to quickly "paint out" any physical scratches or dust spots that the scanner might have picked up. It intelligently fills the background so the repair is invisible.
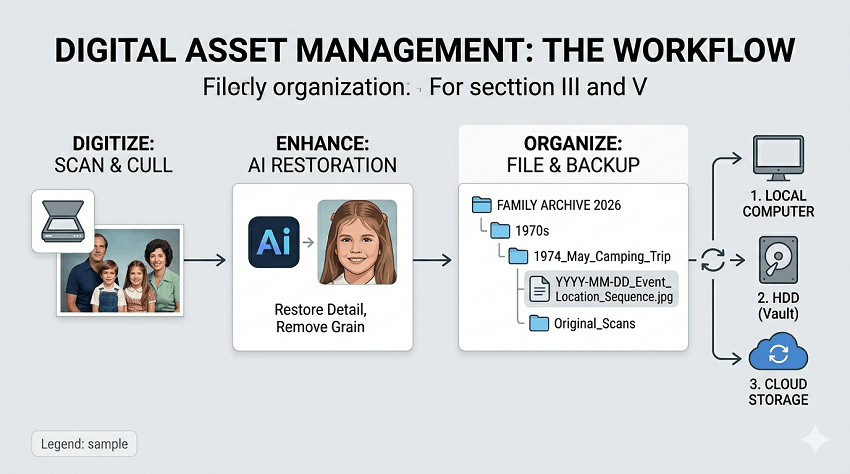
Step 4: Digital Asset Management (DAM)
Now that you have high-resolution, AI-enhanced images, you have a new problem: a folder full of files with names like SCAN001.jpg and Restored_Final_2.jpg. Without a system, these memories will be just as lost on your hard drive as they were in the shoebox.
1. The "Forever" Naming Convention
The key to a professional archive is using a file name that is human-readable and chronologically sortable. If you name a file starting with the year, your computer will automatically sort your life story in order.
The Golden Format: YYYY-MM-DD_Event_Location_Sequence.
- Example: 1982-05-12_Grandpa-80th-Birthday_Chicago_01.jpg
- Why it works: Even if you move these files to a different computer or a different cloud service in ten years, they will always stay in order. If you don't know the exact day or month, use zeros (e.g., 1982-00-00).
2. Keeping the Hierarchy Shallow
Don't bury your photos inside ten layers of folders. A "shallow" structure is easier to navigate and less prone to errors during backups.
- Top Level: Family_Photo_Archive
- Second Level: Decades (1970s, 1980s, 1990s)
- Third Level: Specific Events (1985_Summer_Camping, 1988_Christmas)
3. Metadata: The "Invisible" Storyteller
Modern digital photos store hidden information called EXIF and IPTC data. While file names are great, metadata allows you to search for "Aunt Sarah" or "Wedding" across your entire library instantly.
- Facial Recognition: Take advantage of the AI tagging in tools like Adobe Lightroom, Apple Photos, or Google Photos. Once you identify "Mom" in five photos, the software will find her in the other five hundred.
- Description/Caption: Use the "Description" field in your photo software to write down those stories you found on the back of the original prints. This text is embedded into the file forever.
- Keywords: Add tags like "Holiday," "Portrait," or "Vintage" to make filtering your collection a breeze.
4. Organizing the "Originals" vs. "Restored"
Always keep your raw, untouched scans in a separate subfolder marked Original_Scans. Think of these like your digital negatives. Keep your AI-enhanced versions from Aiarty in your main viewing folders. This ensures that as AI technology continues to improve, you can always go back to the original scan and "re-develop" it with even better tools in the future.
Step 5: The Archival Fail-Safe (Backup)
Digital files are more fragile than paper. A single spilled drink, a house fire, or a simple hard drive failure can wipe out decades of work. To ensure your family legacy survives, you must follow the industry-standard 3-2-1 Backup Strategy.
1. The 3-2-1 Rule
- 3 Copies of Your Data: The original on your computer and two backups.
- 2 Different Media Types: Don't just use two hard drives. Use a mix, such as an HDD (Hard Disk Drive) for local storage and a Cloud Service for the second.
- 1 Copy Off-site: One copy must live in a different physical location (the cloud or a drive kept at a relative's house) to protect against local disasters like fire or theft.
2. Choosing the Right Hardware for "Cold" Storage
In 2026, many people assume SSDs (Solid State Drives) are better because they are fast. However, for long-term archiving, the advice has shifted:
- The HDD Advantage: Traditional hard drives store data magnetically. Unlike SSDs, which can lose data if left unpowered for a year or two, a properly stored HDD can retain data for much longer without being plugged in.
- Use SSDs for Speed: Use your fast SSD for the initial restoration in Aiarty and the organization phase.
- Use HDDs for the Vault: Once the project is done, move a copy to a high-capacity external HDD for long-term safety.
3. Automation is Your Friend
Don't rely on your memory to back up your photos.
- Cloud Sync: Use services like Backblaze, Google Photos, or Amazon Photos (which offers unlimited storage for Prime members). These run in the background and upload new files as soon as you save them. Version Control: Ensure your backup service has "versioning." This allows you to "go back in time" if you accidentally delete a folder or overwrite a file with a mistake.
4. The "Digital Estate" Plan
An archive is only useful if your family can access it after you're gone.
- Legacy Contacts: Most major platforms now have a "Digital Legacy" feature (Apple Legacy Contact, Google Inactive Account Manager). Set these up now so a trusted family member can legally access the photos if something happens to you.
- Physical Key: Keep a small "In Case of Emergency" folder with your estate documents containing the location and passwords (or a recovery key) for your physical backup drives.
Step 6: Sharing the Results
An archive hidden on a hard drive is just a "digital shoebox." The final step is to bring these memories back into the light where your family can actually enjoy them. After the hours spent culling, scanning, and enhancing with Aiarty, this is the most rewarding part of the process.
1. The Modern Coffee Table Book
Digital photos are great, but there is something irreplaceable about turning physical pages.
- Curated Narratives: Don't just print every photo. Create a "Highlights" book for a specific person or decade.
- Premium Printing: Use services like Blurb, Artifact Uprising, or Saal Digital. Because you used AI upscaling, these photos will look crisp even on large, high-gloss pages.
- Add the "Why": Use the captions you saved in your metadata to add text to the pages, turning a photo album into a history book.
2. Collaborative Family Albums
The best part of family history is that it is shared.
- The "Family Vault": Create a shared album on Google Photos or iCloud and invite your relatives.
- Crowdsourced Data: Often, an aunt or a distant cousin will see a photo and comment, "Oh! That's Great-Uncle Arthur!" which helps you fill in the gaps in your metadata.
3. The "Living" Gallery (Digital Frames)
If you have thousands of photos, you can't print them all.
- Wi-Fi Frames: Devices like Aura or Skylight allow you to shuffle your entire archive.
- Dynamic Content: Imagine sitting in your living room and seeing a perfectly restored, sharp image of your parents' wedding from 40 years ago pop up in 4K resolution. It keeps the memories integrated into your daily life.
4. Restoration as a Gift
A high-quality restoration makes for an incredible gift. Frame a side-by-side comparison showing the original faded scan next to the AI-enhanced version. It's a powerful way to show the family the effort you've put into preserving their legacy.
Conclusion: The Best Time to Start is Now
Organizing a family archive can feel like an impossible mountain to climb, but as we've seen, the tools available in 2026 make it more achievable than ever. By breaking the project into small, manageable steps—culling the noise, digitizing with care, and using Aiarty Image Enhancer to bridge the gap between old film and modern screens—you are doing more than just cleaning a closet. You are ensuring that your family's stories don't fade away with the paper they were printed on.
Your turn! Do you have a box of photos waiting in the attic, or have you already started your digital journey? Share your biggest "mystery photo" story in the comments below!
You May Also Like
This post was written by Brenda Peng who is a seasoned editor at Digiarty Software who loves turning ordinary photos into extraordinary works of art. With AI assistance for brainstorming and drafting, the post is reviewed for accuracy by our expert Abby Poole for her expertise in this field.