


Whitening teeth in Photoshop is easy. Making them look naturally white is the part that takes a little more care.
A common mistake is to treat teeth whitening as a simple brightness adjustment. Push the Lightness or Exposure too far and the teeth quickly start to glow. Remove every trace of color and they turn flat gray. The better approach is to deal with the yellow cast first, then add brightness only if the image actually needs it.
For most portraits, a Hue/Saturation adjustment layer is still the most reliable method because it gives you precise control over both color and masking. If you're working with a recent version of Photoshop, Camera Raw's People masking can speed things up by automatically detecting the teeth.
Below, I'll show both workflows and, more importantly, where to stop before the edit begins to look retouched.
How to Whiten Teeth in Photoshop: Quick Answer
The quickest manual method is:
- Select the teeth with the Lasso Tool.
- Add a Hue/Saturation adjustment layer.
- Change the color range from Master to Yellows.
- Lower Saturation until the yellow cast is reduced.
- Switch back to Master and add a small amount of Lightness if needed.
- Refine the layer mask around the gums, lips, and individual teeth.
- Reduce the adjustment layer opacity if the result looks too strong.
The key is to reduce yellow rather than trying to turn the teeth pure white.
Method 1: Whiten Teeth with Hue/Saturation
For controlled portrait retouching, this is the method I use most often. It is non-destructive, easy to revise later, and works well even when the original teeth have uneven color.
Step 1. Select the Teeth
Zoom in until you can clearly see the edges of the teeth, but don't work so close that you lose sight of how the smile fits into the face.
Select the Lasso Tool (L) and draw a loose selection around the visible teeth.
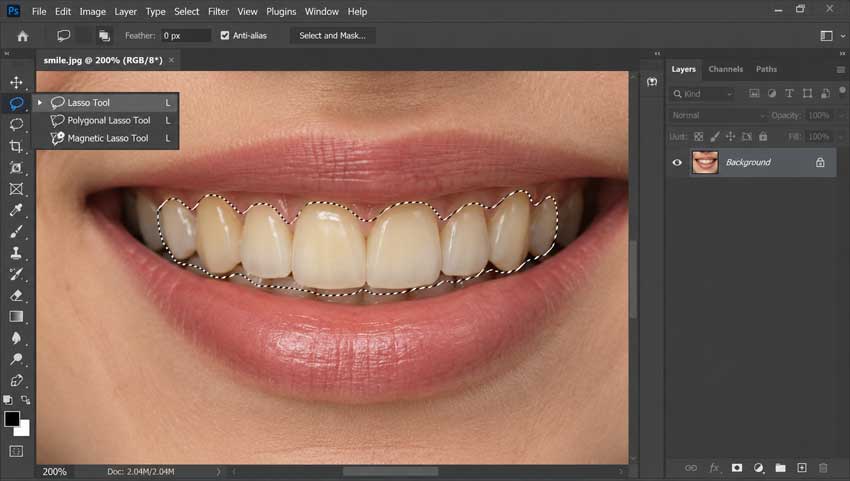
You don't need a perfect selection at this stage. In fact, spending several minutes tracing every tooth is usually unnecessary. Photoshop will turn the selection into a layer mask when the adjustment layer is created, and the mask can be cleaned up much more easily afterward.
Try to keep most of the lips and gums outside the selection, but don't worry if you catch a little of either.
If the mouth contains strong shadows between individual teeth, leave them alone. Those darker areas are important to keeping the smile dimensional later.
Step 2. Add a Hue/Saturation Adjustment Layer
With the selection active, open the Adjustments panel and choose Hue/Saturation.
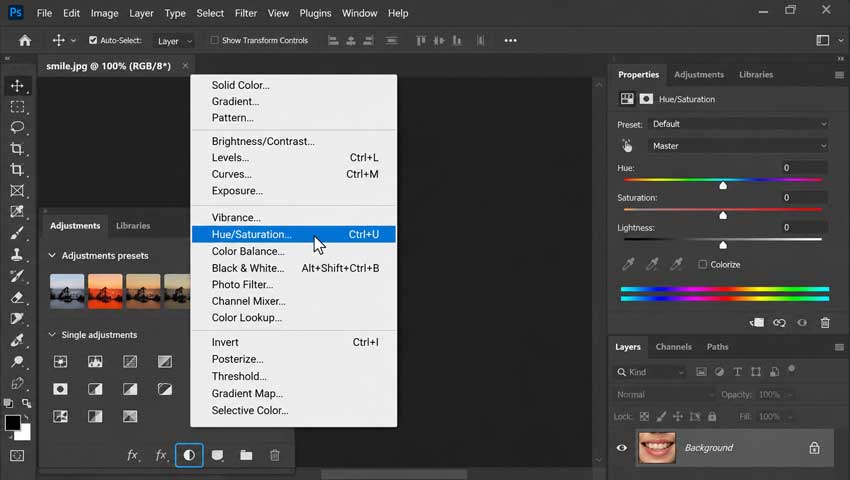
Photoshop creates a Hue/Saturation adjustment layer and automatically converts your selection into a layer mask.
This is preferable to applying Hue/Saturation directly from Image > Adjustments because the adjustment remains editable. You can change the color correction, repaint the mask, lower the opacity, or remove the whitening entirely without altering the original pixels.
For portrait retouching, that flexibility matters.
Step 3. Remove the Yellow Cast
In the Hue/Saturation Properties panel, open the color menu that currently says Master and choose Yellows.
Now lower the Saturation slider.
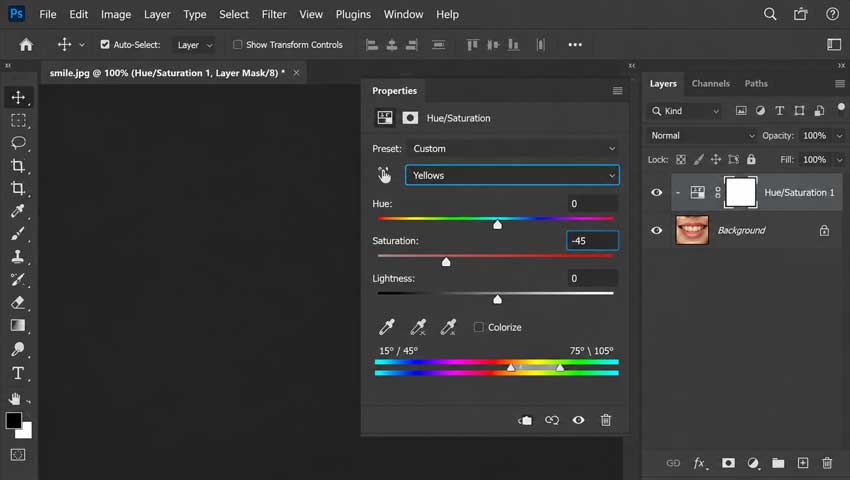
There is no universal value that works for every portrait. As a starting point, something around -30 to -50 is often enough to show you what the adjustment is doing, but judge the result from the image rather than the number.
What you're looking for is a reduction in the obvious yellow cast.
Don't drag Saturation all the way to -100 simply because you can. Real teeth contain warm and neutral tones. Completely stripping that color often produces the familiar gray, lifeless look that makes teeth whitening obvious.
If the yellow correction is affecting colors that don't belong to the teeth, use the color range controls at the bottom of the Hue/Saturation panel to narrow the affected range.
For tricky images, the eyedropper can also help identify exactly which yellow tones need to be targeted.
Step 4. Brighten the Teeth — If They Actually Need It
Once the yellow cast is under control, look at the teeth again before touching Lightness.
Quite often, reducing the yellow is enough.
If the teeth still look a little dark, switch the Hue/Saturation channel back to Master and increase Lightness slightly.
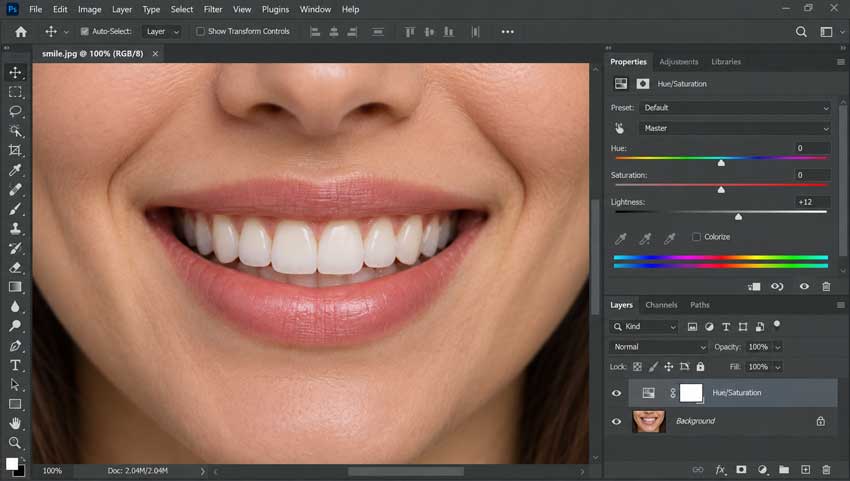
Keep this subtle. A small adjustment usually goes much further than expected, especially in portraits photographed in softer or darker light.
I generally avoid trying to make every tooth the same brightness. Front teeth naturally catch more light, while teeth farther back in the mouth fall into shadow. Flattening those differences makes the smile look pasted on.
If I need more precise tonal control, I'll usually add a separate Curves adjustment layer rather than pushing Hue/Saturation Lightness too far. Curves makes it easier to lift the midtones while keeping some contrast in the teeth.
Step 5. Clean Up the Layer Mask
Click the mask thumbnail on the Hue/Saturation layer and select the Brush Tool (B).
Use a soft-edged brush.
Paint with:
- Black to hide the whitening adjustment
- White to restore it
Clean the effect away from the lips, gums, tongue, and any areas where the adjustment has spilled outside the teeth.
This is where the rough selection from Step 1 gets turned into a clean retouch.
Pay particular attention to the gum line. Whitening that extends even slightly onto pink gum tissue tends to be noticeable.
You also don't need the effect to cover every dark gap between the teeth. Those shadows help define the individual teeth and give the mouth depth.
If the mask edge looks too sharp, open Properties > Masks and add a small amount of Feather. Use only enough to soften the transition. Excessive feathering can spread the correction back onto the lips and gums.
Step 6. Check the Result at Normal Viewing Size
Before calling the edit finished, zoom back out. This step gets skipped surprisingly often. At 200% or 300%, a very white smile can look perfectly reasonable because you're concentrating on small details. At normal viewing size, the same adjustment may jump out immediately. Toggle the adjustment layer on and off and look at the whole face. The viewer's attention should still go to the eyes and expression, not directly to the teeth.
If the whitening suddenly becomes the first thing you notice, lower the adjustment layer Opacity until it settles back into the portrait. For most photographs, slightly underdoing the whitening looks better than slightly overdoing it.
Method 2: Whiten Teeth Faster with Camera Raw Masking
When I'm working through several portraits, manually selecting teeth in every frame gets repetitive. Camera Raw can speed up the selection stage considerably. Recent versions of Adobe Camera Raw can detect people in the image and create masks for individual features, including the teeth. The automatic mask still deserves checking, but on a clear portrait it can remove most of the manual selection work.
Step 1. Open the Image in Camera Raw
If you're already inside Photoshop, I recommend first converting the layer to a Smart Object:
Filter > Convert for Smart Filters
Then open:
Filter > Camera Raw Filter
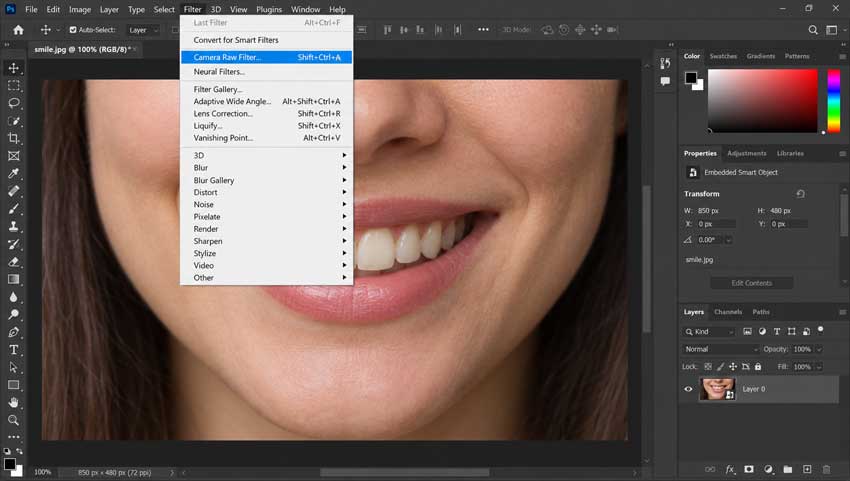
Using Camera Raw as a Smart Filter means you can reopen the settings later instead of committing the adjustment permanently.
Step 2. Select the Teeth with a People Mask
Open the Masking panel in Camera Raw and choose People. Camera Raw will analyze the photograph and identify the people it finds.
Select the person you want to edit, then choose Teeth from the available feature masks and create the mask. Turn the mask overlay on for a moment and inspect the selection.
On a clear, front-facing portrait, the automatic selection can be very good. On a small face, partially open mouth, side angle, or image with heavy compression, expect to make some corrections. Use Add or Subtract with the Brush tool to clean up the mask before adjusting the color.
Step 3. Reduce the Yellow and Lift the Brightness
With the teeth mask selected, start with a small reduction in Saturation. If the teeth are very warm, a slight move toward a cooler Temperature can help, but use this sparingly. Pushing the temperature too far toward blue is one of the quickest ways to make teeth look artificial. Next, add a small amount of Exposure or Whites if the smile needs more brightness.
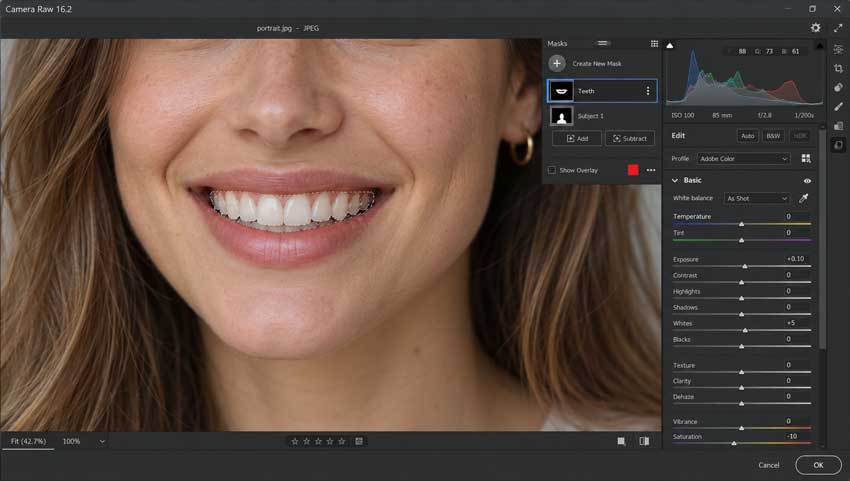
Again, don't assume all of these sliders need to move. A portrait with naturally bright teeth may only need the yellow cast reduced. A darker image may benefit from a little Exposure. Treat the sliders as separate tools rather than a recipe that needs to be copied every time.
Step 4. Inspect the Mask Around the Mouth
Automatic masking saves time, but I wouldn't trust any automatic selection blindly on a finished portrait. Look closely at:
- gum edges
- the corners of the mouth
- dark gaps between teeth
- highlights on wet lips
- braces or dental work, if present
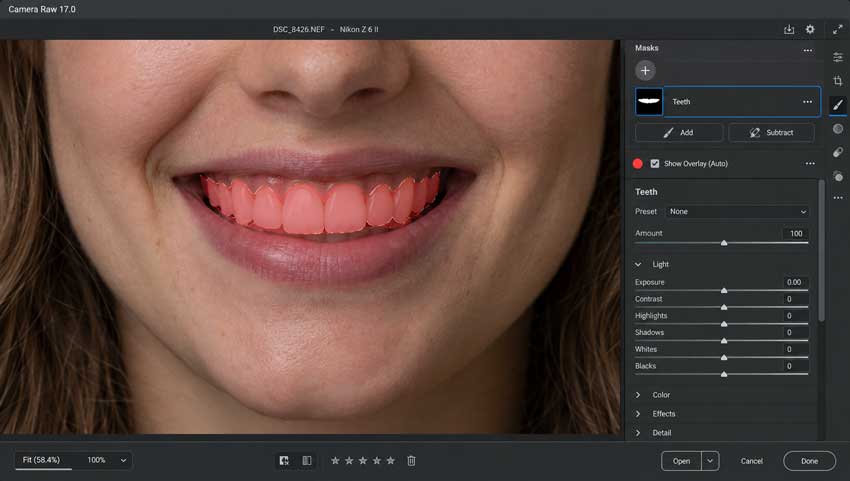
Subtract any areas that shouldn't receive the correction. Once the mask is clean, zoom back out and judge the whitening with the full face visible.
Hue/Saturation vs. Camera Raw: Which Method Is Better?
Both methods can produce excellent results. The main difference is how much manual control you want and how quickly you need to work.
| Method | Best For | Speed | Control |
|---|---|---|---|
| Hue/Saturation | Detailed portrait retouching | Moderate | Excellent |
| Camera Raw People Mask | Fast portrait edits and batches | Fast | Very good |
For a single portrait where I care about every edge of the mask, I usually prefer Hue/Saturation.
For a series of portraits with clear, visible smiles, Camera Raw masking can save a noticeable amount of time.
The final color correction should still be judged manually either way. Automatic selection can identify the teeth, but it can't decide how white those teeth should look in a particular photograph.
How to Make Teeth Look Naturally White in Photoshop
Most bad teeth whitening isn't caused by poor masking. It's caused by pushing the correction too far. A few things make a much bigger difference than they seem.
Don't Remove Every Trace of Yellow
Teeth are not neutral white objects. Their natural color varies, and warm lighting adds even more yellow. The goal of retouching is usually to reduce distracting discoloration, not erase every warm tone in the enamel. If the teeth begin looking gray, you've probably removed too much saturation.
Keep the Original Texture
Whitening doesn't require smoothing. Enamel contains small tonal changes, highlights, edges, and texture. Leave them there. Trying to combine aggressive whitening with heavy surface smoothing often produces the plastic "veneers" look, particularly in close-up portraits.
Preserve the Shadows Between Teeth
The small shadows around and between individual teeth are useful. They establish shape. Brightening those shadow areas to match the front surfaces of the teeth removes separation and makes the entire smile look like one flat white shape.
Match the Lighting in the Portrait
A good whitening adjustment needs to belong to the light already in the photograph. If the face is photographed in dim, warm evening light, extremely bright neutral-white teeth won't make physical sense. The same adjustment that looks fine in a studio beauty portrait can look ridiculous in a low-key environmental portrait. Always judge brightness relative to the eyes, skin highlights, and overall exposure.
Don't Forget About Layer Opacity
One of the easiest ways to improve an aggressive retouch is simply to lower the adjustment layer opacity. If you've spent too long looking at an edit and can't tell whether it's too strong, reduce the opacity by 10–20%, look away from the screen for a moment, and check it again at normal size. Subtle usually wins.
What If the Original Photo Is Too Blurry or Low-Resolution?
Photoshop can change the color and brightness of teeth very precisely, but it can't make a poor source photograph behave like a clean high-resolution portrait. This becomes noticeable when you're working with a heavily cropped image, an old JPEG, a social-media download, or a portrait where the face is simply too small in the frame. At that point, zooming in to make a clean teeth mask may reveal blur, JPEG blocks, noise, or missing detail around the mouth.
In that situation, I prefer to deal with the image-quality problem separately rather than trying to hide it with stronger retouching.
One option is Aiarty Image Enhancer, which can denoise, deblur, reduce compression artifacts, and enhance low-resolution portraits before or after the Photoshop retouch. If I want to preserve the original dimensions, I can use a 1x enhancement; if the face is genuinely too small, upscaling first gives Photoshop more usable resolution for the final local adjustments.
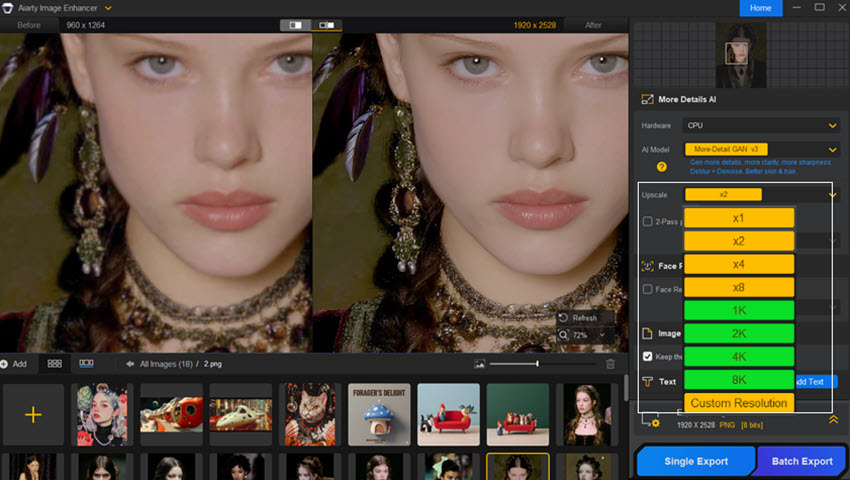
For real portraits, the important thing is restraint. The enhanced version should still preserve believable skin, lip, and tooth texture. Once the source is clean enough to work with, I return to Photoshop for the actual whitening because masking and color control are much more precise there. In other words, use enhancement to solve a quality problem and Photoshop to solve a retouching problem. They are not the same job.
How to Whiten Teeth for Multiple People in Photoshop
If a photo contains more than one person, don't use one strong global adjustment for every smile. Create a separate adjustment layer or Camera Raw mask for each person.
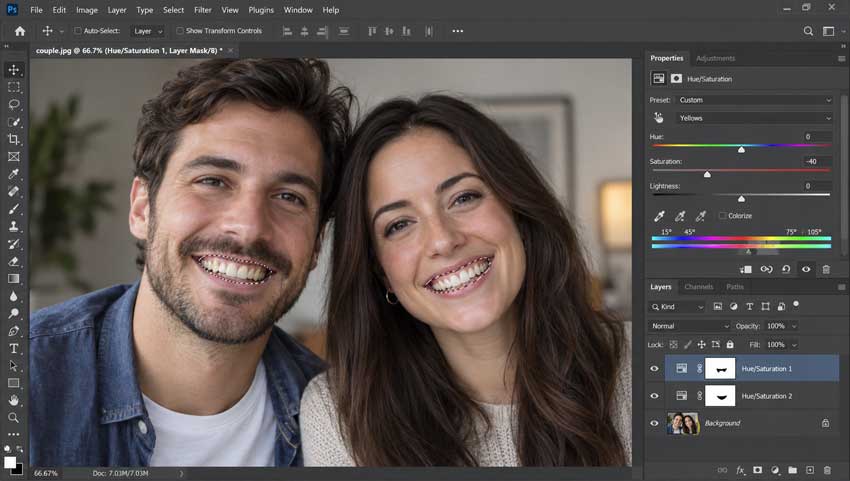
Different people will often have different tooth color, exposure, shadow depth, and surrounding skin tone. An adjustment that looks natural on one person may be too cool or too bright on another. Separate masks give you much better control and only take a little longer to set up.
Final Thoughts
The best teeth whitening in Photoshop is the kind nobody notices.
Start by removing excess yellow, not by chasing pure white. Preserve the enamel texture, leave the natural shadows alone, keep the mask away from the gums, and judge the final brightness in the context of the whole face. For most portraits, Hue/Saturation plus a careful layer mask remains the most controlled approach. Camera Raw's automatic Teeth mask is a useful shortcut when speed matters. And if the source image is too small, noisy, or compressed to retouch cleanly, an image enhancer such as Aiarty Image Enhancer can help restore a better working file before you move on to the local Photoshop adjustments. Whatever workflow you use, stop slightly earlier than you think you need to. In portrait retouching, believable nearly always looks better than perfectly white.

This post was written by Brenda Peng who is a seasoned editor at Digiarty Software who loves turning ordinary photos into extraordinary works of art. With AI assistance for brainstorming and drafting, the post is reviewed for accuracy by our expert Abby Poole for her expertise in this field.
