How to Remaster Old, Blurry, Grainy, or Low-Res Videos to HD or 4K
When people talk about "video remastering", they often mean one thing: making old or low-quality videos look clear and vivid again. But there are actually two very different ways to achieve this goal — depending on what kind of footage you have.
If your original is film (like 8mm, 16mm, or 35mm reels), remastering means re-scanning the film at a higher resolution and restoring it digitally.
If your video was recorded digitally (like VHS tapes, SD TV footage, or old smartphone videos), the best way is to use AI upscaling tools to enhance and reconstruct details.
Below, we’ll explain both methods, what makes them different, and how to do them effectively.
Part 1. Remastering from Original Film Sources (8mm, 16mm, 35mm)
How Film Remastering Works
Film isn’t limited by pixels — it’s a physical medium that can be re-scanned at higher resolution. For example:
- 8mm film can be scanned up to HD or 2K.
- 16mm film can reach 2K–4K.
- 35mm film can even be scanned in 4K or 8K.
So, a real film remaster doesn’t "stretch" an image like an AI upscaler does. Instead, it goes back to the original negatives or reels and captures them again with modern film scanners. This process naturally produces a much cleaner, sharper digital master — without inventing new pixels.
As one film expert put it on Reddit: "They don't just upscale; they re-scan the original film or negatives at higher resolution."
Typical Film Remastering Process
- Clean the film – Remove dust, dirt, and scratches.
- Re-scan – Use professional film scanners (such as Lasergraphics or Blackmagic Cintel) to digitize each frame in high resolution.
- Color correction – Adjust contrast, color balance, and exposure for modern displays.
- Digital restoration – Remove flicker, stabilize motion, and repair damaged frames.
- Final mastering – Export in your target format (4K, HDR, etc.) for playback or archiving.
Pros & Cons of Film Remastering
- True optical detail recovery
- Professional-grade results
- No artificial pixels
- Requires original film reels
- High cost & equipment needed
- Time-consuming process
When to Choose This Method
If you have access to the original film reels (8mm home movies, 16mm documentaries, or 35mm prints), this is the best and most authentic way to bring your footage back to life. It’s exactly how studios remaster old music videos or classic movies for 4K Blu-ray and streaming releases.
AI Film Restoration: Restore & Upscale Movie to 4K >>
Part 2. Remastering Old Digital Videos with AI Upscaling
Not all footage was shot on film. Many old videos — such as VHS tapes, early digital camera clips, or 480p phone recordings — don’t have higher-resolution sources. In those cases, the only practical solution is AI-based video upscaling.
How AI Upscaling Works
AI upscalers use deep learning to analyze each frame and predict what missing details should look like. They don’t just enlarge pixels; they rebuild textures, edges, and patterns by referencing what similar high-quality footage looks like.
Pros & Cons of AI Upscaling
- Simple and affordable
- Fast enhancement with no special equipment
- Works on any digital video
- May introduce minor artifacts
- Limited by source quality
- Not true restoration of details
Preparing Your Video for Remastering
Before you can start remastering your video, it's important to get it ready for the process. If you’re working with old VHS tapes or other physical formats, the first step is digitizing your footage. While it might sound like a hassle, this step is crucial for making them suitable for modern video editing tools. For VHS tapes or other analog sources, you can transfer the video to your computer with a capture card or suitable utility.
Before diving into any editing, make sure to create a backup of your original video. It’s always a good idea to keep a copy of the raw footage in case anything goes wrong during the remastering process. You can store it on an external hard drive or cloud service to keep it safe.
By properly preparing your video for remastering, you ensure that you’re working with the best possible starting point.
Best 4 AI Upscalers for Video Remastering
Now that you’ve prepared your video for remastering, it's time to explore the best tools for the job. Below are four of the most popular and effective video remastering tools available today.
#1. Aiarty Video Enhancer: AI-Powered Video Remastering Tool
Aiarty Video Enhancer is an AI-driven tool designed to remaster videos with minimal effort. It comes with three deeply optimized AI models—moDetail-HQ v2, smooth-HQ v2, and superVideo-HQ—that take full advantage of your GPU to quickly handle a variety of video issues, both in real-world and animated footage. These models can help remaster videos to HD/4K while automatically performing noise reduction, deblurring, and sharpening to enhance the overall video quality.
Whether you're working with old family videos, classic films, or animated content, Aiarty Video Enhancer offers an intuitive, automated workflow that’s perfect for users who want an easy yet effective video remastering solution.
- Easy-to-use interface
- Automatic AI enhancements
- Supports remastering video to 4K
- Batch processing for multiple videos
- Fast video processing speed
- Affordable pricing
- Very fast on GPU, but noticeably slower on CPU.
- SDR 8-bit to HDR 10-bit results need an HDR display to view properly.
- Works fully offline, with no cloud processing yet.
How to Use Aiarty Video Enhancer to Remaster Video
Step 1: Start by downloading and installing Aiarty Video Enhancer.
Step 2: Once the software is installed, open it and click the + button to import your video. You can also drag and drop multiple files for batch processing if you're working with several videos at once.
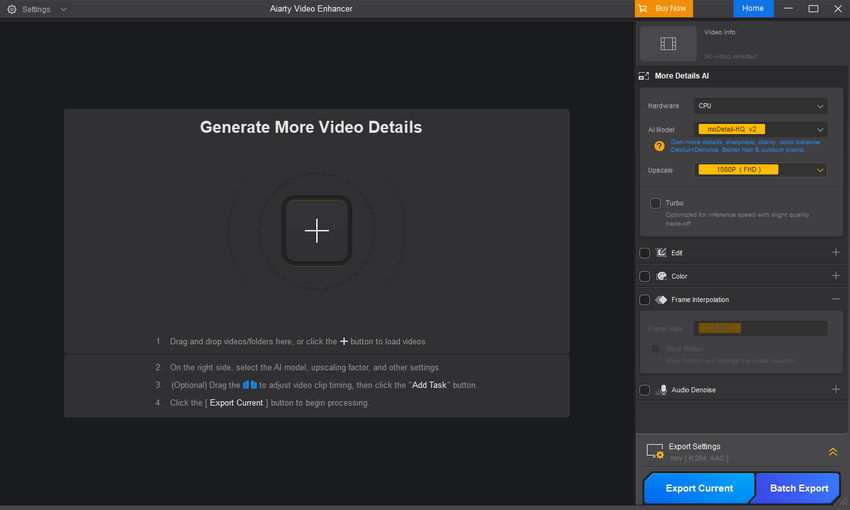
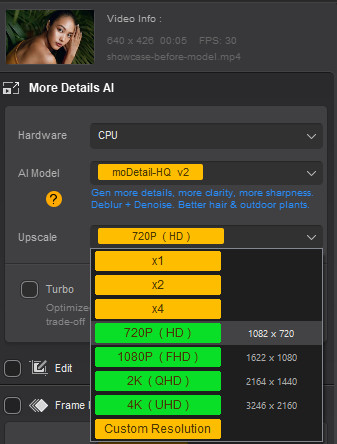
Step 3: Choose an AI model for remastering videos. You can always switch models later if necessary.
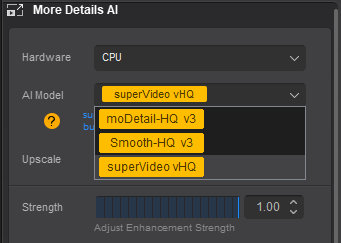
Aiarty Video Enhancer offers several AI models optimized for different video types and scenarios:
- moDetail-HQ v3: Utilizes Diffusion and GAN techniques to achieve precise deblurring and noise reduction. This model excels in enhancing fine details, such as hair, plants, and outdoor scenes with natural daylight. It supports 1x, 2x, and 4x upscaling options.
- smooth-HQ v3: Employs Diffusion to provide smooth, natural enhancements, particularly effective for videos with indoor lighting, facial features, and footage with moderate imperfections. This model ensures a clean and polished result.
- superVideo-vHQ: Best suited for very low-light footage like nighttime scenes or cityscapes. It delivers excellent denoising and high-quality results, though it is limited to 2x upscaling for optimal performance.
Step 5: Once your settings are configured, click the Preview button. Aiarty Video Enhancer will load the model and begin processing the video. This usually takes just a few seconds, thanks to the tool’s fast model loading and optimized inference speed.
Once processed, you’ll be shown a real-time preview. If you're satisfied with the result, proceed to the next step. If not, feel free to try another AI model and Strength value—it’s quick and easy to switch.
Step 6: When you’re happy with the preview, click Add Task to queue the video for export. To export a single video, click Export Current. If you have multiple videos, click Batch Export to process them all at once.
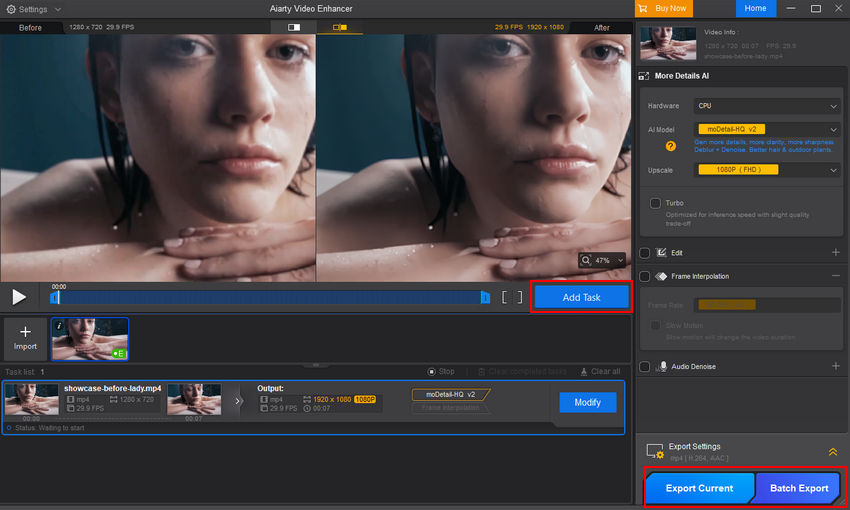
Below is a video where I used Aiarty Video Enhancer to remaster a blurry, artifact-ridden video from 720p to 1080p.
Additional test examples can be found in this third-party YouTube video.
#2. Topaz Video AI: AI-Powered Video Remastering Tool
Topaz Video AI is another powerful AI-driven video remastering tool designed for professionals and enthusiasts who need high-quality video restoration. With its advanced machine learning models, Topaz provides exceptional video upscaling capabilities, including support for up to 8K resolution, as well as deblurring, noise reduction, and enhancing fine details.
With support for upscaling up to 8K, Topaz Video AI offers impressive performance in video remastering tasks. However, users should note that while this tool offers significant improvements, it can be demanding on system resources and may require a powerful computer to process high-resolution videos.
- Supports remastering videos to 8K resolution.
- Wide selection of AI models tailored for different video types.
- Allows some manual adjustments for fine-tuning.
- Batch processing for handling multiple videos at once.
- Annual subscription of $299/year can be quite expensive for casual users.
- Can be resource-intensive and requires a high-performance machine for best results.
- Manual adjustments can be overwhelming for beginners without prior experience.
How to Use Topaz Video AI to Remaster Video
To start using Topaz Video AI, follow these simple steps:
Step 1: Begin by downloading and installing Topaz Video AI from the official website. Once installed, open the application to begin.
Step 2: Click the Browse videos button to import your video file. You can also drag and drop videos into the workspace for convenience.
Step 3: Enable Enhancement and choose the output resolution you want to upscale your video to. Topaz Video AI offers upscaling options such as 2× and 4×, allowing you to enhance your footage from 1080p to 8K if needed.

Step 4: Choose video type: Progressive, Interlaced, Interlaced Progressive.
Step 5: Select an AI model for remastering. Topaz Video AI provides several AI models, each optimized for different video types.
- Proteus: A general enhancement model that allows fine-tuning of several parameters, making it versatile for most video types.
- Iris: Focuses on noise reduction and face enhancement, especially in low-quality footage, making it great for older or heavily compressed videos.
- Nyx: Designed for denoising high-resolution footage with minimal scaling, ideal for old films or VHS videos.
- Rhea: A model specifically for fine details, excellent for 4x upscaling and ideal for organic textures like nature scenes or close-ups.
- Artemis: A balanced model that works well for improving overall detail and reducing noise in a variety of footage types.
- Gaia: Optimized for CGI and animation footage, particularly useful for upscaling animated content.
- Theia: Provides sharpening and detail enhancement with manual settings to fine-tune the final result.
Step 6: Once you’ve selected your settings, click the Render Preview button to see a sample of the enhanced video.
Step 7: After previewing the video, click the Quick Export button to automatically save the remastered video to its original location. Alternatively, use Export As to select a different destination and rename the output. You can also choose Cloud Export to process the video in the cloud and free up your machine's resources.
#3. YouCam Video: Online AI Video Remastering Tool
YouCam AI Video Enhancer is a powerful online tool designed to help you remaster your video footage with the power of artificial intelligence. It focuses on enhancing video quality, upscaling resolution, and restoring details, making it an excellent choice for users who want to improve their videos directly from a web browser without complex software installations.
In addition, YouCam also offers iOS and Android apps for on-the-go video editing.
- Automatically remasters low-quality videos to HD.
- No software installation, accessible from any Mac or Windows device.
- Get 5 free credits upon registration to try out the service.
- Requires a stable internet connection for uploads and processing.
- Full features and watermark removal typically require a subscription.
- You can't manually choose a specific output resolution.
- Remastered videos may sometimes exhibit unnatural or "unrealistic" details.
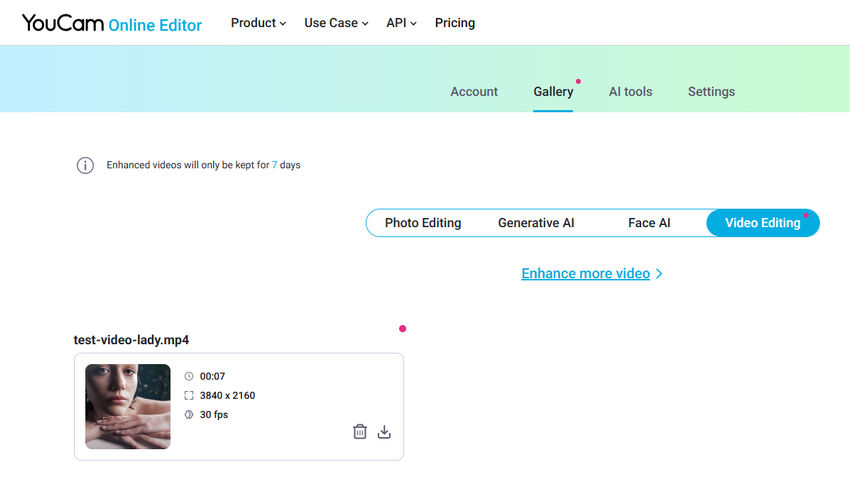
How to Use YouCam Video to Remaster Video
Step 1: Open YouCam AI Video Enhancer and then click video icon or simply drag your MP4, MOV, or M4V file into the enhancer.
Step 2: YouCam will then begin uploading your video. Once the upload is complete, it will automatically start the upscaling process.
Step 3: After the upscaling is finished, the tool will display your enhanced result. You can preview this result to see the improvements.
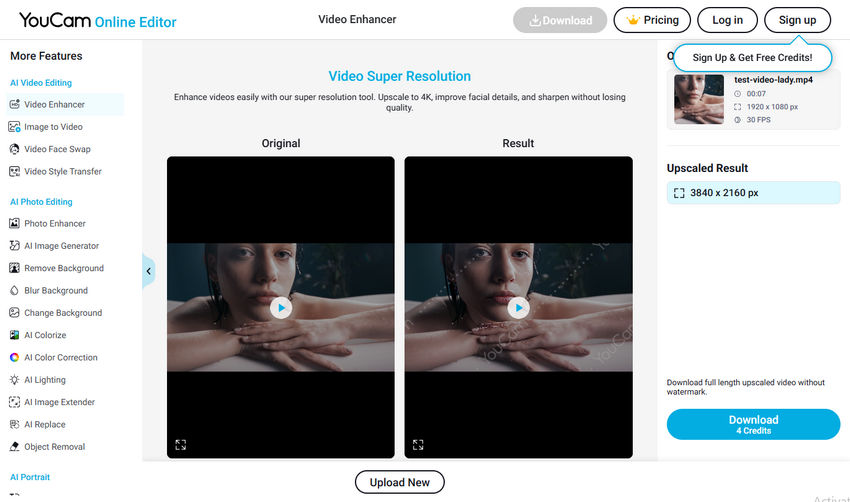
Step 4: Finally, click the "Download" button. YouCam will begin creating your final video. Once it's done, click the download button again to save the remastered video to your local device.
#4. Adobe Premiere Pro: Video Remastering Tool for Professionals
Adobe Premiere Pro is one of the industry-leading video editing software programs, used by professionals across various fields, from filmmakers to YouTubers. While it’s traditionally known for full-fledged video editing, Premiere Pro is also a powerful tool for remastering videos, offering a range of features for upscaling, noise reduction, color correction, sharpening, and more.
If you're looking for advanced control and precision over your video remastering process, Premiere Pro is the go-to option. Its wide array of professional-grade tools makes it suitable for users who want to dive deeper into the details of video enhancement.
- Highly customizable with access to powerful editing tools and plugins.
- Professional-grade color correction and sharpening tools.
- Advanced noise reduction and stabilization options.
- Supports 4K and higher resolutions for upscaling.
- Works with almost any video format.
- Excellent for multi-layer editing and precise adjustments.
- Subscription-based pricing can be expensive for casual users.
- Steep learning curve for beginners, making it harder to use without prior experience.
- Requires a powerful computer to run smoothly, especially when working with high-resolution footage.
- Not ideal for quick, simple enhancements; requires more time and expertise.
How to Use Adobe Premiere Pro to Remaster Video
Step 1: Import Your Video
Launch Premiere Pro and create a new project. Import your video by clicking File > Import or simply drag and drop the file into the workspace.
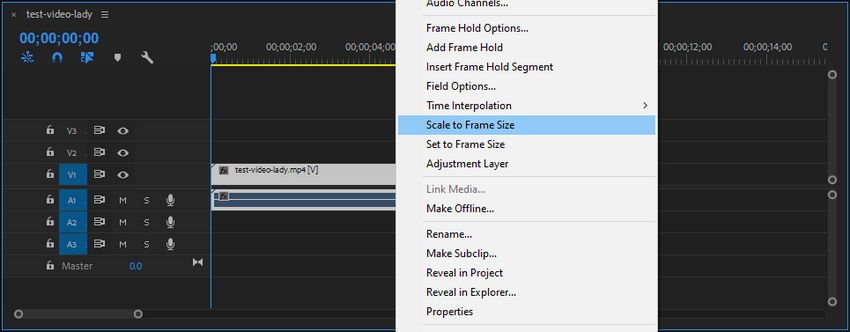
Step 2: Use the Upscaling Feature
To upscale your video, use the 'Scale to Frame Size' or manually adjust the scaling settings under the Effect Controls panel. For a higher resolution, consider using Premiere Pro's built-in AI tools like Adobe Sensei for automatic upscaling.
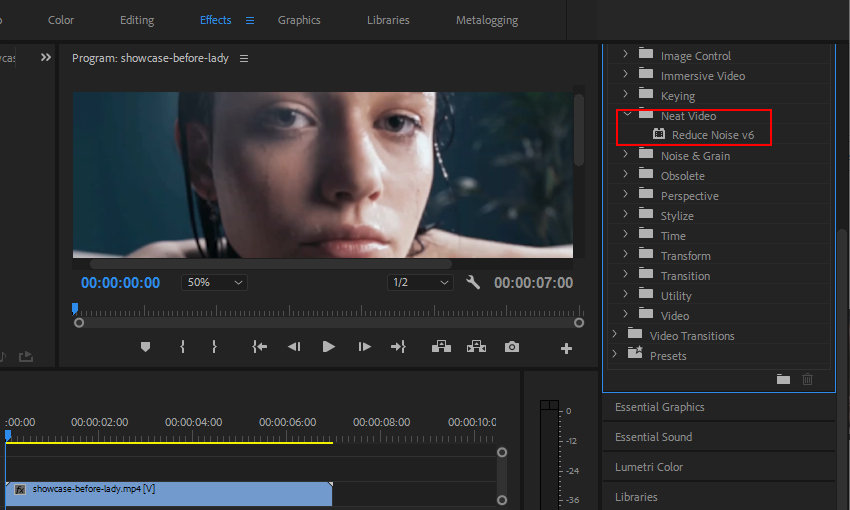
Step 3: Apply Noise Reduction
Navigate to Effects and search for noise reduction tools. Use the Reduce Noise effect under Effects Control for cleaner footage, or apply more advanced noise reduction filters like Neat Video (a plugin) for more precise results.
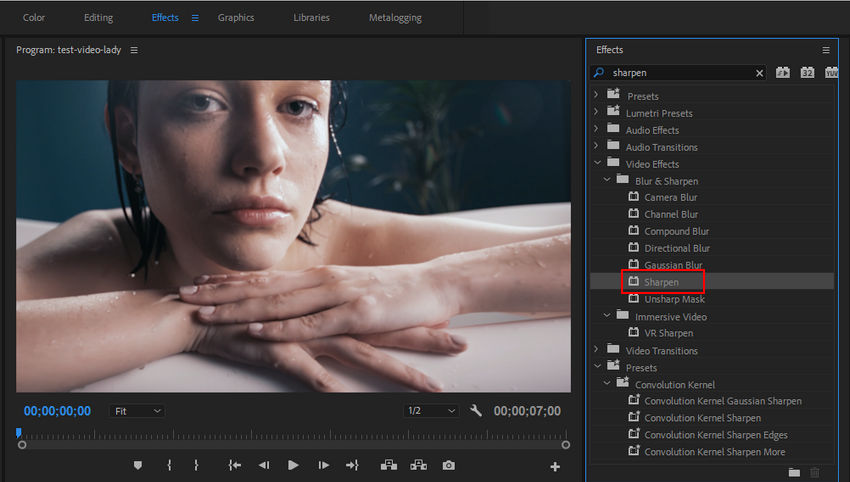
Step 4: Sharpen and Enhance the Video
Under Effects, locate the Sharpen effect and apply it to your video clip. Adjust the amount of sharpening according to the video's original quality. You can also enhance the colors and contrast with the Lumetri Color Panel for more vibrant footage.
Step 5: Stabilize the Footage
If your video is shaky, apply the Warp Stabilizer effect from the Effects panel. Premiere Pro automatically stabilizes the footage while maintaining the natural look of the video.

Step 6: Export the Remastered Video
Once you're satisfied with the enhancements, click File > Export > Media. Choose the desired export settings, such as H.264 for MP4 output, and set the resolution (e.g., 1080p, 4K). Finally, click Export to save your remastered video.
 FAQs
FAQs
To remaster a video into 4K, you can use AI-powered tools like Aiarty Video Enhancer or Topaz Video Enhance AI. These tools automatically upscale low-resolution footage to 4K, preserving the quality without distortion. Just import your video, select the desired resolution, and let the AI handle the rest.
Yes, you can use mobile apps like YouCam Video Enhancer, which allows you to remaster videos directly on your Android or Samsung device. These apps provide easy-to-use interfaces for enhancing video quality on the go.
Aiarty Video Enhancer can automatically unblur your video with its advanced AI models. By selecting the right model, such as moDetail-HQ v2 or smooth-HQ v2, Aiarty intelligently enhances the details and sharpens blurry footage, restoring clarity and improving overall visual quality. With minimal effort, you can transform unclear, low-resolution videos into clearer, more defined footage.
Aiarty Video Enhancer can effectively denoise old, grainy footage, especially with its superVideo-HQ model. This model is optimized for low-light environments, removing noise while preserving high-quality details. As you remaster the video to 4K, Aiarty applies powerful AI algorithms to enhance resolution without pixelation, ensuring smooth upscaling and preserving the original look.
You May Also Like
This post was written by Brenda Peng who is a seasoned editor at Digiarty Software who loves turning ordinary photos into extraordinary works of art. With AI assistance for brainstorming and drafting, the post is reviewed for accuracy by our expert Abby Poole for her expertise in this field.