 Aiarty Image Enhancer

Architecture Photography: How to Take Better Photos of Buildings

Updated on
Architecture photography is a unique and exciting way to capture the beauty of buildings and structures. Whether you are photographing a modern skyscraper or a historical landmark, architecture photography allows you to showcase the details and design that make each building special.
In this guide, you'll learn the essential tips and techniques to improve your architecture photography skills. From choosing the right equipment to mastering composition, we'll walk you through the tips and ideas that will help you capture stunning architectural images. You'll also discover how post-processing can bring out the best in your photos, turning good shots into great ones. Ready to dive in? Let's get started!
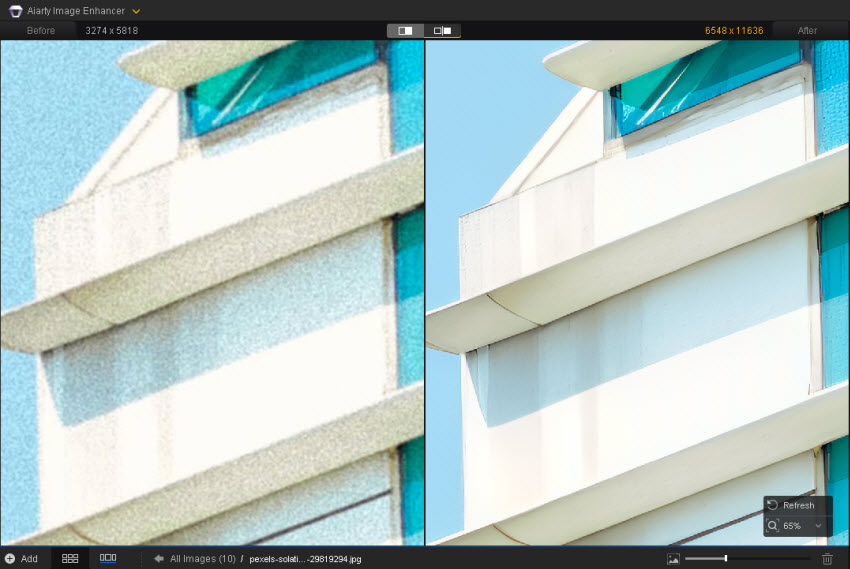
Architecture photos can lose clarity when shot in low light, at high ISO, or from a distance. Cropping or enlarging the image can also make textures and architectural elements look softer. Aiarty Image Enhancer can reduce noise, correct softness, and enhance fine details while preserving the original character of the photo.
What Is Architecture Photography
Architecture photography, also called architectural or building photography, is the practice of photographing buildings and structures in a way that communicates their design, scale, geometry, materials, and surroundings.
It includes both exterior and interior photography. An exterior photograph may emphasize the overall form of a building, its façade, or its relationship with the surrounding city. An interior photograph may focus more on spatial layout, proportions, lighting, materials, and architectural details.
The goal is not always to show the entire structure. A close-up of a window pattern, staircase, column, façade texture, or repeating geometric element can also be a strong architectural photograph.
Types of Architectural Photography
- Exterior Photography: Focuses on the outside of buildings. This type often emphasizes the building's size, materials, or surroundings. It's ideal for shooting skyscrapers, houses, or monuments.
- Interior Photography: Captures the inside of buildings, showcasing layouts, lighting, and textures. Interior photography is common in real estate, magazines, or showcasing modern interiors.
What Equipment Do You Need for Architecture Photography?
You do not need a specialized camera to start photographing architecture. A mirrorless camera or DSLR gives you more control over exposure, focal length, and perspective, while a modern smartphone can also work well in good lighting.
The lens and tripod can be just as important as the camera body.
Choose a lens based on the scene. A wide-angle lens is useful when you need to fit a large building into a confined space or photograph interiors. Around 16–35mm on a full-frame camera can be a useful starting range, although the right focal length depends on the building, available space, and perspective you want. A standard or short telephoto lens can be useful for isolating façades, windows, patterns, and other architectural details. A very wide lens can exaggerate perspective, making nearby parts of a building appear much larger than distant areas. Tilt-shift lenses offer more precise perspective control and can help keep vertical lines straight when photographing tall buildings, although perspective can also be corrected in post-processing.

Use a tripod when stability matters. A tripod is particularly useful for low-light architecture photography, long exposures, exposure bracketing, and precise framing. It also helps keep the camera in the same position when you need to combine multiple exposures. Use a remote shutter release or the camera's timer when possible to reduce camera movement.
Keep your setup simple. For most architecture photography, you can start with a camera, a suitable wide or standard lens, and a tripod. More specialized equipment, such as a tilt-shift lens, becomes useful when you need greater control over perspective or are working on professional architectural assignments.
Best Camera Settings for Architecture Photography
There is no single camera setting that works for every building or lighting condition, but the following settings are a useful starting point for static architectural subjects.
| Setting | Starting Point | Why |
|---|---|---|
| Aperture | f/8–f/11 | A useful range for overall sharpness and depth of field |
| ISO | 100–400 | Keeps noise relatively low and preserves image quality |
| Shutter Speed | Adjust to the light | Use a tripod when a slower shutter speed is needed |
| Focus | Single-point or manual | Helps keep the important architectural elements sharp |
| File Format | RAW | Gives more flexibility for exposure and white-balance adjustments |
| White Balance | Auto or manual | Choose based on the lighting and color consistency you need |
For a bright exterior during the day, you can often start around ISO 100 and f/8–f/11. If you are using a tripod, there is usually less reason to increase ISO simply to maintain a fast shutter speed.
For interiors, twilight scenes, or handheld shooting, you may need a wider aperture, higher ISO, or faster shutter speed.
The important thing is to treat these settings as starting points rather than fixed rules. The building, available light, depth of field, and desired visual effect should determine the final settings.

How to Find the Best Light for Architecture Photography
Light can completely change the appearance of a building. The same façade may look flat at one time of day and show strong depth, texture, and shadows a few hours later.
Golden Hour
The soft, directional light around sunrise and sunset can add warmth, depth, and longer shadows without the harsh contrast of direct midday sunlight.
Golden hour works particularly well for:
- historic buildings and textured façades
- brick, stone, and other materials with visible texture
- residential architecture
- buildings surrounded by trees or landscape
The direction of the light also matters. Side lighting can emphasize columns, walls, windows, and other architectural features, while front lighting produces a more evenly lit façade.

Blue Hour
Blue hour can be especially effective for city architecture and buildings with interior lighting. The remaining daylight keeps some color in the sky while artificial lights inside the building begin to stand out.
This combination can create a balanced exposure between the sky and a brightly lit building. Because shutter speeds are often slower at this time, a tripod can help keep the building and surrounding details sharp.
Overcast Weather
Cloudy weather produces soft, diffused light with fewer harsh highlights and deep shadows. This makes overcast conditions useful when the goal is to emphasize the structure and texture of a building rather than dramatic sunlight.
Overcast light works well for:
- concrete and stone architecture
- detailed façades
- subtle colors and materials
- low-contrast compositions
- buildings where direct sunlight would create distracting highlights
It can also make exposure easier because the difference between bright and dark areas is usually smaller.
Midday Light
Midday light is not automatically a problem for architecture photography. Although direct sunlight can create strong contrast, it can also produce defined shadows and graphic patterns that complement modern, geometric, or minimalist buildings.
Instead of avoiding midday light completely, look for ways to make the shadows part of the composition. Strong sunlight can emphasize repeating windows, columns, balconies, edges, and other geometric elements.

Rain, Snow, and Reflections
Changing weather can add atmosphere and visual interest to an architectural photograph. Wet pavement can create reflections of buildings and city lights, while rain, fog, or snow can simplify the surroundings and draw attention to the structure itself. Snow can also create a clean background that makes architectural shapes and lines easier to isolate.
Weather does not always have to be perfect for architecture photography. Sometimes unusual conditions provide a more distinctive view of a familiar building.
High-Contrast Light and HDR
Architecture often contains both very bright and very dark areas, especially when photographing a building with strong sunlight, deep shadows, or bright windows. If a single exposure cannot retain enough detail in both areas, HDR or exposure bracketing can help preserve highlight and shadow information.
However, HDR is best used selectively. Over-processing can make architectural photos look unnatural and reduce the clean, structured appearance that is often important in building photography.
When possible, start by getting the exposure as balanced as you can in-camera, then use HDR or exposure blending only when the scene's dynamic range requires it.
How to Handle High-Contrast Architecture Scenes
Architecture often creates difficult exposure situations, such as a dark building beneath a bright sky or an interior with bright windows and shadowed corners.
When one exposure cannot retain enough detail in both highlights and shadows, consider:
- shooting RAW
- checking the histogram
- protecting important highlights
- using exposure bracketing
- blending multiple exposures when appropriate
- recovering shadows and highlights during post-processing
HDR can help in high-dynamic-range scenes, but it does not need to be used for every architecture photo. Keep the result natural and avoid excessive local contrast or unnatural halos.
Architecture Photography Composition Tips
Composition is one of the most important parts of architecture photography. Instead of simply fitting the whole building into the frame, look for relationships between lines, shapes, symmetry, space, and surrounding elements.
Use symmetry and geometry. Many buildings naturally provide symmetrical façades, windows, columns, arches, and repeating patterns. A centered composition can emphasize this structure, while repeating shapes can create rhythm and turn an ordinary building into a more graphic image.
Look for leading lines and framing. Roads, staircases, railings, corridors, rooflines, and edges of buildings can guide the viewer through the frame. Windows, arches, doorways, and other structures can also act as natural frames, adding depth while separating the subject from a busy background.

Experiment with perspective and negative space. Do not settle for the first obvious viewpoint. Move around the building, change your camera height, try a low or elevated angle, or step farther back to include more of the surroundings. At the same time, leave enough empty sky, wall, or pavement when it helps emphasize the building's shape.
Capture details, not just the whole building. Architectural photography does not always need to show an entire structure. Zoom in on materials, textures, windows, decorative elements, staircases, reflections, or unusual structural details to reveal aspects that disappear in a wide shot.
Include people when you need to show scale. A person walking through a large hall or standing beside a tall building gives viewers an immediate sense of size. Keep the person as a supporting element when the architecture is meant to remain the main subject.

How to Keep Buildings Straight in Architecture Photography
One of the most common problems in architecture photography is the appearance of converging vertical lines. Tall buildings may seem to lean inward or outward, especially when you tilt the camera upward to fit the entire structure into the frame.
This is commonly referred to as keystone or perspective distortion.
Why Do Buildings Look Tilted?
When the camera is pointed upward, the sensor is no longer parallel to the building's vertical plane. Parallel lines can therefore appear to converge toward the top of the frame.
This is a perspective effect rather than simply a problem with the lens.
How to Avoid Perspective Distortion
Try these approaches:
Keep the camera level. Use your camera's electronic level or grid to keep vertical and horizontal lines aligned.
Move farther away. If possible, step back and use a longer focal length instead of standing close and pointing a wide-angle lens upward.
Change your viewpoint. A higher shooting position can change the relationship between the camera and the building.
Use a tilt-shift lens. The shift movement allows you to change the framing while keeping the camera more level.
Leave some extra space around the building. You can crop after correcting perspective, so avoid framing the building too tightly when you know correction will be necessary.

How to Correct Perspective in Post-Processing
Perspective can often be corrected with transformation tools in applications such as Lightroom or Photoshop.
A practical workflow is:
- Correct lens distortion.
- Adjust vertical and horizontal perspective.
- Check the building's major lines.
- Crop the empty areas created by the correction.
- Adjust exposure and color.
- Fine-tune details after the geometry looks right.
Correct perspective before applying heavy sharpening or detail enhancement. Otherwise, you may spend time enhancing an image that still needs geometric correction.
How to Edit Architecture Photos
Architecture photo editing should first correct technical issues such as perspective, exposure, and color before moving on to noise reduction or detail enhancement. A simple workflow is to start with the corrections that affect the overall image, then refine texture and detail at the end.
Start with perspective and lens correction. Correct converging verticals and lens distortion first, especially when photographing tall buildings or interiors. Keep important architectural lines straight and natural, then crop the image if the correction leaves empty areas around the edges.
Next, balance exposure and color. Recover highlights in bright skies or windows, lift overly dark areas, and adjust white balance when daylight and artificial lighting create unwanted color casts. Fine-tune contrast, highlights, shadows, and saturation carefully so that materials such as stone, brick, concrete, glass, and metal still look natural.
Then reduce noise and prepare the image for detail enhancement. Night architecture photos, high-ISO interiors, or images with heavily lifted shadows may need noise reduction before sharpening or upscaling. Avoid applying aggressive sharpening at this stage, as it can emphasize noise and create harsh edges.
Enhance Fine Details with Aiarty Image Enhancer
Once the basic corrections are finished, Aiarty Image Enhancer can be used when an architecture photo still needs more detail, cleaner textures, or higher resolution.
For architecture photography, this can be useful in several situations:
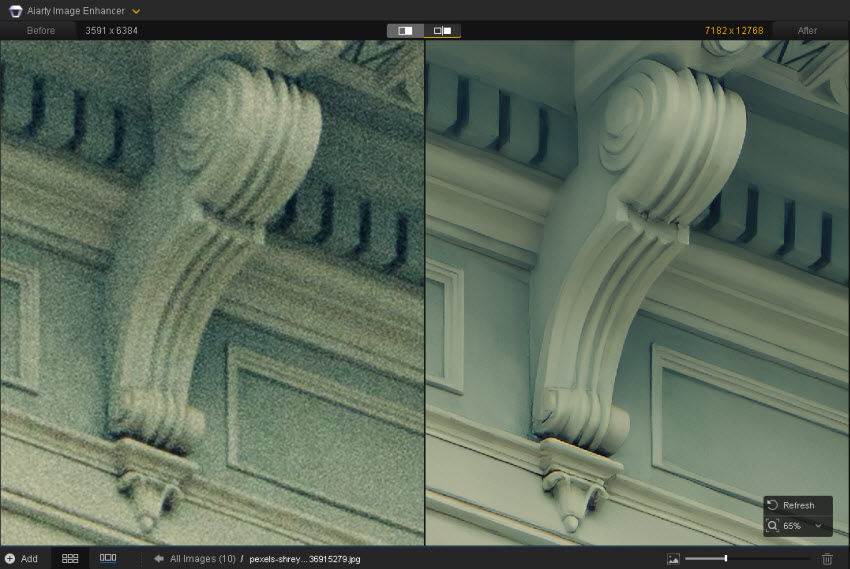
- Noisy night photos: Reduce high-ISO noise while preserving visible building details.
- Soft or slightly blurred photos: Improve clarity when fine architectural edges lack definition.
- Cropped building details: Recover more visible detail from a tightly cropped façade, window, ornament, or structural element.
- Large architecture prints: Upscale a photo when a higher-resolution output is needed.
- Fine material textures: Bring out details in brick, stone, concrete, wood, glass, and metal.
Aiarty Image Enhancer works as a local desktop AI enhancement step, so you can use it after your normal RAW, perspective, exposure, and color corrections rather than replacing your existing editing workflow.
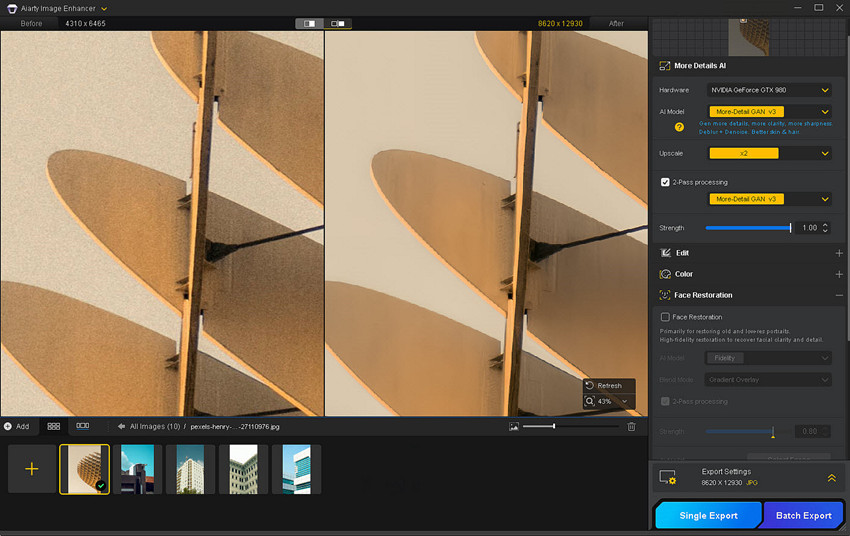
A practical workflow can look like:
Camera → RAW processing → Perspective correction → Exposure & color → Noise reduction → Aiarty Image Enhancer → Final export
The key is to enhance only as much as the image needs. Architecture photography benefits from clean lines and visible texture, but excessive sharpening or artificial detail can make materials look unnatural.
Conclusion
Architecture photography is a captivating way to showcase the beauty, history, and design of buildings and structures. By understanding the right techniques, such as mastering composition, working with light, and using post-processing tools effectively, you can create images that truly stand out. Exploring unique angles and paying attention to details help tell the story behind every structure, whether it's a towering skyscraper or a hidden architectural gem.

Brenda Peng is a seasoned editor at Digiarty Software who loves turning ordinary photos into extraordinary works of art. With years of experience behind the lens and in front of the computer, Brenda shares her passion for photography, image enhancement, and editing through easy-to-follow tutorials.
