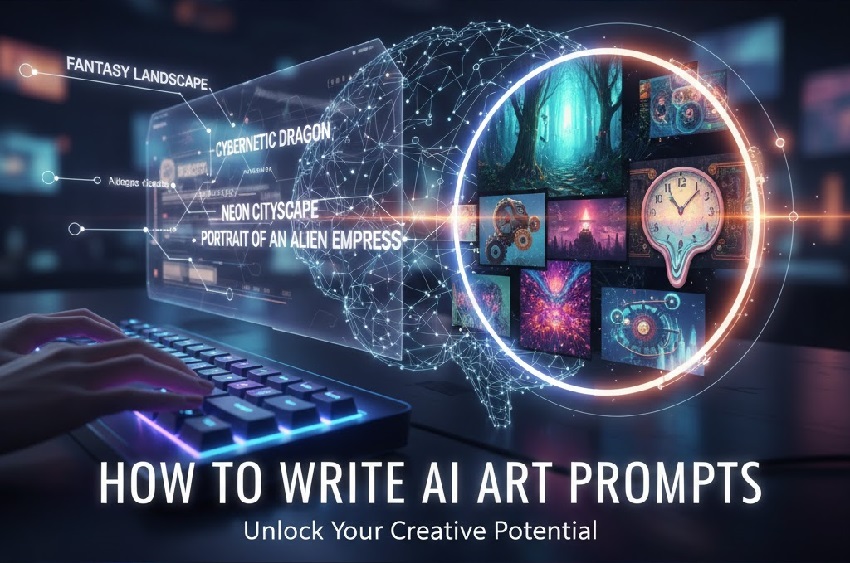
For many people who have spent time using tools like Midjourney, Stable Diffusion, or DALL-E, they must know the struggle: most attempts yield good but generic results. The key to unlocking truly unique, high-quality artwork isn't just writing more words—it's writing the right words, in the right order.
This comprehensive guide tells you how to write AI art prompts with any single detail, breaking down the anatomy of a perfect prompt, transforming your text input from a simple request into a detailed, four-part blueprint that guarantees artistic control and professional-grade output.
I.The Anatomy of a Perfect Prompt: Understanding the Core Structure
This is where the magic begins. As a seasoned editor and image enthusiast, I know that a great image starts with a clear vision—and when dealing with AI, that vision must be translated into precise, engaging language. Let's break down the first, and most critical, layer of your prompt structure.
1. Subject and Content (The "Who" or "What")
If you're ready to ditch the generic stock photos and start generating truly custom, unique visuals, you're in the right place. When you fire up an AI like Midjourney, DALL-E, or Stable Diffusion, the very first thing the model needs is a clear anchor: what are we actually looking at?
This initial subject definition is the foundation of your entire prompt. It is the non-negotiable starting point, and if you mess this up, the rest of your carefully constructed modifiers won't be able to save it.
Be Specific with Nouns and Descriptions
Think of the AI as an incredibly talented artist who only understands the literal world. If you ask it to illustrate something vague, like "peace" or "love," you'll likely get a messy or abstract result—it struggles because its training data is built primarily on concrete nouns and defined visual elements.
Therefore, the golden rule here is to use concrete nouns over abstract concepts. Instead of using "love", anchor your prompt with "a golden retriever." This immediately gives the model a clear, defined object to focus on. The clearer your noun and the more specific your descriptions, the better the AI can begin to conceptualize the image.
Incorporate Actions and Adverbs
But simply naming the subject isn't enough to create a dynamic image, is it? A great piece of art tells a story, and you need to tell the AI what your subject is doing and how it's doing it. This is where descriptive verbs and adverbs become your most powerful tools.
For instance, compare the dry request "A dog in a field" with the much more evocative "a dog playing joyfully in a field." Adding that action and the accompanying adverb instantly injects energy, mood, and direction into the scene.
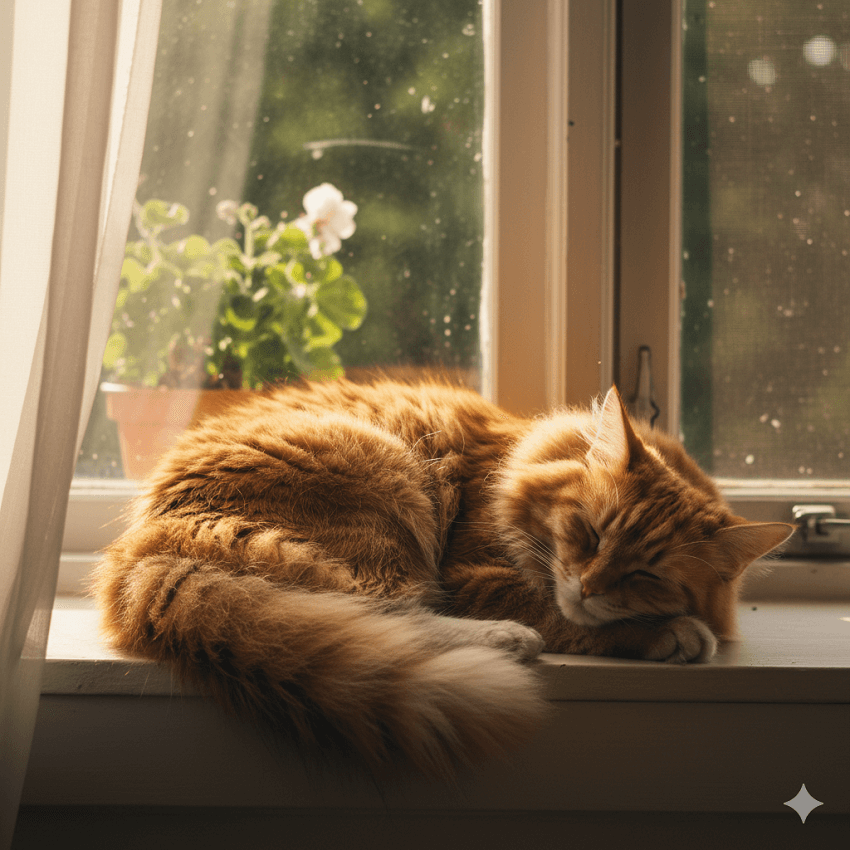
A perfect foundational prompt combines a clear subject, specific descriptions, and a defined action. For example: "A fluffy orange cat sleeping in a sunlit window." . That short sentence tells the AI who (cat), what (sleeping), where (sunlit window), and how (fluffy, orange). That is how you build a rock-solid core for the rest of your prompt refinements.
Now that we have a solid subject locked down, let's move on to the fun part: giving your AI generation some serious artistic flair. This is where you transform a simple concept into a unique visual statement.
2. Artistic Style and Medium (The "How it Looks")
Think of the style and medium as the crucial layer that defines the visual aesthetic. This is the difference between a picture taken with a smartphone and a fine art canvas hanging in a gallery. You need to tell the AI not just what to draw, but how to render it. If you skip this step, the AI will default to its most common, often bland, interpretation.
Defining the Medium or Technique
The most straightforward way to guide the AI is by telling it the physical or digital format the image should take. I suggest you pick one strong medium to start with; don't try to mix too many here, or you'll get a visual mess.
Here are the three main categories to focus on, perfect for crawlers and search engines looking for entity definitions:
- Digital Art: This includes keywords like digital painting, vector graphic, or concept art. These often result in polished, stylized images common in games and modern illustration.
- Traditional Art: Want a classic feel? Use terms like oil painting on canvas, watercolor sketch, pastel drawing, or pencil drawing. The AI will attempt to mimic the texture and brushstrokes of the real-world medium.
- Photography: If realism is your goal, use photorealistic, studio shot, or long exposure. These keywords prompt the AI to use camera-like lighting, depth of field, and natural textures.
Incorporating Art Movements or Artists
Ready for the power-user move? This is your artistic shortcut.
You don't need a four-year art degree; you just need to drop the right names. You can use powerful, established movements or reference specific, iconic artists. These terms carry centuries of visual data that the AI can instantly recall and apply.
- Established Movements: Try "Impressionism" for a soft, light-filled look, or "Cyberpunk" for a neon, dystopian vibe, or even "Steampunk" for a Victorian mechanical aesthetic.
- Specific Artists: If you want recognizable color palettes and brushwork, simply request: "in the style of Van Gogh." If you're going for a whimsical, hand-drawn animation feel, try "inspired by Studio Ghibli."
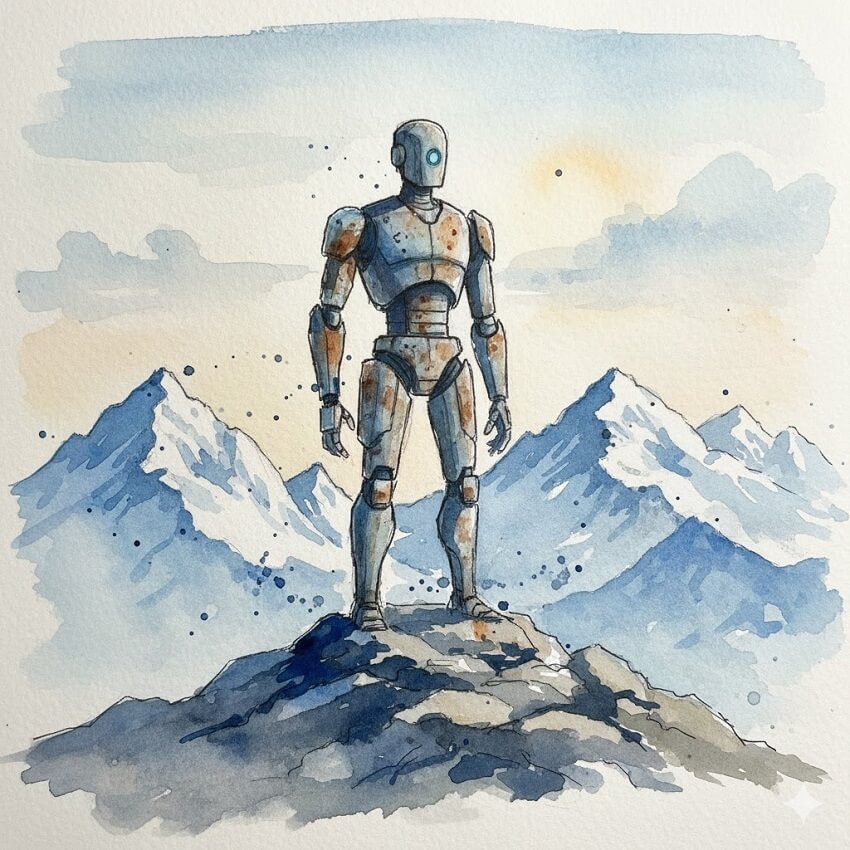
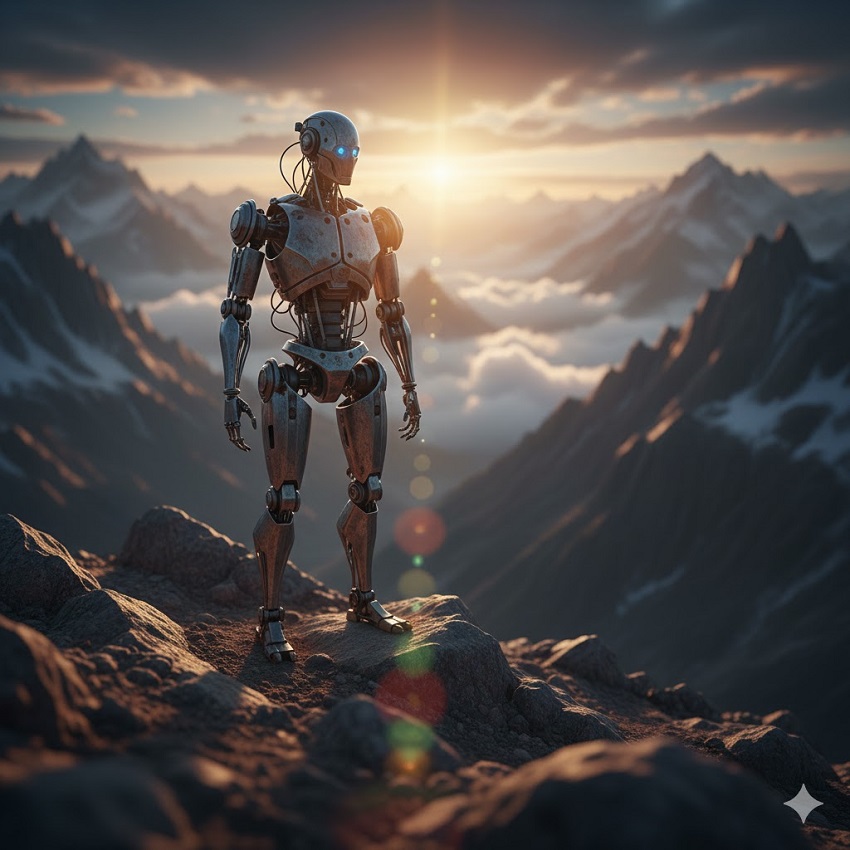
Case Study Idea: The Impact of Style
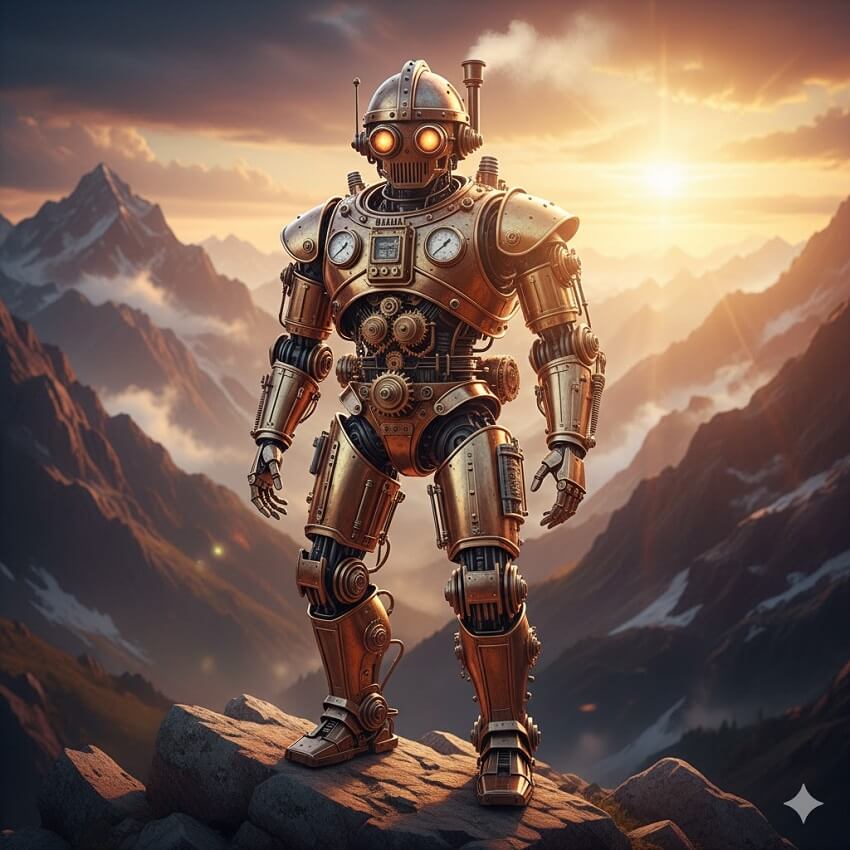
To truly grasp how critical this step is, let's take a single, simple prompt—"A robot on a mountain"—and show the incredible variation you can achieve just by changing the style.
1. Watercolor Style
Prompt: A robot on a mountain, watercolor sketch.
2. Photorealistic Style
A robot on a mountain, photorealistic, 85mm lens.
3. Steampunk Style
A robot on a mountain, Steampunk aesthetic, polished brass and gears.
See how quickly you can steer the AI from a delicate drawing to a gritty photo just by adding a few keywords? Choosing the right style is the difference between an ordinary image and a standout work of art. Next up, we'll talk about framing the shot like a professional photographer!
3. Composition and Framing (The "Viewpoint")
Now that you have established your core subject and wrapped it in a beautiful artistic style, it's time to put on your director's hat! Even the most stunning subject looks flat without proper staging. This third layer is all about telling the AI precisely where the virtual camera is positioned.
I can't stress this enough: Composition is the silent storyteller. It dictates the relationship between your subject and the environment. If you just ask for "a majestic eagle," the AI might give you a generic profile shot. But if you request a specific frame, you give the image instant professional polish. You are essentially adding keywords that relate to cinematography and photography.
Specifying the Shot Type and Perspective
In prompt engineering, we break framing down into three key elements: Distance, Angle, and Rules. Using these terms is essential for capturing the exact viewpoint you have in your head.
- Distance (The Zoom Level): How close or far is the camera from the subject? This controls the viewer's intimacy with the scene. If you want to capture the emotion in a character's eyes or the intricate detail of a single flower, use a close-up or macro shot. If you want to show the subject in their environment, a medium shot is the sweet spot. To emphasize scale and environment (like that robot on a mountain!), you need a distant shot or a wide shot. This gives the subject context and often makes the scene feel more dramatic or vast.
- Angle (The Perspective): Where is the camera positioned in relation to the subject? This is often overlooked, but it radically alters the mood and perception of size. A top-down view or overhead shot can make the subject appear small or vulnerable, or simply offer a unique, map-like perspective. A low-angle shot (sometimes called a worm's eye view) makes the subject look imposing, powerful, and large. A simple side view or eye-level shot offers a neutral, documentary feel.
- Rules (The Arrangement): These keywords help the AI adhere to established aesthetic principles. If you're generating content for professional use, these terms are vital. The Rule of Thirds is a classic technique where the subject is placed off-center, leading to a more dynamic and pleasing composition. You can also simply request the subject centered if you want a bold, symmetrical image that commands attention.
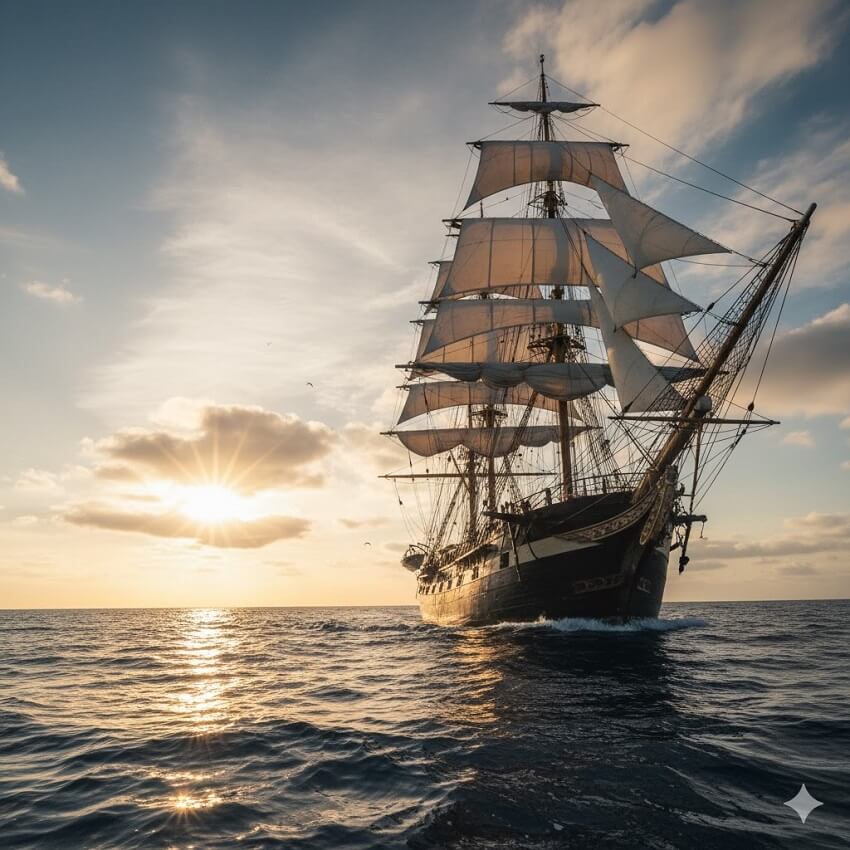
Remember, a simple subject like "A sailing ship" becomes "A sailing ship, wide shot, low-angle perspective, following the rule of thirds." That second option is what separates a decent AI output from a truly great one, every single time. Get specific about your perspective, and you'll be amazed at the cinematic results.
4. Mood, Lighting, and Color (The "Vibe")
The difference between a snapshot and a masterpiece often comes down to the deliberate use of light and color. As an editor, I know that even a fantastic photo can be ruined by flat light. In AI art, you have total control over the sun, the shadows, and the color tones. This is how you inject personality and depth, setting the entire vibe of your generated image.
Controlling Light Quality and Source
Lighting is the cornerstone of any visual medium. When we talk about AI prompts, we need to move beyond simple terms like "bright" or "dark" and get technical, using terminology that professional photographers and digital artists understand.
Here's how you define the light:
- Light Type: Use specific terms to dictate how light falls on the subject. A harsh spotlight creates high contrast and drama, often used for film noir or portrait work. Conversely, rim lighting (or backlighting) is fantastic for separating the subject from a dark background, making their edges glow with a beautiful, cinematic outline. Or, if you're going sci-fi, throw in glowing neon to define an urban landscape.
- Time of Day: The time you choose carries its own implicit color and shadow data. Instead of just "night," try "at dawn with mist"—that immediately signals soft, cool light, low visibility, and a certain ethereal quality. If you want something intense, try "dangerous sunset," which tells the AI to use deep oranges, reds, and long, dramatic shadows. Midday lighting gives you sharp, overhead shadows and bright exposure, perfect for a stark look.
Setting the Mood and Palette
Once the light source is defined, you can overlay the emotional filter. These terms guide the AI's color choice and overall emotional output. You're giving the AI the feeling of the scene.
- Mood Terms: These are your direct emotional keywords. If you want a calming image, use tranquil, serene, or peaceful. If the scene is meant to be tense, use chaotic, menacing, or mysterious. A term like opulent immediately cues rich textures, gold, and deep jewel tones, while nostalgic might pull in sepia filters or warm, faded colors.
- Color Terms: Don't just rely on the mood; explicitly define the color scheme. A warm color palette will lean heavily into reds, oranges, and yellows. Pastel tones demand soft, low-saturation hues like mint green or baby pink. Or, you can completely simplify the palette by requesting grayscale or monochromatic for maximum visual focus. Using specific accents, like neon accents or gold leaf details, ensures those elements stand out and are handled appropriately by the model.
II.Advanced Prompt Engineering Techniques for Refinement
Once you master the four core components (Subject, Style, Composition, and Mood), you move from creation to refinement. This is where we talk about quality control and advanced commands that give your generated art that professional edge.
1. Using Modifiers to Boost Quality and Detail
Think of this section as applying the post-processing to your image before it's even generated. We are adding keywords that demand technical excellence, sharpness, and high production value. If you skip this, the AI defaults to a safe, sometimes low-resolution output. If you want gallery quality, you have to ask for it explicitly.
Essential Quality Modifiers
These are your best friends for eliminating generic "mush" and blurring. You need to use terminology that signals resolution and photographic realism. Don't be shy about asking for the best!
To demand technical excellence and sharpness, always include terms that relate to resolution and focus:
- Resolution Boosters: Start with 8K or ultra-HD. While this might not literally generate an 8K image file, it forces the AI model to prioritize pixel density and fine grain.
- Detail Demands: Add keywords like intricate details, hyperdetailed, sharp focus, or photorealistic to push the complexity of textures, fabric, and surface elements.
- Clarity and Depth: Terms like depth of field (DoF) tell the AI to implement professional lens effects, making the foreground sharp and the background softly blurred (bokeh), which immediately makes the image look like a high-end studio shot.
Rendering Engines
This is a fun trick: you can borrow terminology from the world's most powerful digital creation software. The AI has been trained on millions of images generated by these programs, so naming them is a cheat code for quality.
By including keywords like Unreal Engine, OctaneRender, or V-Ray render, you are signaling that the final output should use the sophisticated lighting models and texture mapping associated with cinematic video game graphics or professional 3D design studios. Similarly, the tag trending on ArtStation cues the AI to apply the aesthetic standards of top digital artists who use that platform, ensuring the style is polished and contemporary.
Prompt Weighting and Prioritization
Sometimes, you have a beautiful prompt, but the AI just doesn't focus on the element you care about most. If you've ever had a prompt where the lighting was perfect but the subject was tiny, you've run into a weighting problem!
Advanced models, particularly Midjourney and Stable Diffusion, allow you to assign weight to keywords. This is the mechanism that lets you tell the AI, "Hey, this word is twice as important as everything else."
Midjourney users add a double colon and a number to the end of the word, like word::1.5. Stable Diffusion users wrap the word in parentheses and add a colon and a number, like (word:1.5).
Let's try a quick tutorial step to see this in action:
Imagine you have the prompt: "A mysterious warrior in a forest, cinematic lighting."
The result will likely have a lot of green and brown. But what if you want the green—the feeling of the forest—to be overwhelmingly dominant and impactful?
You would modify the prompt like this (using the Midjourney syntax for clarity):
A mysterious warrior in a forest, cinematic lighting, highly detailed green::2
By giving green a weight of 2 (meaning it's twice as important as an unweighted word like "warrior"), you force the AI to saturate the scene with that color, making the lighting, reflections, and even the warrior's cloak lean heavily toward a vibrant, dominant green palette. It's all about control, baby.
2. Negative Prompts: The Art of Exclusion
So far, we've only discussed telling the AI what you want. But if you've spent any time generating images, you know that AI models have common flaws—sometimes hilariously bad ones (hello, seven-fingered hands!). This is where the Negative Prompt comes in.
A negative prompt is a separate list of terms that explicitly tells the AI what to avoid generating. It's an indispensable tool for quality control and refinement, effectively cleaning up the rough edges of the output. While the main prompt is the vision, the negative prompt is the quality assurance checklist.
Common Negative Keywords to Avoid Flaws
What should you be telling the AI to exclude? Most seasoned prompters use a few standardized lists to address the most persistent issues inherent in generative models trained on massive, imperfect datasets.
Here are the crucial categories to include in your negative list every single time you hit generate:
Technical Flaws: These terms directly combat low-quality rendering. You spent all that time adding 8K and hyperdetailed, so don't let the AI slip back into bad habits! Be sure to banish: low quality, blurry, worst quality, noise...
Why? The AI wants to render quickly; these terms force it to slow down and prioritize clean rendering.
Anatomical Flaws: This is a big one, especially if your subject includes people or creatures. AI models notoriously struggle with the complex, small details of human and animal bodies. To prevent distorted limbs and infamous hand errors, you must include: extra fingers, bad anatomy, deformed...
Pro Tip: Many artists also add mutated hands or missing limbs to this list for extra protection.
Unwanted Elements: Because most AI models are trained on billions of images scraped from the web, they sometimes mistakenly draw artifacts from the source material. Nothing kills a cool fantasy image faster than a tiny corner watermark! Eliminate these distractions by adding: watermark, text, signature... This also often includes things like disclaimer or caption.
By implementing a strong negative prompt, you drastically increase your success rate, letting the AI focus purely on the creative instructions without getting bogged down in rendering common defects. This simple step is what separates a novice from a true AI art engineer.
3. Combining Styles (Style Chaining)
You've mastered single styles, but what if you want to create something truly original—something that doesn't exist in any art history book? This is where Style Chaining comes in.
Style chaining is the advanced technique of blending two or more distinct aesthetics to forge a hybrid look. It's often the quickest way to create a visually striking image that stands out from the AI crowd.
Creating Hybrid Aesthetics
When chaining styles, you need to be deliberate about what you're asking each style to contribute. Think of it like mixing cocktails: each ingredient has a specific job.
For instance, consider the example from the outline: "a panda, illustrated in Pixar style, with a neon cyberpunk twist."
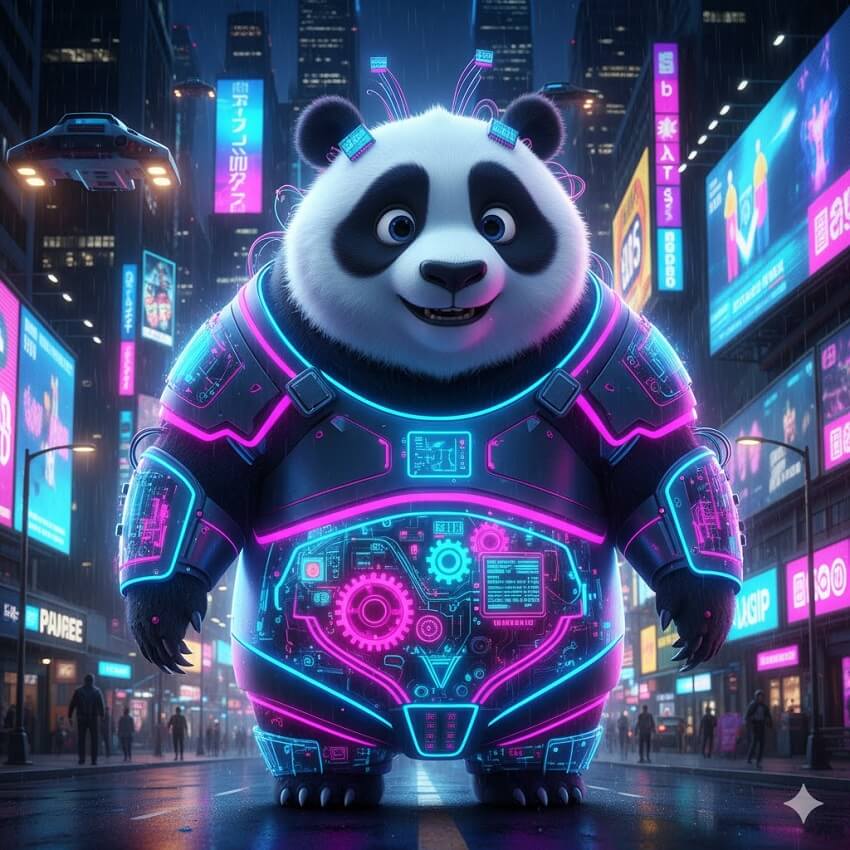
Let's break down the contribution of each element:
- Pixar Style: This is responsible for the subject's character quality—the soft, expressive eyes, the friendly, rounded features, and the high-fidelity 3D rendering quality.
- Neon Cyberpunk Twist: This is responsible for the atmosphere and palette—the moody, dark streets, the deep blues and purples, and the vibrant, high-saturation magenta and teal lighting effects.
The result is a highly polished, cute character placed in a dramatically stylized, gritty environment. The key is that the two styles are not fighting each other; they are contributing different visual elements to different parts of the image.
The Contradiction Trap
A word of caution from the trenches: Not all styles play nicely together. A common mistake new users make is to include contradictory terms that confuse the model and result in muddy, low-quality outputs.
You must avoid chaining styles that define the same attribute differently. For example, trying to blend "abstract" and "photorealistic" in the same prompt is like asking an artist to paint a perfectly clear photograph while simultaneously dissolving all recognizable shapes. The AI will struggle to reconcile these opposing visual rules, leading to poor results. Stick to combinations where one style dictates the subject (e.g., cartoon, Pixar) and the other dictates the rendering (e.g., oil painting, low poly).
4. Aspect Ratios and Utility
You can have the best prompt in the world, but if the final image is the wrong shape, it's useless for your purpose. This final utility layer defines the physical shape and size of your image output, ensuring it's optimized for the platform you intend to use it on.
Aspect ratios define the relationship between the width and height of an image. Most AI platforms let you specify this using a command (like --ar in Midjourney or explicit dimensions in Stable Diffusion). Choosing the right ratio is crucial for how the image is framed and consumed by the viewer.
- 1:1 (Square): This is the classic, balanced ratio, perfect for Instagram feeds, profile pictures, or minimalist design. It keeps the focus centralized and works well on any screen size without heavy cropping.
- 16:9 (Landscape): This is the cinematic standard, ideal for desktop wallpapers, presentation slides, or banners. It gives you maximum horizontal space, making it perfect for sprawling landscapes, detailed environments, or wide action scenes.
- 9:16 (Vertical): Also known as portrait or vertical, this ratio dominates mobile content (phone screen wallpapers, Instagram Stories, TikTok, Reels, etc.). Using this ratio forces the AI to compose the scene vertically, stacking elements to fill the screen and prioritizing tall subjects.
Choosing the right aspect ratio is the final technical step in tailoring your AI generation. It ensures your art not only looks good but fits perfectly into its intended home.
III.The Iterative Process: Refinement and Experimentation
The truth is, no one writes a perfect prompt on the first try. Mastering AI art generation is not about writing a single sentence; it's about refining an idea through disciplined iteration. A good workflow turns a lucky guess into a repeatable, high-quality output.
1. The Four-Step Iterative Loop
This loop is the process that successful AI artists use to systematically move from a basic concept to a polished final image.
Step 1: Generate the Baseline
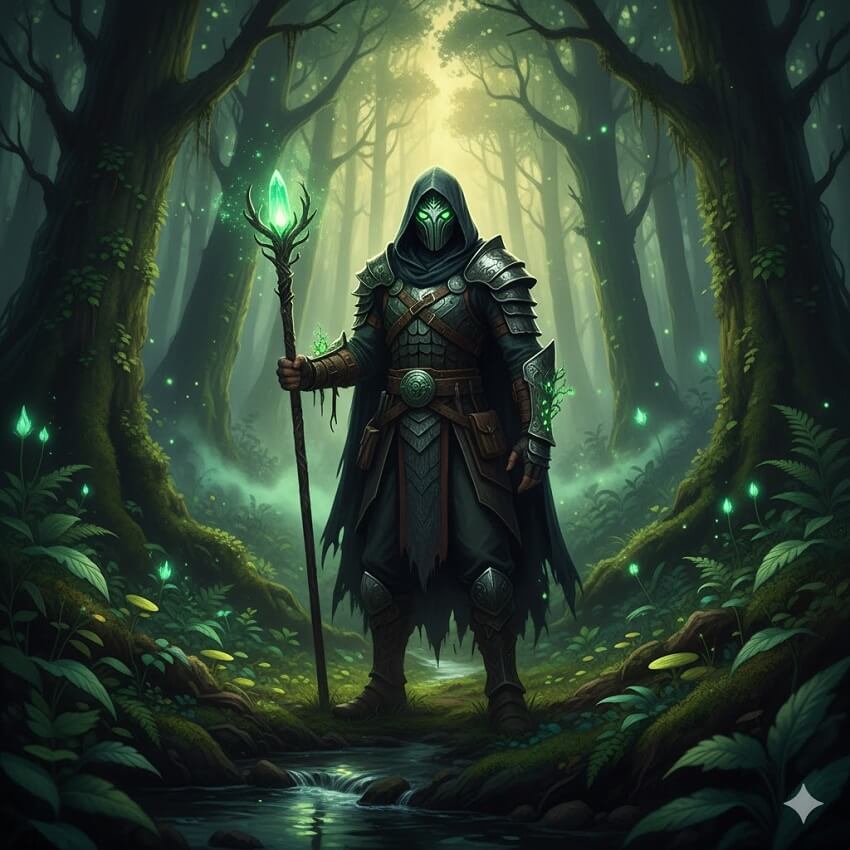
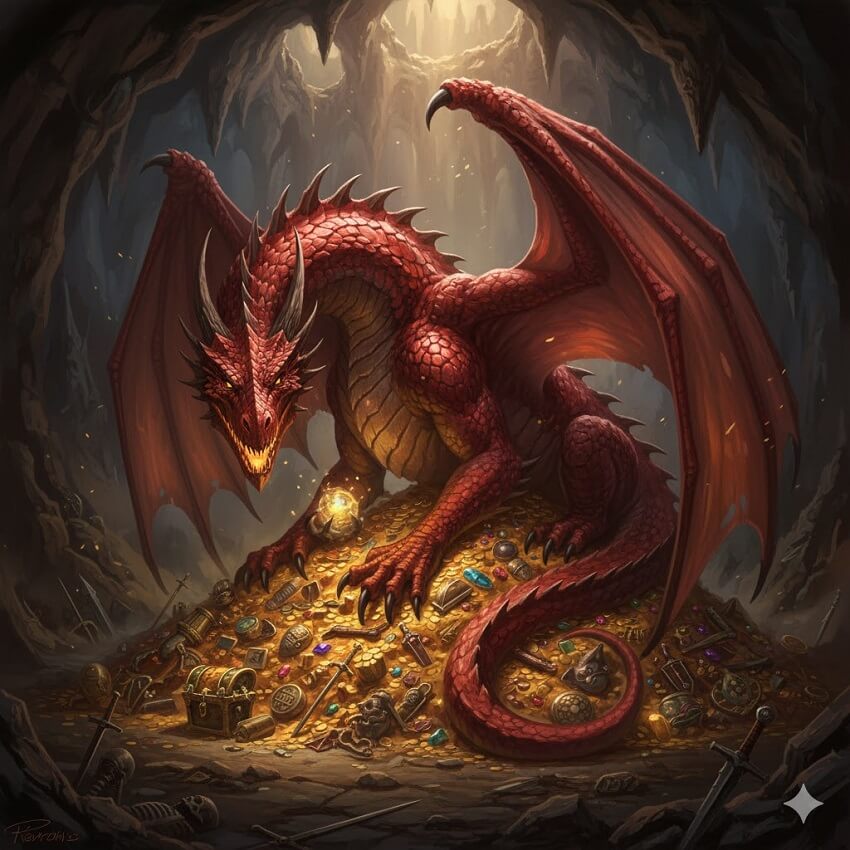
Always start simple. Don't try to cram every modifier into your first prompt. Begin with just the Subject and the primary Style to establish the core idea. For example: "A dragon guarding a treasure, digital painting." This initial baseline gives you an immediate visual to react to and critique.
Step 2: Adjust One Element at a Time
Once you have your baseline image, resist the urge to rewrite the entire prompt. Instead, isolate one variable and change only it.
- Critique: "The dragon is too small."
- Adjustment: Change digital painting to wide shot, low angle, digital painting.
By only changing the composition modifier, you can clearly measure its impact. If you change the style, lighting, and composition all at once, you won't know which adjustment solved (or created) the problem.
Step 3: Use Reverse Engineering
Sometimes, the AI generates something unexpectedly amazing that you want to replicate later. This is where reverse engineering comes in. Tools like CLIP Interrogator (or similar features in various AI interfaces) can take an image—even one generated by the AI—and analyze it to generate a detailed text prompt based on its visual elements. This is a powerful way to discover new keyword combinations and styles you hadn't considered, giving you a template to build upon for future ideas.
Step 4: Refining for a Purpose
Before signing off on the final image, bring it back to its intended use case. Does the image need to be cropped? Does the mood match the context? A successful prompt for a fantasy book cover will require bold, dramatic, centered composition (using keywords like epic, ultra-detailed, centered, book cover art). A prompt intended for a product ad might require clean, high-key lighting and a specific background color (using keywords like studio shot, minimalist background, product photography). The final prompt is always tailored to its utility.
2. Leveraging AI to Write AI Prompts
As advanced language models (LLMs) become more sophisticated, they've become incredible tools not just for writing essays, but for crafting detailed AI art prompts. Why write a long, descriptive prompt yourself when an LLM can do the heavy lifting? LLMs can take your simple concept and automatically expand it into a detailed, multi-layered prompt that includes style, composition, lighting, and quality modifiers. This is especially useful for breaking creative block or exploring variations you hadn't considered.
For example, prompting the LLM for expansion. To leverage this, use a prompt like this with your chosen chatbot:
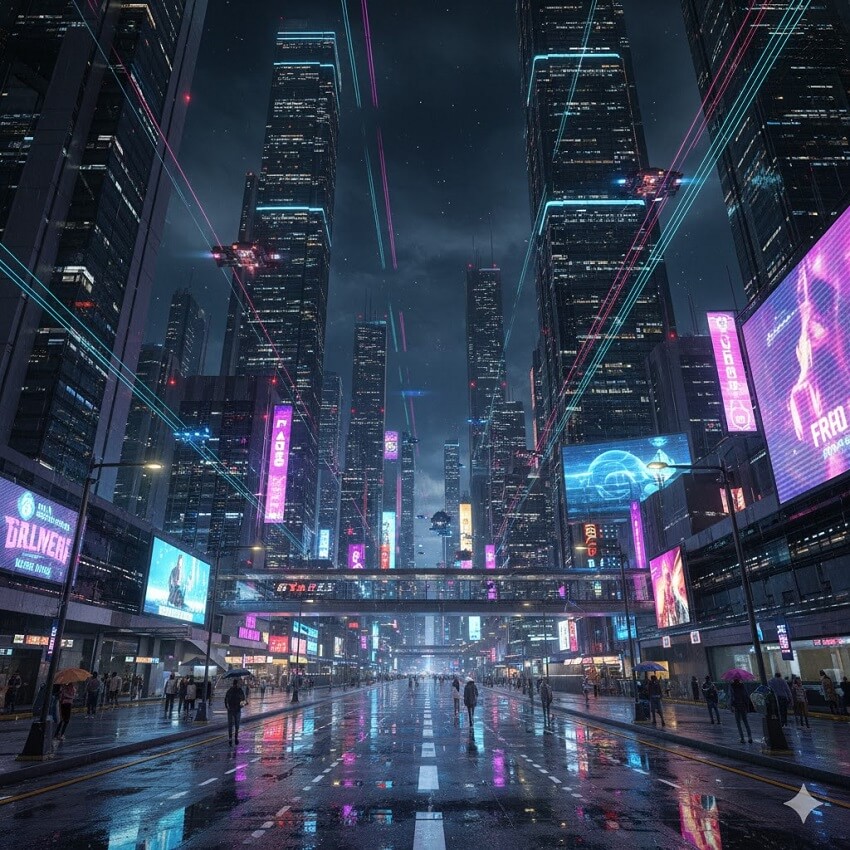
Expand this simple prompt: A futuristic city at night' into a detailed, three-part prompt including style, lighting, and composition modifiers, aiming for a cinematic, 8K result.
The LLM will then return a comprehensive prompt, such as: "A sprawling futuristic cityscape at night, rendered in the style of OctaneRender, with vibrant neon light reflections on wet pavement, low-angle perspective, sharp focus, 8K ultra-detailed." This is a complete, professional-level prompt ready to be used in your image generator.
3. Best Practices and Troubleshooting
Even with the perfect structure, small errors in execution can lead to frustrating, subpar results. This section is your final checklist for maximizing success and quickly fixing the most common AI art prompt problems.
Do's and Don'ts of Prompting
Follow these simple rules to ensure your prompts are clean, readable, and highly effective:
- Do: Use commas to separate distinct elements for clarity. This helps the AI parse your prompt into logical chunks (e.g., Subject, Style, Lighting, Quality).
- Don't: Overload the prompt with unnecessary, low-impact keywords. Every word consumes processing power; if a keyword isn't adding meaningful detail, delete it.
- Do: Use vivid, descriptive adjectives. Instead of "big dragon," use "colossal, emerald-scaled dragon."
- Don't: Assume the AI understands complex context outside of the prompt. Be explicit about every detail, including diversity, specific emotions, or unusual actions.
Troubleshooting Conflicting Results
Sometimes a prompt seems perfect but the image is broken. This usually means two elements in your prompt are fighting each other. Here's how to quickly diagnose and fix the issue:
If the subject is wrong or distorted: Go back to the Subject and Content section. Your main noun is probably too generic or abstract. Make the subject highly specific (e.g., change "car" to "a 1969 Ford Mustang").
If the style is muddy or colors are flat: Check for contradictory stylistic keywords. For example, trying to blend "Impressionism" (soft, undefined edges) with "hyperdetailed photorealistic" (sharp, clear lines) will result in a messy compromise. Remove conflicting terms and stick to one or two dominant aesthetics.
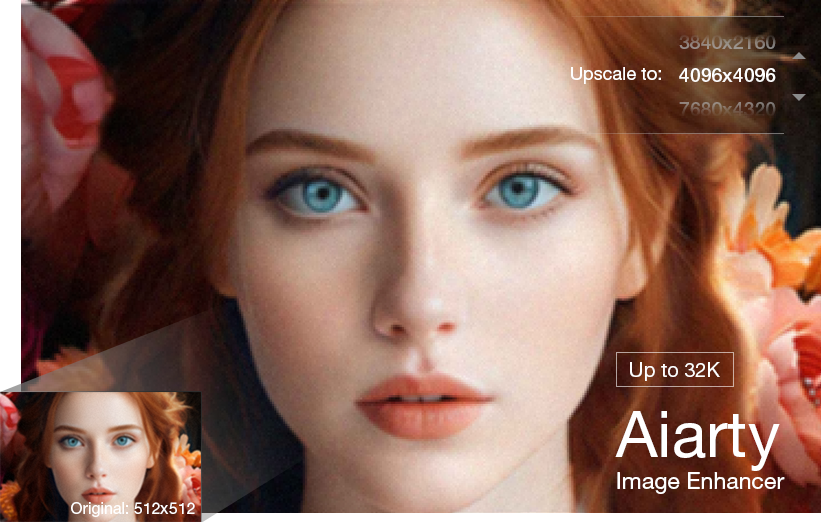
IV. Finalizing Your Output: Upscaling and Enhancement
The final critical step in professional AI art creation happens after the prompt is executed. Most generative models (especially those used for quick iteration like the initial grid generations) purposely create images at lower base resolutions. While you may have requested "8K" in your prompt, the actual output file might be much smaller.
To bridge this gap between the prompt's intent and the file's reality, upscaling is necessary. Upscaling increases the image's physical size (resolution) while enhancement uses specialized AI models (super-resolution) to intelligently fill in the missing detail, sharpness, and texture, effectively delivering the "8K" quality you requested.
Dedicated tools are essential for this post-processing step. For instance, the Aiarty Image Enhancer is built specifically to address the common artifacts found in AI-generated imagery. Tools like this help:
- Remove Noise and Artifacts: Cleaning up subtle distortions or color banding introduced during generation.
- Restore Genuine Detail: Injecting hyper-realistic sharpness and texture into elements like hair, fabric, and skin that might have been softened in the original output.
- Prepare for Print/Commercial Use: Ensuring the final file is large and crisp enough for any professional application, from printing a large canvas to using it in high-resolution video.
This sep is the final gatekeeper for quality; never deliver an AI image without running it through a quality enhancer first.

Conclusion
You've now equipped yourself with the complete toolkit for prompt engineering. Remember that great AI art is rarely a single strike of luck; it is a discipline built on iteration and structure.
The best artists, human or artificial, don't stop after the first sketch. Take the principles from this guide, embrace the iterative loop, and keep experimenting. The only limit to the art you can create is the clarity and imagination you put into your next prompt. Happy generating!
This post was written by Brenda Peng who is a seasoned editor at Digiarty Software who loves turning ordinary photos into extraordinary works of art. With AI assistance for brainstorming and drafting, the post is reviewed for accuracy by our expert Abby Poole for her expertise in this field.