Summary: Unlock the full potential of Midjourney Omni Reference with this comprehensive guide. And if you are struggling with low-quality reference images, do not forget to enhance them effortlessly with Aiarty Image Enhancer, ensuring your visuals are sharp, clear, and ready for stunning AI-generated masterpieces every time.
With the arrival of Midjourney' new version, V7, the platform introduces a powerful new feature called Omni Reference. But what exactly is Omni Reference, and why is it creating such a buzz among artists, designers, and AI enthusiasts?
Simply put, Omni Reference is Midjourney's universal image-reference system. It allows you to embed any visual element-be it a character, an object, a vehicle, or even a non-human creature-from a single reference image directly into your AI-generated creations.
If you've ever struggled to maintain consistency in your AI art or wished for a way to "lock in" specific characters or objects, Omni Reference is here to change the game. Let's dive deeper into how it works and why it matters for your creative projects.
Understanding the Core Concepts of Midjourney Omni Reference
At its heart, Omni Reference lets you embed a single, specific image element-whether it's a character, an object, a vehicle, or even a fantastical creature-directly into your AI-generated artwork. Think of it as telling Midjourney, "Hey, put this exact thing in my picture," with a level of precision that was impossible before.
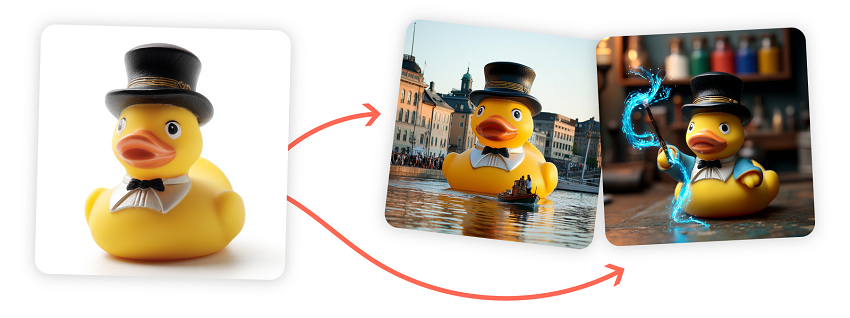
Unlike the older character reference system from V6, which was limited mostly to faces and characters, Omni Reference is universal. It works hand-in-hand with personalization, moodboards, and style references, giving you a flexible toolkit for consistent, high-fidelity image creation. But there are some important caveats: you can only use one reference image per prompt, and it's exclusively available in Midjourney V7.
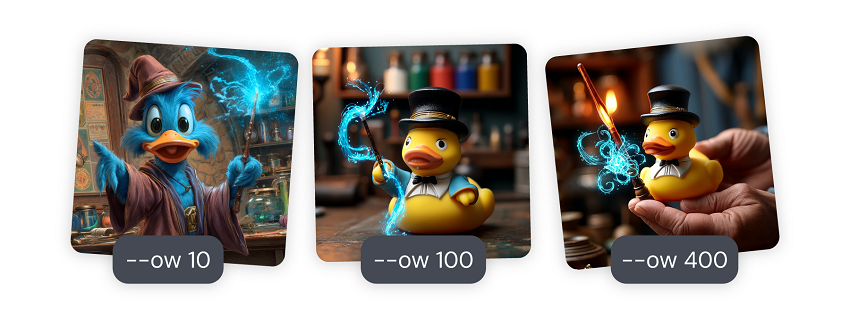
To control how much influence your reference image has on the final output, you use the Omni Weight parameter, --ow. This parameter ranges from 1 to 1,000, with a default of 100. Adjusting this lets you dial up or down the detail Midjourney borrows from your reference. For example, lower values keep it subtle, while higher values (up to around 400) can lock in complex clothing or object details-but beware, pushing it too high might lead to unpredictable results.
One key technical note: Omni Reference requires you to combine your image with a text prompt. The AI needs that descriptive context to know how to place and style your reference within the scene. Also, your image file must be in a common format like PNG, JPG, or GIF and must already be hosted online (or on Discord) so Midjourney can access it via a URL.
There are some current limitations worth knowing. Omni Reference doesn't play well with Fast Mode, Draft Mode, Conversational Mode, or the --q 4 quality setting. It also isn't compatible with inpainting, outpainting, or the vary region features yet. Plus, using Omni Reference doubles the GPU time compared to a standard V7 render, so expect longer processing times.
How to Use Midjourney Omni Reference: Step-by-Step Tutorial
Ready to put Midjourney's Omni Reference to work? Whether you're a hands-on creator or just curious about the process, I'll walk you through both the website and Discord methods. Trust me, once you see how easy it is to anchor your AI art with a single image, you'll wonder how you ever managed without it.
Using Omni Reference on the Midjourney Website
Let's start with the most user-friendly option: the Midjourney website. Here's how you can add a reference image in just a few clicks:
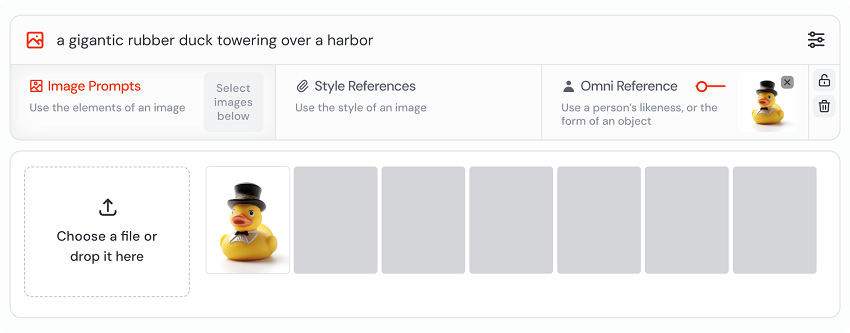
1. Upload Your Image: Head to the Imagine bar on the Midjourney web interface. Simply drag and drop your chosen image into the Omni Reference section. This is where the magic begins!
2. Lock for Reuse: Want to use the same reference across multiple prompts? Just lock the image in the Omni Reference section. This saves you from re-uploading every time.
3. Adjust Omni Weight: Right next to your uploaded image, you'll see a handy slider labeled "Omni Weight." This controls how closely your final image sticks to the reference. The default is 100, but you can dial it anywhere from 1 to 1,000. For most projects, staying under 400 gives you stable, realistic results. Need to capture intricate details, like a patterned dress or a unique prop? Try nudging the weight higher-but don't be surprised if things get a little wild above 400!
Using Omni Reference on Discord
Prefer the classic Discord workflow? No problem! Here's what you need to do:
1. Get a Valid Image URL: First, upload your image to Discord or another image-hosting service. Right-click the image and copy its URL.
2. Structure Your Prompt: In the Midjourney bot channel, paste your image URL, add your text prompt, and finish with the Omni Reference parameter: --oref.
3. Combine with Descriptive Text: Don't skip the text prompt! The AI needs context to know how to use your reference image. Be as specific as possible about what you want to see.
4. Set the Omni Weight: On Discord, you set the weight with --ow followed by a number. The default is 100, but you can experiment within the 1–1,000 range. Remember, under 400 is recommended for reliability.
Omni Weight: Fine-Tuning Your Results
The Omni Weight parameter is your secret weapon for balancing fidelity and creativity. Here's a quick cheat sheet:
| Weight Value | Effect | Use Case Example |
|---|---|---|
| 1-100 | Subtle influence, loose resemblance | Stylized backgrounds, loose props |
| 100-400 | Strong resemblance, stable results | Consistent characters, recognizable props |
| 400-1,000 | High detail, can be unpredictable | Complex clothing, intricate objects |
Practical Midjourney Omni Reference Examples and Use Cases
Let's be honest: the best way to understand any new creative tool is to see it in action. Midjourney's Omni Reference isn't just a technical marvel-it's a practical powerhouse for anyone who wants consistent, high-quality image generation. Whether you're a character designer, a brand manager, or just someone who loves making cool stuff, these real-world scenarios will spark your imagination.
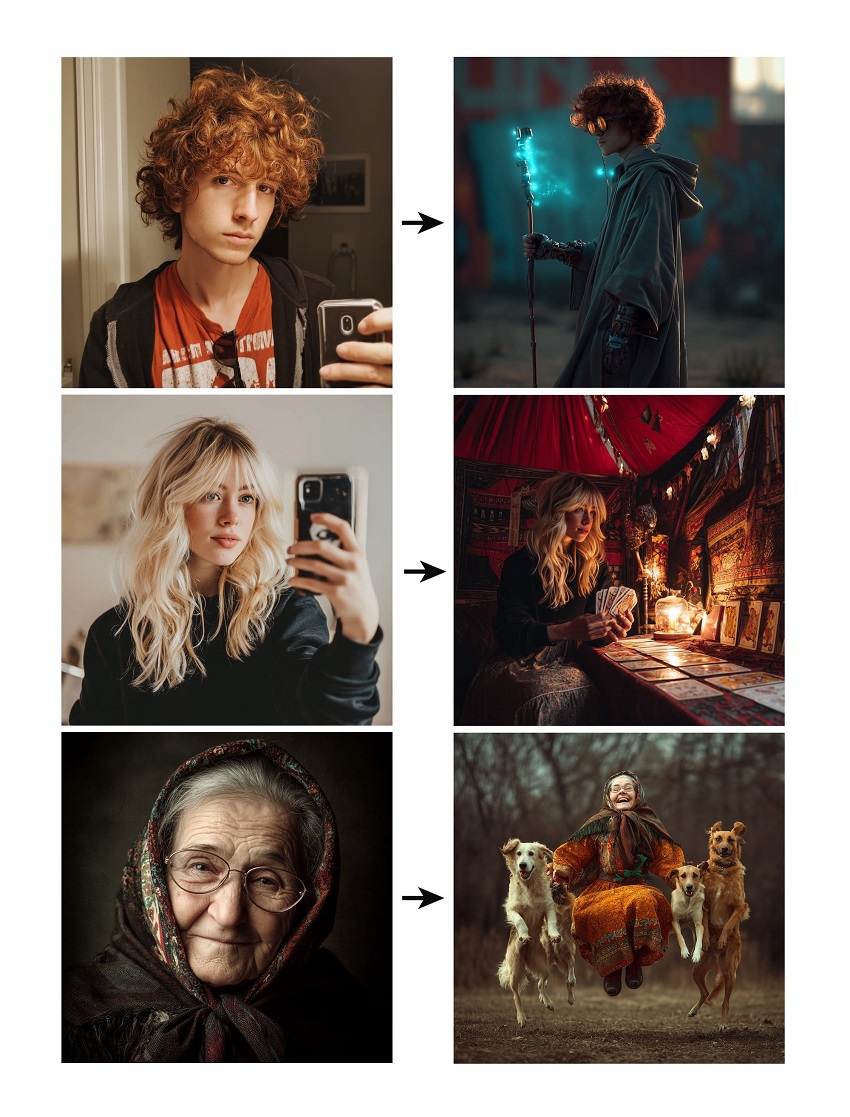
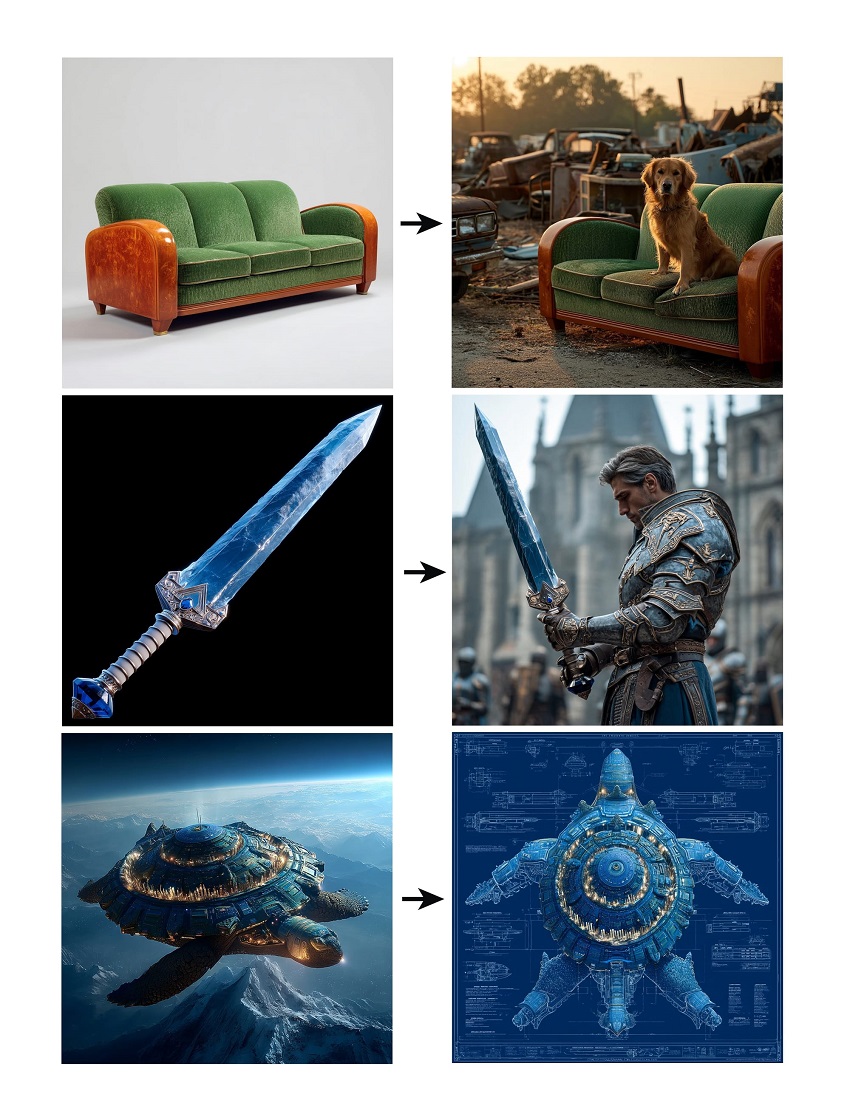
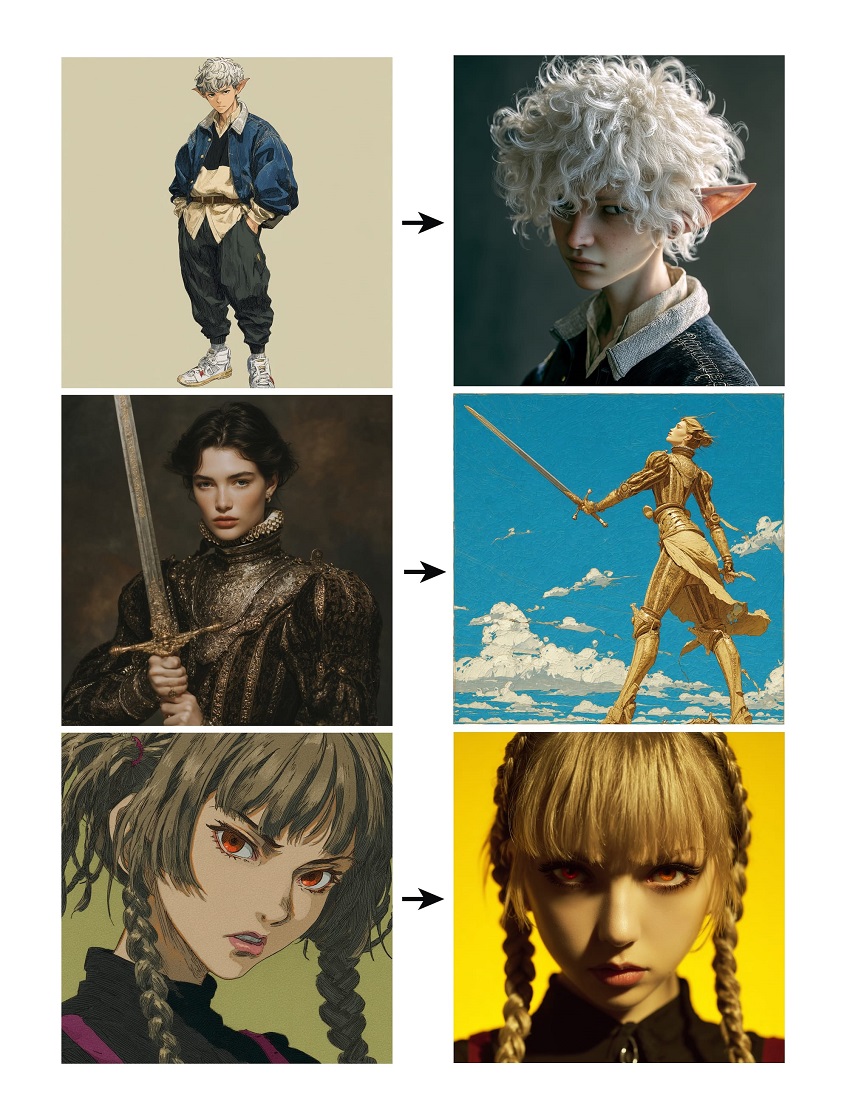
Consistent Character Creation
Ever tried to keep a character's look consistent across multiple images? It's like herding cats-until now. With Omni Reference, you can use a single portrait as your anchor. For example, imagine you're developing a graphic novel and your protagonist, "Wesley," needs to appear in dozens of scenes. By uploading Wesley's portrait as your Omni Reference and setting the Omni Weight between 100 and 400, you'll get images where his facial features, hairstyle, and even that quirky scarf stay spot-on. Want more detail in his clothing or accessories? Bump the weight up-but remember, too high can make things a bit surreal.
Embedding Objects and Props
Let's say you're designing a product catalog, and every page needs the same coffee mug-except this mug has rockets painted on it. Upload a clear shot of your mug as the Omni Reference, describe it in your prompt, and voilà: every generated image will feature your signature mug, with its color, shape, and those adorable rockets intact. This is a game-changer for product designers and marketers who want brand consistency.
Scene and Environment Consistency
Storyboarding a futuristic city? Omni Reference can help you maintain architectural details across multiple scenes. Use a cityscape photo as your reference and combine it with style references or moodboards. You'll get a series of images where the skyline, building shapes, and even lighting feel like they belong to the same universe.
Non-Human Creatures and Pets
Pet portrait commissions, anyone? Upload a photo of a dog, cat, or even a dragon figurine as your Omni Reference. The AI will capture the animal's pose, fur pattern, and personality-making it easy to create a series of consistent, adorable pet images. This is especially handy for fantasy illustrators or anyone who wants their mythical beasts to look the same from every angle.
Tips and Best Practices for Optimal Midjourney Omni Reference Results
If you want to get the most out of Midjourney's Omni Reference, you'll need more than just a cool image and a clever prompt. As someone who's spent a lot of time coaxing magic out of pixels, I've picked up a few tricks that can help you create sharper, more consistent, and more visually stunning results. Let's break down the essentials, from prepping your reference image to troubleshooting those pesky hiccups.
Preparing Your Reference Image
First things first: your reference image is the foundation of your output. If you feed Midjourney a cluttered, low-res photo, you're asking for trouble. Here's how to set yourself up for success:
- Crop to Isolate the Subject: Focus on the character, object, or creature you want to embed. If you're referencing a person, crop out unnecessary background. The more isolated your subject, the less likely Midjourney is to introduce unwanted elements.
- Avoid Background Clutter: Busy backgrounds can confuse the AI, leading to odd artifacts or misplaced details in your final image. Keep it simple!
- Use High-Quality Images: Sharp, well-lit photos yield the best results. Blurry or pixelated images can degrade the fidelity of your generated art.
If your reference image isn't as sharp as you'd like, don't worry - That's where Aiarty Image Enhancer comes in. This powerful tool is designed to rescue and upgrade your images before you use them in Midjourney. Here's how Aiarty Image Enhancer can help:
- AI-Powered Upscaling: Instantly upscale Midjourney images without losing important details, making even small or low-res photos suitable for Omni Reference.
- Smart Sharpening: Restore clarity and crispness to blurry or slightly out-of-focus images, ensuring your subject stands out.
- Noise & Artifact Removal: Clean up grainy, pixelated, or compressed images, so you get smoother and more professional-looking results.
- Color and Lighting Correction: Automatically balance colors and enhance lighting, making your reference image more vibrant and true-to-life.
- Face and Detail Enhancement: Specialized algorithms can bring out facial features, textures, and fine details-ideal for character references and product shots.
With Aiarty Image Enhancer, you can turn almost any photo into a high-quality reference, maximizing the fidelity and consistency of your Midjourney creations. Give it a try and see how much difference a professionally enhanced image can make in your AI art workflow!
Writing Effective Prompts
Your text prompt is just as important as your image. Think of it as giving the AI a roadmap for what you want. Here's how to craft prompts that deliver:
- Add Descriptive Context: Don't just upload a photo and hope for the best. Describe what's in the image and what you want to see. For example: "A young woman in a red scarf, standing in a snowy forest, holding a lantern."
- Mention Key Features Explicitly: If your reference image includes special clothing, props, or poses, call them out in your prompt. Redundancy helps reinforce what matters most.
- Be Specific About the Scene: The more detail you provide, the more likely you'll get what you want. Don't be afraid to spell things out!
Managing Omni Weight
The Omni Weight parameter (--ow) is your fine-tuning dial. Here's how to use it wisely:
- Start with the Default (100): This gives you a good balance of fidelity and flexibility.
- Adjust as Needed: If you want more detail from your reference (like intricate clothing or accessories), increase the weight. But stay under 400 for the most stable results.
- Avoid Going Overboard: Pushing the weight above 400 can sometimes produce unpredictable or distorted images. If you see weird artifacts, dial it back.
- Balance with Stylization: If you're also using style references or moodboards, consider lowering the Omni Weight to let those elements shine through.
Troubleshooting Common Issues
Even with the best prep, things can go sideways. Here's how to handle common hiccups:
- Quality Degradation at High Weights: If your image starts looking muddy or warped, lower the Omni Weight.
- Incompatibility Errors: Remember, Omni Reference doesn't work with Fast Mode, Draft Mode, Conversational Mode, or the --q 4 setting. If you're getting errors, check your parameters.
- Multiple Elements: Need more than one reference? While Omni Reference only supports one image per prompt, you can use the built-in editor to add or refine elements after generation. It's not perfect, but it's a handy workaround.
Conclusion
Midjourney's Omni Reference is a true breakthrough for anyone seeking consistency and control in AI-generated images. By letting you embed a specific character, object, or even a pet from a single image, it streamlines creative workflows and opens up endless possibilities for artists, designers, and storytellers.
Remember to start with a clean, high-quality reference, fine-tune your Omni Weight, and use clear, descriptive prompts for the best results. As Midjourney continues to evolve, expect even more powerful features on the horizon.
Don't be afraid to experiment-each prompt is a chance to discover something new. Dive in, share your creations, and become part of the vibrant Midjourney community. Your next masterpiece is just a reference image away!
You May Also Like
This post was written by Brenda Peng who is a seasoned editor at Digiarty Software who loves turning ordinary photos into extraordinary works of art. With AI assistance from DeepSeek for brainstorming and drafting, the post is reviewed for accuracy by our expert Abby Poole for her expertise in this field.