In today's digital age, we all have countless photos stored on our devices. However, as the number of photos grows, managing them effectively becomes increasingly important. If you're struggling with a disorganized photo library and wondering how to organize photos on Mac, you're not alone. Whether you're a photographer, a casual smartphone user, or someone who simply enjoys capturing memories, organizing photos on your Mac is crucial for maintaining a clutter-free and accessible library. A well-organized photo collection ensures that you can quickly find specific images, avoid duplicates, and keep your photos safe and backed up.
In this guide, we'll explore the best practices and tools available on your Mac for organizing photos efficiently. From using Apple Photos for detailed categorization and smart albums, to leveraging Finder for folder management and quick access, we've got you covered. Read on!
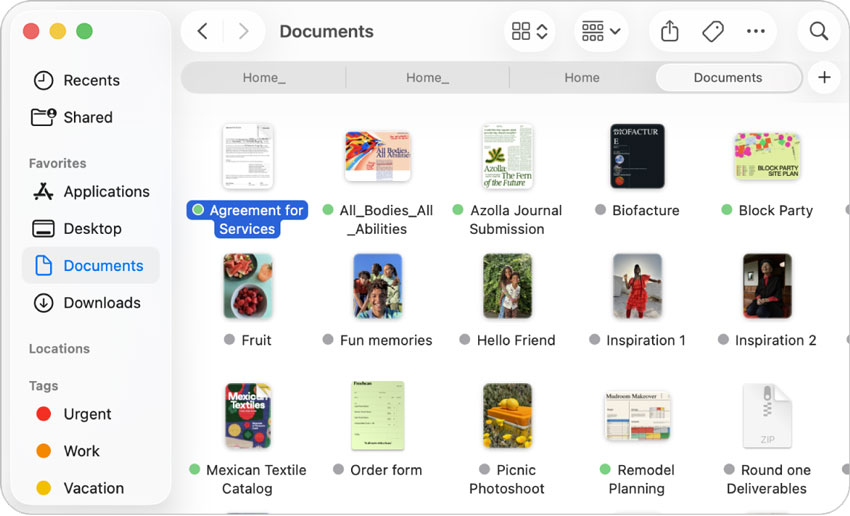
How to Organize Photos on Mac with Finder
1. Creating a Clear Folder Structure
A well-organized folder structure is the foundation of efficient photo management on Mac. Finder, the default file manager on macOS, gives you the flexibility to create a personalized photo organization system. Here's how to set it up:
- Organizing by Time (Year and Month): Start by creating a main folder for each year, for example, 2026. Inside that folder, create subfolders for each month, such as 2026/01 - January or 2026/02 - February. This setup allows you to store and retrieve photos based on when they were taken.
- Organizing by Event or Theme: Another method is to organize photos based on events or themes, such as family vacations, birthdays, or specific locations. For instance, you can create a folder called 2026/Family Vacation or 2026/Paris Trip.
- Folder Hierarchy Suggestions: It's important to keep your folder structure simple. Avoid going too deep with folder layers as it may make it harder to locate files. For example:
- Top-level: 2026
- Second-level: 2026/01 - January
- Third-level: 2026/01/01 - New Year's Day
Tip: If you have a large number of photos, you might want to go even further and create folders for specific days or events, like 2026/01/01 - New Year's Day.
Tip: This method works well if you tend to take a lot of photos of particular types of events or places, helping you easily find them when needed.
Tip: Aim for a clear, flat folder structure that is easy to navigate. You don't want to create too many nested folders, as this can become cumbersome when searching for specific images.
2. File Naming Conventions
Using consistent naming conventions for your photos is essential in maintaining an organized photo library. A standardized system will help you quickly locate specific images, whether by date, event, or location.
- Date Format: The most effective way to name files is by using the YYYY-MM-DD format, such as 2026-01-01_NewYearsDay. This keeps your photos sorted chronologically when viewed in Finder.
- Descriptive Naming: When naming your photos, include a description of the event or location, such as 2026-01-01_FamilyBreakfast or 2026-05-15_ParisTrip. This will give you more context when you search for specific images.
- Avoid Special Characters: While macOS allows the use of spaces and special characters, it's best to avoid these in file names. Stick to letters, numbers, dashes, and underscores to ensure file compatibility across different platforms.
Tip: Using a consistent date format ensures that files are organized in order, making it easier to track down photos taken on a specific day.
Tip: Descriptive names reduce confusion and make your photo collection more intuitive, allowing you to identify images without opening them.
Tip: For example, use 2026-01-01_Family_Breakfast instead of 2026 01 01 Family Breakfast to prevent issues with cloud storage or other software.
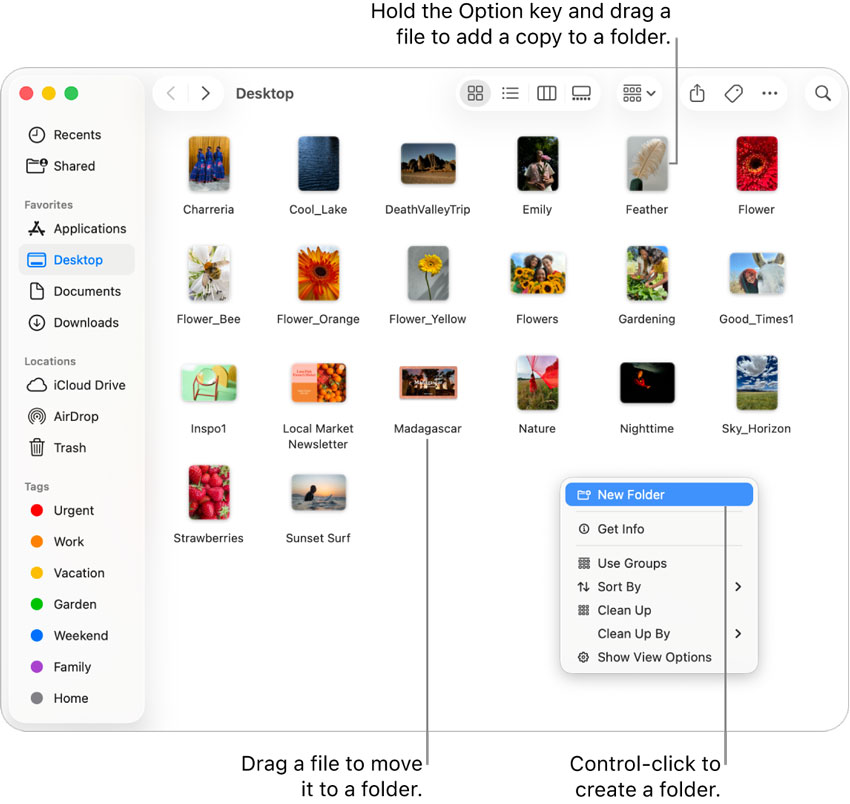
3. Using Tags and Color-Coding
Finder also allows you to tag files with colors, making it easy to prioritize and group photos based on status or category. Tags help improve organization and speed up access to specific groups of files.
- Tagging Files: You can tag folders or individual photos with different colors. For example, you could use red for photos that need editing, green for those that are finalized, and yellow for photos that are ready for review.
- Color-Coding Suggestions: Assign specific colors to represent the status or importance of a photo. For example:
- Red for "In Progress" or "To Edit"
- Green for "Completed" or "Approved"
- Blue for "Family" or "Pets"
- Tip: Color-coding provides an intuitive and visual way to manage and track your photos at a glance.
Tip: By assigning different colors to various categories of photos, you can quickly identify and sort them without opening each file.
4. Quick Search and Sorting
Finder provides powerful search and sorting features that help you locate photos and folders quickly, especially if you have a large collection.
- Using Finder's Search Box: The search function in Finder is a great way to quickly locate specific photos. Simply type in a keyword, date, or file name, and Finder will display all matching files.
- Sorting Photos by Date, Name, or Size: Finder allows you to sort photos by various attributes such as date, name, size, and more. Step: Open Finder, navigate to the folder containing your photos, and click on the top bar to sort by your preferred method (e.g., by "Date Modified" or "Name").
- Smart Folders: Smart Folders are a great way to create dynamic, automated folders that update based on criteria you set. For example, you can create a Smart Folder that automatically collects all photos taken in January 2026. Steps: In Finder, go to File > New Smart Folder. Set criteria, such as "Created Date" or "Keywords," to gather specific photos.
Tip: If you've organized photos by event, location, or person, you can search for specific terms like "Paris" or "2026" to locate relevant images quickly.
Tip: Sorting by date will help you see your photos in chronological order, making it easier to locate photos from a specific time.
Tip: Smart Folders can be a time-saver, especially if you frequently need to find photos based on specific attributes like location or date.
How to Organize Photos on Mac with Apple Photos
Apple Photos is an intuitive tool that allows you to organize, edit, and manage your photos seamlessly. With its powerful features, you can categorize photos by events, locations, people, and even keywords. Here's how to make the most of Apple Photos to organize your photo library on Mac:
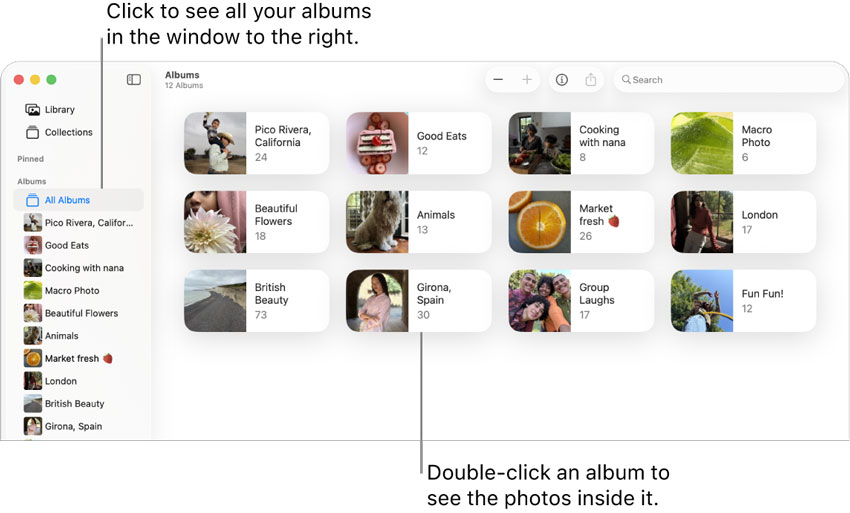
1. Creating Albums to Organize Photos
Creating albums is one of the simplest and most effective ways to organize your photos in Apple Photos. Albums help you group photos by event, date, location, or any other category that makes sense for your collection.
- Manual Album Creation: To create a new album, follow these steps:
- Open Apple Photos on your Mac.
- Click on the + button at the top of the left sidebar and select Album.
- Give your album a name (e.g., "2026 Family Vacation").
- Drag and drop photos from your library into this album to organize them.
- Event-Based Organization: For example, if you took a trip to Paris in 2026, you can create an album titled "2026 Paris Trip." You can then add all relevant photos, such as sightseeing, food, and group photos, into this album.
- Person-Based Albums: If you take many photos of specific people, consider creating albums dedicated to them, such as "John's Birthday," "Anna's Graduation," or "Family Photos." You can easily group images by people using Apple Photos' People feature.
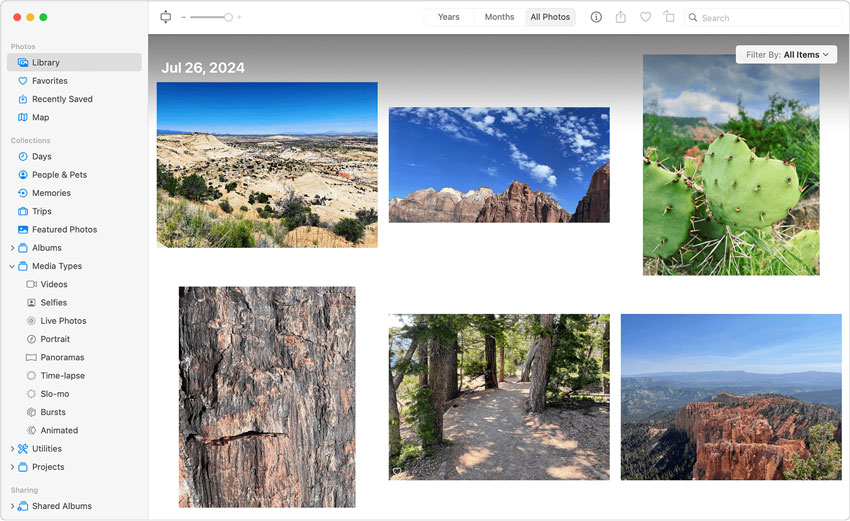
- Organizing Photos by Date: If you prefer organizing by dates, Apple Photos will automatically group photos by year, month, and day. However, you can also manually create albums for special occasions or milestones.
Tip: If you travel a lot, consider organizing albums by year and location (e.g., "2026 Paris Trip" or "2026 Japan Adventure").
2. Using Smart Albums
Smart Albums are one of the most powerful features of Apple Photos. They automatically update based on specific criteria, such as dates, locations, or keywords. This feature helps you save time by dynamically organizing photos without having to move them manually.
Smart Albums are essentially albums that update automatically whenever new photos meet the criteria you've set. For example, you could create a Smart Album for all photos taken in a specific location or on a particular date range. To create a Smart Album:
3. Using Keywords and Tags
Using keywords and tags within Apple Photos enhances your ability to organize and search for specific images. It's particularly useful when you have large photo libraries.
- Adding Keywords to Photos: To add keywords:
- Open Apple Photos and select a photo.
- In the Info panel (click the "i" icon), you'll see a section for Keywords.
- Enter relevant keywords (e.g., "vacation," "birthday," "beach," etc.). (You can add multiple keywords to a single photo, helping you categorize it under multiple themes.)
- Searching with Keywords: Once you've added keywords, you can quickly search for specific categories of photos by typing the keyword into the search bar. For example, searching for "Paris" will show all photos tagged with the word "Paris," making it easier to find specific images.
- People and Places:
- People: Apple Photos uses Facial Recognition to tag people automatically. When you add names to people in your photos, the app will group all photos of that person under their name. You can also search for a specific person, making it easy to locate portraits and group shots.
- Places: If your photos have location data (GPS), Apple Photos automatically groups them by location. You can view your photos on a map and search for all photos taken in a specific city, country, or even neighborhood.
4. Organizing and Cleaning Up Your Photo Library
As your photo collection grows, it's important to periodically clean up your library to remove unnecessary or low-quality images. Apple Photos makes this process easy by offering several tools for organizing and clearing out your collection.
- Deleting Unwanted Photos: Simply select the photos you no longer want and press the Delete key. These photos will move to the Recently Deleted album, where they will remain for 30 days before being permanently deleted.need.
- Creating Albums for Old Memories: You can also use the Memories feature in Apple Photos, which automatically generates albums based on time periods or events. You can move old photos into albums for easier access, such as "Family Memories" or "Vacation Highlights."
- Regular Organization Tips:
- Review periodically: Make it a habit to go through your photo library once a month or every few months to delete unnecessary photos and update your albums.
- Tag new photos immediately: As you add new photos to Apple Photos, tag them with keywords or add them to relevant albums right away to keep things organized.
Tip: Go through your photos periodically to remove duplicates, blurry images, or anything you no longer need.
Tip: Consider creating a "Backups" album where you can store older photos you may not want to delete but also don't need to access regularly.
How to Organize Photos on Mac with Cloud Storage and Backup
Cloud storage services and backup solutions are essential for organizing, storing, and safeguarding your photos. Apple offers its own cloud service through iCloud, but other popular services like Google Photos and Dropbox also provide excellent options for managing large photo libraries. Here's how to use cloud storage to keep your photos organized and secure:
1. Using iCloud for Photo Storage and Synchronization
Apple's iCloud service is tightly integrated with macOS and Apple Photos, making it the most seamless option for Mac users. iCloud allows you to store photos and videos in the cloud, freeing up space on your Mac while keeping everything accessible across all your Apple devices.
- iCloud Photo Library: iCloud Photo Library automatically uploads and syncs all your photos to iCloud. Once enabled, any photo you take on your iPhone, iPad, or Mac will instantly appear across all your devices. To set up iCloud Photo Library:
- Go to System Preferences on your Mac and select Apple ID.
- Click iCloud in the left sidebar, and then check the box for Photos.
- Ensure that iCloud Photos is turned on to enable automatic syncing.
- Optimizing Storage with iCloud: iCloud offers the Optimize Mac Storage option, which allows you to keep your full-resolution photos and videos stored in the cloud while only keeping smaller versions on your Mac. This can save a significant amount of space on your Mac while still giving you access to all your photos when needed. This is especially useful if you have a large photo library and need to manage storage efficiently.
- Accessing Photos from Any Device: With iCloud, your photos are accessible from any Apple device, including your iPhone, iPad, or even through a browser on your Windows PC. If you use a MacBook and an iPhone, you can seamlessly access your photos across both devices. Using iCloud ensures your photos are always backed up and accessible, even if your Mac is lost or damaged.
2. Google Photos for Cross-Platform Syncing
If you prefer a solution that works across multiple platforms, Google Photos is a fantastic option. It offers unlimited cloud storage for photos up to 16 MP and videos up to 1080p (if you use the free plan) or high-quality backups (with the paid plan for higher resolution).
- Syncing Photos Across Devices: Google Photos works on both iOS and Android, as well as in web browsers. This allows you to organize your photos on Mac and then access them on other devices with ease. To use Google Photos on Mac:
- Download Google Backup and Sync from the Google website and install it on your Mac.
- Log in with your Google account, and select the folders you want to back up (like the Photos library folder).
- Your photos will automatically be uploaded to Google Photos, and you can access them from any device.
- Photo Organization with Google Photos: Google Photos offers powerful AI tools that automatically categorize your photos by subject, people, or location. It even recognizes pets, making it easy to search for all photos of your dog, for example. You can manually create albums in Google Photos or let the app automatically sort your photos based on themes, such as "Travel" or "Family."
- Storage Management: Google Photos offers a generous amount of free storage for lower-quality images, but if you want to store photos in their original resolution, you'll need to opt for a Google One subscription for additional space.
3. Dropbox for Sharing and Organization
If you frequently share photos or need a more collaborative platform, Dropbox is an excellent choice. Dropbox allows you to store and organize photos in folders, and it provides a simple way to share albums with others.
- Creating Folders and Subfolders: Dropbox lets you create multiple folders to store your photos. You can organize your photos just like in Finder by creating folders for each year, event, or subject. Using Dropbox for photos you want to share with family or collaborators is an efficient way to manage access and permissions.
- Automatic Photo Backup: Dropbox allows you to automatically back up photos from your devices using the Camera Uploads feature, which uploads photos directly from your iPhone or iPad to Dropbox. This is ideal if you take a lot of photos on your mobile devices. To set up Camera Uploads:
- Download and install the Dropbox app on your mobile device.
- Enable Camera Uploads in the app settings, and photos will be automatically uploaded to Dropbox when you connect to Wi-Fi.
- Collaboration and Sharing: Dropbox allows you to easily share albums or individual photos with other people via links. This is especially useful for projects, photo shoots, or family events where you need to distribute or collaborate on photos.
As your photo library grows, it's essential to keep it organized by performing regular maintenance and cleanups. This ensures that your photo library remains manageable and easy to navigate. Here's how to stay on top of your photo organization:
- Regular Cleanup: Set aside time every few months to go through your photos and delete duplicates, blurry shots, and unimportant images.
- Archiving Old Photos: If you have old photos that you no longer need immediate access to, consider archiving them to external storage or cloud backups. You can move older albums into an Archive folder or a dedicated External Drive if you don't want to keep them on your Mac.
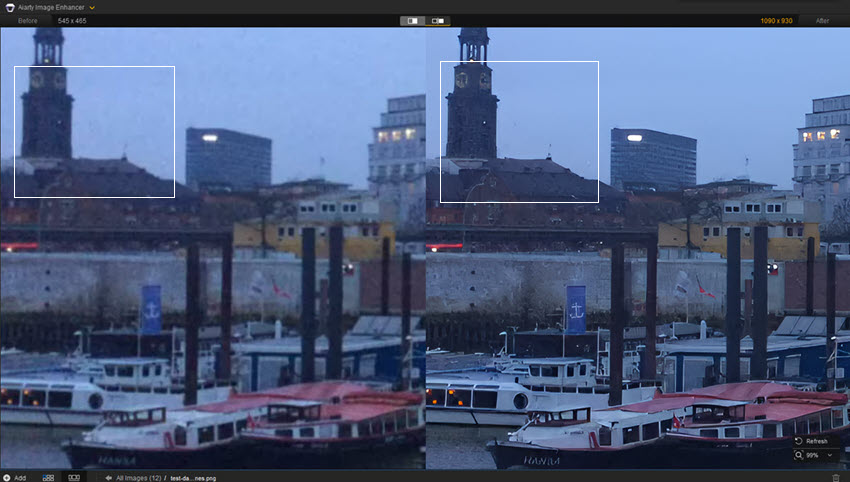
Use apps like Gemini 2 or Duplicate Cleaner to quickly identify and remove duplicate images. For blurry photos that you don't want to discard just yet, consider enhancing them using tools like Aiarty Image Enhancer. Aiarty is an AI-powered tool designed to restore and sharpen blurry images, whether caused by low-light conditions, motion blur, or slight focus issues. It uses advanced AI algorithms to analyze your images and improve their sharpness, clarity, and overall quality. With its easy-to-use interface, Aiarty helps bring out the fine details that might have been lost, giving your photos a second chance before deciding to delete them. This is especially useful for sentimental photos that might not be perfect but are still precious.
 FAQs
FAQs
To organize your photos on a Mac, you can use Apple Photos or Finder. In Apple Photos, create albums and use Smart Albums to organize photos by date, event, or location. In Finder, create a structured folder system with clear file names and use tags for easy categorization. Regularly back up your photos to iCloud or an external drive to ensure they're safe.
The best way to name photos is to use a date-based format (e.g., YYYY-MM-DD) and add descriptive keywords (e.g., 2026-01-01_FamilyVacation_Paris). Avoid spaces and special characters in filenames to maintain consistency. For batch renaming, consider using tools like Automator on Mac to apply naming conventions to multiple photos at once.
Yes! Apple Photos offers Smart Albums that automatically sort photos based on criteria like date, location, and people. Additionally, third-party apps like Adobe Lightroom and Mylio also provide automatic tagging, categorization, and syncing features to help you keep your photo library organized.
To remove duplicates, you can use apps like Gemini 2 or PhotoSweeper that scan your library and identify duplicate or similar images. After running the tool, you can choose which photos to keep and which to delete, saving storage space and reducing clutter.
The best way to back up your photos is by using Time Machine for local backups, iCloud for cloud backups, and an external hard drive for additional security. Combining these backup methods ensures your photos are protected and accessible from multiple devices. Additionally, using cloud services like Google Photos or Dropbox can provide extra storage and synchronization across devices.
If you've accidentally deleted photos, you can recover them using Time Machine if you've been backing up your Mac. Simply use Time Machine to restore your photos from a previous backup. Additionally, iCloud stores recently deleted photos for up to 30 days, so you can recover deleted photos directly from the iCloud Photos app.
To organize photos by event or people, create albums in Apple Photos or Finder. You can also use tags and keywords to categorize photos by themes, like "vacation," "birthday," or "family." For people, Apple Photos offers face recognition that automatically groups photos based on individuals, which you can then refine by adding names and tags.
You May Also Like
This post was written by Brenda Peng who is a seasoned editor at Digiarty Software who loves turning ordinary photos into extraordinary works of art. With AI assistance for brainstorming and drafting, the post is reviewed for accuracy by our expert Abby Poole for her expertise in this field.