
How to Remove Background from Picture in Illustrator Step by Step
Updated on
Summary: This post walks you through different methods for removing backgrounds from images in Illustrator step-by-step. However, if you're intimidated by Illustrator's steep learning curve or its subscription cost, and you need more precise and accurate results, try Aiarty Image Matting. Powered by cutting-edge AI technology, it offers one-click background removal for effortless, professional-looking results.
Wondering how to remove the background from a picture in Illustrator? You've come to the right place. Whether you're a designer, marketer, or content creator, Adobe Illustrator offers precise background removal for layouts, product showcases, or creating shareable stickers. This guide explores Illustrator's techniques to remove backgrounds from pictures, helping you create professional, standout designs.
Let's Face It: Illustrator Isn't the Best Tool for Removing Backgrounds
Before you dive into the detailed steps on how to remove the background from a picture in Illustrator, it's important to know some notable drawbacks of Illustrator.
- Expensive Subscription Fee: Illustrator operates on a subscription model through Adobe Creative Cloud. An individual subscription to Illustrator alone costs $20.99 per month.
- Limited Accuracy and Efficiency: Illustrator isn't designed for background removal, nor does it offer a one-click solution for background removal. It requires using a combination of tools and techniques to get rid of the background. This process can be especially time-consuming and challenging for images with complex backgrounds, transparent or semi-transparent elements (such as smoke, glass, or fine hair), or when the edges between the foreground and background are not clearly defined.
If you need a faster, easier solution, particularly for batches of images or those with complex details, consider AI-powered tools like Aiarty Image Matting. It uses deep learning to remove backgrounds from any image – even tricky ones like water drops, lace, or fur – with just a click, perfect for e-commerce pros, designers, and anyone needing quick, clean background swap or removal.


1. How to Remove Background from Picture in Illustrator via Image Trace
Illustrator's Image Trace tool can be a handy way to get rid of backgrounds, but it's not a one-size-fits-all solution. The trick is that it works by converting your image into vector shapes first, and then letting you delete the parts you don't want. This means it only works well when you're dealing with images that have clean and simple backgrounds like logos or basic graphics. The more colors and details in your background, the more tedious the cleanup becomes. If you're trying to tackle a photo or anything with a complex backdrop, Image Trace might bog you down. In those cases, jumping straight to an AI-powered background removal tool can make your life easier.
Step 1. Import the Image
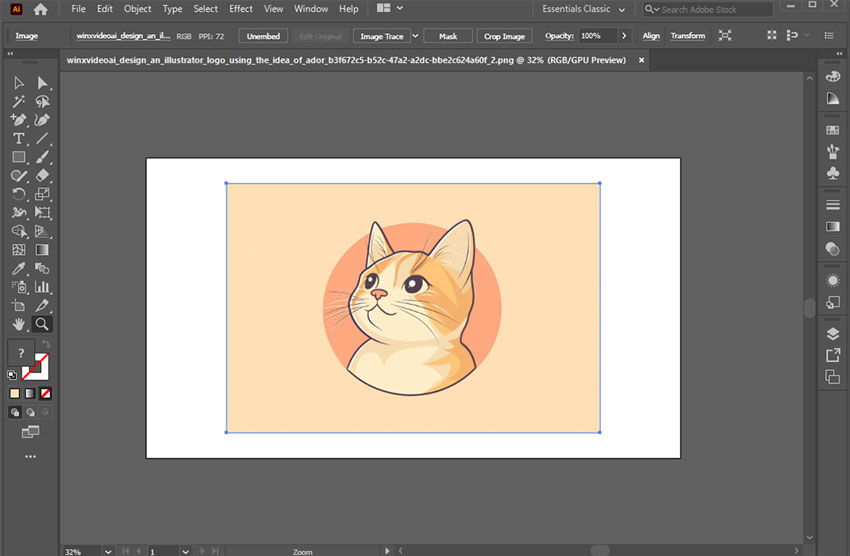
Open Illustrator and either drag your image directly into the workspace or click File > Place and choose your image from your computer to import it.
Step 2. Select the Image
Select the image using the Selection Tool, which can be found in the left-hand toolbar. Then, go to the top menu bar and click on Window > Image Trace. This will open the Image Trace panel, where you can adjust the settings for tracing your image.
Step 3. Configure Image Trace Settings
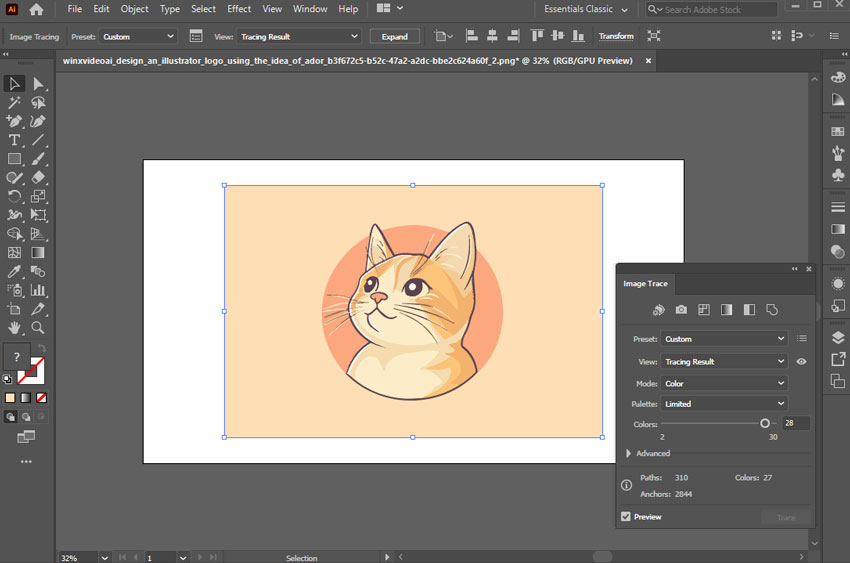
In the Image Trace panel, select Color as the mode and set the maximum number of colors you want to use. Illustrator will then scan the image and create outlines that can be converted into vector objects. Be aware that if your image has a large number of colors, this process can take some time and may consume significant computer resources.
Step 4. Convert the Image to Vector Objects
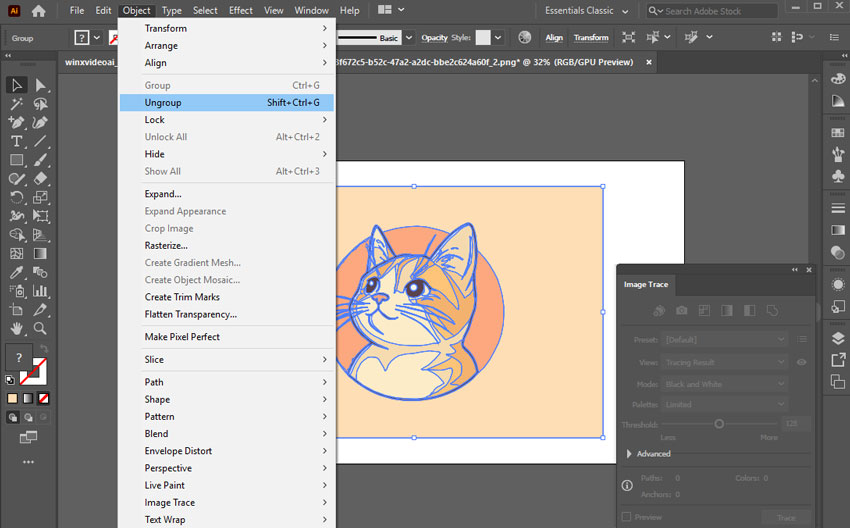
Once you've set up your Image Trace settings, click the Expand button to convert your image into vector objects. You should now see outlines around the different colors in the image.
Step 5. Remove Unwanted Background
To remove the background, go to the top menu bar and select Object > Ungroup. This will ungroup all the objects detected by Illustrator. Then, use the Selection Tool to select the background and press the Delete key to remove it.
Advanced tips:
If the background consists of multiple separate shapes, you can hold down the Shift key while clicking to select several at once.
If there are many background objects of the same color, the Magic Wand Tool (found in the toolbar) can quickly select all objects with a similar fill color.
Step 6. Export Your Image
Illustrator supports a wide range of options, including AI, EPS, SVG, PDF, PNG, and JPG. For example, to save as a PNG, go to File > Export > Export As, choose a location and filename, select PNG as the format, adjust any resolution or background settings, and click OK.
2. How to Remove Background from Picture in Illustrator via Clipping Mask
Clipping masks offer a precise and controlled way to remove picture backgrounds in Illustrator. Instead of erasing, you're essentially defining what you want to keep. You do this by creating a vector shape that outlines your subject. This shape then acts as a mask, revealing only the portion of the image that falls within its boundaries and hiding the rest. This combination of the mask and the image is called a clipping set. Because the mask is a vector, you can achieve very accurate selections, even around complex shapes. And since it's a non-destructive process, your original image is preserved. This makes clipping masks a commonly used technique for simple picture background removal in Illustrator.
Step 1. Import the Original Image
Open Adobe Illustrator and drag the source image into the program. This will add the image to the vector image designer tool.
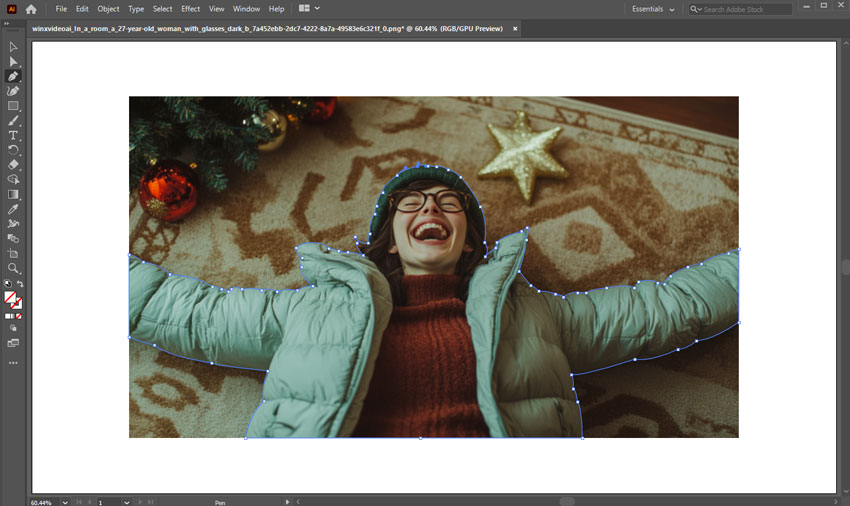
Step 2. Select the Image Foreground
Use the Pen Tool to trace the foreground object of your image. This may take some time and practice to master, especially for beginners. To use the Pen Tool, click to create lines and anchor points, or click and drag to create curved lines. Trace an outline around the foreground object of your image, trying to be as accurate as possible. For more detailed information on how to use the Pen Tool, you can refer to the official Adobe guide.
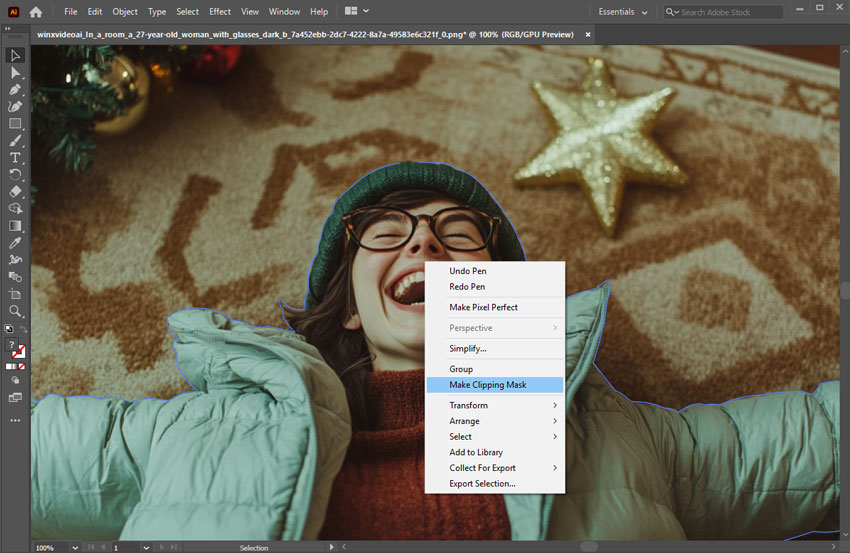
Step 3. Create a Clipping Mask
Once you've traced the foreground object, select the Selection Tool from the top-left toolbar section. Click on the foreground object, then right-click and select Create Clipping Mask. This should remove the background from the image.
Note
Tracing the edges of an object with the Pen Tool can be challenging, especially with fine details like hair, fur, or semi-transparent elements like glass or smoke.
In the comparison below, the left image, done in Illustrator, took about 20 minutes and resulted in rigid edges, missing fine details, and retaining unwanted parts. The right image, processed with AIarty Image Imaging in under a minute, delivers a much cleaner and more natural result, preserving intricate details like hair and edges while seamlessly removing the background.

3. How to Remove Background from Picture in Illustrator via Magic Wand Tool
The Magic Wand tool in Illustrator is designed to select vector objects based on similar attributes like fill color, stroke color, or opacity. The Magic Wand truly excels when working with pre-existing vector shapes within Illustrator. If you have an illustration with distinct, solid-colored areas (e.g., a logo with a white background), the Magic Wand can instantly select all instances of that specific color, allowing for quick deletion.
Step 1. Import the Original Image
Open Adobe Illustrator and drag the source image into the program. This will add the image to the vector image designer tool.
Step 2. Select Magic Wand Tool
On the left toolbar, find and click on the Magic Wand Tool (Y). Then click on the background area you want to remove. Illustrator will select pixels with similar color values.

Step 3. Adjust Magic Wand Tolerance (Optional)
Double-click the Magic Wand Tool icon to open its settings. Increase or decrease the tolerance to fine-tune the selection. A lower tolerance (closer to 0) selects only colors very similar to the one you click. A higher tolerance selects a broader range of similar colors.
Step 4. Delete the Background
With the Magic Wand tool, click directly on the background area you want to remove in Illustrator. Then simply press Delete or Backspace on your keyboard.
Use the Eraser Tool (Shift + E) or Clipping Mask to clean up any leftover bits. Export your design with a transparent background: File > Export > Export As..., then select PNG and check “transparent background.”
Note
While the Magic Wand tool in Illustrator is designed for selecting similar attributes, it primarily works on vector objects. To use it effectively for background removal from a raster image (like a JPEG), you must first convert the image into vector paths using Image Trace and Expand.
4. How to Remove Background from Picture with Illustrator Alternative AI
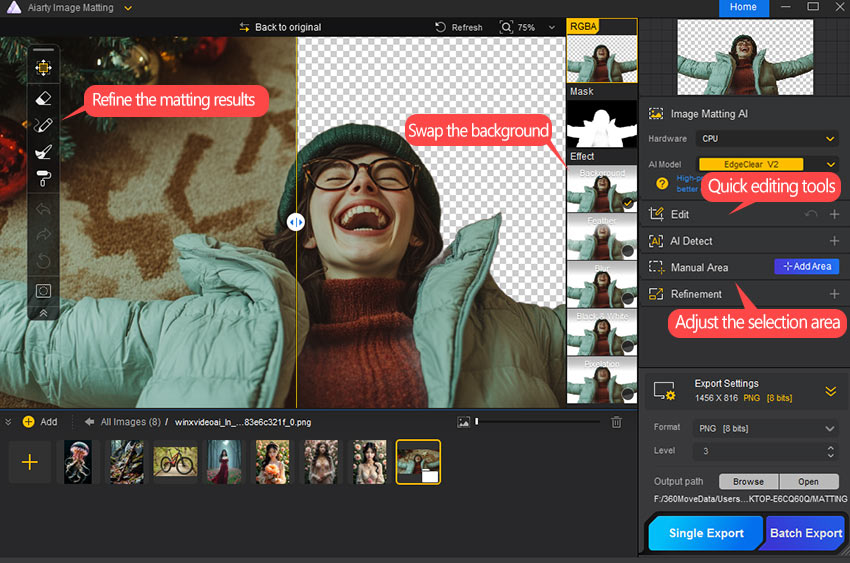
Tired of wrestling with Illustrator for background removal? Aiarty Image Matting offers a fast, accurate, and AI-driven alternative for making image backgrounds transparent on your PC or Mac. Whether you're an e-commerce pro, a designer, or just need a quick cutout, Aiarty handles everything from wispy hair and transparent glass to complex product shots with ease.
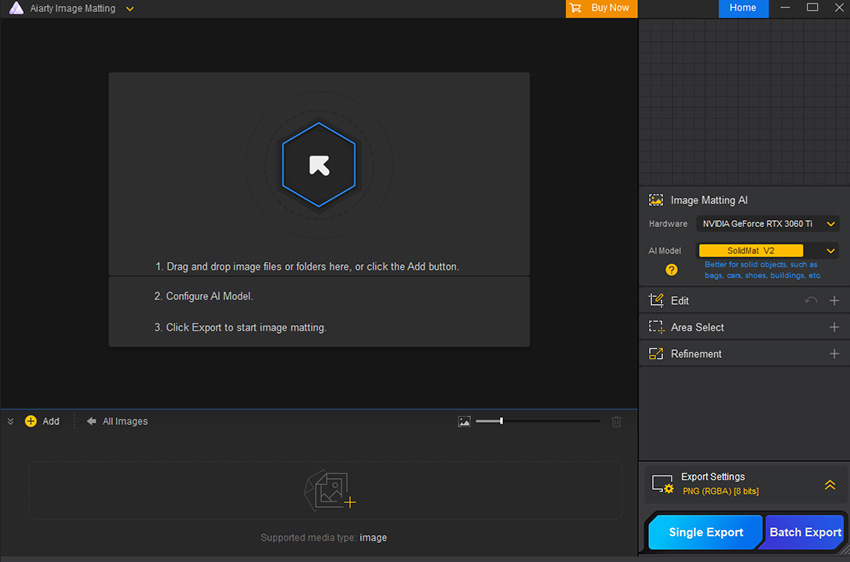
Step 1. Import Your Image(s)
Download and install Aiarty Image Matting. Drag and drop your image (or a whole batch of them!) into this AI image matting software.
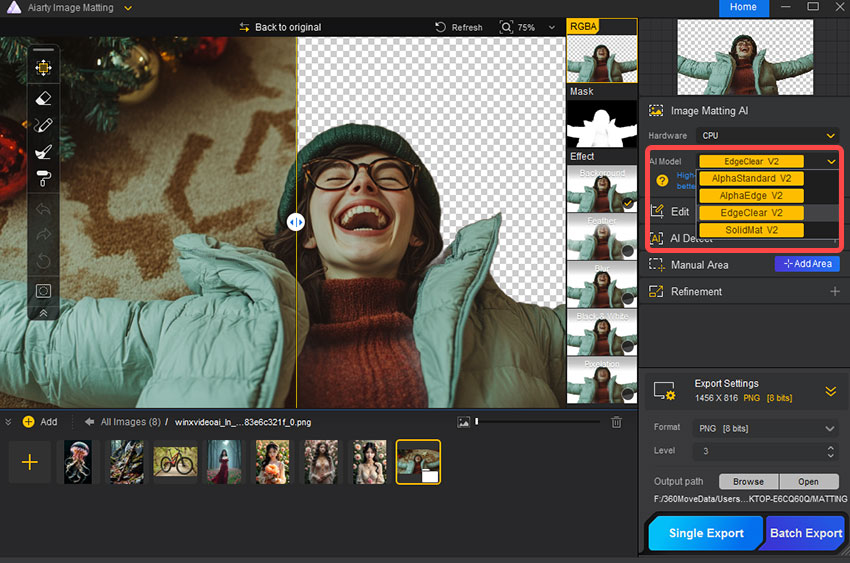
Step 2. Choose the Right AI Model
Aiarty offers specialized AI models optimized for different image types. Select a proper AI model for your image or feel free to experiment and find the model that works best for your specific image.
- AlphaStandard V2: Ideal for semi-transparent objects like wedding dresses, glass, and hair.
- AlphaEdge V2: Best for semi-transparent objects where edge clarity is paramount, such as product images, anime, and graphics.
- EdgeClear V2: Best for solid objects with intricate details like bicycles, jewelry, or furniture.
- SolidMat V2: Best for objects with crisp edges like architecture and industrial products.
Step 3. Start Removing the Picture Background
Hit the Start button to enable Aiarty Image Matting to analyze and matte your image. If you only need to remove the background from a single image, click the Single Export button to export the image with a transparent background. For multiple images, click Batch Export to export in bulk.
Tips and Additional Features
- AI Upscaling Tool: Upscale your image resolution with the built-in AI upscaling tool.
- Basic Editing Tools: Access basic editing tools like crop and rotate under the Edit section.
- Manual Adjustment: While Aiarty Image Matting automates the process, manual adjustment is still allowed in a flexible manner. You can specify the detection area, click and drag on the preview window to select the part you want to detect and fine-tune the outcome with a handful of tools.
- Background Replacement: Replace the background with a solid color, gradient, or any background you like.
Conclusion
Removing picture background in Adobe Illustrator isn’t one-size-fits-all—it depends on your image type, editing goals, and how much precision you need. Whether you choose Image Trace for vector conversion, Clipping Mask for flexible editing, or Magic Wand for quick selection, Illustrator offers a range of tools to get the job done. And if you're in a hurry or working with complex details, AI-powered background removers can deliver instant results with minimal effort. Choose the method that fits your workflow best and bring your subject into sharper focus—literally.
 FAQ
FAQ
As discussed in the above post, there are different ways to remove the background from an image in illustrator, including Image Trace, Clipping Mask, Magic Wand, and the AI method. Choose the way that best suits your image and needs.
To remove something from an image in Illustrator, you typically need to convert the image into a vector first using Image Trace if it's a raster image (like a JPEG or PNG). Once it's vectorized, you can use tools like the Direct Selection Tool or Eraser Tool to delete or modify specific parts. For more precision, you can also create a Clipping Mask to hide unwanted areas, or draw over the part you want to remove and use the Pathfinder > Minus Front function to cut it out.
No, Adobe Illustrator does not have a "Magic Eraser" tool like Photoshop does. However, it offers tools like Eraser Tool, Image Trace + Expand, Clipping Mask, and Shape Builder Tool or Pathfinder to help users cut out part of the image or delete unwanted parts.
To make an image have a transparent background in Illustrator, ensure the background is removed or hidden using tools like Clipping Mask or Image Trace + Expand, then export the file as a PNG with transparency enabled. Just go to File > Export > Export As, choose PNG, and in the PNG Options, select Transparent Background before saving.