Trying to get that perfect, crisp white background for your product photos, professional headshots, or creative projects? You've come to the right place. A clean white background is often crucial for making your subject pop, enhancing professionalism, and meeting e-commerce standards. Photoshop offers incredibly powerful tools to achieve this, but let's be honest—it can feel like navigating a complex maze, especially if you're new to the software or facing tricky details like flyaway hair or intricate edges. This comprehensive guide will simplify the process, walking you through the most effective methods to make background white in Photoshop. Plus, we'll introduce you to an innovative AI-powered alternative that can cut down on hours of tedious editing, giving you perfect results with surprising ease.
How to Make Background White in Photoshop
Photoshop offers multiple ways to change a background to white, each with its own advantages. Whether you're looking for a quick and straightforward approach or prefer more control over the final result, there's a method to suit your needs. Let's explore 4 effective techniques for achieving a clean, white background in your images.
Method 1: Using Quick Selection Tool and Masking
This is often the most precise method as it allows for easy refinement.
Step 1. Open your image in Photoshop. Select the Quick Selection Tool (W). It looks like a magic wand with a dotted circle.
Step 2. Click and drag over your subject to select it. Photoshop will try to intelligently detect edges.
Pro Tip: If the selection goes too far, hold Alt (Windows) or Option (Mac) and drag over the area to deselect.
Step 3. Go to Select > Select and Mask to refine the selection.
- In the Select and Mask workspace, you can use the Refine Edge Brush Tool to improve the selection around intricate areas like hair or fur.
- Adjust the Smooth, Feather, and Contrast sliders to get a better edge.
- Under Output Settings, choose Output To: Layer Mask and click OK.

Step 4. Below your image layer in the Layers panel, click the New Layer icon (square with a plus sign).
Step 5. Fill the new layer with white:
- Make sure your foreground color is white (press D to reset colors to black and white, then X to swap them).
- Go to Edit > Fill and choose Foreground Color.
Step 6. Drag the white layer below your image layer in the Layers panel. The background should now be white.
Method 2: Using Solid Color Fill Layer
This is good if you're going to use the Pen Tool or a similar precise selection method.
Step 1. Open your image in Photoshop. Select your subject using any selection tool you prefer (e.g., Pen Tool for precision, Lasso Tool, Quick Selection, Object Selection Tool). The Pen Tool is highly recommended for sharp, clean edges.
Step 2. Once your subject is selected, go to Layer > New Fill Layer > Solid Color...
Step 3. A New Layer dialog box will appear. Click OK. The Color Picker will open. Choose white and click OK.
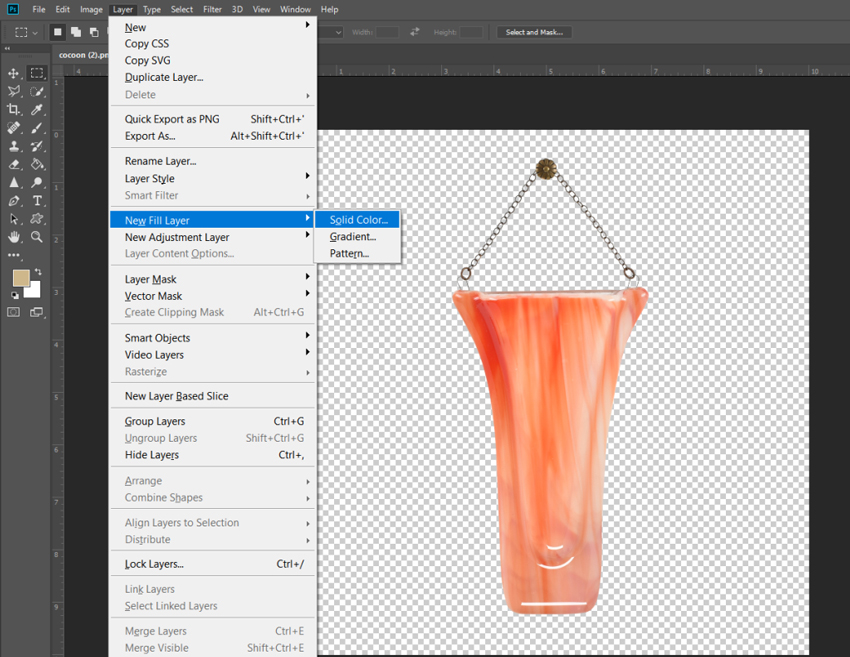
Photoshop will create a white solid color fill layer with a mask. The selected subject will be cut out, revealing the white. If the subject is white and the background is still visible, it means the mask is inverted. Select the mask thumbnail in the Layers panel and press Ctrl+I (Windows) or Cmd+I (Mac) to invert it.
Method 3: Magic Wand Tool
This works best when the background is a solid color and contrasts well with the subject.
Step 1. Open your image in Photoshop. Select the Magic Wand Tool (W). In the options bar at the top, adjust the Tolerance. A lower tolerance selects fewer similar colors, a higher tolerance selects more.
Step 2. Click on the background with the Magic Wand Tool. It will select areas of similar color. Hold Shift and click on other areas of the background that weren't selected. Refine the selection if necessary (Select > Select and Mask...).
Step 3. Once the background is selected, press Delete or Backspace. This will make the background transparent.
Step 4. Create a new layer below your image layer and fill it with white as described in Step 5 & 6 of Method 1.
💡 The limitations of using Photoshop to change background to white:
- Photoshop's process is time-consuming, requiring multiple steps from selection to refinement.
- Photoshop delivers inconsistent results, with edges often looking rough or overly smooth.
- Requires frequent manual adjustments, which offer flexibility but can be tedious.
- Its complex and advanced tools can be challenging for beginners. co
What if you could make background white flawlessly in just one click?
Aiarty Image Matting is an AI background remover, seamlessly handling semi-transparent objects, fine edges, and intricate details. It streamlines the process with intelligent automation but also provides manual adjustment tools for those who need extra refinement. All processing happens locally, ensuring complete data security—just like Photoshop.
Download Aiarty Image Matting to make background white precisely:

How to Make Background White with AI
While Photoshop offers powerful tools for making backgrounds white, there's an innovative AI-powered alternative that simplifies the process: Aiarty Image Matting. This software uses advanced artificial intelligence to automate background removal and replacement, making it an excellent option for those seeking a more streamlined workflow.
As a state-of-the-art AI tool, Aiarty Image Matting can handle even the most complex background removal tasks. It uses four smart AI models trained on over 320,000 high-resolution images to accurately detect and isolate subjects from various types of backgrounds. The software not only removes backgrounds but also offers features like adjustable transparency, batch processing, and AI-driven image enhancement.
- Accurate subject separation with transparent details and fine edges in a click.
- Produce smooth, gradient-based alpha edges for natural background blending.
- Obtain the original quality. Upscale/enhance images to maximize quality with AI.
- Provide an AI-powered brush for quick, easy, and flexible manual adjustments.
- Bulk processing. Run entirely locally to ensure user data privacy and security.
Step 1. Free download Aiarty Image Matting on your computer. Run the installer and follow the on-screen instructions to complete the installation.
Step 2. Open Aiarty Image Matting on your computer. Drag and drop the image(s) you wish to change the background color to white into the workspace. Alternatively, click the "Add" button to browse and select your image files.
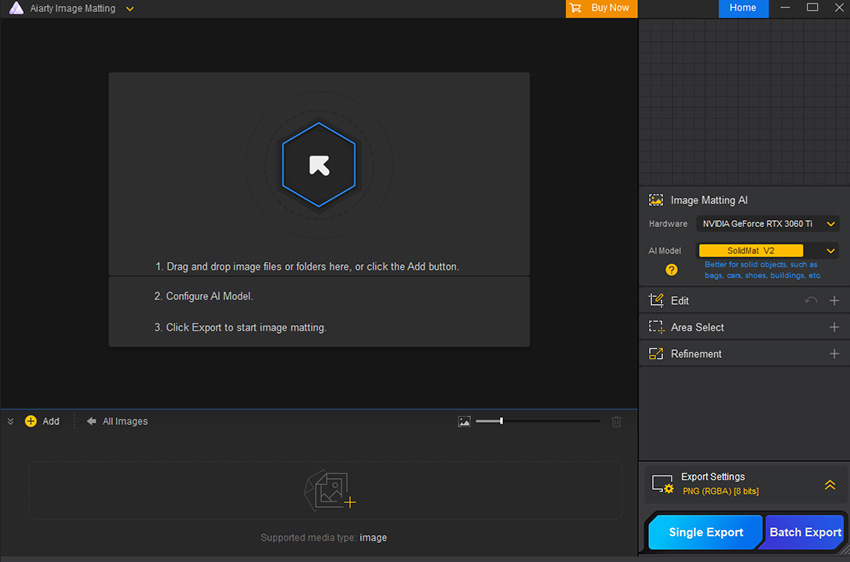
Step 3. Select the image you want to process. Click the yellow "Start" button on the right. The program will analyze and process the image, automatically detecting the subject and performing precise matting.
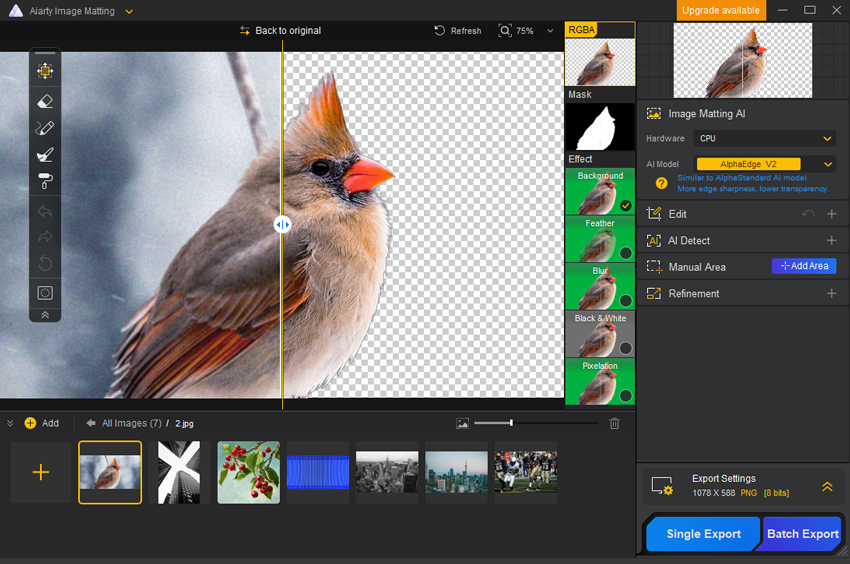
Step 4. After processing, an "Effect" panel will appear on the right side of the preview area.
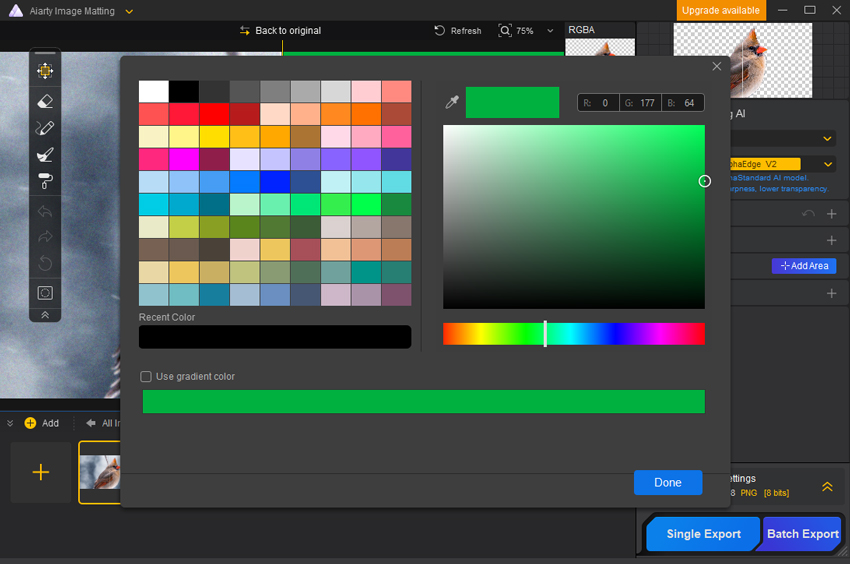
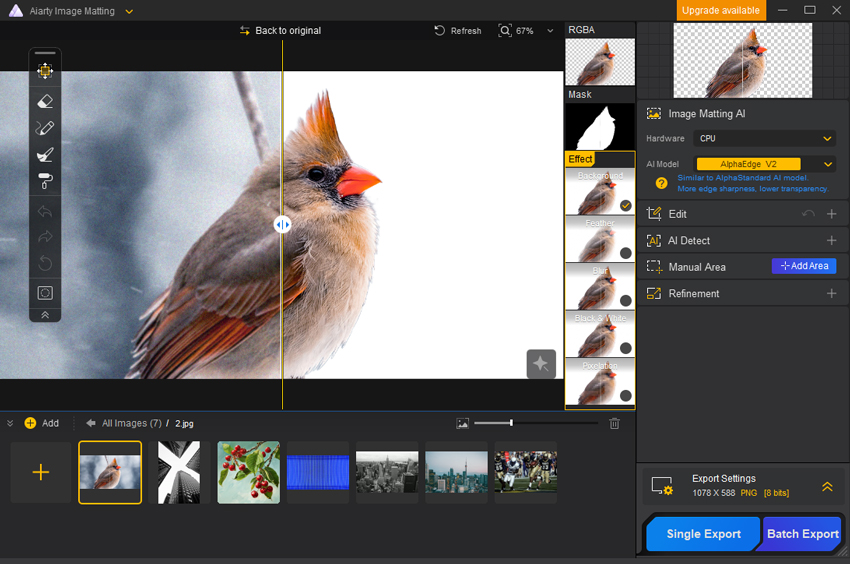
Click on the "Background" option in the "Effect" panel. Click the color icon next to the image icon to change the background color, and pick white from the color. Click on 'Done' to apply the change.
Step 5. Use the Preview Slider to compare the changes. Once satisfied, click the blue "Single Export" button on the right to save the edited image. For multiple images, use "Batch Export" to process and save them all at once.
Conclusion
Mastering the skill of creating a white background in Photoshop is invaluable for enhancing the professionalism and versatility of your images. By utilizing the techniques discussed, you can effectively isolate your subjects and achieve a clean, white backdrop. For those seeking an alternative approach, AI-powered tools like Aiarty Image Matting offer automated solutions to streamline this process. We encourage you to experiment with these methods to determine which best suits your workflow and artistic vision.
This post was written by Brenda Peng who is a seasoned editor at Digiarty Software who loves turning ordinary photos into extraordinary works of art. With AI assistance for brainstorming and drafting, the post is reviewed for accuracy by our expert Abby Poole for her expertise in this field.