What Is a Transparent Background? - Your Ultimate Beginner's Guide
Have you ever noticed how some logos on websites seem to float over any background color? Or wondered how stickers can seamlessly blend onto any surface? The secret behind this visual magic is often a transparent background.
In the digital world, images aren't always solid blocks. Sometimes, parts of an image are designed to be see-through, allowing whatever is behind them to show through. This is the essence of a transparent background. In this article, we'll demystify transparent backgrounds. We'll clearly explain what they are, why they are so important, and touch upon how the transparent backgrounds are created, even with the help of exciting new AI technologies. Get ready to understand the magic behind see-through images!

![]() Is creating perfect transparent backgrounds taking too long and too difficult?
Is creating perfect transparent backgrounds taking too long and too difficult?
- Spending hours painstakingly selecting backgrounds manually?
- Struggling to get smooth, clean edges without jagged lines or halos?
- Finding complex image editing software too confusing and expensive just for background removal?
- Worrying about losing image quality during the background removal process?
💡 Fortunately, there's a smarter, faster way: AI-powered background removal!
Aiarty Image Matting offers a revolutionary solution to make transparent backgrounds for your images. Using deep-trained AI, it precisely isolates subjects and makes background transparent in seconds. Experience effortless bulk creation of transparent backgrounds and unlock stunning visuals with unparalleled speed.
What Exactly Is a Transparent Background
Imagine a regular picture printed on paper. The paper is solid, right? You can't see through it. That's like an image with a solid, or opaque, background. It's just... there.
Now, picture a window made of clear glass. You can see through it. A transparent background in an image is similar to that clear glass. It's an area of the image that is designed to be see-through. It doesn't have a color or a solid fill of its own. Instead, it allows whatever is behind it to be visible.
Think of it like a sticker. If you have a sticker with a transparent background, and you put it on your laptop, you'll see the sticker design, but around the edges of the design, you'll see your laptop's surface showing through. That see-through part is the transparent background.
The Checkerboard Pattern - The Sign of Transparency
You'll often see transparency represented by a checkerboard pattern of light gray and white squares. This pattern is not actually part of the transparent image itself! It's just a visual way that image editing software and websites use to show you where the transparent areas are. It's like saying, "Hey, this area is see-through!"
So, when you see that checkerboard, remember it means transparency. If you save an image with a transparent background (usually as a PNG file), and then place it on top of another image or a colored background, those checkerboard areas will become invisible, letting the background show through beautifully.
Why Transparent Backgrounds Are Important
Transparent backgrounds might seem like a small thing, but they play a huge part in creating professional, versatile, and engaging visuals. Let's look at some of the key reasons why they're so important:
1. Enhancing Visual Versatility and Branding
Transparent backgrounds are vital for creating a strong and consistent brand presence. Think about your logo – with a transparent background, it's simple to overlay on websites of any color scheme, integrate into social media posts, and even look good on printed materials without an awkward background box. This flexibility translates to app and web design as well, where buttons and icons with transparent backgrounds can seamlessly hover over the interface, creating a cleaner and more intuitive experience regardless of what color scheme the design is.
2. Presenting Products in a Professional Way
For e-commerce sellers, transparent backgrounds are a lifesaver. When customers are browsing products, they want a clean, distraction-free view. Presenting products in front of white or transparent backgrounds eliminates distractions and brings all the attention to the product itself. This professional-grade presentation builds trust and leads to sales in the end.
3. Nourishing Creativity and Image Editing
Open the doors of creativity with the power of transparency. Whether you're creating engaging social media stickers, designing intriguing video overlays, or creating unique graphics, transparent backgrounds allow easy layering of images. It also makes editing images easier. Have to place an object against a different background or create a captivating collage? Transparent backgrounds eliminate harsh edges, allowing seamless and natural blending of multiple visuals.
4. Time and Effort Saving
In today's age, efficiency is the key. If you have an image with a transparent background – whether your company logo or product photo – you can recycle it in hundreds of projects without having to undergo the hassle of removing the background each time. This single step saves considerable time and effort, especially for those who work with visuals every day.
Technical Aspects - How Transparency Works
Image transparency refers to the ability for parts of an image to be see-through. This capability depends on the image file format. It relies on what's called the "alpha channel" – extra data for each pixel that determines its opacity level, or how solid or transparent it is. PNG and GIF are two of the most common formats supporting transparency and using this pixel-level alpha data. While GIF is often preferred for animated graphics, PNG generally offers better quality for static images needing transparent areas.
Crucially, the JPEG format does not support transparency. Saving an image with transparent areas as a JPEG will result in those areas being filled with a solid color, usually white. For transparency, you must use PNG or GIF.
How to Create Transparent Backgrounds for Your Photos
If you've ever struggled with a photo that had to be background-free, you understand how useful a transparent background can be. It opens up endless possibilities, whether you're making graphics, building custom logos, or something to place on a website. In this section, I will show you three ways to strip backgrounds, so you can choose the one that best fits your skill and needs.
How I tested:
I wanted to make sure that we're giving you an unbiased comparison, so I tested all three methods with the same set of images in the same test environment. That way, I could be able to compare how each option fared in making a transparent background directly.
- My PC's specs: Windows 10, Intel (R) Core i7, 32GB RAM, AMD Radeon RX 7600 Graphics.
- The test images: a portrait photo at 1024x1024
- I spent hours testing every tool listed here, the 3 methods were cited by most editors.
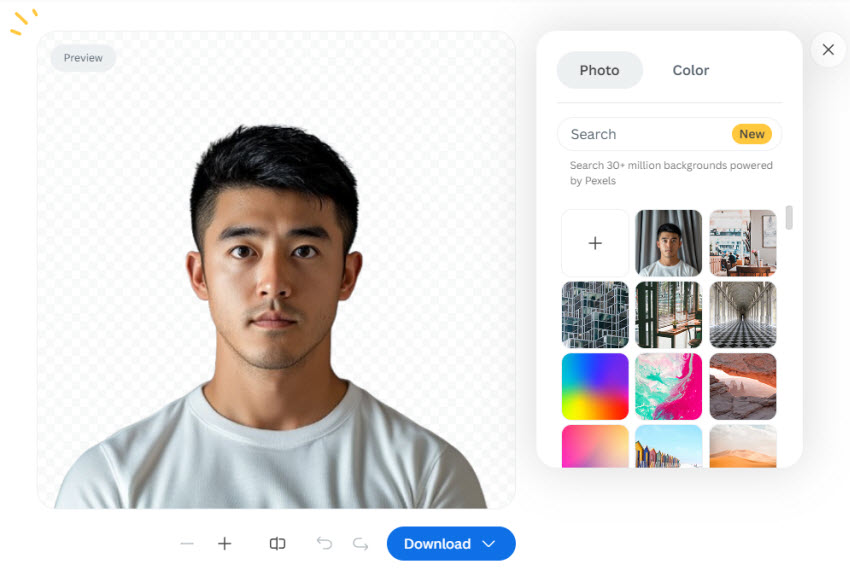
Method 1. Make Your Background Transparent in a Click
Aiarty Image Matting ensures flawless transparent backgrounds with AI-powered precision, preserving intricate details like product edges, complex graphic elements, and even subtle shadows. Its advanced algorithms detect and isolate subjects with pixel-perfect accuracy, eliminating jagged edges or residual background artifacts. Whether you're working with detailed product photography, intricate logos, or layered graphic designs, the tool retains natural sharpness and clarity, avoiding the "cut-out" look common in basic editors.
With Aiarty Image Matting, creating professional-quality transparent backgrounds is incredibly effortless and fast. The built-in AI automatically handles the complexities, delivering studio-quality results in seconds – no manual refining is typically needed.
Key features to make clear transparent background:
- Leverages SOTA advanced AI models for accurate and detailed background removal.
- Alpha matte fine detail preservation, excels with hair, fur, transparent, semi-transparent, and complex edges.
- No learning curve. Achieve instant transparency with a single click – incredibly easy to use for anyone.
- Optimized for commercial and large projects with the ability to process 3000+ images at once for ultimate efficiency.
- Runs offline on your computer, ensuring data security and privacy.
Download Aiarty Image Matting and make transparent image background instantly!
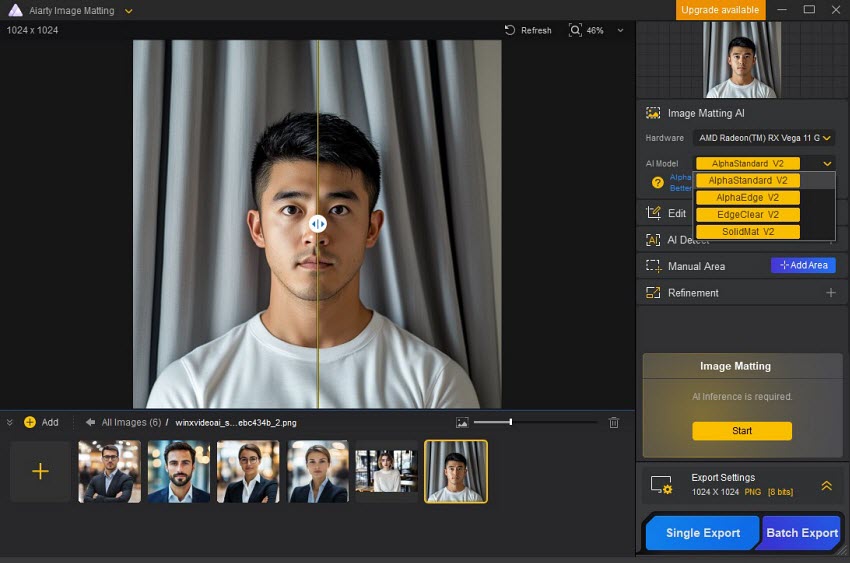
Steps to Remove Product Background with Aiarty Image Matting
Step 1. Import Your Images
After downloading, installing, and launching this AI background remover, drag and drop original image(s) to the workspace for import. You can process single or multiple images simultaneously for batch background removal.
Step 2. Choose the AI Background Rmeoval Model
Choose the desired AI model from the drop-down of the AI Model menu. There are 4 models available, each optimized for different scenarios:
- AlphaStandard V2 is best for semi-transparent objects, sheer fabrics, and transparent objects such as glass, wedding dress, hair, and fur.
- AlphaEdge V2 is best for semi-transparent objects needing sharper edges and less transparency, such as silhouette images, anime, and tattoos.
- EdgeClear V2 is best for solid, non-transparent objects with intricate details, such as vehicles, accessories, furniture, and birds.
- SolidMat V2 is best for solid, non-transparent objects needing maximum edge sharpness, such as architectural photography, electronics, clothing, and books.
Step 3. Make the Background Transparent
Click Start to initiate the AI-powered process to make the image background transparent. You can preview the before/after results in real-time. If needed, utilize the Eraser, Brush, Dodge, and other handy tools listed on the left of the interface to make further adjustments and refine edges.
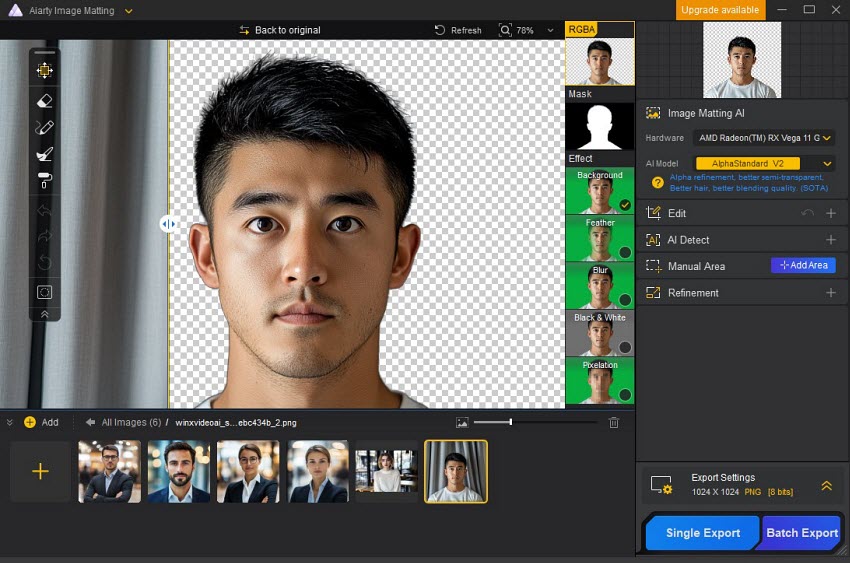
Tips:
If your original image is of lower quality, or if you want to enhance the overall look of your subject after background removal, you can enhance the image by using the AI Enhance feature located in the Edit section.
Step 4. Export the Transparent Background Image
Once you are satisfied with the background removal and any optional refinements or enhancements, click Single Export to export the image you're currently working with. Alternatively, click Batch Export to export the transparent background versions of all photos in bulk, saving significant time for larger projects.
Method 2. How to Make Your Background Transparent with Photoshop
Adobe Photoshop, the industry-standard powerhouse for professional image editing, offers an unparalleled arsenal of tools for creating visual appealing artwork. With its sophisticated selection tools and layer masking, users can remove the background from images for getting transparent background images. However, Photoshop has a steeper learning curve, requiring time, practice, and expertise, and its manual process can be time-consuming compared to AI automation.
Furthermore, Photoshop can be less effective at handling semi-transparent or truly transparent elements, and may struggle with preserving extremely fine details compared to specialized AI tools. While offering unmatched power for many tasks, Photoshop is best suited for users prioritizing absolute control and willing to invest time and effort, particularly when not dealing with highly complex transparency or extremely fine details.
Step 1. To begin using Adobe Photoshop, you will first need to purchase an Adobe Photoshop subscription, which starts at $22.99 per month (as of March 2025, pricing may vary), from Adobe's website or through their Creative Cloud platform.
Step 2. Once you have subscribed and installed Photoshop on your Windows or macOS computer, launch the application. Go to File > Open in the Photoshop menu to locate and open the image file from your computer that you intend to make transparent.
Step 3. Go to the Layers panel, double-click the Background layer and click OK in the New Layer dialog to unlock it and convert it to a regular Layer 0. Right-click this layer and choose Duplicate Layer.
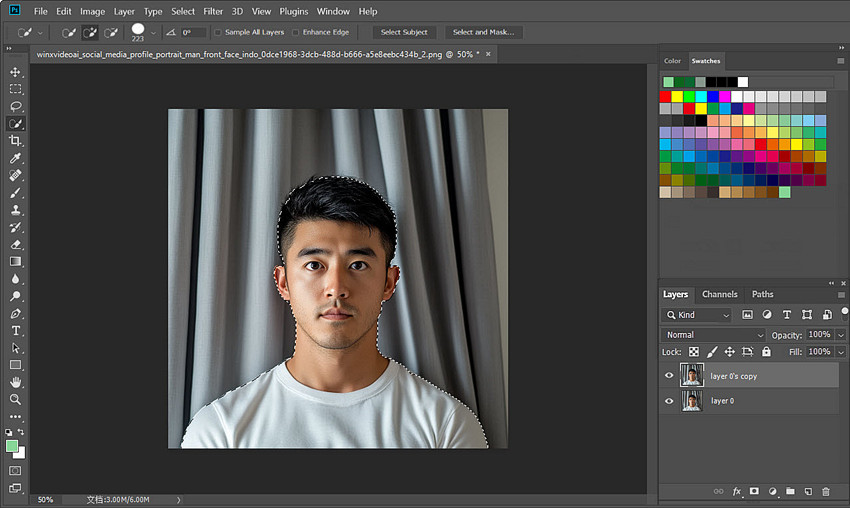
Step 4. Select the background with the selection tools offered by Photoshop. You can use one or several of them for getting the best possible result.
- Quick Selection Tool (W): Excellent for quickly selecting backgrounds with good contrast from the foreground. Simply brush over the background to select it.
- Magic Wand Tool (W): Works well for backgrounds with uniform color. Click on the background to select areas of similar color. Adjust "Tolerance" in the top toolbar for selection sensitivity.
- Pen Tool (P): For the most precise selections, especially around complex shapes like hair. Draw paths around the foreground object to create a vector-based selection. This offers the highest accuracy but requires more skill and time.
Step 5. After your initial selection, click Select and Mask in the top toolbar. This opens a dedicated workspace for refining edges. Here, you can
- Use the Refine Edge Brush Tool to brush along the edges of the foreground object, especially hair or fur. Photoshop intelligently improves edge detection.
- Adjust Smooth, Feather, Contrast, and Shift Edge sliders in the Properties panel to fine-tune the selection and remove halos or jaggedness. Experiment with these sliders to get the cleanest possible edges.
- Check the Decontaminate Colors box to remove color fringing around the edges of the foreground object after background removal.
Step 6. In the Select and Mask workspace, under Output Settings, ensure Output To: is set to Layer Mask. Click OK. Photoshop will create a layer mask, hiding the selected background and revealing transparency.
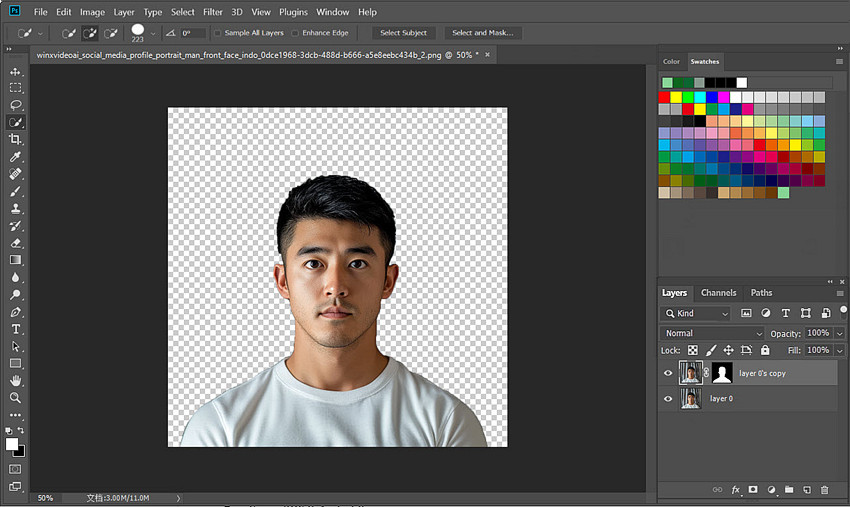
Step 7. Go to File > Export > Export As. In the Export As dialog, select PNG as the format. PNG is essential for saving transparency. Click Export and choose your save location.
Method 3. How to Make Your Background Transparent Online
When you need a transparent background right now for a single, non-critical image, and browser-based convenience is paramount, remove.bg offers an undeniably quick solution. However, for more demanding needs, remove.bg is not ideal. It's a purely automated online tool with inherent limitations. If you're processing multiple images, require higher quality, need batch processing or advanced features, or value efficiency and quality over bare-bones speed, dedicated software like Aiarty Image Matting is a far more powerful and versatile solution. Anyway, think of remove.bg as a basic, entry-level option for occasional, single-image transparency tasks.
Step 1. Visit Remove.bg on Chrome, Safari, or any other prevalent browser.
Step 2. Click on the Upload Image button and select the original image that you want to make it background transparent.
Step 3. Remove.BG starts removing the image background. Once it finished, you can refine the result with the Erase/Restore feature.
Step 4. Click Download to download the transparent background image. Keep in mind the free remove.bg account severely restricts download quality, providing only a small, low-resolution (500x500 pixels) preview image.
Test Results & Comparison of Transparent Background Methods
Having explored these methods, let's look at simple test results to guide your choice. Which method is best for you?
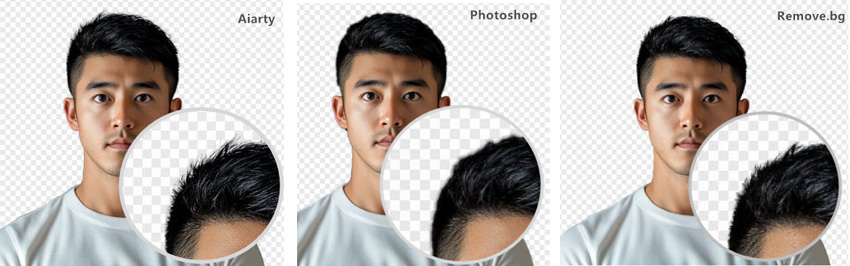
Aiarty Image Matting: It produces transparent backgrounds that are visibly the cleanest and sharpest. Edges around the subject are smooth and well-defined, with excellent detail preserved, even in tricky areas. The overall visual result is a professional and polished transparent background that looks naturally integrated.
Remove.bg: It creates transparent backgrounds that are generally decent for simpler images. The transparency is achieved rapidly online. However, visually, the edges can appear slightly less refined, sometimes a bit softer or less sharp, and fine details may be slightly less preserved compared to Aiarty Image Matting
Adobe Photoshop: Using its Quick Selection tool alone results in transparent backgrounds with visually rough and less clean edges. Fine details can be lost, and the edges may appear somewhat jagged or artificial-looking. To achieve truly visually refined and professional transparent backgrounds in Photoshop, significant manual refinement using advanced techniques is visually necessary – requiring more time and expertise.
Stop settling for less than perfect transparency. Experience the cleanest, sharpest results and effortless background removal by trying Aiarty Image Matting today!
You May Also Like
This post was written by Brenda Peng who is a seasoned editor at Digiarty Software who loves turning ordinary photos into extraordinary works of art. With AI assistance for brainstorming and drafting, the post is reviewed for accuracy by our expert Abby Poole for her expertise in this field.