Summary: This guide to business portrait photography covers essential gear, posing techniques, and lighting tips to capture confident, approachable portraits. It emphasizes the importance of subtle editing to enhance without transforming. Tools like Aiarty Image Enhancer can streamline post-processing, ensuring professional-grade results that align with a company's brand identity.
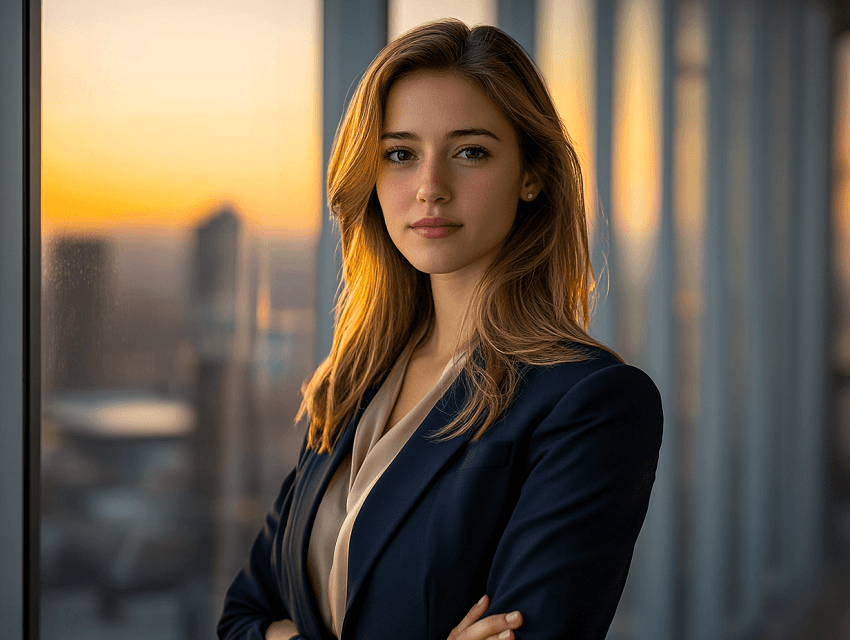
A great business portrait isn't just a photo—it's a visual handshake. Whether it's for LinkedIn, a company website, or a press release, a polished corporate portrait builds trust before the first meeting. (And let's be honest, nobody wants their profile picture to scream "deer in headlights.")
Business portrait photography is all about projecting professionalism while keeping things natural. It's not stiff yearbook photos—it's about capturing confidence, approachability, and brand identity in a single frame. Think of it as the difference between "I just woke up like this" and "I run board meetings before breakfast."
In this guide, we'll walk through everything you need to know—from pre-shoot prep (because winging it rarely works) to lighting tricks (goodbye, unflattering shadows), posing hacks (no awkward arm-crossing), and subtle editing (no plastic-skin disasters).
Whether you're a photographer, a business professional updating your headshot, or just someone who wants to nail that "competent but not terrifying" vibe, these tips will help. Let's get started—your future clients (or bosses) will thank you.
Capturing a compelling business portrait is not just about pointing a camera and clicking. It involves understanding your subject's needs, managing lighting, posing, and editing to create a polished image that reflects professionalism and approachability. However, one of the most significant challenges photographers face is achieving consistent, high-quality results in post-processing.
This is where AI-powered tools like Aiarty Image Enhancer come into play. These innovative solutions automate tasks such as denoising, skin smoothing, blemish removal, and eye brightening, allowing photographers to focus on creative aspects while ensuring their subjects look their best without appearing overly retouched.
By leveraging such tools, photographers can streamline their workflow, reduce editing time, and consistently deliver professional-grade portraits that enhance their clients' brand image.
Whether you're shooting for LinkedIn profiles, company websites, or press releases, the right combination of photography skills and AI-driven editing can make all the difference in projecting confidence and approachability.
Essential Gear for Business Portrait Photography
You wouldn't show up to a business meeting in pajamas (unless you work from home very casually), so why skimp on the right gear for a professional portrait? Whether you're shooting in a studio, an office, or outdoors, having the right equipment makes the difference between a "Wow, you look sharp!" and a "Why do I look like a ghost?" moment.
Let's break down the must-haves—no fluff, just the essentials.
Camera and Lenses: The Heart of the Setup
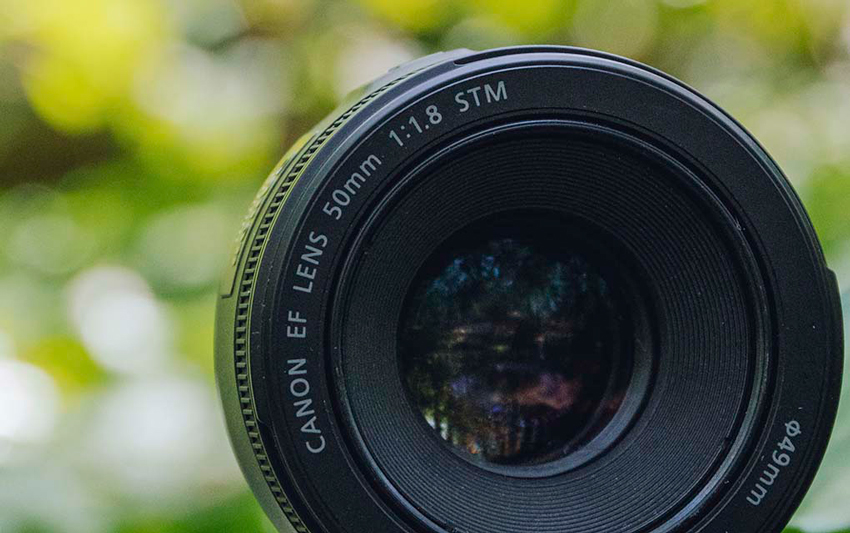
First things first: your camera matters. While modern smartphones can take decent portraits, a dedicated camera gives you control over depth, detail, and lighting—key for corporate headshots.
DSLR vs. Mirrorless: DSLRs are reliable workhorses with excellent battery life—great for long studio sessions. Mirrorless cameras are lighter, quieter, and often better for on-location shoots where discretion matters.
Pro tip: Full-frame sensors (found in both types) capture sharper details and handle low light better—ideal for professional work.
Prime vs. Zoom Lenses: An 85mm prime lens is a portrait powerhouse, offering flattering compression and dreamy background blur. A 24-70mm zoom lens is more versatile for tight office spaces or group shots.
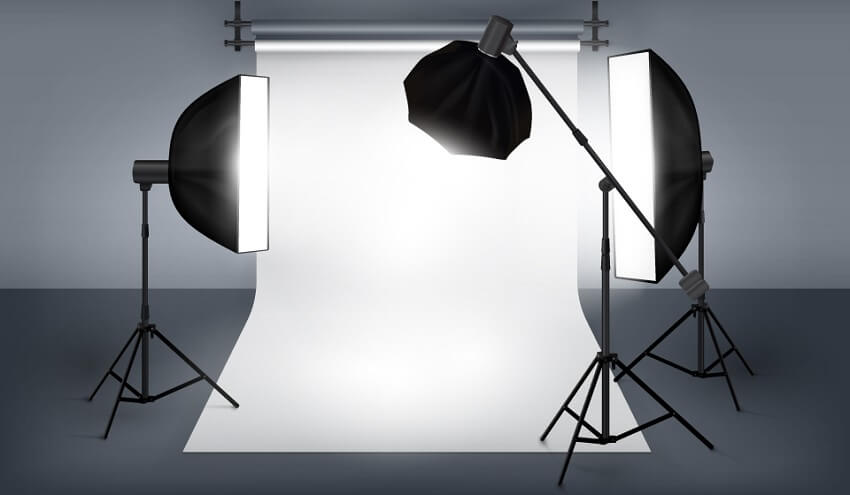
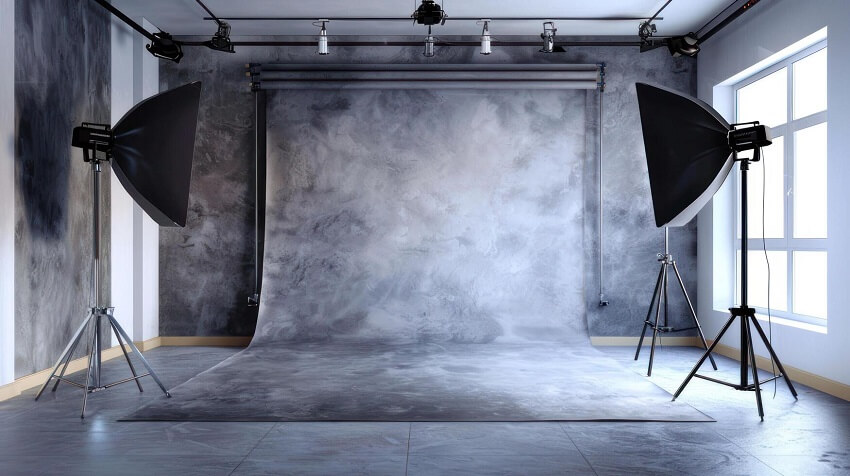
Lighting Equipment: Because Shadows Aren't Your Friend
Lighting is a crucial element in business portrait photography, as unflattering shadows can detract from the professionalism of the image. While natural light can be beneficial, it often presents challenges, such as harsh midday sun or overcast skies that can create undesirable effects. This is where artificial lighting becomes indispensable.
Softboxes are particularly effective for creating soft, diffused light that mimics natural window illumination. They help eliminate harsh shadows under the eyes and chin, resulting in a more flattering appearance. For those looking for versatility, ring lights provide even illumination and are popular among influencers; however, they may produce a flat look that isn't ideal for formal corporate portraits.
Additionally, using a simple pop-up reflector can significantly enhance your lighting setup. A reflector can bounce light onto your subject's face, brightening their eyes and smoothing skin tones. Silver reflectors add contrast, while white reflectors offer a softer fill.
Accessories: The Unsung Heroes
- Tripod: For consistency (and to avoid arm fatigue during long shoots).
- Diffusers: To soften harsh sunlight if shooting near windows.
- Backup Batteries & Memory Cards: Because "Storage Full" mid-shoot is a nightmare.
Pre-Shoot Preparation: The Secret to Stress-Free Business Portraits
Let's be honest—the best business portraits don't happen by accident. They're the result of smart planning, clear communication, and a little bit of strategy. Think of it like preparing for a big presentation: the more you prepare, the smoother it goes (and the less you'll sweat the small stuff).
Here's how to set yourself—and your subject—up for success.
Client Consultation: Ask the Right Questions
Before you even pick up your camera, you need to understand exactly what your client (or yourself) wants. A quick 10-minute chat can save hours of reshoots.
Key questions to ask:
- Brand guidelines: Are there specific colors, tones, or styles that match their company's image? (A law firm's headshots will look different from a tech startup's.)
- Intended use: Will these photos be used on LinkedIn, a corporate website, or printed for brochures? (This affects framing, resolution, and even posing.)
- Formality level: Should the vibe be "friendly CEO" or "authoritative executive"?
- Inquire about any specific preferences or concerns the client may have regarding their appearance. Do they have a preferred side, or are there any features they'd like to emphasize or minimize?
Pro tip: Don't underestimate the power of visual aids. Requesting reference photos is an excellent way to establish a shared understanding of the desired outcome. This will minimize misunderstandings and ensure that everyone is on the same page before the photoshoot begins.
Location Scouting: Studio, Office, or Outdoors?
Location scouting is paramount because it sets the stage for the entire photoshoot. Each setting—studio, office, or outdoors—offers unique advantages and challenges that can significantly influence the final result.
A studio provides ultimate control over lighting and background, allowing you to create a polished, consistent look. However, it can sometimes feel impersonal if not carefully styled.
Shooting in an office setting adds authenticity, showcasing the subject in their natural work environment. This approach can convey a sense of approachability and professionalism. However, you must be prepared to manage potential clutter and suboptimal lighting conditions.
Finally, outdoor locations offer the benefit of natural light and a more relaxed, dynamic feel. Be mindful of unpredictable weather and distracting backgrounds. Utilizing open shade, such as shooting under a tree or awning, can help mitigate harsh sunlight. Remember to bring portable lighting equipment for fill light if needed.
Choosing the Right Background
Selecting the right background is more than just filling space behind your subject; it's a pivotal decision that impacts the overall message and professionalism of the portrait.
In a studio setting, neutral-colored backdrops provide a clean, distraction-free environment, ensuring the focus remains squarely on the individual. Gray, white, and black are classic choices that work well for various skin tones and attire.
However, don't be afraid to introduce subtle textures, such as a lightly distressed wood panel or a concrete-like surface, to add a touch of modernity and visual interest without overwhelming the subject.
For environmental portraits taken in an office, strategic background choices can tell a story about the person's role and company culture. While it's important to blur out distracting elements like messy desks or overflowing bins using a shallow depth of field, consider incorporating elements that reinforce the brand, such as a company logo subtly placed in the background or a recognizable office feature.
Ensure the chosen background elements are clean, organized, and relevant to the subject's professional identity. The key is to create a harmonious balance where the background complements the subject without stealing the spotlight.
Wardrobe and Grooming Tips
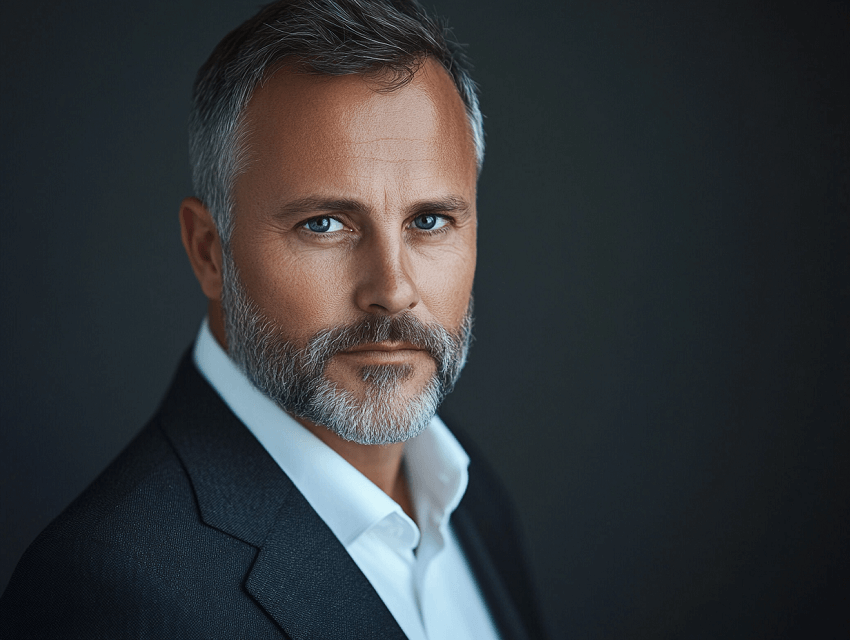
Wardrobe and grooming are critical details that can significantly elevate the quality of a business portrait. Encourage subjects to choose clothing that is well-fitted and free of wrinkles or distracting patterns. Solid colors in classic shades such as navy, charcoal, or gray often convey professionalism and sophistication, while lighter tones can project a sense of approachability and warmth.
Grooming is equally important. Remind clients to pay attention to details such as neat hairstyles, trimmed beards, and minimal jewelry. Suggest that they iron their clothing the night before the shoot to avoid last-minute wrinkles. Also, advise them to avoid using excessive shiny makeup or hair products, as these can create unwanted reflections in the photos. A well-groomed subject exudes confidence and attention to detail, which translates into a more polished and professional image.
Shooting Techniques for Polished Portraits: Look Like a Pro (Even If You're Nervous)
Alright, you've got your gear ready, your client prepped, and your location scouted—now it's time for the magic to happen. But here's the thing: taking a great business portrait isn't just about clicking a button. It's about making your subject look confident, approachable, and effortlessly professional (even if they secretly hate having their photo taken).
Let's break down the techniques that separate "meh" headshots from "hire me immediately" portraits.
Camera Settings: The Technical Foundation
You don't need to be a camera wizard, but nailing these basics will give you pro-level results every time.
Aperture & Depth of Field: Use f/2.8 to f/5.6 for that perfect, soft background blur that makes your subject pop. Wider apertures (like f/1.8) can be too dreamy—you still want the eyes and suit details sharp!
ISO & Shutter Speed: Keep ISO under 800 to avoid grainy, noisy photos (unless you're in a dimly lit office—then crank it up just enough). Shutter speed: 1/125 or faster to freeze motion (no one wants a blurry CEO).
Pro tip: Shoot in RAW format. It gives you way more flexibility in editing later.
Posing: Make Awkward Feel Natural
Posing is an art. When subjects feel self-conscious, it shows in their posture and expression. Your role is to guide them into natural-looking positions that exude confidence and approachability.
For standing poses, encourage a slight weight shift to one foot. This simple adjustment relaxes the body and creates a more dynamic stance. Always remind them to relax their shoulders, rolling them back and down to prevent hunching, which can make them look tense.
Hand placement is another critical element. Avoid stiff, straight arms by suggesting they place a thumb in a pocket or lightly clasp their hands.
For seated poses, especially for executives, angling the chair at 45 degrees to the camera creates a powerful yet approachable look. A slight lean forward conveys engagement and interest, avoiding the appearance of disinterest.
Employing simple tricks like a "fake laugh," by telling a light-hearted joke or asking about a pleasant memory, can elicit genuine smiles and relaxed expressions that capture the subject's personality. The goal is to create an environment where they feel comfortable and authentic, resulting in portraits that reflect their true professional persona.

Lighting: Flatter Like a Best Friend
Skillful lighting can enhance your subject's best features and minimize any perceived flaws.
Window light is an excellent option for achieving natural-looking portraits. Positioning your subject at a 45-degree angle to a window provides soft, directional light that flatters facial contours. Using a reflector on the opposite side to bounce light back into the shadows can further balance the exposure and brighten their eyes.
In a two-light studio setup, the key light, typically a softbox placed at a 45-degree angle, serves as the primary light source. Complement this with a fill light, either a weaker light source or a reflector, to soften shadows and prevent harsh contrasts. This ensures that the subject's features are well-defined without any unflattering shadows.
Don't forget the importance of catchlights. These small reflections in the eyes can add life and sparkle to the portrait, making the subject appear more engaging and approachable.
Working With Different Corporate Roles
Not all business portraits are created equal. A startup founder might want "friendly innovator," while a lawyer needs "trustworthy authority."
Executives: Strong eye contact. Have them look just above the lens for intensity.
Team Members: Softer angles: Shoot slightly from above for approachability. Closer crops: Focus on smiles and eye crinkles (warmth = team player).
Group Shots: Stagger heights: No awkward lineup—mix standing and seated. Layered lighting: Use a stronger key light in front and a softer backlight to separate people from the background.
Post-Processing Tips for Flawless Results: The Subtle Art of Looking Perfect (Without Looking Fake)
Let's be real—even the most polished business portraits can benefit from a little digital TLC. But here's the golden rule: edit to enhance, not to transform. You want your subject to look like the best version of themselves, not an airbrushed mannequin.
Whether you're using Photoshop, Lightroom, or AI-powered tools, these post-processing techniques will take your portraits from "good" to "hired on the spot."
Basic Retouching: Keep It Natural
Basic retouching is the cornerstone of polished business portraits, but it requires a delicate balance. The objective is to refine the image, addressing minor imperfections without sacrificing the subject's authentic appearance.
When it comes to skin smoothing and blemish removal, approach it with a light touch, using tools like the healing brush or clone stamp sparingly. Overdoing it can result in an unnatural, plastic-like texture that detracts from the overall professionalism.
Pro tip: Now there are many AI tools, like Aiarty Image Enhancer, can speed up skin retouching while preserving texture.
Eye brightening can add a subtle sparkle and freshness to the portrait. Employing a dodge brush with low opacity on the whites of the eyes can make them appear more alert and engaging. However, excessive brightening can create an unnatural, almost otherworldly effect, so moderation is key.
Similarly, teeth whitening should be approached with subtlety. Desaturating the yellows slightly using the HSL panel in Lightroom can brighten the teeth without making them appear unnaturally white.
Remember, the aim is to enhance the subject's natural features, ensuring they look their best without appearing overly processed.

Background Adjustments: Clean & Professional
A cluttered or distracting background can detract from an otherwise excellent photo, undermining the subject's professional image. Blurring distractions using Gaussian Blur in Photoshop or masking tools in Lightroom is a simple yet effective way to soften busy backgrounds, ensuring the focus remains on the individual.
Adhering to Adobe's recommendation of using neutral backgrounds, such as gray or white, in corporate headshots is a safe bet for maintaining professionalism.
However, there are instances where background replacement becomes necessary, such as when the original background clashes with the company's brand colors or contains distracting elements that cannot be easily removed.
Photoshop's Select Subject combined with Refine Edge offers a powerful tool for creating clean and precise cutouts, allowing you to seamlessly replace the background with a more suitable alternative.
Color Grading: Match the Brand Vibe
Color grading is about more than just making the photos look aesthetically pleasing; it's about ensuring consistency and reinforcing the brand's message. Start by adjusting the white balance to reflect the desired mood. Warmer tones often convey a friendly, approachable vibe, while cooler tones can evoke a sense of sleekness and modernity.
Consider the specific color palettes associated with the company. A financial firm, for example, might benefit from muted blues and grays to project trustworthiness and stability. In contrast, a creative agency could embrace brighter, more saturated tones to reflect their innovative and dynamic culture.
Pay close attention to skin tones, using the HSL sliders in Lightroom to even out any redness or sallowness, ensuring a natural and healthy appearance. The key is to create a cohesive visual identity that strengthens the brand's image and resonates with its target audience.
Common Editing Pitfalls to Avoid
- The "Plastic" Effect: Over-smoothed skin = instant uncanny valley.
- Over-sharpening: Harsh edges make pores look like craters.
- Ignoring brand colors: Delivering photos that clash with a company's website is a no-go.
Common Mistakes to Avoid: Don't Let These Blunders Ruin Your Business Portraits
Even experienced photographers can fall into these traps—but armed with a little knowledge, you can sidestep them like a pro. Here are the most common business portrait pitfalls and how to avoid them.
1. Over-Editing: When "Flawless" Goes Fake
We get it—you want your subject to look perfect. But there's a fine line between polished and plastic.
- The "Facetune" Effect: Over-smoothed skin erases natural texture, making people look like wax figures.
- Fix: Use a light hand with retouching tools, and always zoom out to check realism. Utilize frequency separation techniques in Photoshop to smooth skin while retaining texture. Focus on minimizing distractions rather than obliterating every pore. Remember, subtle imperfections add character and authenticity. Consider using AI-powered tools like Aiarty Image Enhancer for efficient yet natural-looking skin retouching.
- Crazy Eye Brightening: Over-whitened eyes can make your subject look like they've seen a ghost.
- Fix: Keep adjustments subtle—eyes should look awake, not radioactive. Instead of globally brightening the entire eye, focus on enhancing the catchlights. Use a small, soft brush with a low opacity to subtly dodge the iris and sclera, paying attention to maintaining natural variations in tone. Avoid harsh, artificial-looking whitening that removes depth and realism.
2. Ignoring Brand Guidelines
A mismatch between the portrait and the company's branding is like wearing flip-flops to a board meeting.
- Color Clashes: Delivering photos with the wrong tones (e.g., warm edits for a corporate brand that uses cool grays).
- Fix: Ask for brand color references before editing. Create a mood board that incorporates the brand's colors, fonts, and visual style to guide your color grading process. Use color grading tools in Lightroom or Photoshop to fine-tune the overall tone of the image, ensuring it aligns with the brand's aesthetic. Calibrate your monitor to ensure accurate color representation throughout the editing process.
- Style Mismatch: A creative agency might want dynamic, unconventional shots, while a law firm needs classic professionalism.
- Fix: Review the company's existing marketing materials for visual cues. Conduct thorough research into the company's brand identity, including their website, social media presence, and marketing campaigns. Pay attention to the overall tone, style, and visual language they employ. Tailor your posing, lighting, and editing techniques to match the brand's aesthetic, ensuring the portraits resonate with their target audience.
3. Bad Lighting: The Fast Track to Unflattering
Lighting can make or break a portrait—literally.
- Harsh Shadows: Direct, unmodified light creates unflattering shadows (e.g., under-eye bags, nose shadows).
- Fix: Use diffusers, softboxes, or natural window light with a reflector. Invest in quality lighting equipment, such as softboxes, umbrellas, and reflectors, to create soft, diffused light that minimizes harsh shadows. Experiment with different lighting setups to find the most flattering angles for your subject's face. Pay attention to the direction and intensity of the light, and use fill light to balance shadows and create a more even exposure.
- Flat, Lifeless Light: A single, straight-on light source removes all depth from the face.
- Fix: Use multiple light sources to add depth and dimension. Bounce flash off walls or ceilings to create softer, more natural-looking light. Use a key light to define the subject's features and a fill light to soften shadows. Consider adding a hair light to separate the subject from the background. Experiment with different light modifiers, such as grids and snoots, to control the direction and shape of the light.

4. Awkward Posing: When "Professional" Turns Stiff
Even the most confident people can look awkward if posed poorly.
- The "Deer in Headlights" Stare: Unnatural posing makes people look uncomfortable and unapproachable.
- Fix: Guide your subject with clear, specific instructions. Start with basic poses and gradually adjust them to create a more natural look. Encourage them to relax their shoulders, soften their gaze, and breathe deeply. Use verbal cues, such as "imagine you're talking to a friend," to elicit genuine expressions.
- Stiff Arms and Hands: Arms glued to the sides or awkwardly crossed arms create a sense of tension.
- Fix: Suggest natural hand placements (e.g., thumb in pocket, lightly holding a prop, resting on a desk). Guide the subject to slightly bend their arms and relax their hands, avoiding rigid or unnatural positions. Use props, such as a pen, notebook, or coffee cup, to give them something to hold and create a more relaxed and natural look.
5. Neglecting Wardrobe and Grooming Details
A cluttered or poorly chosen background pulls focus from your subject.
- Wrinkled Clothing: A wrinkled shirt or jacket screams "unprofessional."
- Fix: Advise subjects to iron or steam their clothes the day before the shoot. Bring a portable steamer or iron to the location for last-minute touch-ups. Pay attention to collars, cuffs, and seams, as these areas are particularly prone to wrinkling.
- Distracting Patterns or Colors: Loud patterns or clashing colors can detract from the subject's face.
- Fix: Recommend solid-colored clothing in classic shades (navy, gray, black). Advise against wearing overly bright or distracting patterns. Consider the company's brand colors when suggesting wardrobe choices, ensuring the clothing complements the overall aesthetic.
6. Incorrect Camera Settings: Technical Mishaps
- Shallow Depth of Field Overkill: Blurring everything except the nose makes for a weird portrait.
- Fix: Use an aperture that keeps the eyes and key facial features sharp (f/2.8 to f/5.6 is a good range). Consider the focal length of your lens and the distance to your subject when choosing your aperture. Use focus peaking or live view to ensure critical sharpness on the eyes.
- High ISO Noise: Grainy photos look amateurish.
- Fix: Keep ISO as low as possible (under 800 if possible). Use proper lighting to avoid having to crank up the ISO. Utilize noise reduction software in post-processing if necessary, but use it sparingly to avoid softening the image too much.
7. Ignoring the Subject's Personality
- Generic, Soulless Portraits
- Fix: Connect with your subject before the shoot. Chat about their job, interests, and what they want to convey in the portrait. Tailor the posing, lighting, and overall style to reflect their personality and professional identity. Encourage them to express themselves authentically and capture genuine moments of connection.
You May Also Like
This post was written by Brenda Peng who is a seasoned editor at Digiarty Software who loves turning ordinary photos into extraordinary works of art. With AI assistance for brainstorming and drafting, the post is reviewed for accuracy by our expert Abby Poole for her expertise in this field.