How to Blur the Background of Photos Already Taken or In-Camera
Okay, let's be honest, we've all been there. You snap that perfect photo—perfect lighting, amazing subject, and you're thinking, 'This is going straight to my profile!' But then you look closer, and... ugh. The background. It's a mess. Cluttered, distracting, just plain wrong.
It's not just me, right? Busy streets, cluttered rooms, distractions stealing focus. In fact, I've seen the posts on forums: 'How do I blur the photo background without making it look fake?' 'How to blur the background of a photo already taken on your iPhone?' We're all in the same boat, trying to make our photos look professional without spending hours glued to a screen.
Well, I've found something that actually works. In this guide, I will show you how to blur the background of a picture like a pro—no fancy skills required. Let’s get started!
💡 Blur Background of Photo Already Taken Instantly
Struggling to blur photo background perfectly without harsh edges or uneven blurs? Aiarty Image Matting blurs background of photos already taken easily. Its advanced AI ensures smooth transitions between your subject and the blurred picture background, even for complex details like hair or fine patterns, preserving every element while delivering a clean, professional blur.
Click to download Aiarty Image Matting to blur photos in clicks!
5 Ways to Blur Background of A Photo
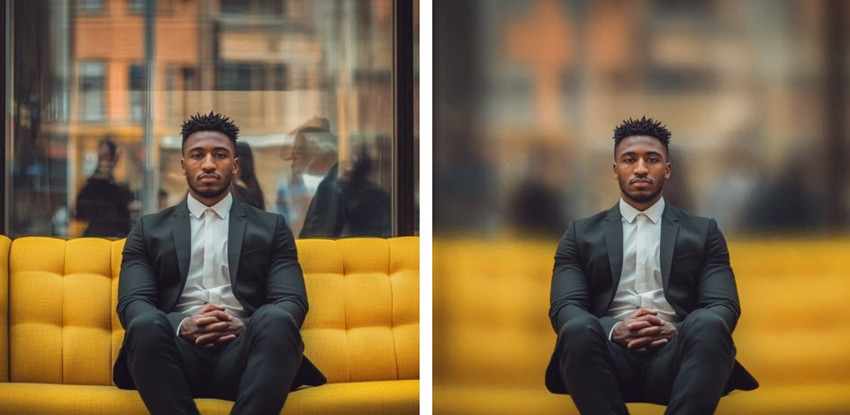
How do you blur a background on a photo? The best way is to achieve a natural background blur right when you take the photo in camera using techniques like using wide aperture lenses (e.g., f/1.8, f/2.8), creating shallow depth of field with DSLR or mirrorless cameras, or shooting with Portrait Mode on newer smartphones.
However, more often, we are wondering how do you blur the background of a picture on iPhone or Android that already taken? In this case, there’s no one-size-fits-all solution. Depending on your skill level, the tools you have, and the complexity of your photo, some methods work better than others. That’s why I’ve tested and compared 5 popular ways to blur photo backgrounds. Each method has its pros and cons, and I’ll walk you through them step by step.
#1. How to Blur Photo Background in AI?
Aiarty Image Matting’s advanced AI accurately detects edges, even in challenging areas like hair, lace, or transparent fabrics from the blurred image background. The result is a smooth, natural-looking background blur that mimics shallow depth of field, without sacrificing subject sharpness. Whether it’s a crowded street or a wispy wedding veil, Aiarty can identify your subject and leave every detail crisp, such as hair or fine patterns.
Key features of Aiarty Image Matting for easier background blurring:
- Add Gaussian Blur, fast blur, dynamic blur, center focus, box blur, etc.
- Adjust the blur intensity with a simple slider—subtle for portraits, dramatic for artistic shots.
- Remove background, add pixelated, black& white, blend new background, and more.
Free download Aiarty Image Matting to blur background of any photo already taken. Perfect for beginners and pros!
Step 1. Load in our photo
Download the image background blur tool on your computer and drag the pictures into it. Got a bunch of photos to blur? No problem—you can add them all at once and blur the picture backgrounds in one go.
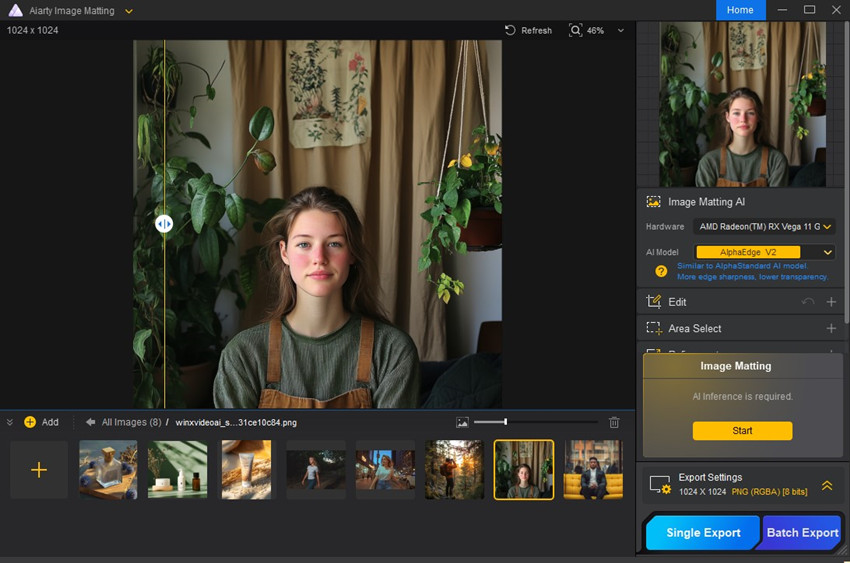
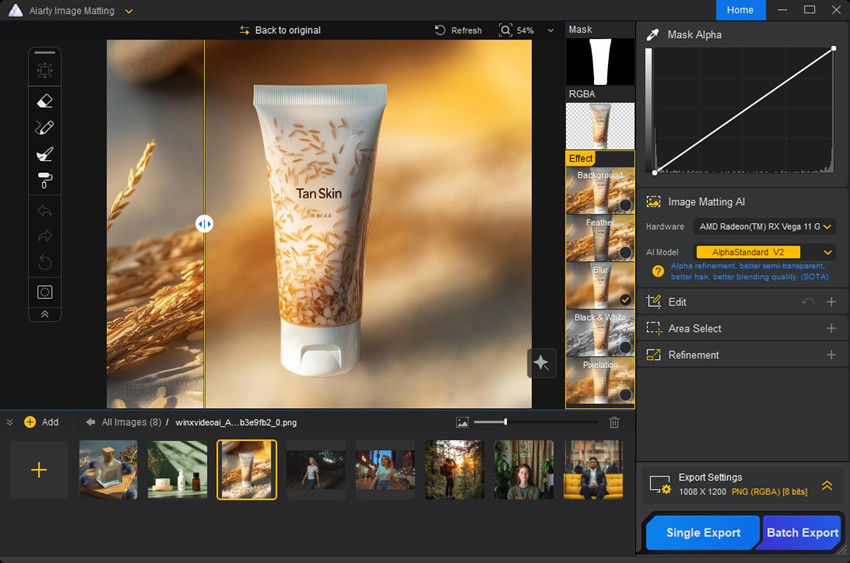
Step 2. Extract the subject
On the right panel, you’ll see 4 different AI models. Pick the one that best suits your photo (e.g., portrait, product, or landscape). Then click the Start button and let the AI work its magic to extract your subject.
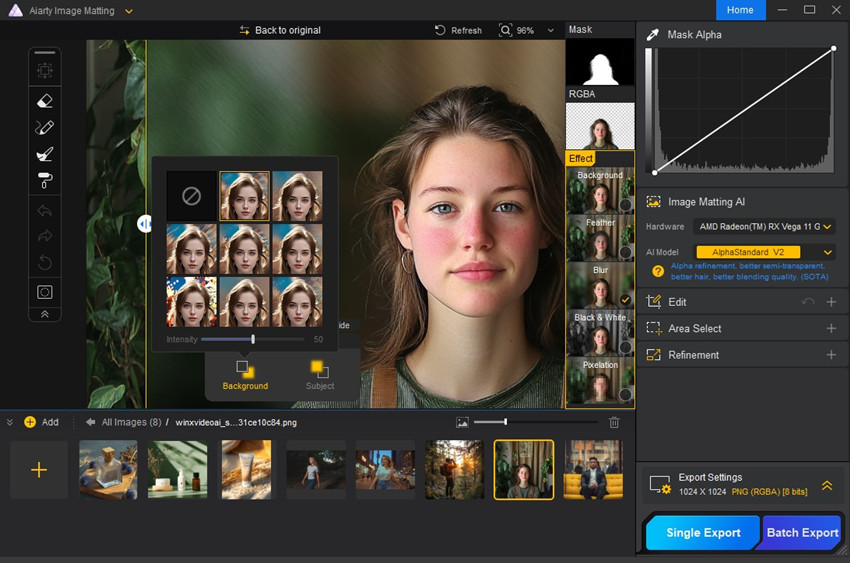
Step 3. Blur the background of photo already taken
Now you will get a photo with transparent background. You need to enable the Blur box under Effect menu bar on the right side of the interface. It will pop up the blur settings. It offers a comprehensive image background blur solution with 8 different blur types—Gaussian Blur, Fast Blur, Dynamic Blur, and more. Pick the one that matches your creative vision. Use the slider to control how much blur to make.
Step 4. Export the blurred image
Click Export Settings to save your photo as a PNG (for transparency) or JPG (for smaller file sizes). Click Single Export for one photo or Batch Export if you’re working with multiple images.
By following the simple steps outlined above, you can effortlessly blur the background of any image. Whether you're working with product photography, aiming to create a focused and appealing presentation of your items, or capturing stunning portraits, where you want to draw attention to the subject while softening the surroundings, it will deliver impressive results.
#2. How to Blur the Background of A Photo with Photoshop?
Photoshop is a very powerful tool when it comes to blurring photo backgrounds. It offers a wide range of blur features, such as Gaussian Blur, Motion Blur, Radial Blur, Shape and Surface Blur, etc. Photoshop gives you complete control over the blur effect, allowing you to fine-tune every detail. When done right, the results are stunning—your photos look like they were taken with a high-end camera. However, this needs a bit of practice.
Note: Photoshop's photo background blur quality is directly tied to the selection accuracy. Tools like the Quick Selection Tool often include unwanted background, particularly when subject and background colors are close. It also falters with fine details, such as hair. To achieve precise background blurring for subjects with complex details, investing time in tools like the Pen Tool is essential.
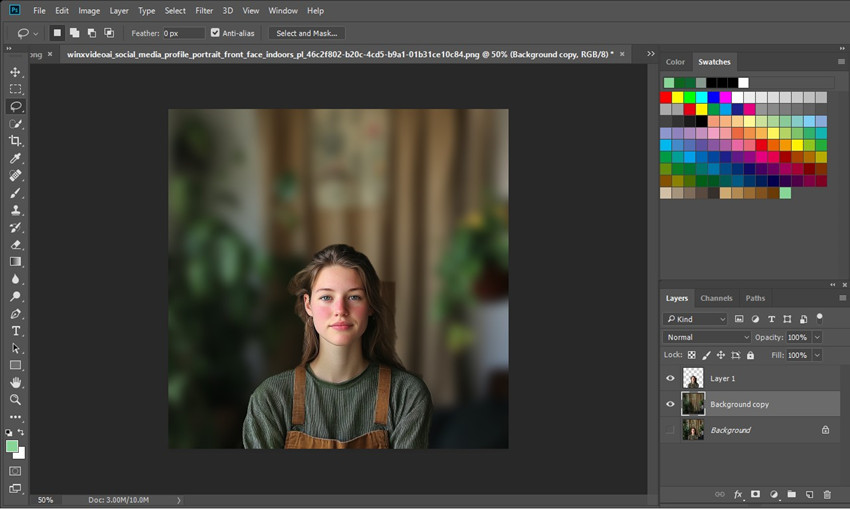
Step 1. Open your photo in Photoshop
Launch Photoshop and go to File > Open. Then choose and load the photo that you’d like to have a blur background.
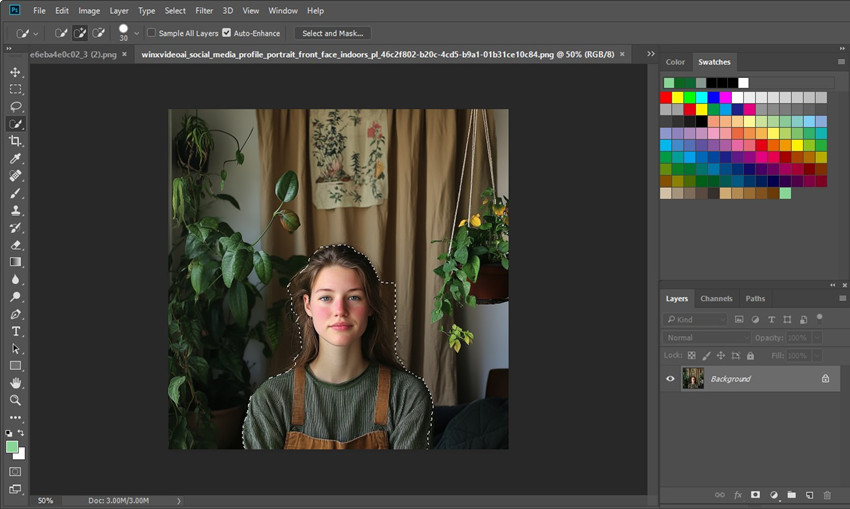
Step 2. Select the subject
The Quick Selection Tool works well for simple subjects, but for complex ones (like hair or intricate patterns), the Pen Tool is worth the extra effort.
- Use the Quick Selection Tool(shortcut: W) to highlight your subject. Click and drag over the subject to select it. If the tool misses parts of the subject, hold Shift and click to add to the selection.
- For more precision, switch to the Pen Tool(shortcut: P) and manually trace the edges of your subject. Once the path is complete, right-click and choose Make Selection.
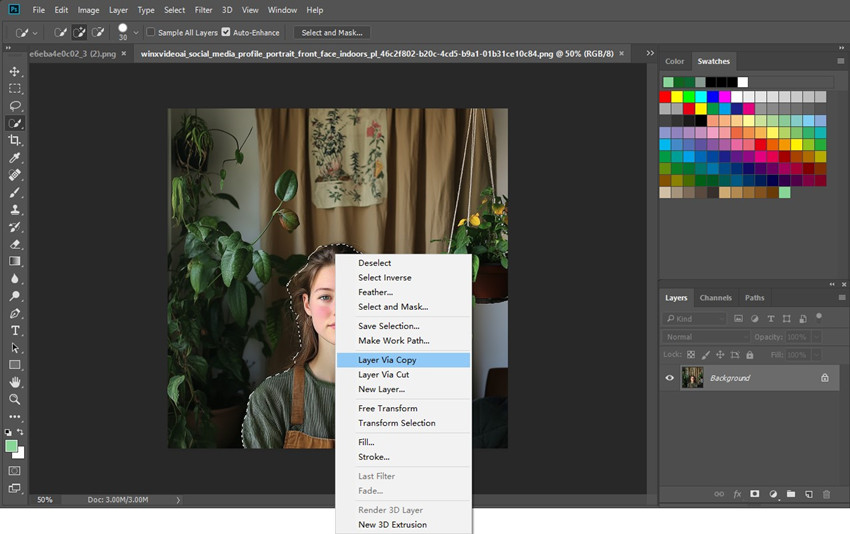
Step 3. Copy the selected subject to new layer
With your subject selected, right-click on it and choose Layer via Copy to save the selected subject to a new transparent layer.
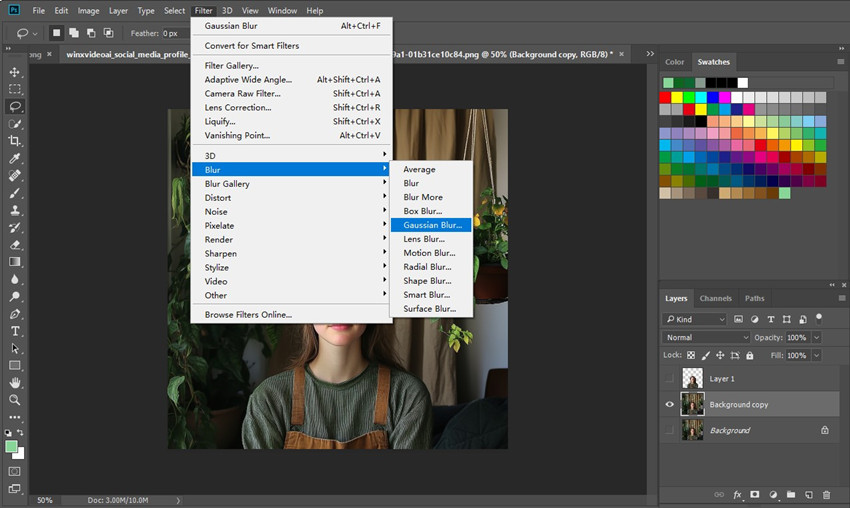
Step 4. Create a blur background layer
Next, copy the background layer to a new layer and we will work on it to blur the photo background. First, disable the transparent and background layers.
On the new layer, go to go to Filter > Blur and choose a Blur effect. Choose a type of blur to add to the photo. Once selected, it will pop up the setting window based on the blur type.
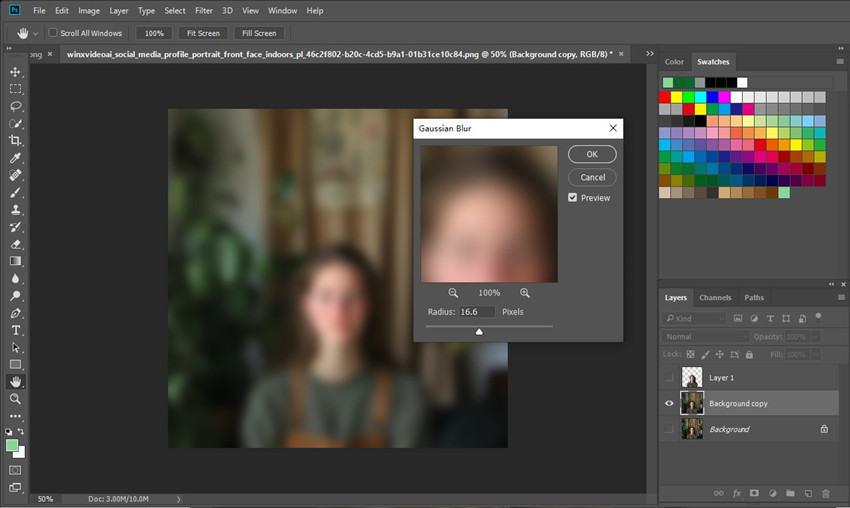
For example, here we choose Gaussian Blur. Then we can adjust the slider to control the blur intensity. For portraits, a blur radius of 10-20 pixels usually works well. For a more dramatic effect, increase the radius.
Step 6. Save the Blurred Photo
Now the entire photo is now blurred, which is fine. If you're satisfied with the blur level, enable the blur background layer and the transparent subject layer. The clear, isolated subject will then overlay and match the blurred subject within the image and you will get blurred photo background only.
Next, go to File > Export > Save for Web (Legacy). Choose JPEG or PNG as the file format and adjust the quality settings. Click Save and choose your desired location.
Also see: how to remove background in Photoshop
#3. How to Blur the Background of a Picture with Canva Online?
Online free photo background blur tools are generally user-friendly, offers a quick and easy way to blur the background of images without needing to download complex software. When it comes to blurring the background of a photo online free, Canva lives up to this reputation, offering two distinct methods that require minimal effort: the "Blur" effect and the "Auto Focus" tool. Both blur effects deliver rapid results, letting users make background blur effectively.
Note: While Canva's blur tools offer convenience, they often struggle with precision. Subject detection and background blurring can be inaccurate, leading to parts of the subject being unintentionally blurred, especially with intricate details like hair. Users are generally limited to a broad, approximate blur effect.
Step 1. Go to Canva’s blur picture background tool here and click the “Upload your file” button. Then add and load your photo from the local computer.
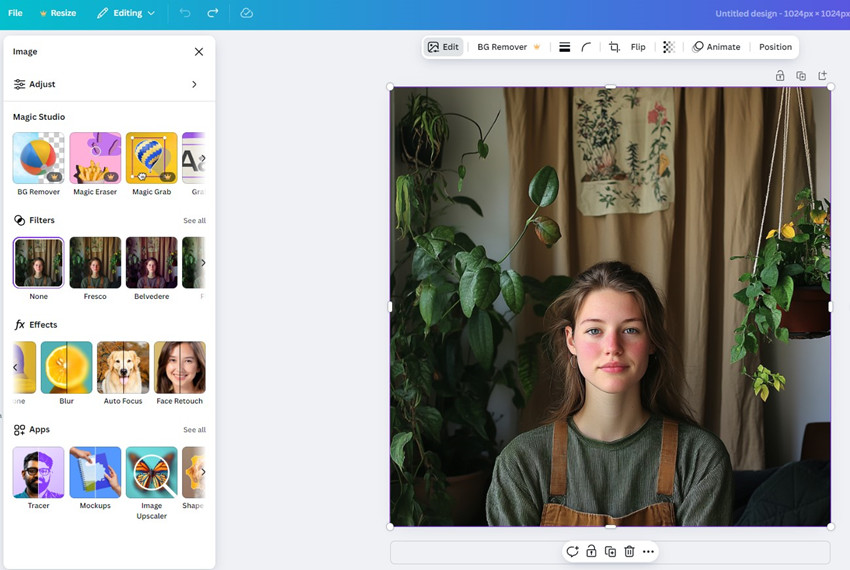
Step 2. Once your image is uploaded, there are two ways to make the image background blur in Canva. Click the Edit button above the image, go to Effects and you can find 2 features:
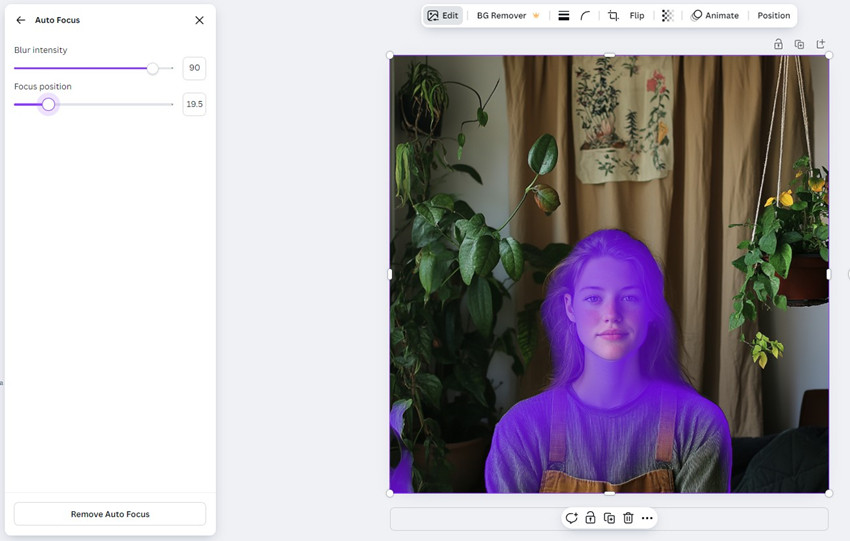
Auto Focus –Canva's Auto Focus is an AI-powered tool that automatically identifies the main subject in your photo and blur the photo background, creating a shallow depth of field. You can adjust the focus position to roughly select the area that you want to keep clear.
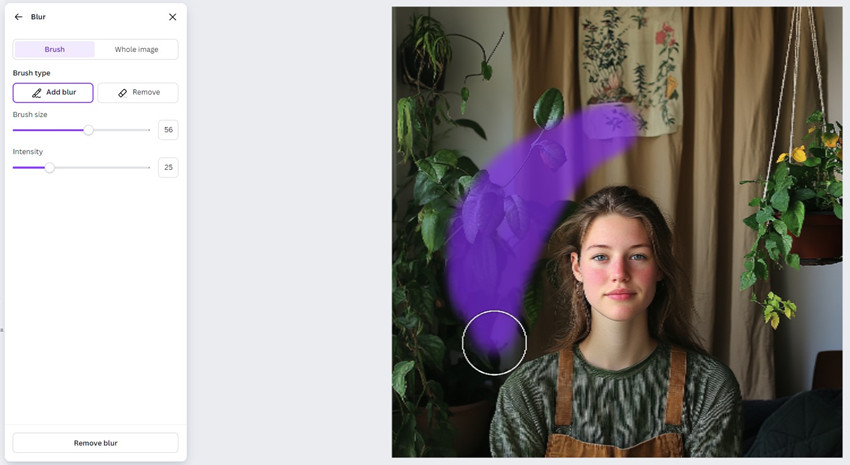
Blur –If you don’t want the automatic picture background blur in Auto Focus feature, this allows you to manually blur parts of your image. Use the brush to paint blur onto specific areas of your image. Adjust the brush size and intensity as needed.
This method provides more control over where and how much blur is applied. However, manually blurring with the brush can be more time-consuming and it’s hard to blur the boundary between the background and subject.
Step 3. Next, click the Download button on the top menu bar and save the background blurred image to your computer.
#4. How to Blur Background of a Photo with Pixelcut Online?
Pixelcut makes blurring photo backgrounds fast and effortless — perfect for users who want a clean, professional look without diving into complex editing. Its AI automatically separates the subject from the background and applies a soft Gaussian blur to highlight the main focus of your image.
Ideal for social media posts, profile photos, or quick product shots, Pixelcut delivers a polished result in seconds. However, for those who need advanced blur controls like depth simulation or bokeh customization, the single blur style might feel limiting.
Note: Pixelcut offers a quick and user-friendly way to blur photo backgrounds online. However, it only supports Gaussian blur only.
Step 1. Go to Pixel's free blur background tool here and click Upload Image.
Step 2. Load the photo you'd like to blur. Once the photo is loaded, it will automatically apply the blur effect to the photo background.
Step 3. Use the slider on the left hand to adjust the blur strength as you need.
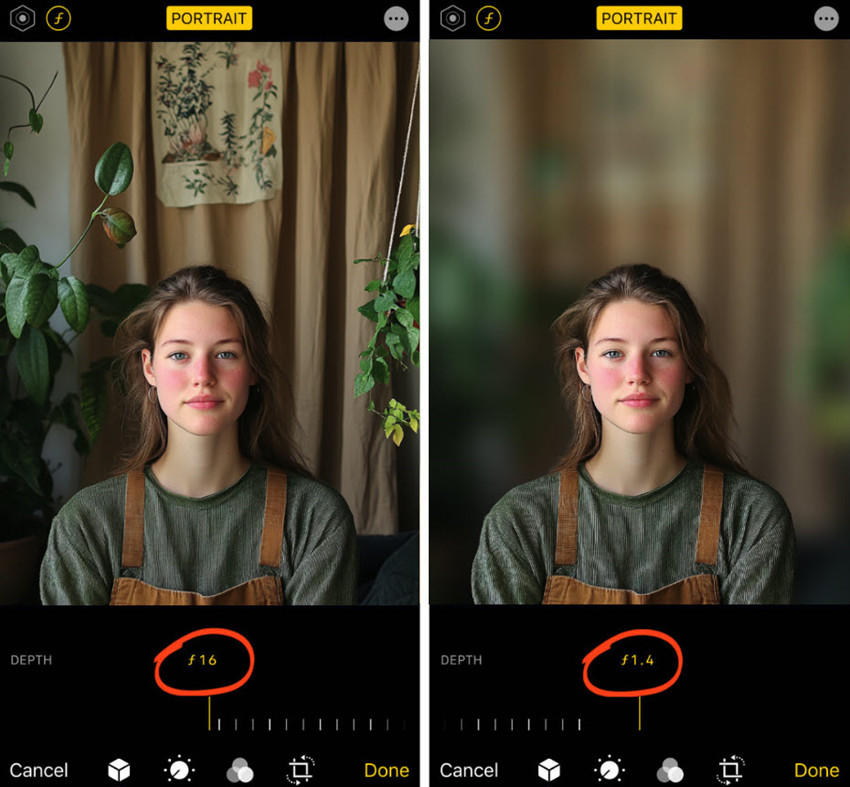
#5. How to Blur Background of a Photo Already Taken on iPhone/Android?
While iPhone’s Portrait Mode can automatically blur the background when taking a photo, how to blur the background of photos on iPhone already taken? If you have an iPhone with Depth Control (iPhone XS, iPhone XR, and newer models), you can easily blur the background of a picture after it’s taken. Here’s a detailed, step-by-step guide to help you get the perfect blur every time.
Note: This method works only for photos taken in Portrait Mode.
Step 1. Launch the Photos app and find the Portrait photo you wish to modify.
Step 2. Tap “Edit” located at the top right corner of the screen.
Step 3. Use the depth slider (aperture icon) to control the blur intensity.
If your photo was not taken in Portrait Mode, you can rely on third-party apps to make background blur. Apps like Snapseed, Picsart, and Focos offer a range of blur tools, from simple Gaussian blurs to more sophisticated depth-of-field simulations. Simply upload your image, select a blur effect tool, and adjust the intensity.
#6. How to Blur Photo Background with DSLR Camera Techniques?
For photographers using DSLR cameras, achieving a beautifully blurred background, often called "bokeh," is a fundamental technique that elevates images from ordinary to extraordinary. This method relies on the camera's lens and settings to create a shallow depth of field, effectively isolating the subject and minimizing distractions. With a DSLR camera, there are different methods to blur the background of a photo:
1. Aperture (f-stop) Control:
The aperture, measured in f-stops (e.g., f/1.8, f/2.8, f/4), directly influences depth of field. A wider aperture (smaller f-number) creates a shallower depth of field, resulting in a more pronounced background blur.
2. Lens Selection:
Lenses with wider apertures (e.g., f/1.4, f/1.8) are ideal for creating background blur. Prime lenses (fixed focal length) often offer wider apertures than zoom lenses. Telephoto lenses (longer focal lengths) also tend to produce a shallower depth of field compared to wide-angle lenses.
3. Subject Distance:
The closer your subject is to the camera, and the further the background is, the more pronounced the blur effect will be. This principle is crucial for maximizing background blur. Move closer to your subject, and increase the distance between your subject and the background.
4. Focal Length:
Using a longer focal length lens will also create a shallower depth of field. For example, a 200mm lens at f/2.8 will create a much more blurry background than a 50mm lens at f/2.8.
The Verdict
After spending hours testing AIarty Image Matting, Photoshop, Canva, and iPhone’s Portrait Mode, Camera, I can confidently say that each tool has its strengths.
- AIarty Image Matting: Easily blur image background while retain the subject clear and sharp, including every details like hair or furs. No technical skills needed—just import, blur, and export.
- Photoshop: The steep learning curve and time-consuming process make it overkill for casual users. If you’re not a design pro, it can feel overwhelming.
- Canva: Great for quick, simple edits, but it struggles with complex subjects and lacks advanced blur options. The manual layering process can also be frustrating.
- iPhone Portrait Mode: Perfect for on-the-go blurring, but it only works for photos taken in Portrait Mode.
- Camera: Photographers prioritizing organic, high-end blur when taking a photo without digital processing.
Ultimately, Aiarty Image Matting delivers the most accurate and efficient photo background blurring, while maintaining exceptional subject focus. Its intuitive workflow requires no specialized skills.
Free download Aiarty Image Matting to blur picture background in clicks.
 FAQ
FAQ
Absolutely! Apps like Snapseed and Afterlight offer great blur tools for mobile users.
I highly recommend AIarty Image Matting. It’s user-friendly and delivers professional results in seconds.
Yes, but it can be tricky. Make sure to select all subjects carefully to avoid uneven blurs.
You May Also Like
This post was written by Brenda Peng who is a seasoned editor at Digiarty Software who loves turning ordinary photos into extraordinary works of art. With AI assistance for brainstorming and drafting, the post is reviewed for accuracy by our expert Abby Poole for her expertise in this field.