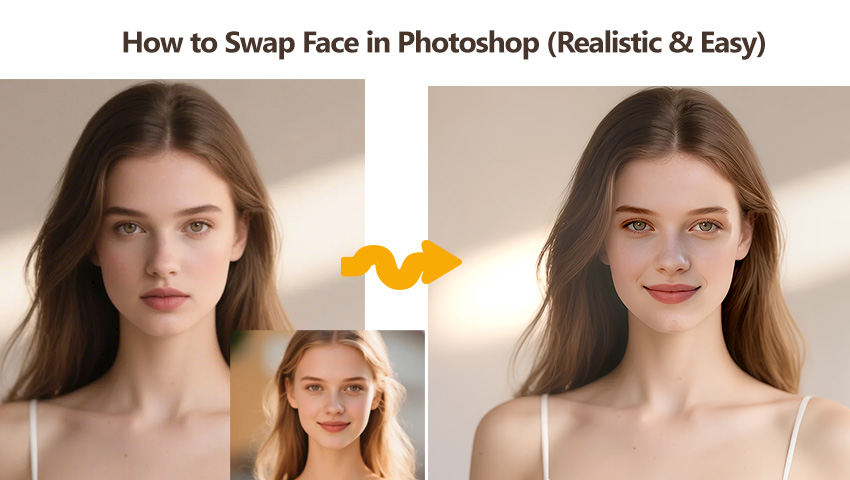
Imagine the hilarious memes you could create or the unique artistic portraits you could design by seamlessly swapping faces in photos. Sure, there are plenty of AI face swappers out there, but for those who want finer control and the ability to really customize their results, Photoshop remains the go-to tool. This step-by-step guide will walk you through the process of face swapping in Photoshop, even if you're a complete beginner. You'll learn the essential techniques to create seamless swaps and unlock your creative potential.
💡 What If the Face Swap Result Looks Blurry?
You've meticulously selected, blended, and color-matched, but what happens after the main work is done? It's not uncommon to encounter a few minor quality hurdles with your finished face swap:
- The final image may appear less sharp, especially after resizing or blending.
- The resulting resolution might not be high enough for large prints or significant cropping.
- Subtle digital noise or artifacts can become more noticeable after multiple edits.
Elevate Your Swapped Face Images to Up to 32K Clarity with AI
Aiarty Image Enhancer sharpens details, removes blur and noise, and even upscales images to 4K, 8K, and even 32K. Whether you're editing portraits or face swaps, it's the perfect way to boost quality and get that crisp, professional finish.
Free download Aiarty now to instantly enhance and upscale your face swap results!
How to Face Swap in Photoshop: Step-by-Step Guide
Traditionally, face swapping in Photoshop involved manually selecting the face, overlaying it onto the target, and then painstakingly using tools like brushes and erasers to blend the edges. This method can be quite tedious and often results in unnatural-looking transitions. In this post, we'll show you a more efficient technique that leverages Photoshop's powerful Auto-Blend Layers feature to achieve a more seamless face swap. Ready to learn? Grab your source and target images, and let's get started.
Step 1. Choose and Open Your Photos
Start by selecting two images:
- Source image: This contains the face you want to copy.
- Target image: This is the photo where the face will go.
For the most convincing results, choose photos with similar lighting conditions, angles, and perspectives. Using high-resolution images will also make the selection, resizing, and blending processes much smoother and yield better final quality.
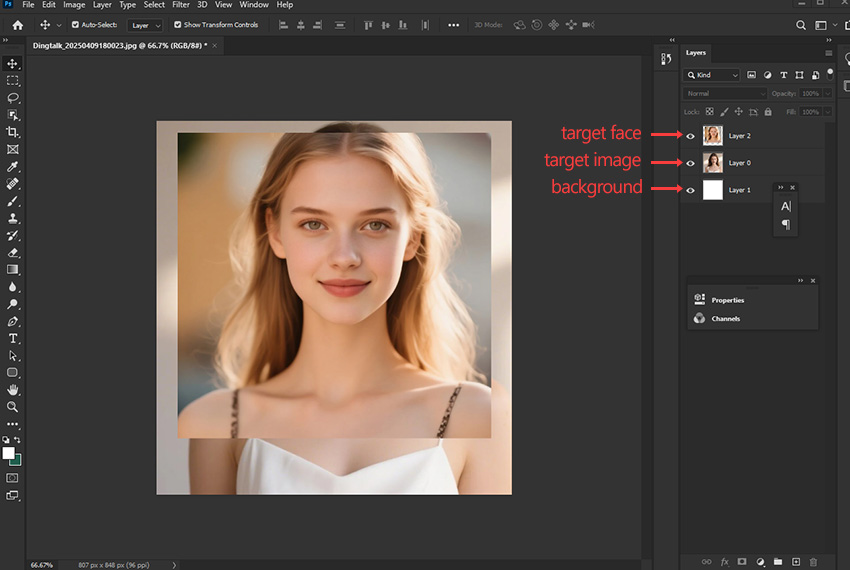
Step 2. Select the Face
Open both images in Photoshop. In the source image, select the face you want to use. The Lasso Tool is a good choice for a loose selection, but you could also use the Quick Selection Tool or Object Selection Tool for more complex areas. Draw a selection that includes the main features (eyes, nose, mouth) and a bit of the surrounding skin/hair, but don't worry about being perfectly precise at this stage.
Step 3. Copy the Face to a New Layer
With the selection active on the source image's layer, press Ctrl + C (Cmd + C on Mac) to copy the selected face. Switch to your target image document. Press Ctrl + V (Cmd + V on Mac) to paste the copied face onto the target image. Photoshop will automatically place it on a new layer above the target image layer. Rename this new layer something descriptive like New Face.
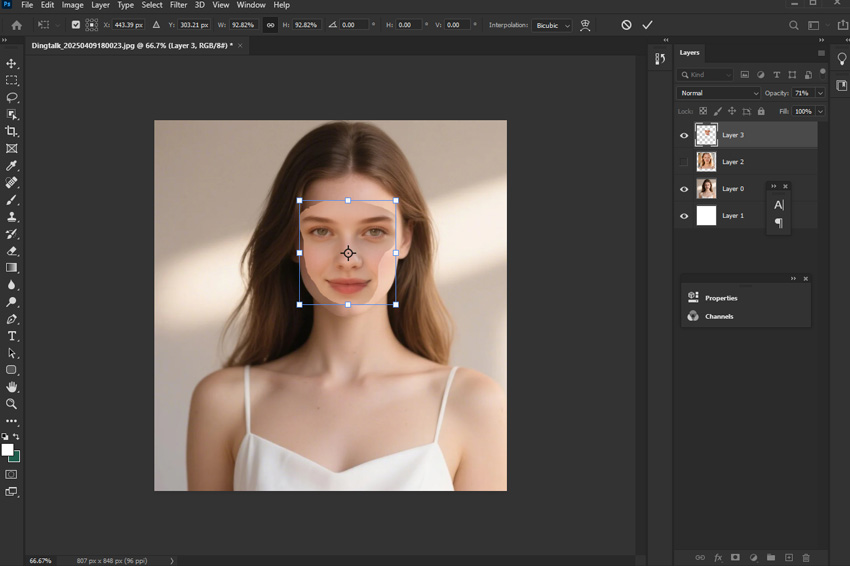
Step 4. Resize the Face
Select the New Face layer in the Layers panel. Press Ctrl + T (Cmd + T on Mac) to activate the Free Transform tool. Drag the handles to resize the new face so it roughly matches the size of the face in the target image. You can also click and drag inside the transform box to reposition the face over the target face. Adjust the size and position until it looks like a good fit. You might temporarily reduce the layer's opacity to see the target face underneath for easier alignment
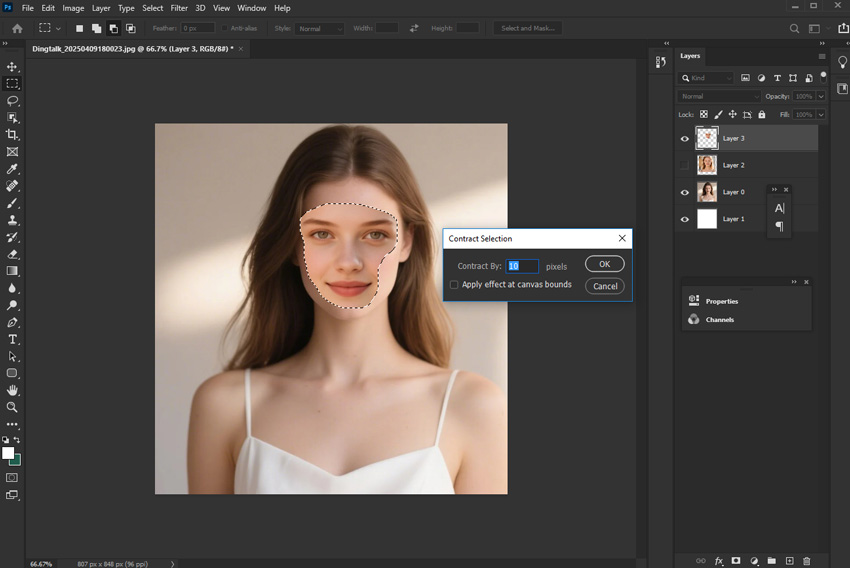
Step 5. Refine the Selection
This step prepares the new face layer for seamless blending. Hold down Ctrl (Cmd on Mac) and click directly on the thumbnail of the New Face layer in the Layers panel. This will load the layer's contents as a selection. Now, go to Select > Modify > Contract. Contracting the selection by a few pixels (e.g., 5-10 pixels, depending on image resolution) pulls the selection boundary inward, away from the very edge of the pasted face. This helps prevent hard edges during the blending process.
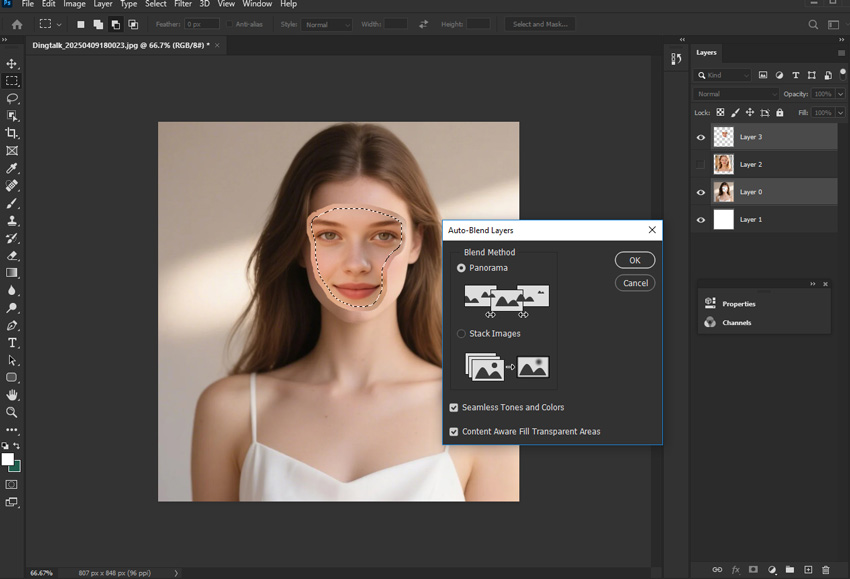
Step 6. Blend the Layers
With the contracted selection still active, select the target image layer (the body layer) in the Layers panel. Press the Delete key on your keyboard. This removes the area under the new face from the target layer, preventing overlap issues. Now, select both the "New Face" layer and the target image layer in the Layers panel (hold Shift or Ctrl/Cmd and click both). Go to Edit > Auto-Blend Layers. In the dialog box, choose Panorama and make sure Seamless Tones and Colors is checked. Click OK. Photoshop will analyze the content and attempt to blend the edges and colors of the two layers automatically.
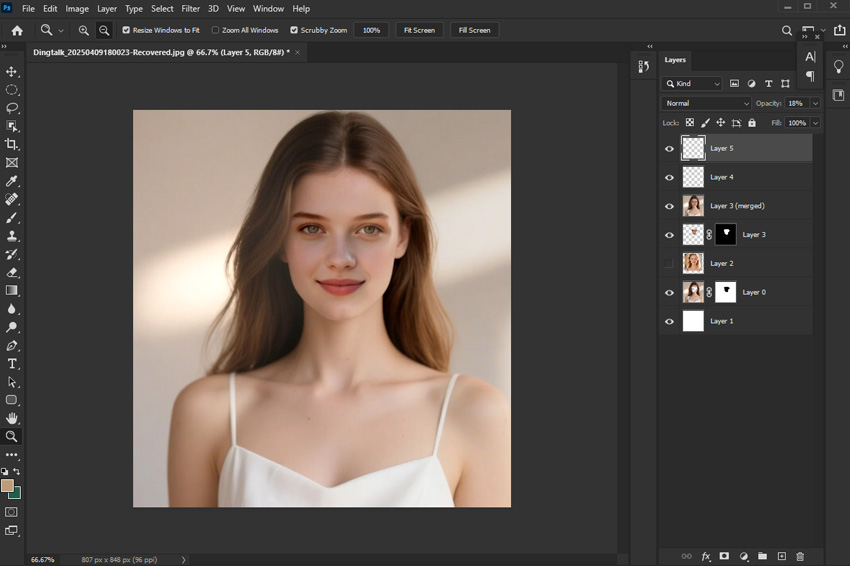
Step 7. Final Adjustments
After Auto-Blend, you'll likely need to make manual adjustments. Use tools like the Clone Stamp Tool or Healing Brush Tool to fix any remaining seams or awkward transitions. Use Adjustment Layers (like Brightness/Contrast, Color Balance, or Hue/Saturation) to match the color and tone of the new face to the target body more accurately. Work non-destructively with masks on adjustment layers to apply changes only where needed.
Bonus Step: Upscale & Enhance Your Face Swap with Aiarty
Congrats on your Photoshop face swap! Notice any softness, lack of detail, or noise? Aiarty Image Enhancer is the perfect final step. This AI-powered tool sharpens details, removes blur and noise, and upscales your image for a professional, high-resolution finish.
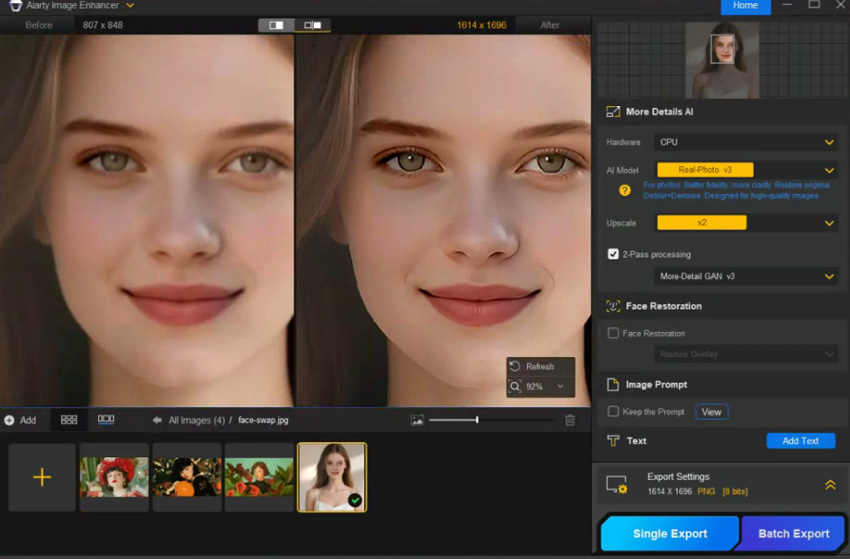
How to Enhance Your Completed Face Swap Image
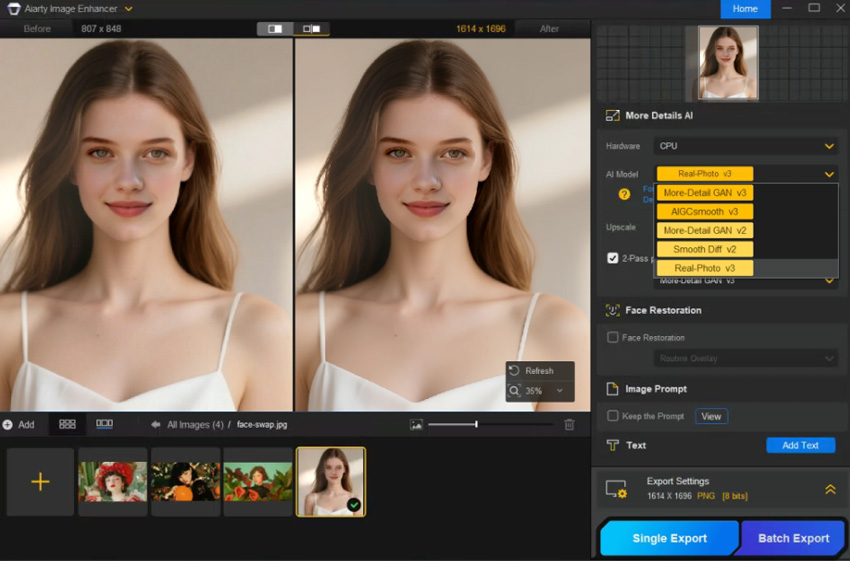
Step 1. Download and install Aiarty Image Enhancer. Drag and drop your face-swapped image into the program.
Step 2. Select an AI model like More Detail GAN V3 or Real Photo V3 to focus on realistic textures and detail.
Tips:
If you need to upscale the image for viewing on a large screen or for printing, simply go to the Resolution section and choose the desired resolution or upscale ratio (e.g., 4K, 8K).
Step 3. Click Single Export to save your enhanced face swap image. Use Batch Export if you have multiple images to process.
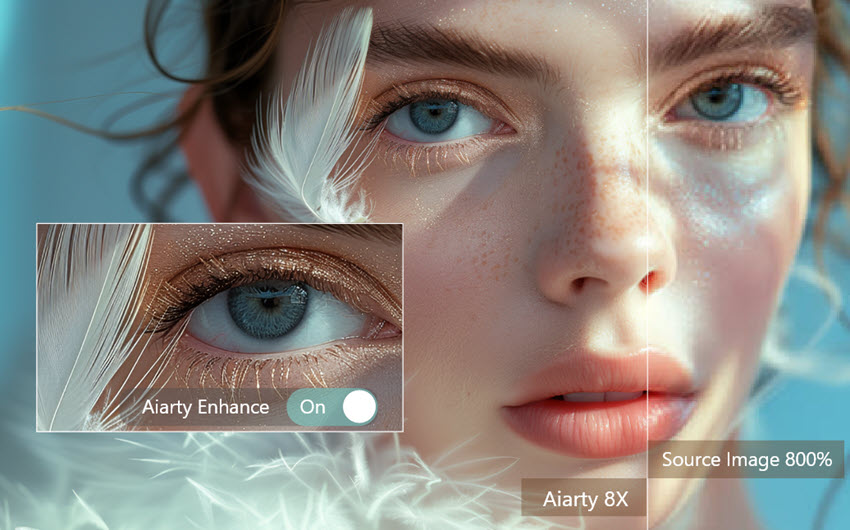
Let's see the difference - clarity and detail
Take a close look at a side-by-side comparison, especially when zoomed in. Notice the difference? We can easily find the improved sharpness in details like eyelashes or hair strands.
 FAQs
FAQs
Blurriness can occur due to various factors such as initial image quality, resizing issues, or blending artifacts. For a sharper, print-ready result, consider using Aiarty Image Enhancer as a final step to enhance clarity and upscale resolution.
Yes, you can. Repeat the steps for each face you want to swap. However, for group photos, pay extra attention to perspective and scale to ensure each face swap looks natural within the scene.
Images with similar lighting conditions, angles, and resolutions generally yield the best results. Front-facing or slightly angled portraits are easier to work with compared to profile shots or images with dramatic lighting.
Yes, be mindful of privacy and consent. Avoid face swapping without permission, especially for malicious or misleading purposes. Always use face swapping responsibly and ethically.
You May Also Like
This post was written by Brenda Peng who is a seasoned editor at Digiarty Software who loves turning ordinary photos into extraordinary works of art. With AI assistance for brainstorming and drafting, the post is reviewed for accuracy by our expert Abby Poole for her expertise in this field.